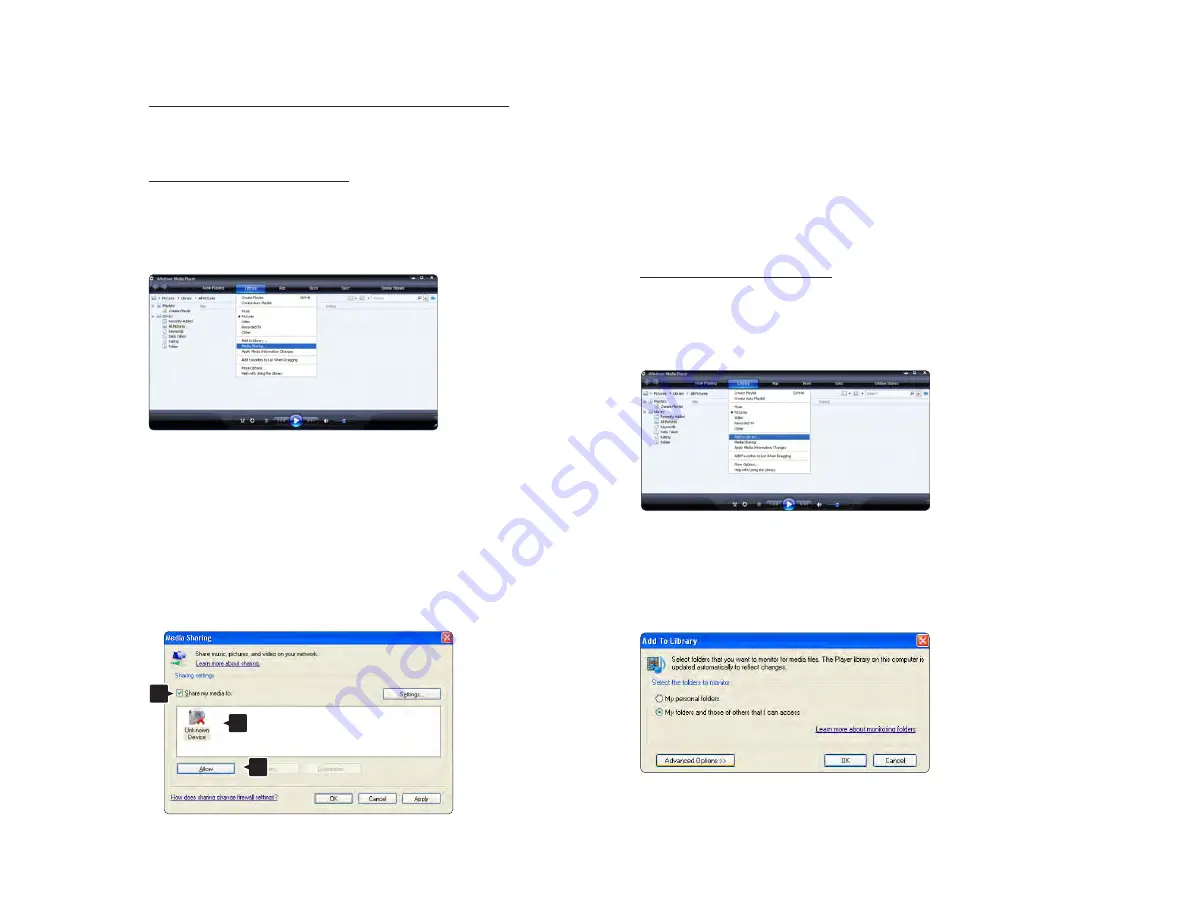
Windows Media Player v11 on Windows XP
Set for network sharing
In Windows Media Player select Library from the menu
and select Media sharing …
In the Media Sharing window, check the Share my
media box.
When the TV is connected, by the router, to the PC and
everything is switched On, the Media sharing window
will show the TV as an Unkown Device. Select the
device and click Allow.
You can open the Settings window to change
particular settings on sharing.
When the device icon (the TV) is checked with a green
tick, click OK.
Set folders for sharing
In Windows Media Player select Library from the menu
and select Add to Library.
In the Add To Library window, select My folders and
those of others that I can access and click the
Advanced Options button.
1
2
3
Содержание 56PFL9954H
Страница 1: ...www philips com welcome Register your product and get support at EN User manual 56PFL9954H ...
Страница 30: ...1 3 2 Wall mounting 3 8 Calculate the TV s ideal position ...
Страница 31: ...1 3 2 Wall mounting 4 8 Position and level the wall mount bracket and fix the bracket firmly to the wall ...
Страница 32: ...1 3 2 Wall mounting 5 8 Mount the 2 spacers on the 2 lower discs at the back of the TV ...
Страница 33: ...1 3 2 Wall mounting 6 8 Connect all cables ...
Страница 34: ...1 3 2 Wall mounting 7 8 Lift the TV into the wall mount bracket ...
Страница 35: ...1 3 2 Wall mounting 8 8 You can slide and level the TV on the bracket ...
Страница 214: ...5 3 1 HTR9900 BDP9100 2 4 First connect your antenna to the TV Antenna connector ...
Страница 215: ...5 3 1 HTR9900 BDP9100 3 4 The use 2 HDMI cables to connect the BDP to the HTR and the HTR to the TV ...
Страница 216: ...5 3 1 HTR9900 BDP9100 4 4 Finally use a digital audio cable to connect the HTR to the TV ...
Страница 217: ...5 3 2 DVD player Use an HDMI cable to connect the DVD player to an HDMI connector on the back of the TV ...
Страница 218: ...5 3 3 DVD Home Theatre System 1 3 First use an HDMI cable to connect the device to the TV ...
Страница 221: ...5 3 4 DVD Recorder 1 2 First use 2 antenna cables to connect the antenna to the DVD Recorder and the TV ...
Страница 222: ...5 3 4 DVD Recorder 2 2 Finally use a scart cable to connect the DVD Recorder to a scart connector on the back of the TV ...
Страница 226: ...5 3 6 Digital receiver and DVD Recorder 2 3 Then use a scart cable to connect the digital receiver to the TV ...
Страница 227: ...5 3 6 Digital receiver and DVD Recorder 3 3 Finally use 2 scart cables to connect the 2 devices and the TV ...
Страница 234: ...5 4 1 Digital HD receiver 1 2 First use 2 antenna cables to connect the Digital HD receiver to the TV ...
Страница 235: ...5 4 1 Digital HD receiver 2 2 Use an HDMI cable to connect the Digital HD receiver to the TV ...
Страница 237: ...5 4 2 Game console 2 3 The most practical connections for a game console are at the side of the TV ...
Страница 242: ...5 4 4 Camcorder 2 3 The most practical connection for a camcorder is at the side of the TV ...
Страница 243: ...5 4 4 Camcorder 3 3 Use an HDMI or the EXT3 YPbPr and Audio L R cable to connect the camcorder to the back of the TV ...
Страница 254: ...5 7 1 Wireless network connection To set up the wireless network connection read all chapters in Setup Network ...
Страница 278: ......
Страница 279: ...DVB T DVB C CVBS Flash LED DIMMING FPGA Dimming USB 2 0 WiFi HDMI MUX Diagramma elettronico Electronic diagram ...


