1
Connect
2
Set up
Start with the ‘Basic Connection.’
If you have a VCR, follow the instructions for ‘Connection with a VCR or similar device’.
Connection with a VCR or
similar device
A
Before Connecting
Your new DVD recorder replaces the VCR for your
recording needs. First, unplug all the connections from
your VCR.
B
Connecting
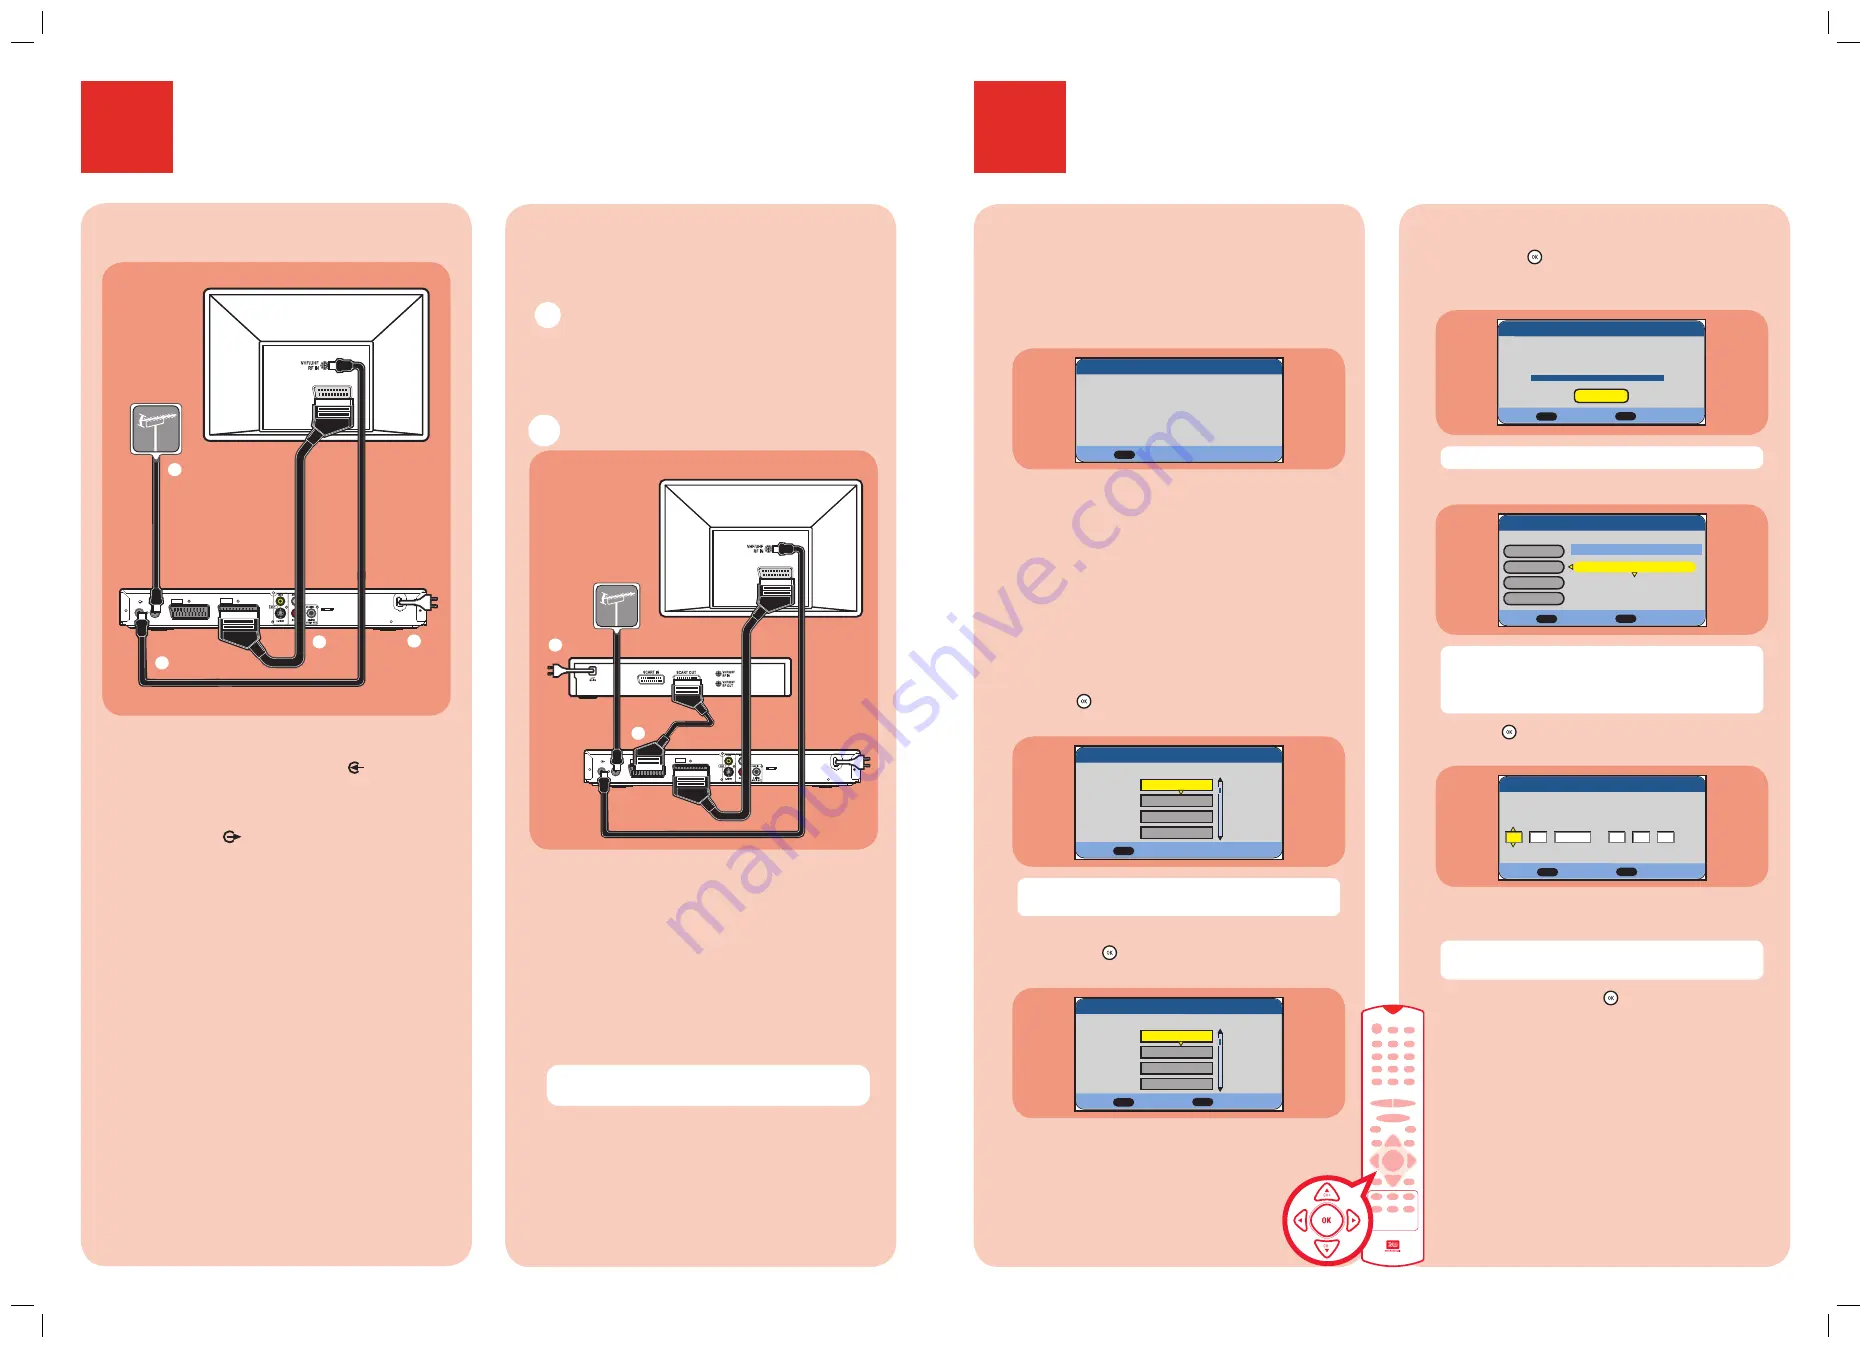
ANTENNA-IN
TV-OUT
~
MAINS
TO TV - I/O
EXT
1
AUX - I/O
EXT
2
SCART IN
Television (rear)
To antenna or
set-top box
Basic Connection
A
Disconnect the antenna cable from your TV and
connect it to the
ANTENNA-IN
socket on
this recorder.
B
Use a RF coaxial cable (not supplied) to connect
the
TV-OUT
socket on this recorder to the
Antenna In socket on the TV.
C
Use a SCART cable (not supplied) to connect
the
EXT1 TO TV-I/O
socket on this recorder
to the corresponding SCART input socket on
the TV.
D
Connect the power cable from the recorder to
an AC power outlet.
DVD Recorder (rear)
To AC
power
ANTENNA-IN
TV-OUT
~
MAINS
TO TV - I/O
EXT
1
AUX - I/O
EXT
2
SCART IN
Television (rear)
DVD
Recorder
(rear)
VCR or similar
device (rear)
A
Follow the steps under ‘Basic Connections’
before you proceed to step
B
below.
B
Use another SCART cable (not supplied) to
connect the
EXT2 AUX-I/O
SCART socket
on this recorder to the SCART OUT socket on
the VCR.
C
Connect the power cable from your VCR to an
AC power outlet.
Note
In this setup, the VCR cannot record TV
programmes.
For additional connection diagrams, see
the accompanying User Manual.
To
AC power
To antenna or
set-top box
A
Finding the viewing channel
A
Press
STANDBY-ON
on the recorder.
B
Turn on the TV and other connected devices (e.g.
Cable Box, Satellite Receiver).
You should see the welcome menu.
Welcome
OK
Next Page
Before use the recorder,
please complete the installation.
C
In case you don’t see the recorder’s welcome menu,
press the Channel Down button on the TV’s remote
control repeatedly (or AV, SELECT,
°
button) until
you see the menu. This is the correct viewing channel
for the recorder.
B
Start basic setup
Use the recorder’s remote control and follow the on-
screen instructions to complete the installation.
A
Press
OK
on the remote control.
The language setting menu appears.
Menu Language
OK
Next Page
Select a Menu language.
English
Français
Deutsch
Español
Note
The language options are different depending
on your country or region.
B
Select the language for this recorder’s on-screen display
and press
OK
.
The country setting menu appears.
Country Setting
OK
BACK
Next Page
Exit
Select your current country.
UK
Germany
France
Spain
A
B
C
D
B
C
C
Select the country of your area for auto channel tuning
and press
OK
.
The auto scan menu appears and the automatic TV
channel search starts.
Cancel
Auto scan the channels.
Channels found: 10
Auto Scan
100%
OK
BACK
Next Page
Prev Page
Note
This process may take several minutes.
D
Once complete, the programme list menu appear
s.
Program List
OK
BACK
Next Page
Prev Page
1 C2 On
2 C3
Off
3 C4
Off
Sort, skip and rename the programs.
PR
CH NICAM Station
Move Up
Move Down
NICAM
Rename
Note
In this menu, you can change the TV channels
sequence, rename it or set NICAM mode. For
detailed descriptions, refer to the accompanying User
Manual.
E
Press
OK
on the remote control to continue.
The clock setting menu appears.
Set the system time.
Clock Setting
OK
BACK
Exit
Prev Page
Date:
Time:
01
01
2006
12
00
00
:
:
/
/
F
Use
ST
keys to set the current date and time,
use
W
X
keys to select different entry fields.
Note
You may use the
numeric keypad 0-9
on
the remote control to enter the date and time.
G
Once complete, press
OK
to confirm and exit the
menu.
The DVD recorder is now ready for use.


