background image

10


   50HFL3683S

Changing picture and sound settings

 You must set 

Home

 in 

Location

. Otherwise, these settings 

will not be memorized after the unit goes to standby mode.

Changing picture settings

Press 

MENU

; navigate to 

Consumer TV setup

 - 

Picture

.

Press 

Î

 or 

ï

 to select one of the picture settings, and 

press 

OK

 to enter the setting.

Adjust the picture quality.

Auto Picture

You can manually set the picture controls for the Personal 

setting and/or you can select one of the following Auto 

Picture presets. Press 

Î

 or 

ï

 to select the desired setting, 

then press 

OK

.

Personal

The customized settings you de

fi

 ned by using the 

Picture

 menu.

Standard

For normal TV viewing.

Sports

Vivid picture settings for high action.

Movie

Brilliant picture settings for a cinematic experience.

Game

 Optimized for PCs, games consoles and playstations.

Press 

MENU

 to exit.

 Changing sound settings

Press 

MENU

; navigate to 

Consumer TV setup

 - 

Sound

.

Press 

Î

 or 

ï

 to highlight a sound setting and press 

OK


to select the setting. 

Adjust the following items.

Auto Sound

You can manually set the sound controls for the Personal 

setting and/or you can select one of the following Auto 

Sound presets. Press 

Î

 or 

ï

 to select the desired setting, 

then press 

OK

.

Personal

The customized settings you de

fi

 ned by using the 

Sound

 menu.

Standard

For normal TV viewing.

Movie

Realistic sound settings for a cinematic experience.

Music

Emphasize high and low frequency for instrument 

sound.

News

Clear sound settings for human voice.

Press 

MENU

 to exit.

Clone TV con

fi

 guration data

 Once you have completed the setup of the master TV and 

tested that it receives all the required channels, follow the 

TV to USB section below to extract a copy of the setup 

con

fi

 guration to a USB storage device.

Then follow the USB to TV section below to copy the 

setup con

fi

 guration to all additional TVs using the same 

con

fi

 guration.

TV to USB

Connect your USB storage device to the USB port on 

the side of your TV.

Press 

MENU

 and select 

TV to USB

Press 

OK

 to start the copy of the con

fi

 guration data to 

USB.

USB to TV

Connect your USB storage device to the USB port on 

the side of your TV.

Press 

MENU

 and select 

USB to TV

Press 

OK

 to start the copy of the con

fi

 guration data to 

TV.

Note


After this setting is completed, the TV will restart automatically.

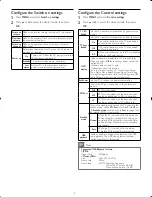
Multi RC

Multi RC enables control of multiple TVs in a room without any 

interference from each other’s remote control.

To enable Multi RC, each remote control is set to one of the 

four colors - Blue, Green, Yellow or Red. Each TV in the room 

is separately programmed to a remote control of one of those 

colors.

In this way, each TV responds to only one RC that is set to the 

same color as the TV itself. This prevents interference from each 

other’s remote control when you watch multiple TVs in a room.

Press 

MENU

 on the setup remote control to display the 

setup menu.

Press 

ÎïÍÆ

 to select 

[Control settings]

.

Press 

ÎïÍÆ

 to select 

[MultiRC]

.

Press 

ÎïÍÆ

 to select 

[Select a color code]

.


The TV is con

fi

 gured to respond to the RC that is set to the 

same color.

On the guest RC, press 

HOME

 (the menu button) and 

the 

color button

 (same color as above) simultaneously, 

for at least 5 seconds.


The guest RC is set to the selected color.

Note


The Guest RC defaults to Blue, and a remote which has been 

set to any color can operate any TV which has not been 

con

fi

 gured to a different color yet. Therefore, if 2 TVs are being 

con

fi

 gured in the same space, then each TV/RC pair MUST 

be set a their own color (one pair cannot be left as default, 

otherwise both RCs will operate the TV which has not been 

con

fi

 gured).

LC10̲PHILIPS̲hospitality̲EN̲QG.indd   10

LC10̲PHILIPS̲hospitality̲EN̲QG.indd   10

2012/03/08   16:05:11

2012/03/08   16:05:11

Содержание 50HFL3683S

Страница 1: ...Quick Start Setup Guide 50HFL3683S ...

Страница 2: ...OVER OR BACK NO USER SERVICEABLE PARTS INSIDE REFER SERVICING TO QUALIFIED SERVICE PERSONNEL RISK OF ELECTRIC SHOCK DO NOT OPEN The caution marking is located on the rear or bottom of the cabinet CAUTION WARNING To reduce the risk of fire or electric shock do not expose this apparatus to rain or moisture Apparatus shall not be exposed to dripping or splashing and no objects filled with liquids suc...

Страница 3: ...le 820 40 of the NEC that provides guidelines for proper grounding and in particular specifies that the cable ground shall be connected to the grounding system of the building as close to the point of cable entry as practical Example of Antenna Grounding as per NEC National Electric Code ANTENNA DISCHARGE UNIT NEC SECTION 810 20 GROUNDING CONDUCTORS NEC SECTION 810 21 POWER SERVICE GROUNDING ELECT...

Страница 4: ... However there is no guarantee that interference will not occur in a particular installation If this equipment does cause harmful interference to radio or television reception which can be determined by turning the equipment off and on the user is encouraged to try to correct the interference by one or more of the following measures Reorient or relocate the receiving antenna Increase the separatio...

Страница 5: ...ss to turn the unit on and go into standby mode To completely turn off the unit you must unplug the AC power cord Disconnect the AC plug to shut the unit off when trouble is found or not in use The AC plug shall remain readily available Never use a gas duster on thisTV The gas trapped inside of this unit may cause ignition and explosion CAUTION Danger of explosion if battery is incorrectly replace...

Страница 6: ...ty bolt and cap x 2 Washer x 2 Security nut x 2 Security double sided tape x 4 Note The items are available on selected models only An optional security tool is required to tighten the security screws and nuts Please contact your Philips authorized agent or distributor to purchase the tool TV Setup Philips HospitalityTVs have a USB cloning capability so you only need to manually setup oneTV the ma...

Страница 7: ...e remote control 4 Press RC5 SETUP to put the remote control into setup mode then press the HOME MENU button to display the setup menu Hereafter HOME MENU will be simply referred to as MENU 5 Select ConsumerTV setup Setup Autoprogram then select Cable unless the installation is using only Antenna signals in which case you would select Antenna Note TheTV will not tune any channel that has not been ...

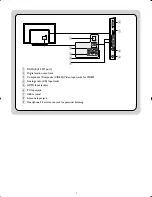
Страница 8: ...port b Digital audio output jack c Component Composite VIDEO Video Input jacks forVIDEO d Analog audio L R Input jacks e HDMI Input jack s f PC Input jack g USB terminal h Antenna Input jack i Headphone 3 5mm stereo jack for personal listening ...

Страница 9: ...ose settings below cannot be displayed onTV channel number label name channel not valid information The rest of menus such as CC Guest menu Setup Menu Status Menu Splash Screen SleepTimer Sleep warning Message Freeze Child lock Message and USB Media Playback menu etc are still displayed EcoPower Sets theTV to reduce the power consumption SPI Port Choose the SPI port connected to the external set t...

Страница 10: ...py of the setup configuration to a USB storage device Then follow the USB toTV section below to copy the setup configuration to all additionalTVs using the same configuration TV to USB 1 Connect your USB storage device to the USB port on the side of yourTV 2 Press MENU and select TV to USB 3 Press OK to start the copy of the configuration data to USB USB toTV 1 Connect your USB storage device to t...

Страница 11: ...11 ...

Страница 12: ...334 0430 P F Mexicana S A de C V Av La Palma No 6 Col San Fernando La Herradura Huixquilucan Edo de México C P 52787 Printed in China A21UZUH 1EMN29799 Philips and Philips Shield are used under license of Koninklijke Philips Electronics N V ...

Отзывы: