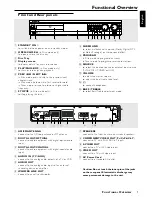
background image

10

English

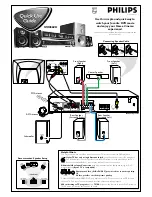
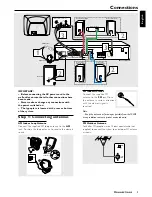
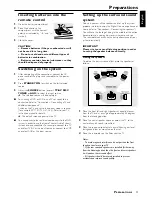
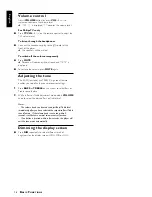
Step 2: Connecting the

speakers

Connect the supplied speaker systems using the supplied
speaker cables by matching the colors of the jacks and
speaker cables.

1

Press up (or down) the speaker’s jack and fully inser t the
stripped portion of the speaker cable into the jack, then
release.

2

Connect the subwoofer’s audio input to the 

WOOFER

LINE OUT

 jack and the speakers as follows :

Speakers


-


+

Front Left (FL)

black

white

Front Right (FR)

black

red

Center (C)

black

green

Surround Left (SL)

black

blue

Surround Right (SR)

black

gray

Notes:
– Ensure that the speaker cables are correctly connected.
Improper connections may damage the system due to short-
circuit.
– For optimal sound performance, use the supplied speakers.
– Do not connect more than one speaker to any one pair of

+

/

-

 speaker jacks.

– Do not connect speakers with impedance lower than the
speakers supplied.  Please refer to the SPECIFICATIONS
section of this manual.

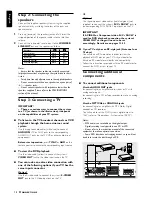
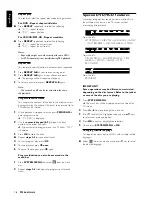
Step 3: Connecting a TV

IMPORTANT!

There are various ways to connect the system

to a TV (as shown in the illustration), it depends

on the capabilities of your TV system.

To listen to the TV broadcast channels or VCR

playback through the home cinema sound

system

Use the supplied audio cables (white/red) to connect

AUDIO IN

 (TV or AUX) jacks to the corresponding

AUDIO OUT jacks on the TV, VCR or other audio/visual
components.

Before start operation, 

press 

TV/AV

 or 

AUX

 on the

remote control to activate the corresponding input source.

To view the DVD playback

Use the video cable (yellow) to connect the system’s

VIDEO OUT

 jack to the video input jack on the TV.
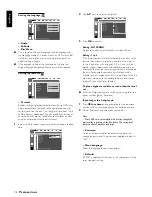
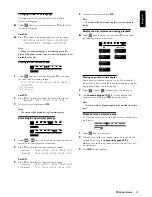
You can make an extra video connection with

one of the following options if your TV has the

same input connector

Option 1

Use the S-video cable to connect the system’s 

S-VIDEO

OUT

 jack to the S-Video input jack on the TV.

C

O N N E C T I O N S

OR

Option 2

Use the component video cables (red/blue/green) (not
supplied) to connect the system’s 

Pr/Cr Pb/Cb Y 

jacks to

the corresponding Pr/Cr Pb/Cb Y input jacks on the TV.

IMPORTANT!

If S-VIDEO or Component video Pr/Cr Pb/Cb Y is

used for DVD playback connection, the system’s

VIDEO OUT setting will need to be set

accordingly.  Details are on pages 12-13.

If your TV only has an RF-style jack (Antenna In or

75 ohm)

You will need an RF modulator in order to view the
playback of DVD dics on your TV.  Ask your dealer for
details on RF modulator availability and compatibility.
Follow the instructions provided with the RF modulator to
connect the DVD system to your TV

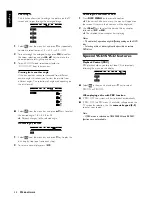
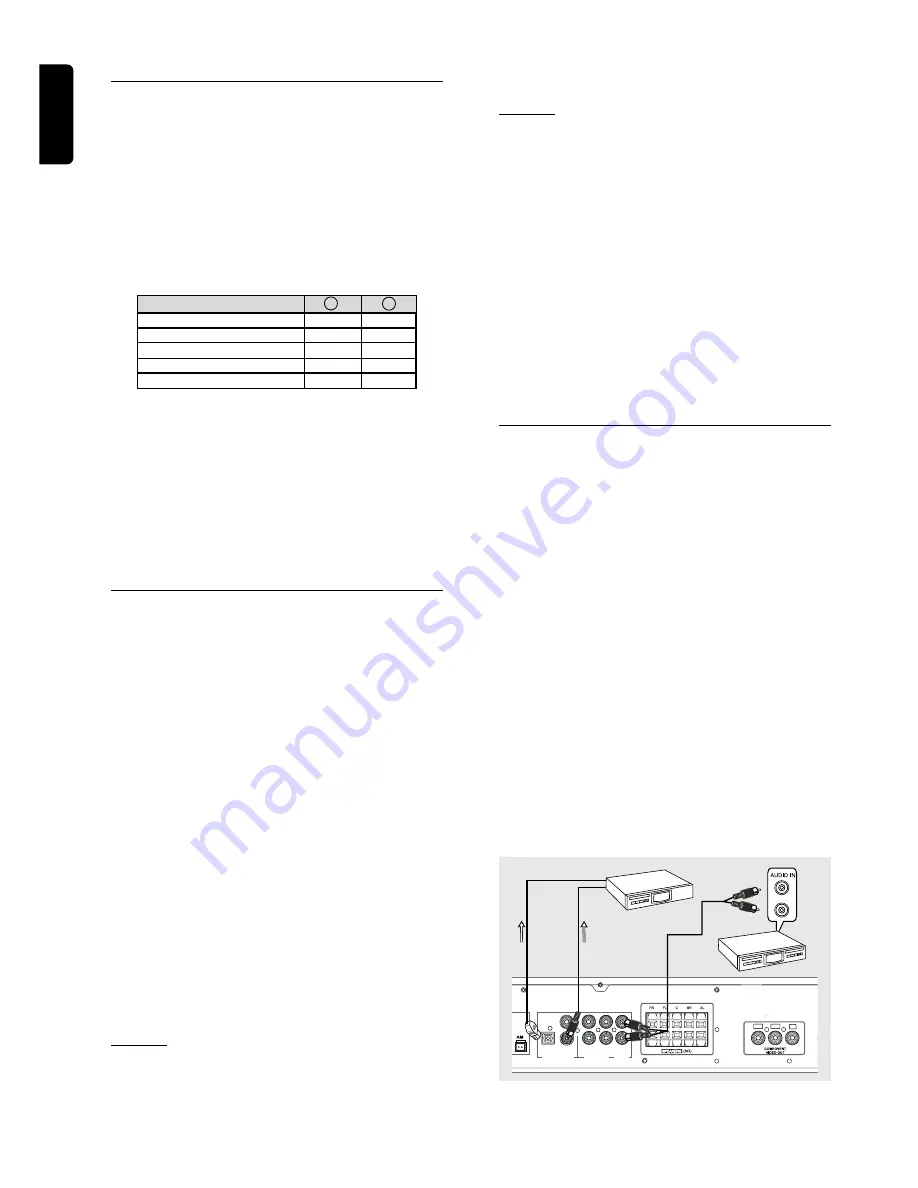
Connecting additional

components

To connect additional components

Use the AUDIO OUT jacks

for connecting to an amplifier, audio system or TV with
analog audio inputs.

for connecting to a CD or Tape recorder to make an analog
recording.

Use the OPTICAL or COAXIAL jacks

for connecting to an amplifier with DTS, Dolby Digital
decoder or CD recorder.
You will need to set the DVD system’s digital output to
“ALL” (refer to “Preparations - System setup (DVD)”).

Notes:
– MP3 audio is not available on the digital output.
– Digital recording is only possible on a CD or VCD.
– Always refer to the instruction manual of the connected
equipment to make an optimal connection.
– Some DVD discs have anti-copying devices, so you will not
be able to record the disc through a VCR.

Pr/Cr

Pb/Cb

Y

COAXIAL IN

OPTICAL IN

M

NA

DIGITAL OUT

WOOFER
LINE OUT

OPTICAL COAXIAL

AUX

TV

AUDIO IN

AUDIO

OUT

L

R

Содержание 5 DVD-CD CHANGER HOME THEATER CLASS D AMPLIFIER MX3660D

Страница 1: ...ful Hints You only need to make one video connection to yourTV in order to view the DVD playback If yourTV has only a single Antenna In jack you will need an accessory RF modulator The RF modulator converts the video from the DVD system so it can play through theTV s Antenna connector Refer to your owner s manual for proper connection AdditionalVideo Input Connections can provide better picture qu...

Страница 2: ...or more details 3 Press OPEN CLOSE 0 on the front of the DVD system and load a disc then press the OPEN CLOSE 0 again to close the disc tray Make sure the disc label facing up For double sided discs load the side you want to play facing up 4 Playback will start automatically If not press É Å button If a disc menu appears use 3 4 1 2 buttons on the remote to make the necessary selection then press ...

Страница 3: ...ons First time Setup or any of the Features We want you to start enjoying your new product right away CALL US BEFORE YOU CONSIDER RETURNING THE PRODUCT 1 800 531 0039 or Visit us on the web at www philips com S EE WHY INSID E I M PORTAN T Return yourWarranty Registration Card within 10 days DVDVIDEO DIGITAL SURROUND SYSTEM MX 3660D MX 3660D ...

Страница 4: ...onfirms your right to maximum protection under the terms and conditions of your Philips warranty Owner Confirmation Your completed Warranty Registration Card serves as verification of ownership in the event of product theft or loss Model Registration Returning your Warranty Registration Card right away guarantees you ll receive all the information and special offers which you qualify for as the ow...

Страница 5: ...dio noise emissions from digital apparatus as set out in the Radio Interference Regulations of the Canadian Department of Communications Français Cet appareil numérique n emet pas de bruits radioélectriques dépassant les limites applicables aux appareils numériques de Class B prescrites dans le Règlement sur le Brouillage Radioélectrique édicté par le Ministère des Communications du Canada Laser T...

Страница 6: ...t or table specified by the manufacturer or sold with the apparatus When a cart is used use caution when moving the cart apparatus combination to avoid injury from tip over 13 Unplug this apparatus during lightning storms or when unused for long periods of time 14 Refer all servicing to qualified service personnel Servicing is required when the apparatus has been damaged in any way such as power s...

Страница 7: ...nctions Selecting the surround sound mode 15 Selecting the digital sound effect 15 Volume control 16 Adjusting the tone 16 Dimming the display screen 16 Contents Operations Discs information 17 Basic playback 17 18 Skipping to another track chapter Fast Search Continue playback from the last stop point Repeat play Repeat A B Program favorite tracks Special DVD VCD features 18 20 Changing subtitle ...

Страница 8: ...ite speakers including five speaker cables Active subwoofer including a connection cable This instruction booklet and Quick Use Guide If any item is damaged or missing contact your retailer or Philips Environmental information All unnecessary packaging has been omitted We have tried to make the packaging easy to separate into three materials cardboard box polystyrene foam buffer and polyethylene b...

Страница 9: ... TV AV DISC TUNER or AUX VOLUME to adjust the master volume to adjust the bass treble tone level n to connect headphones BASS TREBLE to select Bass Treble adjustment mode 1 AM FM ANTENNA connect to the AM loop antenna or FM antenna 2 DIGITAL OUT OPTICAL connect to audio equipment with digital optical audio input 3 DIGITAL OUT COAXIAL connect to audio equipment with digital coaxial audio input 4 AU...

Страница 10: ...tart or interrupt disc playback 7 Ç to stop playing the disc 8 SURROUND to select multichannel surround Dolby Digital DTS or Dolby ProLogic or stereo sound effect 9 SOUND to select the various sound effects CONCERT DRAMA ACTION SCI FI CLASSIC JAZZ ROCK or DIGITAL 0 REPEAT to repeat chapter track or disc REPEAT A B to repeat a specific section on a disc SUBW to adjust the subwoofer s level REAR to ...

Страница 11: ...ections until the clearest signal is received Note Keep the antenna as far away as possible from theTV VCR or any radiation source to prevent unwanted noise FM Outdoor Antenna For better FM reception use a 75 ohm coaxial cable not supplied to connect the system to an outdoor FM antenna as shown AM FM 75 Ω Connections CONNECTIONS Pr Cr Pb Cb Y Rear of System FL C FR FL C FR SL SR 4 SPEAKERS SPEAKER...

Страница 12: ... theTV You can make an extra video connection with one of the following options if yourTV has the same input connector Option 1 Use the S video cable to connect the system s S VIDEO OUT jack to the S Video input jack on theTV CONNECTIONS OR Option 2 Use the component video cables red blue green not supplied to connect the system s Pr Cr Pb CbY jacks to the corresponding Pr Cr Pb CbY input jacks on...

Страница 13: ...lectTV AV as the input source or connect to aVCR and select AUX as the input source Setting up the surround sound system You must connect all the speakers and set up the system properly in order to enjoy the Digital Cinema experience at home refer to Connections Connecting the speakers You will have the feeling of being in the middle of the action because sound is coming from everywhere around you...

Страница 14: ...etup DVD The system setup is carried out via theTV it enabling you to customize the DVD system to suit your particular requirement If the preferred options selected are not available on a disc then the disc s own preference will be used IMPORTANT To access the System Setup menu playback must be stopped General operation 1 Press SYSTEM MENU icon will be highlighted in the menu bar on theTV screen 2...

Страница 15: ...to specify the type of digital output suitable for your DVD system Select ALL if you have connected the digital output COAXIAL or OPTICAL to a multichannel decoder receiver Select PCM 96K if the external component is capable of processing digital signal input with sampling rates of 96 kHz Select PCM 48K if the external component is incapable of processing 96 kHz digital signal input then convert t...

Страница 16: ...s with a lower or equal level will play For example if the player is set to 5 only discs with ratings of 5 4 3 2 and 1 will be played Higher rated scenes will not be played unless an alternative that has the same rating or lower is available on the disc For example consider a disc that generally is suitable for most audiences and it is rated at level 2 for the most part However in the middle there...

Страница 17: ... been recorded in Dolby Digital Surround DTS Surround The DTS Surround is a cinema surround sound format that offers superior digital audio performance DTS offers more clarity and definition especially for higher tones The better sound quality is a result of the limited sound compression 3 1 instead of 11 1 for Dolby Digital and the 20 bit resolution Dolby Pro Logic Surround The Dolby Pro Logic Su...

Страница 18: ...SS low tone andTREBLE high tone feature enables you to define the sound processor settings 1 Press BASS or TREBLE on the system to select Bass or Treble sound feature 2 While in Bass orTreble adjustment mode adjust VOLUME knob to select the desired Bass orTreble level Notes The volume knob can be used to adjust Bass Treble level immediately after you have selected the respective Bass Treble sound ...

Страница 19: ... to highlight your selection and press OK to confirm To select a play option press numeric keypad 0 9 5 PressÉ Å to start playback Notes Your player will not play discs that have a region code different from the region code of your player If the inhibit icon appears on theTV screen when a button is pressed it means the function is not available on the disc you are playing To interrupt playback Pre...

Страница 20: ...to program more than 99 tracks FULL is displayed 3 Press OK to store the track Repeat steps 2 3 to store other tracks 4 To start program play pressÉ Å 5 To stop playback press Ç once 6 To cancel the program press Ç again Program function can also be accessed via the menu bar 1 Press SYSTEM MENU and select from the menu bar 2 Repeat steps 2 6 listed above to program your favorite tracks Special DVD...

Страница 21: ... search speed reverse FR x2 FR x4 FR x6 FR x8 OFF forward FF x2 FF x4 FF x6 FF x8 OFF For VCD 2 Press 4 key to select the required search speed reverse FR x1 FR x2 FR x3 FR x4 OFF forward FF x1 FF x2 FF x3 FF x4 OFF 3 To resume normal play pressÉ Å Note The sound will be muted during fast reverse or forward search Display the disc information during playback Select from the menu bar and press 4 ke...

Страница 22: ...ess 4 key to play the disc step by step one frame each step 2 To resume normal play press É Å Checking the contents of DVD 1 Press DISC MENU on the remote control If the current title has a menu the menu will appear on the screen Otherwise the disc menu will be displayed 2 Use 1 2 34 keys to select the desired title or chapter followed byÉ Å or OK The selected title or chapter starts playing Notes...

Страница 23: ...he MP3 CD menu The album menu appears on theTV screen 2 To select a desired album press 341 2 and followed by OK orÉ Å to confirm The title menu appears on theTV screen 3 To select a desired title press 341 2 and followed by OK orÉ Å to start playback You can also use the numeric keypad 0 9 to enter your choice If the MP3 CD menu is switched off You can only play the existing selected title by pre...

Страница 24: ...on Repeat steps 1 4 to store other radio stations Notes If you attempt to program more than 40 preset radio stations FULL is displayed During programming if no key is pressed within five seconds the system will exit the program mode automatically Listening to preset radio stations In tuner mode press 1 or 2 or use the numeric keypad 0 9 to select the desired preset number The preset number radio f...

Страница 25: ...d power 1 kHz Frequency Response 180 Hz 14 kHz 1 dB Signal to Noise Ratio 65 dB CCIR Input Sensitivity 400 mV TUNER SECTION Tuning Range FM 87 5 108 MHz 100 kHz steps AM 530 1700 kHz 10 kHz steps 26 dB Quieting Sensitivity FM 20 dB 26 dB Quieting Sensitivity AM 5000 µV m Image Rejection Radio FM 25 dB AM 28 dB IF Rejection Ratio FM 60 dB AM 24 dB Signal to Noise Ratio FM 55 dB AM 35 dB AM Suppress...

Страница 26: ...t the center or rear surround speakers are connected correctly Use surround mode and make sure that the source material is recorded or broadcast in Dolby Digital DTS or Dolby Pro Logic surround sound The DVD player does not Insert a readable disc with the playback side facing down start playback Check the disc type color system and regional code Check for any scratches or smudges on the disc Press...

Страница 27: ... the local Philips service organization will attempt to provide service although there may be a delay if the appropriate spare parts and technical manual s are not readily available MAKE SUREYOU KEEP Please keep your sales receipt or other document showing proof of purchase Attach it to this owner s manual and keep both nearby Also keep the original box and packing material in case you need to ret...

Отзывы: