background image

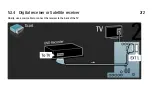
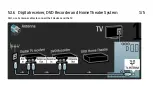
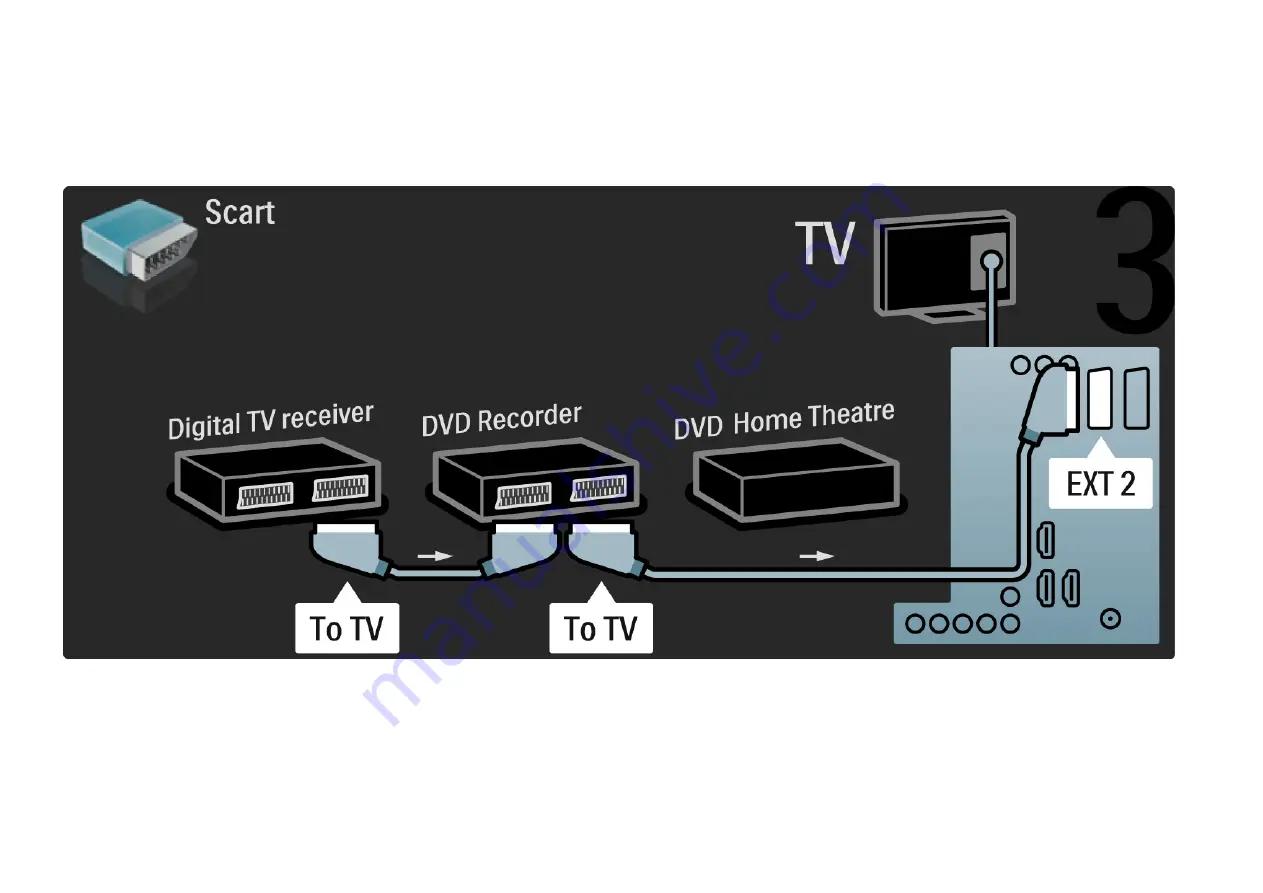
5.3.6   Digital receiver, DVD Recorder and Home Theatre System

3/5

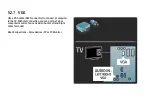
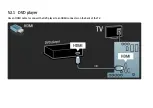
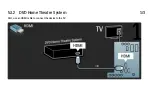
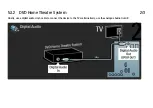
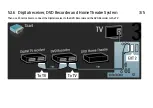
Then use 2 Scart cables to connect the Digital receiver to the DVD Recorder and the DVD Recorder to the TV.

Содержание 47PFL5604H - annexe 2

Страница 1: ...www philips com welcome Register your product and get support at EN User manual 47PFL7864H 47PFL7404H 47PFL5604H ...

Страница 2: ...800 544 Ortsgespräch Appel local Chiamata locale Sverige 08 5792 9100 Lokalsamtal Suomi 09 2311 3415 paikallispuhelu United Kingdom 0870 900 9070 Local Estonia 6008600 Local Lithuania 67228896 Local Latvia 527 37691 Local Kaзaкcтaн 007 727 250 66 17 Local Бълария 3592 489 99 96 Местен разговор Hrvatska 01 6403 776 Lokalni poziv Česká republika 800 142840 Bezplatný hovor Polska 022 3491504 połączen...

Страница 3: ...to find FAQ s featuring the list of HD channels or providers in your country You can receive programmes in High Definition from a Blu ray DVD player connected with a HDMI cable with a HD Movie a digital HD receiver connected with an HDMI cable with a subscription to HD channels from a cable or satellite company an Over the air HD broadcaster DVB T MPEG4 an HD channel on your DVB C network an HD Ga...

Страница 4: ...instructions the warranty does not apply Risk of electric shock or fire Never expose the TV to rain or water Never place liquid containers such as vases near the TV If liquids are spilt on or into the TV disconnect the TV from the power outlet immediately Contact Philips Consumer Care to have the TV checked before use ...

Страница 5: ...o strain is exerted on the power cord Strain on the power cord can loosen connections and cause arcing Never place the TV remote control or batteries near naked flames or other heat sources including direct sunlight To prevent the spread of fire keep candles or other flames away from the TV remote control and batteries at all times ...

Страница 6: ...ly Place the TV on a flat level surface that can support the combined weight of the TV and the stand When wall mounting the TV use only a wall mount that can support the weight of the TV Secure the wall mount to a wall that can support the combined weight of the TV and wall mount Koninklijke Philips Electronics N V bears no responsibility for improper wall mounting that results in accident injury ...

Страница 7: ...angs over the edge of the mounting surface Never place the TV on tall furniture such as a bookcase without anchoring both the furniture and TV to the wall or a suitable support Educate children about the dangers of climbing on furniture to reach the TV Risk of overheating Never install the TV in a confined space Always leave a space of at least 4 inches around the TV for ventilation Ensure curtain...

Страница 8: ...ull the plug never the cable Disconnect the TV from the power outlet and aerial before lightning storms During lightning storms never touch any part of the TV power cord or aerial cable Risk of hearing damage Avoid using earphones or headphones at high volumes or for prolonged periods of time Low temperatures If the TV is transported in temperatures below 5 C unpack the TV and wait until the TV te...

Страница 9: ...1 1 3 Position the TV Carefully read the safety precautions before positioning the TV Position the TV where light does not shine directly on the screen ...

Страница 10: ...icture or any picture without straining your eyes Find the sweet spot right in front of the TV for the best possible TV experience and relaxed viewing The ideal distance to watch TV from is three times its diagonal screen size While seated your eyes should be level with the centre of the screen ...

Страница 11: ...1 1 5 Security slot Your TV is equipped with a Kensington security slot at the back of the TV Purchase a Kensington anti theft lock not supplied to secure the TV ...

Страница 12: ...ohol chemicals or household cleaners on the TV To avoid deformations and colour fading wipe off water drops as soon as possible Avoid stationary images as much as possible Stationary images are images that remain on screen for extended periods of time Stationary images include on screen menus black bars time displays etc If you must use stationary images reduce screen contrast and brightness to av...

Страница 13: ...1 1 7 End of use 1 3 Your product is designed and manufactured with high quality materials and components which can be recycled and reused ...

Страница 14: ...2002 96 EC Please inform yourself about the local separate collection system for electrical and electronic products Please act according to your local rules and do not dispose of your old products with your normal household waste Correct disposal of your old product helps to prevent potential negative consequences for the environment and human health ...

Страница 15: ...e European Directive 2006 66 EC which cannot be disposed with normal household waste Please inform yourself about the local rules on separate collection of batteries because correct disposal helps to prevent negative consequences for the environmental and human health ...

Страница 16: ...r is off press O at the right of the TV to switch it on Press O again to switch off The white LED flashes during start up and switches on when the TV is ready for use You can set the white LED off permanently or set its brightness Press h Setup Installation Preferences LightGuide brightness ...

Страница 17: ...1 2 2 Volume V The keys on the side of the TV allow basic TV control You can adjust the volume with Volume on the side of the TV ...

Страница 18: ...1 2 3 Programme P The keys on the side of the TV allow basic TV control You can switch TV channels with Program on the side of the TV ...

Страница 19: ...1 2 4 Source key The keys on the side of the TV allow basic TV control To view connected sources press Source s continuously to select different sources ...

Страница 20: ...1 2 5 IR sensor Always take care to point the remote control at the remote control infra red sensor on the front of the TV ...

Страница 21: ...the following VESA code to purchase the bracket 19 48cm VESA MIS D 75 4 22 56cm VESA MIS D 100 4 26 69cm VESA MIS E 200 100 4 32 81cm VESA MIS F 200 200 6 37 94cm VESA MIS F 200 200 6 42 107cm VESA MIS F 400 400 6 47 119cm VESA MIS F 400 400 8 52 132cm VESA MIS F 400 400 8 Use a screw length as shown in the drawing ...

Страница 22: ...1 3 2 Unmount the stand 1 2 32 52 models Unscrew the 4 stand screws on the back of the TV before you lift the TV from the stand ...

Страница 23: ...1 3 2 Unmount the stand 2 2 19 26 models Partially unscrew the 3 screws under the stand before you detach the TV from the stand ...

Страница 24: ......

Страница 25: ...illiant flicker free progressive scan picture with optimum brightness and superb colours Certain models are equipped with a HD display only For detailed product information go to www philips com support To enjoy HD TV you need to get programmes in HD first If you are not watching HD programmes the picture quality will be that of a normal TV Read Get started Important Enjoy HD TV ...

Страница 26: ...ain countries also digital cable DVB C TV and radio broadcasts DVB Digital Video Broadcasting gives you better picture and better sound quality Some broadcasters have several audio speech and or teletext languages available Verify if the TV supports DVB T DVB T Lite or DVB C in your country Check the Digital TV Country Compatibility sticker on the back of the TV ...

Страница 27: ...scheduled TV programmes This guide is provided by digital broadcasters You can read the programme summary set a message to remind you when the programme starts or select programmes by genre Read More on Electronic Programme Guide EPG is not available in all countries ...

Страница 28: ...1 4 4 USB connection View or play your own multimedia files photos music videos from the USB connection on the side of the TV ...

Страница 29: ...to install and operate this TV You can open or close the user manual with the yellow key on the remote control Alternatively access the user manual via the Home menu Before you carry out the instructions close the manual with the yellow key When you open the manual again it opens on the same page you left it ...

Страница 30: ...1 5 2 On the internet A printable version of the user manual is available on the internet View or print the user manual at www philips com support ...

Страница 31: ...1 6 Open source licenses ...

Страница 32: ... or back to standby 2 Home h To open or close the Home menu 3 Guide g To open or close the Electronic Programme Guide To open or close the content list when you browse multimedia content 4 Options o To open or close the options menu which shows the available options ...

Страница 33: ...down left or right 6 OK key To open the channel overview To activate a selection 7 Back b P P To return to the previous menu screen To return to the previous channel UK only Not supported on MHEG channels 8 Info i To show channel or programme information if available ...

Страница 34: ...sed to control EasyLink HDMI CEC compliant devices 10 Volume V To adjust the volume 11 Mute m To mute the sound or restore it 12 Channel Programme up and down To switch to the next or previous channel in the channel overview To switch to the next or previous teletext page 13 Format f To select a picture format ...

Страница 35: ...trol overview 4 6 14 TV key To switch back to the antenna source 15 Subtitle To enable or disable subtitles 16 MHEG Teletext To open or close MHEG Teletext 17 Source s To select a connected device from the Source list ...

Страница 36: ...age selection in Teletext Scenea transforms your TV into a personalized photo frame Not supported on all models 20 Yellow key e To open or close the user manual Easy page selection in Teletext 21 Blue key AD Easy page selection in Teletext AD Audio Descriptor enables audio commentary for the visually handicapped Not supported on all models ...

Страница 37: ...2 1 1 Remote control overview 6 6 22 Number keys To select a TV channel or enter digits and text 23 Sound N To open or close the Sound menu 24 Picture A To open or close the Picture menu ...

Страница 38: ...atteries supplied Type AAA LR03 1 5V Make sure the and ends of the batteries line up correctly and are marked inside Remove the batteries if you have not used the remote control for a long time Dispose of batteries according to the end of use directives Read Get started Important End of use ...

Страница 39: ...ess Back b to leave the channel overview without changing the channel With the Channel overview on screen you can press Options o to access the following functions Select list Select which channels are shown in the Channel overview When a filter is set in the Channel overview press P to go through the channels of the filtered overview while watching TV Mark as favourite When a channel is highlight...

Страница 40: ...highlight another channel and do the same To stop Reorder press Options o and select Exit reorder Rename You can rename a channel 1 In the channel overview navigate to the channel you want to rename 2 Select Rename in the Options o menu 3 Press Back b to delete a character Use the remote control number pad as you do for SMS text messaging to scroll to the character you need Use the 0 number key to...

Страница 41: ...nhide channel You can navigate to another channel and do the same To exit the Show hidden channels view select Exit hidden channels in the Options menu The overview is adapted the next time you open it Hide channel Select this option when you want to hide a channel in the Channel overview When you hide a channel it will be hidden next time you open the Channel overview To unhide hidden channels se...

Страница 42: ...can do with your TV Press h to open the Home menu To start an activity highlight the desired item with the navigation keys and press OK You can add an activity always linked to a device with the Add your devices item To exit the Home menu press h again ...

Страница 43: ...h the TV to this device In the Home menu select Add your devices and press OK Follow the instructions on screen The TV asks you to select the device and the connector to which the device is connected From now on this device is added to the Home menu To remove a device item from the Home menu select the item press Options o and select Remove device in the list Press OK ...

Страница 44: ... the Setup menu you can set picture or sound settings set some special features update or re install TV channels update the TV software In the Home menu select Setup and press OK Select an item with the w or x u or v keys and press OK To exit the Setup menu press Back b ...

Страница 45: ...2 2 5 Options o The Options menu offers convenient settings related to what is on screen Press Options o in any circumstance to see which options are available To exit press Options o again ...

Страница 46: ...dcasts in certain countries Also use the Guide key to view the list of your photos music or videos from a connected USB memory device While watching TV press Guide g to open the EPG if this information is available When browsing your USB memory device press Guide g to show the content Read More on Electronic Programme Guide or More on Multimedia ...

Страница 47: ...ng is available digital radio stations are installed during installation Switch to a radio channel as you would do for TV channels Radio stations usually start from channel number 400 onwards Channel overview While watching TV press OK to open the Channel overview Select the channel with the navigation keys and press OK to switch to the channel To leave the channel overview without changing the ch...

Страница 48: ...available While watching TV press Info i to open the programme information on the channel you are watching To close the programme information press Info i again Options o When the programme information is on screen press Options o to access information on the quality of the digital channel you are watching ...

Страница 49: ...andby energy continues to be consumed When the TV is not in use for an extended period of time we advise to switch the TV off with the O key on the TV and to unplug the TV mains cord from the mains outlet If you can not locate your remote control and you want to switch the TV to Standby press O on the side of the TV This switches off your TV To switch the TV back on press O again ...

Страница 50: ...icture and sound Press OK Select Smart settings and press OK Select a setting from the list and press OK Personal Sets the TV to your personal preferences set in the Picture and Sound menus Vivid Rich and dynamic settings ideal for daylight use Standard Factory standard settings Cinema Ideal settings for watching movies Game Ideal settings for gaming Energy saving with the most energy conscious se...

Страница 51: ...ss OK If subtitles are hidden in a programme press u to shift the picture upwards You can select the following picture format settings Auto format Enlarges the picture automatically to fill the screen Minimal picture distortion subtitles remain visible Not fit for PC In the Setup Picture Auto format mode menu you can select 2 Auto format settings Auto fill to fill the screen as much as possible Au...

Страница 52: ...cture is adjusted to fit the screen 4 3 format Displays programme in the 4 3 format Movie expand 16 9 Scales the format to 16 9 Wide screen Stretches the format to 16 9 Unscaled Maximum sharpness Distortion may appear on borders Black bars may appear with pictures from your PC Only for HD and PC ...

Страница 53: ...cture automatically appears on the screen if the DVD player is connected by HDMI and is EasyLink HDMI CEC compliant If the DVD picture does not appear press h on the remote control and select DVD player Press OK Wait a few seconds until the DVD picture appears If the DVD player is not yet in the Home menu read Get started Menus Add your devices ...

Страница 54: ...and add the receiver to the Home menu To add the receiver to the Home menu read Get started Menus Add your devices To watch the receiver programme switch on the receiver If the receiver programme does not appear automatically press h and select the receiver item in the Home menu Press OK Use the remote control of the digital receiver to select TV channels ...

Страница 55: ...he device to the Home menu read Use your TV Menus Add your devices To watch TV from a connected device press h and select the device item in the Home menu Press OK If the connected device is not in the Home menu select the device from the Source menu Press s Source on the remote control or at the side of the TV to show the source list Select the device or its connector and press OK ...

Страница 56: ...ext While watching TV press MHEG Teletext To exit teletext press MHEG Teletext again To select a page Enter the page number with the number keys Press P or u or v or b to view the next or the previous page Press a colour key to select a colour coded item at the bottom of the screen ...

Страница 57: ...e Some digital TV broadcasters have several teletext languages available You can set your primary and secondary language Press h Setup Installation Languages Primary or Secondary teletext and select your preferred teletext languages ...

Страница 58: ...Select teletext subpages A teletext page number can hold several subpages The pages are shown on a bar next to the main page number Use w or x to select the subpages when they are available on a teletext page ...

Страница 59: ...ily jump from one subject to another without using page numbers with T O P teletext Not all channels broadcast T O P teletext Press Info i when teletext is switched on The T O P overview appears Select a subject and press OK to view the page ...

Страница 60: ...Switch on teletext and press OK The first word or first index number of the page is highlighted on screen Jump to the next word or number on the page with w or x u or v Press OK to search for a page featuring the highlighted word or number Each time you press OK the next page featuring the highlighted word or number is shown To exit Search press MHEG Teletext ...

Страница 61: ...en again Freeze page Stop the automatic rotation of subpages or stop the page counter when you have entered a wrong page number or when the page is not available Dual screen Full screen Not available for channels with Digital Text services Select Dual screen to view the TV channel and teletext alongside each other Select the option Full screen to show full screen teletext again Reveal Hide or unhi...

Страница 62: ...t of characters Switch to the other character group to show the text correctly Enlarge teletext page You can enlarge the teletext page for more comfortable reading In teletext press f to enlarge the top part of the page and f again to view the enlarged lower part of the page With u or v you can scroll through the enlarged page Press f again to return to the normal page size ...

Страница 63: ... and navigation keys to select and navigate While watching TV press MHEG Teletext and navigate to select or highlight items Use the colour keys to select an option and press OK to confirm or activate Press MHEG Teletext again to cancel Digital text or interactive services Digital text services are blocked when subtitles are broadcast and Subtitle On is set in the Features menu Read Subtitles and l...

Страница 64: ...t 2 5 Teletext 2 5 offers more colours and better graphics if broadcast by the TV channel Teletext 2 5 is activated as a standard factory setting To switch it off select h Setup Installation Preferences Teletext 2 5 ...

Страница 65: ...s While watching TV press OK to open the Channel overview With a channel highlighted press Options o Select Mark as favourite to make the highlighted channel a favourite channel Favourite channels are marked with a F Unmark the channel as favourite with Unmark favourite Select list With the Select list option in the Channel overview you can set the overview to show only your favourite channels Rea...

Страница 66: ...an set a reminder to show a message when a programme starts or select programmes by genre While watching TV press Guide g to open the EPG If available a list of the current TV programmes appears It may take some time to load this information To exit the EPG press Guide g EPG is not available in all countries When available you will receive either Now Next or 8 Days EPG ...

Страница 67: ...ked with To cancel the message select Clear reminder and press OK To switch to the TV channel of the programme directly select Watch channel and press OK Options o In the EPG list press Options o to select the following Set reminder If a reminder is set the option Scheduled reminders is available with a list of all reminders Change day View the previous or next day s programmes More info Opens the...

Страница 68: ...Programme Guide 3 3 Search by genre View all programmes by genre Select a programme and press Info i for more info or to set a reminder List of preferred programmes Set channels to appear in the EPG list max 50 channels ...

Страница 69: ... time Close the user manual and press h Setup Features Sleeptimer With the Sleeptimer slider bar you can set the time up to 180 minutes in steps of 5 minutes If set to 0 minutes Sleeptimer is switched off You can always switch off your TV earlier or reset the time during countdown ...

Страница 70: ...ur personal lock code in h Setup Features Set code Enter the four number code with the number keys You can always change the code if necessary Child lock Select Lock as Child lock setting to lock all TV channels and the programmes from devices When Lock is set you need to enter your personal code to unlock the TV The lock is activated the moment you close the menu on screen or set the TV in standb...

Страница 71: ...r child Programmes with a higher rating will be blocked To set an age rating in this list read More on Timers and locks Age rating Parental rating is not available in all countries Did you forget your code Select Change code press x and enter the overriding code 8888 Enter a new personal code and confirm The previous code is erased and the new code is stored ...

Страница 72: ...tures Child lock and select Parental rating With Parental rating selected in Child lock go to h Setup Features Parental rating and select the age rating for programmes that are allowed to be viewed A programme with a higher age rating will be blocked and the TV will ask for the Lock code to unblock the programme Age rating is activated the moment you close the menu on screen or set the TV in stand...

Страница 73: ...t subtitles For digital channels a preferred subtitle language can be set For analogue channels To have subtitles constantly on screen select an analogue TV channel and press MHEG Teletext to switch on teletext Enter the three number page number of the subtitles page usually 888 and press MHEG Teletext again to switch off teletext Subtitles will show if available Each analogue channel needs to be ...

Страница 74: ... 5 1 Subtitles 2 3 For digital channels To switch subtitles on constantly press Subtitle Select Off On or On during mute With On during mute the TV displays subtitles only when the sound is muted with m ...

Страница 75: ... channels you can select a preferred subtitle language from a list of broadcast languages See h Setup Features Subtitle language Select a subtitle language from the list of available languages and press OK The preferred subtitle languages set in the Installation menu are overruled temporarily ...

Страница 76: ...Languages Primary language You can also set a secondary language in the same Languages menu The TV will automatically switch to the language you set if the language is broadcast To check if an audio language is available press Options o and select Audio language You can select another audio language from the list Some digital TV channels broadcast special audio and subtitles adapted for people tha...

Страница 77: ...ge When the TV was switched on for the first time you selected a menu language To change the menu language press h Setup Installation Languages Menu language The TV will automatically switch to the menu language you set ...

Страница 78: ...nt of the USB device on screen If the content does not show press h Browse USB and press OK While the USB content list is open on screen select the file you want to play and press OK or play P A song a slideshow of photos or a video starts playing To pause press P again To jump to the next file press x or P To jump to the previous file press w or P To fast forward a music file press Q Press Option...

Страница 79: ... To pause the video press pause P To fast forward press Q once to go slow press twice to go fast Press again for normal speed Press Options o to change to Full screen Small screen Play once etc To exit Browse USB press h and select another activity or disconnect the USB memory device ...

Страница 80: ... on hearing impaired audio and subtitles press h Setup Installation Languages Hearing impaired Select On and press OK The TV switches to hearing impaired audio and subtitles if available To verify whether a hearing impaired audio language is available press Options o and select Audio language and look for an audio language with an ear icon ...

Страница 81: ...d Select On and press OK The TV switches to visually impaired audio if available In the Options menu you can set the visually impaired audio to be heard from the Speakers the Headphones only or from both Speakers and headphones Also in the Options menu select Volume Visually impaired to change the volume of the extra commentary To verify whether a visually impaired audio language is available pres...

Страница 82: ...e and sound Press OK Select Smart settings and press OK Select a setting from the list and press OK Personal Sets the TV to your personal preferences set in the Picture and Sound menus in Setup Vivid Rich and dynamic settings ideal for daylight use Standard Factory standard settings Cinema Ideal settings for watching movies Game Ideal settings for gaming Energy saving with the most energy consciou...

Страница 83: ...st a setting Press OK to activate a setting Settings assistant Start the Settings assistant to guide you through basic picture settings easily Follow the instructions on screen Contrast Changes the level of brightness in the picture but the level of darkness remains the same Brightness Changes the level of light in the whole picture Colour Changes the level of saturation ...

Страница 84: ...ces the noise in the picture Set levels to Minimum Medium Maximum or Off Tint Sets the colours to Normal Warm reddish or Cool bluish Select Custom to make your own personal settings in the Custom menu Custom tint Use a slider bar to change the colour temperature of the picture R WP red whitepoint G WP green whitepoint B WP blue whitepoint R BL red blacklevel G BL green blacklevel ...

Страница 85: ...ixel response time for extreme motion sharpness for all your movies and sports This setting is not available on all models Dynamic contrast Sets the level at which the TV automatically enhances the details in the dark middle and light areas of the picture Dynamic backlight Sets the level at which power consumption can be reduced by dimming the brightness intensity of the screen Choose for the best...

Страница 86: ...urs PC mode Sets the TV to the ideal predefined computer setting in case a computer has been connected Light sensor Adjusts the picture settings automatically to the lighting conditions of the room Switches the Light sensor on or off Picture format auto format mode Read Use your TV Watch TV Picture format Picture shift To shift the picture vertically on the screen with the navigation keys ...

Страница 87: ...nd adjust a setting Press OK to activate a setting Bass Changes the low tones of the sound Select each bar to change the setting Treble Changes the high tones of the sound Use each slider bar to change the setting Volume Changes the volume If you do not want the volume bar to appear press h Setup Installation Preferences Volume bar Select Off and press OK ...

Страница 88: ...t you can choose between two different languages Mono stereo If stereo broadcasting is available you can select Mono or Stereo for each TV channel TV speakers If you have an audio system connected to your TV you can switch off the TV speakers If your audio system supports EasyLink read Connections EasyLink Select Automatic EasyLink to have the sound from your TV automatically reproduced by your au...

Страница 89: ...h m Delta volume Levels out volume differences between channels or connected devices First switch to the channel or device whose volume difference you want to level out Balance Sets the balance of the left and right loudspeakers to best fit your listening position Auto volume levelling Reduces sudden volume differences like at the beginning of commercials or when switching from one channel to anot...

Страница 90: ...4 1 4 Factory settings You can return to the original factory settings Only picture and sound settings will be reset Close the user manual and press h Setup Installation Factory reset and press OK ...

Страница 91: ...ew shows the TV channels and radio stations installed on your TV To reorder or rename press Options o and select the option you need Reorder You can reposition channels within the overview 1 Select Reorder in the Options o menu to start reordering channels 2 Highlight a channel and press OK 3 Reposition the channel where you want it with the navigation keys 4 Press OK to confirm the position You c...

Страница 92: ... want to rename 2 Select Rename in the Options o menu 3 Press Back b to delete a character Use the remote control number pad as you do for SMS text messaging to scroll to the character you need Use the 0 number key to enter a special character Press OK to end the text input 4 Select Done and press OK to end Rename ...

Страница 93: ... the TV to add or remove digital channels automatically You can also manually start the channel update Automatic update To set the TV to update digital TV channels automatically leave the TV in standby mode Once a day the TV updates earlier found channels and stores new channels Empty channels are removed from the Channel overview ...

Страница 94: ...n Channel installation Channel update message To disable automatic updates select Off in h Setup Installation Channel installation Channel update in standby Manual update To update channels yourself at any time press h Setup Installation Channel installation Automatic installation and press OK Start the update and select Update Channels The update may take a few minutes ...

Страница 95: ...ver again to set your language country and install all available TV channels Full installation To reinstall the TV press h Setup Installation Channel installation Automatic installation and press OK Start the installation and select Reinstall channels The update may take a few minutes To reorder or rename found channels read Setup Channels Reorder and rename ...

Страница 96: ...position your antenna to try to improve the reception For best results contact a specialised antenna installer To verify the reception quality of such a digital channel select the channel press h Setup Installation Channel installation Digital Reception test Search and press OK The digital frequency is shown for this channel If the reception is poor you can reposition your antenna Select Search an...

Страница 97: ...x and w and change the number with u and v Press Search to verify this frequency If you receive the channel with DVB C the options Symbol rate mode and Symbol rate are shown For Symbol rate mode select Automatic unless your cable provider supplies a specific symbol rate value You can enter this supplied value in Symbol rate using the number keys ...

Страница 98: ...all available analogue TV channels 1 System If you have your own antenna you need to select the country or part of the world where the TV channel comes from If you receive TV channels via a cable system you only need to select the country or part of the world once 2 Find channel Search for an analogue TV channel The search starts automatically but you can manually enter a frequency If the channel ...

Страница 99: ... 2 2 3 Fine tune Fine tune the found channel with u and v Press Done once the channel is fine tuned 4 Store A found channel can be stored on the current channel number with Store current channel or as a new channel number with Store as new channel ...

Страница 100: ...ne tune analogue channels press h Setup Installation Channel installation Manual install analogue Fine tune Fine tune the channel with u and v Press Done once the channel is fine tuned You can store this fine tuned channel on the current channel number with Store current channel or as a new channel number with Store as new channel ...

Страница 101: ...nna for a DVB T DVB T Lite installation Select Cable for a DVB C installation DVB C channel installation All DVB C TV settings are set to automatic but the DVB C network might need some settings supplied by the DVB C provider Enter these settings or values when the TV asks for them You can install your TV for DVB T DVB T Lite and DVB C In that case you need to carry out two channel installations F...

Страница 102: ...herefore winter and summer time changes might be ignored You can correct this with the clock settings If the TV shows the incorrect time press h Setup Installation Clock Auto clock mode and select Manual In the Daylight saving menu select Standard time winter or Daylight saving time summer according to your local time ...

Страница 103: ...ad the TV software from the internet onto your PC Use a USB memory device to upload the software from your PC to the TV Preparation You need a PC with a high speed internet connection You will need a USB memory device with 256Mb free space and make sure that the write protection is switched off Some USB memory devices might not work with the TV ...

Страница 104: ...ons The TV will ask to insert the USB device into the USB connector at the side of the TV 2 Download from PC to USB Once the TV identification file is written to the USB device insert the USB into your PC that is connected to the internet On the USB device locate the file update htm and double click it Click on Send ID If new software is available it will download to the USB device ...

Страница 105: ...ice from the TV during the software update If a power cut occurs during the update never remove the USB memory device from the TV When the power returns the TV continues to update At the end of the update the message Operation successful appears on screen Remove the USB device and press O on the remote control Do not press O twice use the O switch on the TV The TV switches off for 10 seconds and b...

Страница 106: ... sure that the power plug in the wall socket is accessible at all times When disconnecting the power cable always pull the plug never the cable Although this TV has a very low standby power consumption unplug the power cable to save energy if you do not use the TV for a long time ...

Страница 107: ...5 1 2 Antenna cable Locate the antenna connection at the back of the TV Insert the antenna cable securely in the Antenna a socket ...

Страница 108: ...ections shown in this user manual are recommendations for the cases most used Other solutions are possible Read more on specific cable types and available connections in About cables HDMI etc Add your devices When you have connected a device to the TV always add this device as an item in the Home menu With this item in the Home menu you can easily switch the TV to this device To add a new device p...

Страница 109: ...re and sound quality One HDMI cable combines video and audio signals Use HDMI for High Definition HD TV signals An HDMI cable transfers picture and sound signals in only one direction the opposite to a scart cable Do not use an HDMI cable longer than 5 m ...

Страница 110: ... to HDMI Use a DVI to HDMI adaptor if your device has only a DVI connection Use one of the HDMI connectors and for sound add an Audio L R cable to Audio In Left Right HDMI DVI mini jack connector on the back of the TV EasyLink HDMI with EasyLink offers easy operating of your connected devices when these have the HDMI CEC standard Read Connections EasyLink HDMI CEC ...

Страница 111: ...video Use the Component Video YPbPr connection together with an Audio Left and Right connection for sound Match the YPbPr connector colours with the cable plugs when you connect YPbPr can handle High Definition HD TV signals ...

Страница 112: ...5 2 4 Scart A scart cable combines video and audio signals Scart connectors can handle RGB video signals but cannot handle High Definition HD TV signals ...

Страница 113: ...5 2 5 S Video Use an S Video cable together with an Audio Left and Right cinch cable Match the Audio connectors colours with the cable plugs when you connect ...

Страница 114: ...5 2 6 Video Use a Video cinch cable together with an Audio Left and Right cinch cable Match the Audio connectors colours with the cable plugs when you connect ...

Страница 115: ...VGA cable DE15 connector to connect a computer to the TV With this connection you can use the TV as a computer monitor You can add an Audio Left and Right cable for sound Read Connections More devices TV as PC Monitor ...

Страница 116: ...5 3 1 DVD player Use an HDMI cable to connect the DVD player to an HDMI connector on the back of the TV ...

Страница 117: ...5 3 2 DVD Home Theatre System 1 3 First use an HDMI cable to connect the device to the TV ...

Страница 118: ...5 3 2 DVD Home Theatre System 2 3 Finally use a digital audio cinch cable to connect the device to the TV or alternatively use the analogue Audio Out L R ...

Страница 119: ... Audio Out L R connection Audio and Video synchronisation sync If the sound does not match with the video on screen you can set a delay on most DVD Home Theatre Systems to match the sound and video Do not connect the audio signal from a DVD player or other device directly to the Home Theatre System Always lead the sound through the TV first ...

Страница 120: ...5 3 3 DVD Recorder 1 2 First use 2 antenna cables to connect the antenna to the DVD Recorder and the TV ...

Страница 121: ...5 3 3 DVD Recorder 2 2 Finally use a scart cable to connect the DVD Recorder to a scart connector on the back of the TV ...

Страница 122: ...5 3 4 Digital receiver or Satellite receiver 1 2 First use 2 antenna cables to connect the antenna to the receiver and the TV ...

Страница 123: ...5 3 4 Digital receiver or Satellite receiver 2 2 Finally use a scart cable to connect the receiver to the back of the TV ...

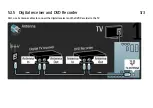
Страница 124: ...5 3 5 Digital receiver and DVD Recorder 1 3 First use 3 antenna cables to connect the digital receiver and the DVD Recorder to the TV ...

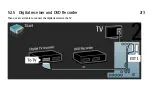
Страница 125: ...5 3 5 Digital receiver and DVD Recorder 2 3 Then use a scart cable to connect the digital receiver to the TV ...

Страница 126: ...5 3 5 Digital receiver and DVD Recorder 3 3 Finally use 2 scart cables to connect the 2 devices and the TV ...

Страница 127: ...5 3 6 Digital receiver DVD Recorder and Home Theatre System 1 5 First use 3 antenna cables to connect the 2 devices and the TV ...

Страница 128: ...5 3 6 Digital receiver DVD Recorder and Home Theatre System 2 5 Then use a scart cable to connect the digital receiver to the TV ...

Страница 129: ...5 3 6 Digital receiver DVD Recorder and Home Theatre System 3 5 Then use 2 Scart cables to connect the Digital receiver to the DVD Recorder and the DVD Recorder to the TV ...

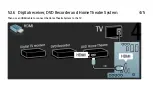
Страница 130: ...5 3 6 Digital receiver DVD Recorder and Home Theatre System 4 5 Then use an HDMI cable to connect the Home Theatre System to the TV ...

Страница 131: ...5 3 6 Digital receiver DVD Recorder and Home Theatre System 5 5 Finally use a digital audio cinch cable to connect the Home Theatre System to the TV ...

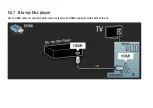
Страница 132: ...5 3 7 Blu ray Disc player Use an HDMI cable to connect the Blu ray Disc player to an HDMI connector on the back of the TV ...

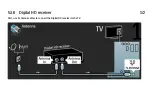
Страница 133: ...5 3 8 Digital HD receiver 1 2 First use 2 antenna cables to connect the Digital HD receiver to the TV ...

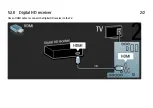
Страница 134: ...5 3 8 Digital HD receiver 2 2 Use an HDMI cable to connect the Digital HD receiver to the TV ...

Страница 135: ...o and Video at the same time If you use an HDMI or YPbPr connection you can use the connectors at the back of the TV See the next pages for how to connect your games console Picture delay To prevent picture delay set the TV to Game mode Close this user manual and press Options o and select Picture and sound Press OK Select Smart settings and press OK Select Game and press OK ...

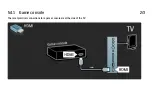
Страница 136: ...5 4 1 Game console 2 3 The most practical connections for a game console are at the side of the TV ...

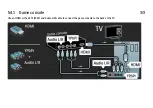
Страница 137: ...5 4 1 Game console 3 3 Use an HDMI or the EXT3 YPbPr and Audio L R cable to connect the game console to the back of the TV ...

Страница 138: ...5 4 2 HD Game console Use an HDMI cable or YPbPr cables to connect a High Definition game console to the TV Read also Connections More devices Game ...

Страница 139: ... most practical connection for a camcorder is at the side of the TV You can use an HDMI S Video or Video connection but never connect the S Video and Video at the same time See the next pages for how to connect your camcorder ...

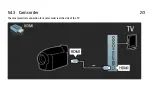
Страница 140: ...5 4 3 Camcorder 2 3 The most practical connection for a camcorder is at the side of the TV ...

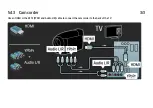
Страница 141: ...5 4 3 Camcorder 3 3 Use an HDMI or the EXT3 YPbPr and Audio L R cable to connect the camcorder to the back of the TV ...

Страница 142: ... PC to the side of the TV or alternatively to the back See the next pages for how to connect your computer Ideal TV setting Set the TV Picture format to Unscaled for the sharpest picture quality While watching TV press Options o select Picture format and select Unscaled Supported PC resolutions For a list of supported resolutions see Technical data Display resolutions ...

Страница 143: ...5 4 4 TV as PC monitor 2 3 Use a DVI to HDMI adapter to connect the PC to HDMI and an audio L R cable to connect the Audio L R to the side of the TV ...

Страница 144: ...5 4 4 TV as PC monitor 3 3 Use a VGA cable to connect the PC to the VGA connector and an audio L R cable to connect the VGA Audio L R to the back of the TV ...

Страница 145: ...ors at the back of the TV You have to assign the TV channel as a channel to be decoded Then assign the connection where the decoder is connected Close this user manual and press h Setup Installation Decoder Select Channel to set the channel that you want to decode Select Status to set the connector you use for the decoder ...

Страница 146: ...nk set to On To switch EasyLink off press h Setup Installation Preferences EasyLink With EasyLink the following functions are available One touch play Insert a disc and press Play on the device The TV switches on from standby mode and shows the disc programme automatically System standby Press O on the TV remote control for 3 seconds to switch the connected devices into standby mode ...

Страница 147: ... the TV speakers off or permanently on press h Setup Sound TV speakers Make sure that all HDMI CEC settings are properly set up on the device EasyLink might not work with devices from other brands Naming of HDMI CEC on other brands The HDMI CEC functionality has different names with different brands Some examples of name are Anynet Aquos Link Bravia Theatre Sync Kuro Link Simplink Viera Link Not a...

Страница 148: ...ting Verify if all devices are suited for this setting Unsuited devices will not respond Try out this function first before you switch on EasyLink Remote control permanently To switch EasyLink Remote control on press h Setup Installation Preferences EasyLink Remote control Except for the Home h key all remote control commands will try to operate the device Some commands might not work with the dev...

Страница 149: ... for more information and terms conditions Insert a CAM Switch off the TV before inserting a CAM Look on the CAM for the correct method of insertion Incorrect insertion can damage the CAM and the TV Look for the common interface slot on the side of the TV Gently insert the CAM as far as it will go and leave it in the slot permanently It can take a few minutes before the CAM is activated Removing t...

Страница 150: ... paid the TV shows the programme from the digital TV service provider The applications their function the content and the on screen messages all come from the CAM service CAM settings To set passwords or PIN codes for the CAM service press h Setup Features Common Interface Select the CAM provider and press OK ...

Страница 151: ...and back on again Contact information Consumer Care If the TV problem is not solved you can call the Philips Consumer Care hotline in your country Find the telephone number on the printed documentation that came with the TV Or consult our website www philips com support TV model number and serial number Find these numbers on the packaging label or on the type label on the back or bottom of the TV ...

Страница 152: ... on the TV to switch the TV on The TV does not respond to the remote control Verify that the batteries of the remote control are not empty or weak Verify their orientation Clean the remote control and TV sensor lens Verify if EasyLink Remote control is set to Off During the warming up time of the TV which is about two minutes it is possible that the TV and some external devices do not immediately ...

Страница 153: ...wer cable wait a minute and plug it back in Verify if there is enough space for ventilation Wait until the TV has cooled down If the TV does not restart from standby and the blinking occurs again call Consumer Care You forgot your code to unlock Child lock Read Timers and locks Child lock ...

Страница 154: ... Read Use your TV Menus Channel overview A channel could be hidden in the Channel overview Read Use your TV Menus Channel overview No digital channels found during installation Verify if the TV supports DVB T DVB T Lite or DVB C in your country Check the Digital TV Country Compatibility sticker on the back of the TV ...

Страница 155: ...or Verify if the antenna is connected properly Non earthed audio devices neon lights high buildings or mountains can influence the picture quality Try to improve the picture by changing the position of the antenna or placing devices away from the TV Verify that the correct TV system is chosen in the Manual installation menu If only a certain channel is poor try to fine tune this channel with the F...

Страница 156: ...ay when a game console is connected To prevent picture delay set the TV to game mode Select Game in the Smart settings in the Setup menu The TV does not remember my settings when I switch it back on The TV is in Shop mode Check that the TV is set to Home mode in the Home menu Setup Installation Preferences Location menu It is necessary to switch the TV to standby to ensure that the TV exits Shop m...

Страница 157: ...y to switch the TV to standby to ensure that the TV exits Shop mode completely The picture does not fit the screen it is either too big or too small Press f and select a more fitting picture format in the Picture format menu The picture position on screen is not correct Some picture signals from some devices do not fit the screen properly You can move the picture with the cursor keys on the remote...

Страница 158: ... is not a malfunction The sound is poor Verify that the sound is set to Stereo Select any of the Smart settings in h Setup Smart settings The sound comes from one speaker only Verify that the Balance is not set to extreme left or right Sound delay when a DVD Home Theatre System device is connected Read the user manual of the DVD device to adjust the audio sync delay If you cannot set a delay switc...

Страница 159: ...stently see the user manual of the device to verify the output settings If that does not help connect an additional audio cable If a DVI to HDMI adaptor is used verify that an additional audio connection is in place to complete the DVI connection HDMI with EasyLink Verify if the connected device supports the HDMI CEC standard and is properly set up Read the user manual that comes with the device V...

Страница 160: ...control Some devices have identical functionality but do not support the specific remote control commands Read Connections EasyLink HDMI CEC EasyLink RC The PC display on my TV is not stable or is not synchronised with TV as PC monitor Set the refresh rate of your PC to 60Hz Verify that the correct resolution mode is selected on your PC Read Technical data Display resolutions ...

Страница 161: ...pliant The USB device may need specific driver software Unfortunately this software cannot be downloaded to your TV Not all audio and picture files are supported Read Technical data USB device content does not play back smoothly The transfer performance of the USB device limits the transfer rate ...

Страница 162: ...ower Mains power AC220 240V 10 Ambient temperature 5 C to 35 C Power and standby power consumption see the technical specification on www philips com Reception Antenna input 75ohm coaxial IEC75 TV system DVB COFDM 2K 8K Video playback NTSC SECAM PAL DVB DVB Terrestrial 0151 Cable see selected countries on the TV typeplate Tunerbands VHF UHF S Channel Hyperband ...

Страница 163: ...0 Hz 576i 50 Hz 576p 50 Hz 720p 50 Hz 60 Hz 1080i 50 Hz 60 Hz 1080p 24 Hz 25 Hz 30 Hz 1080p 50 Hz 60 Hz Computer formats Resolution Refresh rate 640 x 480 60 Hz 800 x 600 60 Hz 1024 x 768 60 Hz 1280 x 1024 60 Hz full HD only 1360 x 765 60 Hz 1600 x 1200 60 Hz full HD only 1920 x 1080 60 Hz ...

Страница 164: ...7 3 Multimedia Connections USB Supported USB memory device formats FAT 16 FAT 32 NTFS Supported file formats Images JPEG Audio MP3 LPCM Video MPEG 1 MPEG 2 H 264 MPEG 4 AVC ...

Страница 165: ... HDMI 1 3a for all HDMI connections HDMI 2 in HDMI 3 in Audio In L R DVI to HDMI min jack 3 5 mm Audio Out L R display synchronised Digital Audio out coaxial cinch S PDIF display synchronised Side HDMI side in S Video in Y C Video in CVBS Audio L R in Headphones stereo mini jack 3 5mm USB Common interface slot Availability varies according to TV model ...

Страница 166: ...ting that results in accident injury or damage Before you connect the TV to the power outlet ensure that the power voltage matches the value printed on the back of the TV Never connect the TV to the power outlet if the voltage is different Risk of injury to children Follow these precautions to prevent the TV from toppling over and causing injury to children Never place the TV on a surface covered ...

Страница 167: ... obtain the source code write to Development Manager Technology Development Philips Consumer Lifestyle 620A Lorong 1 Toa Payoh TP1 Level 3 Singapore 319762 Compliance with EMF Koninklijke Philips Electronics N V manufactures and sells many products targeted at consumers which like any electronic apparatus in general have the ability to emit and receive electromagnetic signals One of Philips leadin...

Страница 168: ......
Страница 169: ...istered trademarks are property of their respective owners Specifications are subject to change without notice Trademarks are the property of Koninklijke Philips Electronics N V or their respective owners 2009 Koninklijke Philips Electronics N V All rights reserved www philips com www philips com tv ...

Отзывы: