background image

13

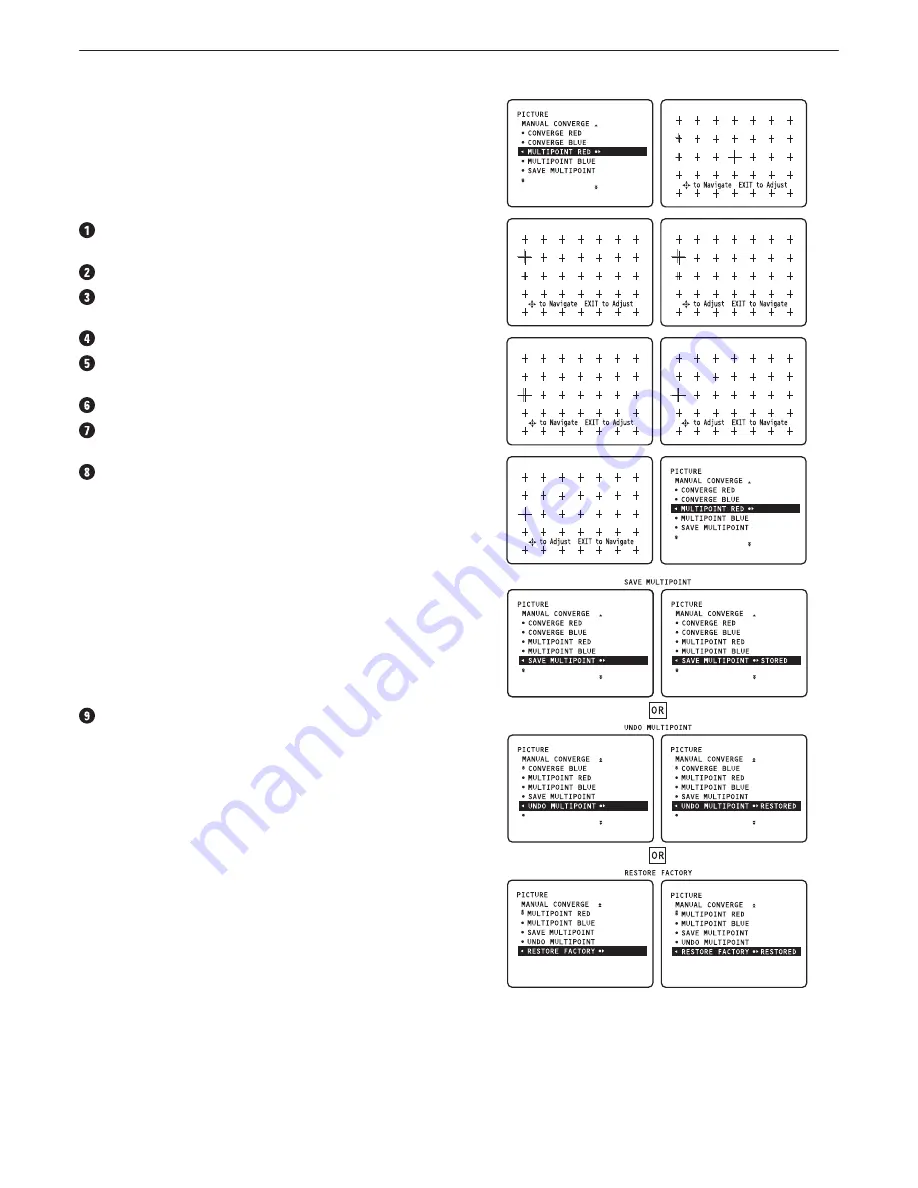
Using Manual Converge: Multipoint Red/Blue

The Multipoint Red/Blue convergence controls allow you to adjust 
picture convergence at specific points on the TV screen.

Note: Allow the TV to warm up for 20 minutes before adjusting 
convergence. Adjust Converge Red or Converge Blue before using the 
Multipoint Red/Blue controls. See the previous page.

 Select 

MULTIPOINT RED

 or 

MULTIPOINT BLUE

 in the 

MANUAL CONVERGE

 menu.

 Press the cursor right to enter navigate mode.

 Use the cursor left, right, up or down to move to a cross hair 

that has a colour outline.

 Press the 

OSD

 (Status/Exit) key to enter adjust mode.

 Use the cursor left, right, up or down to adjust the cross hair 

until the colour outline is gone.

 Press the 

OSD

 key to return to navigate mode.

 Repeat steps 3-6 until all misaligned cross hairs have been 

adjusted. Then press the 

MENU

 key.

 For your multipoint adjustments to be stored in the TV’s 

memory, you must activate 

SAVE MULTIPOINT

.


Note: If you are not satisfied with the adjustments you just made 
and want to start over, you can use the 

UNDO MULTIPOINT 

control. 

This control allows you to undo the adjustments, but only 

if you use it before saving.


To save your multipoint adjustments: Select 

SAVE MULTIPOINT


and press the cursor left or right.


To undo your multipoint adjustments: Select 

UNDO 

MULTIPOINT

 and press the cursor left or right.


To restore the TV’s picture convergence to factory settings, select 

RESTORE FACTORY

 and press the cursor left or right.

 Press the 

MENU

 key to return or the 

OSD

 key to switch the 

menu off.

Содержание 43PP8545

Страница 1: ...Rear projection TV with HD Input 43PP8545 50PP8545 User manual 3141 085 20041 ...

Страница 2: ...lace your TV set under direct sunlight or heat Leave at least 5 cm around each side of TV set to allow for proper ventilation Avoid placing your set e g near the window where it is likely to be exposed to rain or water No objects such as vases filled with liquids should be placed on top the TV so as to avoid dripping or splashing of liquids on the set Disconnect mains plug when the red light below...

Страница 3: ... sharper more detailed images and enhanced green phosphor which creates deeper more natural colours Hybrid projection lenses work in concert with each CRT to improve focus and correct optical errors removing distortion and creating a crisp picture to the edge of the screen The lenticular screen has nearly one third finer pitch 515mm than traditional screens improving picture detail and resolution ...

Страница 4: ... the TV set for the correct operation voltage Consult your local dealer if your main supply is different To prevent damaging the mains AC cord which could cause hazard do not place the TV on the cord Remove the cover of the battery compartment on the remote control Insert the two batteries supplied Type R6 1 5V The batteries supplied do not contain the heavy metals mercury and cadmium Nevertheless...

Страница 5: ...u is displayed pressing or selects the next item in the menu Also use either of these keys to switch the TV on from Standby mode POWER Switches the TV on or activates standby mode MENU Press to activate the on screen menu INTELLISENSE When pressed automatically adjusts the set s picture convergence using the Auto IntelliSense focus feature REMOTE SENSOR Receives infrared commands to activate contr...

Страница 6: ...ing See page 19 DOLBY V with Dolby Surround Signals Allows you to select various factory surround sound listening modes Dolby Virtual Virtual Dolby Surround Dolby Virtual uses two speakers to simulate the surround effect produced by a multichannel system Incredible Surround In Stereo sound mode when switched on the Incredible Surround feature provides the feeling that the speakers are farther apar...

Страница 7: ...ptions are 4 3 Auto and Expand 4 3 For AV4 and AV5 1080i signal sources the options are 4 3 and Compress 16 9 For AV4 and AV5 480p or 576p signal sources no screen format options are available through the TV Control the format at the source DVD player or digital set top box CURSOR RIGHT Allows you to access the menus and adjust the settings CURSOR DOWN Allows you to select the next or previous ite...

Страница 8: ...racters even when a language that uses other characters has been selected Tuning Channels Manually Manual tuning allows you to store channel by channel You must go through every step of the manual store menu Select MANUAL STORE in the INSTALL menu Press the cursor right to enter the menu Select COLOUR SYSTEM and press the cursor right If AUTO is selected the respective colour system will be automa...

Страница 9: ...7 14 to continue searching for another transmitting channel Press the MENU key to return to the INSTALL menu or press the OSD key to switch the menu off Sorting Channels According to your preference you can change the order of the stored TV channels Select SORT in the INSTALL menu Press the cursor right to enter the menu Key in the channel number in the FROM column you want to swap from Use the di...

Страница 10: ...NSTALL menu or the OSD key to switch the menu off Note To add back channels to the list repeat steps 1 4 and press the OSD key to switch the menu off Naming Channels It is possible to assign a name to a TV channel This feature allows you to enter a name or modify an existing name of a channel including peripherals Note Even when you have selected another language in the LANGUAGE menu only the Engl...

Страница 11: ...n includes 100Hz plus Digital Scan which together eliminate picture flickering and line jitter offering a stable picture for relaxed viewing no eye strain 100Hz offers field flicker reduction Progressive doubles the number of visible picture lines per field by displaying all picture frame lines at once This minimizes the visibility of the scan lines Auto detects the input signal and provides the a...

Страница 12: ... 20 seconds Note You can also manually adjust picture convergence to suit your personal preferences or to further fine tune the picture See the next section on using the MANUAL CONVERGE controls Using Manual Converge Converge Red Blue Using the Auto IntelliSense feature you can automatically adjust convergence in 20 seconds or less see the previous page Also if you desire you can use the Manual Co...

Страница 13: ...ir until the colour outline is gone Press the OSD key to return to navigate mode Repeat steps 3 6 until all misaligned cross hairs have been adjusted Then press the MENU key For your multipoint adjustments to be stored in the TV s memory you must activate SAVE MULTIPOINT Note If you are not satisfied with the adjustments you just made and want to start over you can use the UNDO MULTIPOINT control ...

Страница 14: ...lifies the high frequency response of the audio output signal Bass Attenuates or amplifies the low frequency response of the audio output signal Balance Adjusts the balance of the right and left speaker s sound output AVL Automatic Volume Leveller Automatically controls the volume level to avoid excessive level differences especially when switching to another channel or during commercial breaks He...

Страница 15: ... Press the cursor right again to enter TIME mode Key in the current time with the digit keys You must use 24 hour or military time For example 2 15 p m is 14 15 If you entered an incorrect digit Complete the actual time with arbitrary numbers then start again Press the cursor left to exit TIME mode Setting Start Time Select START TIME with the cursor down Press the cursor right to enter the START ...

Страница 16: ...message CORRECT will appear and make the Child Lock menu accessible Changing the Access Code Select CHANGE CODE to enter an access code of your choice Press the cursor right to enter the CHANGE CODE mode Key in the access code of your choice and confirm it again The message CORRECT will appear Activating the Child Lock Select LOCK CHANNEL in the CHILD LOCK menu Note Enter the access code if reques...

Страница 17: ...ack bars are displayed at the top and bottom of the screen Switching Blue Mute on The Blue Mute feature indicates to you the absence of signal in the transmission when BLUE MUTE is activated Select BLUE MUTE in the FEATURES menu Press the cursor right to select ON to activate the blue mute feature Press the OSD key to switch the menu off Switching Active Control on Turn Active Control on using the...

Страница 18: ... you want to add to the Surf list Press the SURF key Cursor right to add the selected channel to the Surf list The channel is added when delete appears representing the next available action Repeat steps 1 3 to add more channels to the Surf list Press the OSD key to switch the menu off Press the SURF key repeatedly to cycle through channels Deleting Channels to the Surf List Press the SURF key Pre...

Страница 19: ...mphasizes very vibrant colours This option is desirable for AV mode in a brightly lighted room Natural Emphasizes all settings equally Soft Emphasizes warm colours This option is desirable for a dimly lighted room and gives a cinema like effect when the light is switched off Multimedia Emphasizes soft colours This option is desirable for playing computer games Smart Sound Options Personal Sound se...

Страница 20: ...diately available the precapturing of the page numbers referred to in the displayed page and the precapturing of all the subpages Switching Teletext on and off Press the b key to switch the teletext on The main index page appears on the screen together with two information lines at the top and one option line at the bottom of the screen Press the b key again to overlay the teletext page on the TV ...

Страница 21: ...h the cursor left right The other subpage numbers appear in white as soon as the transmission has found them They are stored in the memory so that they are available while the teletext page is on screen Use the cursor left right to select the previous or the following subpage Using Special Teletext Functions Enlarge Press h repeatedly to display the upper part and the lower part and then to return...

Страница 22: ... satellite receivers or other equipment VIDEO composite sockets INPUT AV 1 INPUT AV 2 and TV s side socket panel AV3 compatible with 480i and 576i signals Use to connect peripherals having composite video outputs such as VCRs video game players or other equipment AUDIO inputs INPUT AV 1 INPUT AV 2 and TV s side socket panel AV3 use to connect from the audio output sockets on VCRs DVDs or other per...

Страница 23: ...t and right Also connect to the H and V SYNC inputs on the TV if required for your digital equipment Note The AV4 sockets are compatible with some digital equipment having RGB outputs with sync on green or RGB with separate H and V sync Output standards for digital equipment however may vary by manufacturer No industry standards have been established for HD television RGB signal systems timing syn...

Страница 24: ...4 or AV5 is selected The current colour space setting appears to the right of AV4 or AV5 To change the setting cursor left or right Press the OSD key to switch the menu off Selecting Connected Equipment for Viewing Equipment Connected with an Aerial Cable Only Select the channel number under which you have stored the test signal with the digit keys Equipment Connected to the back or to the side of...

Страница 25: ...conditions for the tubes to age at an even rate The result will be a TV picture that is evenly bright over the entire screen Placement of the TV See page 4 Cleaning To avoid possible shock hazard be sure the TV is unplugged from the electrical outlet before cleaning Regularly dust the TV with a dry nonscratching duster to keep the TV clean When cleaning the TV take care not to scratch or damage th...

Страница 26: ...ignal is detected the TV automatically switches off the sound This is proper operation and does not indicate a malfunction Check the transmission system s sound settings on the set Good sound but poor colour or no picture Adjust the contrast and brightness setting or select another picture setting with the Smart Picture key on the remote control Check the transmission system s colour settings on t...

Страница 27: ...CVBS in YPbPr Audio L R in AV2 480i 60Hz 576i 50Hz CVBS in S Video Y C Audio L R in AV3 Side 480i 60Hz 576i 50Hz CVBS in S Video Y C Audio L R in Headphone out AV4 1080i 60Hz 480p 60Hz 576p 50Hz YPbPr RGB H V AV5 1080i 60Hz 480p 60Hz 576p 50Hz DB15 RGB H V Output Rear Subwoofer out CVBS out Audio L R out Convenience Child Protection Child Lock Parental Control Clock Functions Clock Sleep Timer Con...

Страница 28: ......

Отзывы: