background image

Use more of your TV

5.11.3  Watch your pictures, start a

slideshow and play music

Look up your pictures in the Picture album of your
USB device.

Select the Picture folder for the picture files you
have stored on your USB device.

®

Press 

π

to enter the Picture folder.

Ò

Press 

o

or 

œ

to select a picture or a picture

album.

Press 

OK

to watch the picture or to start a

slideshow of the pictures in the album.

º

Press 

OK

to pause the slideshow. Press again to

restart.

Press one of the colour keys on the remote

control to perform the corresponding function
shown at the bottom of the screen.
If the function bar at the bottom disappeared,
press any colour key to let it reappear.

Press 

p

and select another picture or another

album.

Slideshow settings

Details / More details

Shows the picture name, date, size and next
picture in the slideshow.

Transitions

Shows the list of available transition styles of the
pictures.
Press 

o

or 

œ

to select and press 

OK

to

activate.

Slide time

Sets the time lag for the picture transitions:
Short, Medium or Long.

Rotate

To rotate a picture.

Start/Show/Pause

To stop, pause and restart the slideshow.

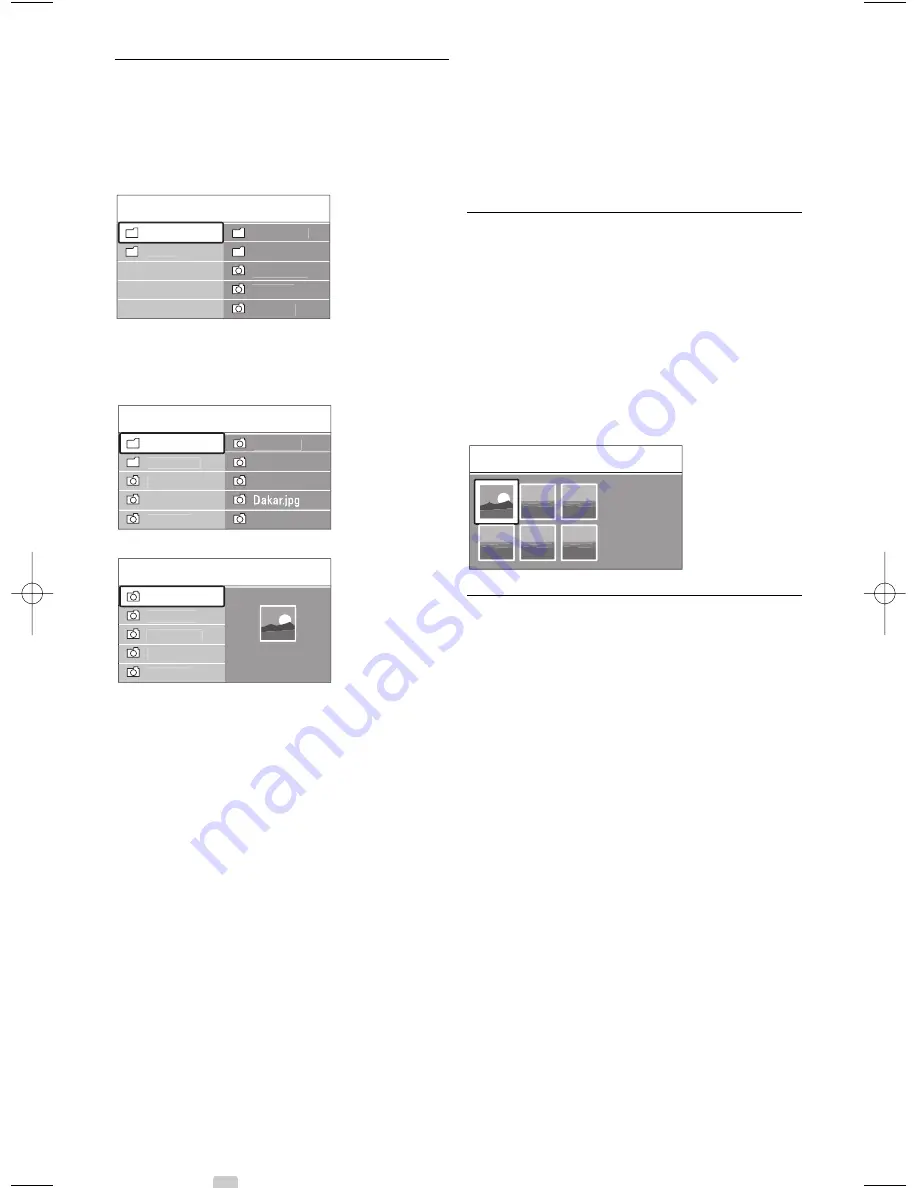
Thumbnails

Watch the pictures of a selected album in an
overview.

Select a picture album.

®

Press 

π

to enter the picture list.

Ò

Press the blue key.

Press 

o

or 

œ

,

p

or 

π

to highlight a picture.

º

Press 

OK

to watch the picture.

Press 

p

to return to the thumbnail overview.

Press the blue key again to go back to the
picture list.

Listen to music

Look up your songs in the Music album of your
USB device.

Select the Music folder for the music files you
have stored on your USB device.

®

Press 

π

to enter the Music folder.

Ò

Press 

o

or 

œ

to select a song or a music

album.

Press 

OK

to play the selected song or to play a

song followed by the next song in the same
album.

º

Press one of the colour keys on the remote
control to perform the corresponding function
shown at the bottom of the screen.
If the function bar at the bottom disappeared,
press any colour key to let it reappear.

Music settings

Details

Shows the file name.

Repeat one/all

Repeat all songs in the album until you stop a
song or only repeat the one song selected until
you stop the song.

Shuffle

Play songs in a random sequence.

USB

Afrika_2001

Kenya.jpg

Kenya.jpg

Jean.jpg

Mary.jpg

Picture

Afrika_2001

Kenya.jpg

Congo.jpg

Victoria.jpg

Cairo.jpg

Paris_2005

My_car.jpg

Afrika_2001

Afrika_2001

Afrika_2001

Kenya.jpg

Congo.jpg

Victoria.jpg

Dakar.jpg

Cairo.jpg

Kenya.jpg

USB

Picture

Afrika_2001

Paris_2006

My_car.jpg

Jean.jpg

Mary.jpg

Music

Picture

28

2710.1 (PC netwerk) EN  18-06-2008  13:04  Pagina 28

Содержание 42PFL9903H

Страница 1: ...____________________ NL LCD televisie ________________________________ IT Televisore LCD ________________________________ ES Televisor LCD ________________________________ PT Televisor LCD ________________________________ EL TËÏÂfiÚ ÛË LCD ________________________________ Register your product and get support at www philips com welcome ...

Страница 2: ......

Страница 3: ...stallation 33 6 2 Manual channel installation 34 6 3 Rearrange stored channels 34 6 4 Channel management 35 6 5 Digital reception test 35 6 6 Factory settings 35 7 Connections DVD receiver 36 7 1 Connections overview 36 7 2 About connections 37 7 3 Connect your devices with the Connection assistant 38 7 4 Connect your devices without the Connection assistant 38 7 5 Connection setup 44 7 6 Preparin...

Страница 4: ...any products targeted at consumers which like any electronic apparatus in general have the ability to emit and receive electromagnetic signals One of Philips leading Business Principles is to take all necessary health and safety measures for our products to comply with all applicable legal requirements and to stay well within the EMF standards applicable at the time of producing the products Phili...

Страница 5: ...ming on the mains plugs Mains plugs that are partly loosened can cause arcing or fire 1 2 Care of the screen Unplug the TV before cleaning Clean the surface with a soft damp cloth Do not apply any other substance chemical or household cleaning agent This may damage the screen Do not touch push or rub or strike the screen with anything hard as this may scratch mar or damage the screen permanently T...

Страница 6: ...nel up and down 7 Power switch Connectors 1 Back connectors 2 Side connectors For more info see section 7 Connections Remote control 1 Switch On or switch to Standby 2 Watch a connected device DVD VCR 3 Programme guide 4 Volume up or down 5 Ambilight On or Off 6 Program Channel up and down 7 Menu On or Off 8 Navigation and Rotary key 9 Colour keys For more info see section 5 1 Remote control overv...

Страница 7: ...d superb colours Ambilight For a more relaxed viewing experience and improved perceived picture quality DVB T and DVB C integrated tuner Next to normal analogue TV broadcast your TV receives digital terrestrial and in certain countries also digital cable TV and radio broadcasts Electronic Programme Guide EPG The EPG shows the scheduled digital TV programmes on screen The guide can remind you when ...

Страница 8: ...cial skills that should only be performed by qualified personnel Wall mounting the TV should meet safety standards according to the TV s weight Koninklijke Philips Electronics N V bears no responsibility for improper mounting or mounting that results in accident or injury Read also the safety precautions in section 1 1 Safety before you position the TV Collect the parts for wall mounting Insert ju...

Страница 9: ...on and level the wall mount bracket and fix the bracket firmly to the wall Connect all cables See section 7 Connections Lift the TV into the wall mount bracket ÚSecure the TV in the bracket by screwing in the 2 already fitted screws ENGLISH Your TV 7 648mm 257mm 404mm 37 25kg 697 5mm 209 5mm 402mm 42 30kg 2 ...

Страница 10: ...at results in accident or injury Your TV is prepared for VESA compliant wall mounting This bracket is not included You need one of the VESA codes hereunder to purchase the bracket that fits your TV 37 94cm VESA MIS F 200 200 8 42 107cm VESA MIS F 300 300 8 Prepare the TV for VESA compliant mounting Locate the VESA screwholes on the back of the TV Should the plastic discs obstruct the VESA bracket ...

Страница 11: ...he TV Insert the antenna cable tightly into the Antenna x socket 3 5 Power cable Keep the mains plug at the wall socket accessible at all time The TV is never powered off completely and consumes energy unless the mains cord is physically unplugged Although this TV has a very low standby power consumption unplug the mains cord if you do not use the TV for a long time to save energy Verify that your...

Страница 12: ...by indicator is off Press B on the remote control if the standby indicator is on The LightGuide flashes during start up and turns on completely when the TV is ready for use To switch to standby Press B on the remote control The LightGuide turns off and the standby indicator is on To turn off Press B Power at the side of the TV Both the LightGuide and the standby indicator turn off 10 Use your TV D...

Страница 13: ... the digital receiver The picture from your receiver automatically appears on the screen Use the remote control of your digital receiver to select TV channels If the picture does not appear Press the Source v key Press o or œ to select where you connected your digital receiver Ò Press OK rNote When you did not connect your devices yet go to section 7 Connections 4 4 Watch connected devices Switch ...

Страница 14: ...mation through Teletext To watch Teletext Press Teletext The main index page appears To select a page of your choice Enter the page number with the number keys Press P or P or o or œ or the g key to view the next or the previous page Press a colour key to select one of the colour coded items at the bottom of the screen Press R to return to the previously viewed page Ò Press Teletext again to switc...

Страница 15: ...ntensity of Ambilight Ò Slide the AUREA Ambilight switch up or down to change the light intensity LoungeLight mode When the TV is in standby you can switch Ambilight on Press Ambilight Wait until Ambilight lights up Press Mode repeatedly to toggle through the available Ambilight effects For more information on Ambilight see section 5 5 Ambilight à Tip Dim lighting conditions in the room for best A...

Страница 16: ...he remote control in TV mode 4 Teletext To switch teletext on or off 5 Colour keys Easy selection of teletext pages Easy selection of tasks Demo To switch the Demo menu on and to get a demonstration of the features of the TV 6 Guide a To switch on or off the Electronic Programme Guide 7 Navigation and rotary key To navigate o œ p π or turn left or right to go through lists or settings 8 OK To disp...

Страница 17: ...ct or operates incorrectly you need to set up your remote control for your particular device See section 5 1 3 Set to operate a particular device Ò Press the TV key to return to normal TV mode When no key is pressed for 30 seconds the remote control switches back to normal TV 5 1 3 Set to operate a particular device You can choose from three ways to programme the remote control for a device of a p...

Страница 18: ...ches off press OK to stop the search Press B to switch on your device Press the remote control keys to try if you can operate all functions If you cannot operate all functions press OK again to continue the automatic search for a correct code If you can operate all functions press the currently selected universal mode key to confirm and to quit the automatic search rNote To pause the automatic sea...

Страница 19: ...scribes how to navigate 5 3 1 The menu Press Menu Ï to show the TV menu Press Menu Ï to quit the TV menu The TV menu offers the following items Smart settings Select this item to set the TV to one of the predefined settings Each setting combines picture sound and Ambilight Picture Select this menu item to adjust all picture settings Sound Select this menu item to adjust all sound settings Ambiligh...

Страница 20: ...redefined settings Each setting combines picture sound and Ambilight Press Menu Ï and select Smart settings Press π to enter the list Ò Press o or œ to select a setting Press OK º Press Menu Ï to quit the TV menu Smart settings Personal Vivid Standard Movie Energy saving Game 5 4 2 Settings assistant Use the Settings assistant to guide you through basic picture and sound settings in an easy way Pr...

Страница 21: ... quiet image and a larger viewing angle Advanced sharpness Enables superior sharpness especially on lines and contours in the picture Dynamic contrast Sets the level at which the TV automatically enhances the details in dark middle and light areas of the picture Dynamic backlight Sets the level at which power consumption can be reduced by dimming the brightness intensity of the screen Choose for t...

Страница 22: ...ot for HD Scales the format to 14 9 Movie expand 16 9 Not for HD Scales the format to 16 9 Wide screen Stretches the format to 16 9 Unscaled Only for HD and PC Maximum sharpness Distortion may appear on borders Black bars may appear with pictures from your PC rNote Do not forget to name the connection in the Connection menu See section 7 5 1 Naming your devices 5 4 5 Sound settings This section de...

Страница 23: ...ces sudden volume differences like at the beginning of commercials or when switching from one channel to another Select on or off Delta volume Levels out volume differences between channels or connected devices Switch to the channel or device you want to level out the volume difference Select Delta volume in the Sound menu and change the volume level Auto surround Switches the TV automatically to ...

Страница 24: ...en teletext Press Teletext again to show normal teletext Ò Press Teletext to switch off teletext 5 6 5 Search teletext Quickly jump to a subject linked to a series of pagenumbers or search for specific words in teletext pages Press Teletext Press OK to highlight the first word or number Ò Press p or π o or œ to jump to the next word or number on the page Press OK to search a page which holds the h...

Страница 25: ...nces Teletext 2 5 and press π to enter the list Select on or off 5 7 Create favourite channel lists View the All channels list or set up a Favourite list of your own with your preferred TV channels and radio stations 5 7 1 Select a favourite list You can select one of the favourite channel lists Press OK The first time after you have finished the installation the All channels list is shown In othe...

Страница 26: ...ext and 7 or 8 day EPG When digital channels are installed and broadcasted EPG is available Now and Next is always available but the 7 or 8 day EPG is only available in some countries With the EPG menu you can see a list of current broadcasted programmes see the next programme group programmes by genre set reminders when programmes will start set up preferred EPG channels etc 5 8 1 Switch on EPG P...

Страница 27: ...ter º Press o or œ to make a selection Press OK to activate or press the green key to watch Press a to quit the EPG rNote Only channels marked as Preferred EPG channels appear in the Programme guide menu Programme guide What s on 12 30 South Today 13 00 In aller Freund 11 50 Working Lunch 11 55 Melrose Place Preferred EPG ch Acquire EPG data What s on Search by genre Scheduled remind Programme gui...

Страница 28: ...et or Change code and press π to enter your code Enter your code with the number keys The Features menu reappears with a message confirming that your code has been created or changed Did you forget your code Select Change code Press π Ò Enter the overriding code 8 8 8 8 Enter a new personal code º Confirm your new entered code The previous code is erased and the new code is stored 5 9 4 Activate o...

Страница 29: ...ge If subtitle broadcasting is available with digital channels you can select a preferred subtitle language out of a list of broadcasted languages The preferred subtitle languages set in the Installation menu are overruled temporarily Press Menu Ï on the remote control and select Features Subtitle language and press π to enter the list of available languages Press o or œ to select a subtitle langu...

Страница 30: ...ed album in an overview Select a picture album Press π to enter the picture list Ò Press the blue key Press o or œ p or π to highlight a picture º Press OK to watch the picture Press p to return to the thumbnail overview Press the blue key again to go back to the picture list Listen to music Look up your songs in the Music album of your USB device Select the Music folder for the music files you ha...

Страница 31: ...he PC content comes on Ò Select the content you want to watch or listen to and press π Use p or π o or œ to go through the photo or music files or folders º Press OK to watch or listen Press p to go back to the previous list See section 9 Troubleshooting in case of problems playing files or in case your PC does not appear in the PC network menu 5 12 Listen to digital radio channels If digital broa...

Страница 32: ... green key again to finish πRemove the USB memory device from the TV Step 2 Software download from the PC to the USB device Insert the USB memory device into a PC linked to the internet Locate and open the file update htm on your USB device Ò Read the instructions on screen and click on the Send ID button If new software is available the update is downloaded on the USB memory device Remove the USB...

Страница 33: ...ase wait The TV switches back on again The update is done 5 13 2 Software update by digital broadcast DVB T Your TV might receive new software from the digital broadcast system automatically If you receive an update message on screen it is strongly advised to update the software immediately select Now If you want to be reminded later on select Later Select Cancel to quit the update not recommended...

Страница 34: ...ondary preferred language Hearing impaired Select On to display the hearing impaired subtitle version of your preferred audio or subtitle language when available Visually impaired UK only Select to hear the additional commentary audio if available in your selected audio language through the loudspeakers of your TV or through the headphones or through both rNote If both Visually impaired and Hearin...

Страница 35: ...elect to install analogue channels or not Select Start The installation may take a few minutes In case of Cable selection the TV can ask to enter the Network ID supplied by the cable provider Enter this ID with the digit keys When the installation is done press Finish to return to the Channel installation menu Ò Press Menu Ï to quit the menu à Tip When digital channels are found the list of instal...

Страница 36: ... installation Analogue manual installation Fine tune Press π to enter the Fine tune menu Ò Press o or œ to adjust the frequency Press p when you finished fine tuning º Select Store current channel to store the fine tuned channel under the current channel number Press π to enter Press OK Done appears Press Menu Ï to quit the Channel installation menu 6 3 Rearrange stored channels To rename reorder ...

Страница 37: ... Press Menu Ï and select Setup Installation Channel installation Installation update Press π to enter the Installation update menu Ò Press OK Press the green key to start The update starts and may take a few minutes º When the update is completed press the red key to return to the Channel installation menu Press Menu Ï to quit the menu 6 5 Digital reception test If you receive Digital TV broadcast...

Страница 38: ...ors 8 EXT1 EXT2 Scart connectors for DVD VCR Digital receiver Game console etc 9 EXT3 Component Video Y Pb Pr and Audio L R connectors for DVD Digital receiver or Game console etc VGA and Audio L R connectors for a PC 10 Service UART For service only 11 Digital Audio Out Sound output cinch connector for a Home Theatre System etc 12 Audio Out L R Sound output cinch connectors for a Home Theatre Sys...

Страница 39: ... if your device has only a DVI connection Connect an Audio L R cable to Audio In L R DVI to HDMI for sound Assign this Audio In to the HDMI 1 2 or 3 where the device is connected See section 7 5 2 Audio setup if present r Note HDMI supports HDCP High bandwidth Digital Contents Protection HDCP is a copy protection signal that comes with HD content DVD disc or Blu ray Disc YPbPr Higher quality Use t...

Страница 40: ...ngs TV speakers rNote Ensure that all HDMI CEC features in the HDMI CEC devices for ex Home Theatre System are properly set up 7 2 3 Display synchronised audio out For the best match of image and sound in speech on screen connect a Home Theatre System to Audio Out L R or Digital Audio outputs See diagrams 7 4 4 and 7 4 8 Do not connect the audio signal of a DVD player digital receiver or other aud...

Страница 41: ...na cables Connections 39 ENGLISH EXT 3 VGA SERVICE UART OUT Y Pb Pr L R L R EXT 2 EXT 1 AUDIO OUT AUDIO DIGITAL VGA Y Pb Pr AUDIO VGA YPbPr Receiver Cable box DVD Recorder IN OUT IN OUT EXT 3 VGA SERVICE UART OUT Y Pb Pr L R L R EXT 2 EXT 1 AUDIO OUT AUDIO DIGITAL VGA Y Pb Pr AUDIO VGA YPbPr DVD Player EXT 3 VGA SERVICE UART OUT Y Pb Pr L R L R EXT 2 EXT 1 AUDIO OUT AUDIO DIGITAL VGA Y Pb Pr AUDIO...

Страница 42: ...es 40 EXT 3 VGA SERVICE UART OUT Y Pb Pr L R L R EXT 2 EXT 1 AUDIO OUT AUDIO DIGITAL VGA Y Pb Pr AUDIO VGA YPbPr Home Theatre System DVD Recorder DIGITAL AUDIO IN OUT IN DIGITAL AUDIO OUT EXT 3 VGA SERVICE UART OUT Y Pb Pr L R L R EXT 2 EXT 1 AUDIO OUT AUDIO DIGITAL VGA Y Pb Pr AUDIO VGA YPbPr Satellite receiver EXT 3 VGA SERVICE UART OUT Y Pb Pr L R L R EXT 2 EXT 1 AUDIO OUT AUDIO DIGITAL VGA Y P...

Страница 43: ... player Use an HDMI cable 41 ENGLISH L R HDMI 1 HDMI 2 HDMI 3 AUDIO HDMI DVI NETWORK IN Blu ray Disc player OUT HDMI L R HDMI 1 HDMI 2 HDMI 3 AUDIO HDMI DVI NETWORK IN OUT HD Digital receiver HD Satellite receiver IN OUT HDMI EXT 3 VGA SERVICE UART OUT Y Pb Pr L R L R EXT 2 EXT 1 AUDIO OUT AUDIO DIGITAL VGA Y Pb Pr AUDIO VGA YPbPr Home Theatre System Digital Receiver DVD Recorder DIGITAL AUDIO IN ...

Страница 44: ... Use an HDMI connection or the EXT3 YPbPr and Audio L R connections for HD quality 7 4 11 Camcorder The most practical connection for a camcorder is at the side of the TV Connected at the side of the TV Use the HDMI connection or the Video and Audio L R connections or use the S Video and Audio L R connections Connected at the back of the TV Use an HDMI connection or the EXT3 YPbPr and Audio L R co...

Страница 45: ... the Picture format menu for maximal PC picture sharpness See section 5 4 4 Widescreen picture format DVI to HDMI connection Use a DVI to HDMI adaptor to connect to the HDMI side connection Connect the Audio L R at the side for sound PC to TV connection Use a PC TV out cable to S Video and Audio L R cable to connect to the side of the TV VGA connection Use a VGA cable to connect the PC to the EXT3...

Страница 46: ...to HDMI at the back of the TV assign this Audio In to the HMDI 1 2 or 3 where the device is connected Press Menu Ï on the remote control and select Setup Installation Audio setup Press π twice Ò Press o or œ to select the HDMI connection to link with this Audio In 7 5 3 Decoder channels Decoders that decode an antenna channel are connected to EXT1 or EXT2 scart You have to assign the TV channel as...

Страница 47: ...orrect insertion can damage the CAM and the TV Gently insert the CAM into the Common Interface slot at the side of your TV as far as it will go Leave the CAM in the Common Interface slot permanently It can take a few minutes before a CAM is activated Removing the CAM will deactivate the digital TV service 7 6 2 Common interface menu From this menu you access the CAM service you have installed The ...

Страница 48: ...the media server this TV will present itself as a number a MAC or IP number Have the TV and router switched on for this number to appear in the media server Select the TV number in the media server and set the server to share files with this number For media server software marked with an in sections 8 Technical data a step by step setting instruction is available in the online User manual Type in...

Страница 49: ...rk discovery to On Set File sharing to On Go back to the Media Sharing window in Windows Media Player and check the Share my media box Click OK When the TV is connected by the router to the PC and everything is switched On the Media sharing window will show the TV as an Unkown Device Select the device and click Allow You can open the Settings window to change particular settings on sharing When th...

Страница 50: ...your TV Click OK In the Add To Library window the newly added folder is shown You can add more folders to share Click the OK button to add the files to the library Now everything is set to enjoy music photos and videos on your TV Windows Media Player v11 on Windows XP Set for network sharing In Windows Media Player select Library from the menu and select Media sharing 48 Connections 1 2 1 1 2 ...

Страница 51: ...ing In Windows Media Player select Library from the menu and select Add to Library In the Add To Library window select My folders and those of others that I can access and click the Advanced Options button With Advanced Options open you can add specific folders to the list to share Click Add In the Add Folder window select a folder with music photos or videos you want to share with other devices y...

Страница 52: ...lls you that the media server service is started Click OK Click the Sharing tab Set folders for sharing Click the green plus icon and select Add folder In the Add media pop up window click the Browse button In the Browse for Folder window select a folder with music photos or videos you want to share Click OK Now everything is set to enjoy music photos and videos on your TV 50 Connections 1 2 1 1 2...

Страница 53: ...der a content location to be shared on the network click the Browse button In the blue frame click the hard disk name to browse to a folder with music photos or videos you want to share with other devices your TV Click Select to select the folder for sharing Now click Save Changes Then click Rescan content directories In some cases this might not make all files and folders available Click Support ...

Страница 54: ...EG1 MPEG2 Supported media server software Windows Media Player 11 on Microsoft Windows XP or Vista PacketVideo Twonky Media 4 4 2 on PC Intel Mac OSX Sony Vaio media server on Microsoft Windows XP or Vista TVersity v 0 9 10 3 on Windows XP Nero 8 Nero MediaHome on Microsoft Windows XP DiXiM on Windows XP Macrovision Network Media Server on Windows XP Fuppes on Linux UShare on Linix Philips Media M...

Страница 55: ...ns are subject to change without notice For more specification details of this product see www philips com support Technical data 53 ENGLISH Dimensions and weights approx TV model 37PFL9903 42PFL9903 width 953mm 1054mm height 604mm 658mm depth 101mm 100mm weight 25kg 28kg TV stand width 953mm 1054mm height 677mm 731mm depth 242mm 265mm weight 28 5kg 32 5kg ...

Страница 56: ...ture Verify if the antenna is connected properly Verify if the correct device is selected The sound is on but there is no picture Verify the contrast or brightness setting in the menu The TV picture is poor Verify if the antenna is connected properly Non earthed audio devices neon lights high buildings or mountains can influence the picture quality Try to improve the picture by changing the antenn...

Страница 57: ...HDMI cable is properly connected Verify if Easylink is activated in the Setup Installation Preferences menu Ensure that the System audio control in your HDMI CEC audio devices is properly set up See the user manual that comes with your audio device USB connection The TV does not show the USB device content Set your device camera to Mass Storage Class compliant The USB device may need specific driv...

Страница 58: ...mon interface CAM menu 45 slot 36 45 Connection best 37 overview 36 set up 44 Contrast 19 Country selection 32 Custom lock 26 Custom tint 19 Daylight saving 33 Decoder channel 44 Delta volume 21 Device connecting 38 naming 44 watch 11 DHCP 46 Digital audio out 36 subtitle language 27 receiver 39 text services 23 test reception 35 Dual I II 21 Dual screen 15 DVB T 5 DVD connect 39 playback 12 playe...

Страница 59: ... receiver 40 Scart connection 37 Screen cleaning 3 Search channels 33 teletext pages 22 Set code 26 Settings assistant 18 Sharpness 19 Sleeptimer 26 Smart settings 18 Software update 30 Sound menu 20 surround mode 21 Standby 14 26 Super zoom 20 Stationary images 3 Stereo 21 Subtitle 27 language 27 shift 20 Switch on 10 Table of Pages T O P 22 Technical data 52 Teletext 22 digital 23 dual screen 22...

Страница 60: ...gitalTV switchover in the UK Digital UK provides impartial information on what people need to do to prepare for the move to digital and when they need to do it How the switchover affects your TV equipment Your newTV has a digital tuner built in which means it is ready to receive the Freeview signal by simply plugging it into your aerial socket check if you can get digitalTV through your aerial now...

Страница 61: ... re tuner during the switchover If you choose to connect yourTV to satellite or cable with a digital box then it will no be affected by switchover and you won t need to re tune If you have any questions please contact your equipment supplier or call Digital UK on 0845 6 50 50 50 or visit www digitaluk co uk To find out how to re tune yourTV check this user manual for details Go to section 6 1 Auto...

Страница 62: ...60 ...

Страница 63: ...60 0064 0119 0144 0147 0169 0179 0187 0236 0256 Graetz 0051 Grundig 0021 0031 0139 0144 0148 H B 0060 0061 Haaz 0055 0126 Harman Kardon 0045 HiMAX0062 Hitachi 0018 0037 0051 0062 0196 0209 0284 0302 0317 0330 Humax 0157 Innovation 0022 0023 0024 0037 Jeutech 0056 JVC 0012 0049 0106 0117 0133 0214 0215 0216 0217 0237 0238 0239 0240 0276 0277 0278 0279 0293 0329 0335 Kenwood 0015 0043 0138 0181 0186...

Страница 64: ...089 0090 0091 0092 0134 0210 0269 0272 Teac 0019 0050 0126 0168 Tec 0066 Technics 0170 0184 Telefunken 0058 Tevion 0022 0023 0024 0037 0069 0126 Thomson 0010 0011 0093 0094 0095 0096 0097 0098 0099 0102 0115 0162 0167 0191 0331 0332 Tokai 0051 0066 Toshiba0013 0049 0100 0142 0161 0190 0211 0212 0218 0218 0220 0234 0235 0264 0265 0281 TruVision 0062 Vtrek 0065 Wharfedale 0027 0055 0126 Wintel 0056 ...

Страница 65: ...343 0344 0345 Einhell 0002 0005 0071 0072 0116 0123 0222 0225 0275 Elap 0122 0123 Elekta 0006 Elsat 0092 0123 Elta 0002 0010 0025 0043 0105 0108 0115 Emanon 0002 Emme Esse 0010 0020 0033 0102 0108 0115 0121 Engel 0123 Ep Sat 0003 Eurieult 0111 0127 0128 Eurocrypt 0064 Eurodec 0055 Europa 0069 0085 0105 0105 0119 Europhon 0119 0222 Eurosat0225 Eurosky 0010 0108 0110 0115 0116 0119 0222 0225 Eurosta...

Страница 66: ...m 0006 0081 Maspro 0003 0020 0040 0063 0066 0089 0094 0113 0117 0123 0289 0328 0393 0412 Matsui 0049 0066 0095 0107 0113 0117 0122 0412 Max 0119 MB 0039 0086 0118 Mediabox 0073 0109 0114 Mediamarkt 0225 Mediasat 0013 0073 0082 0109 0114 0116 Medion 0010 0039 0050 0052 0057 0108 0115 0123 0222 0297 0303 0335 0347 0372 Medison 0123 Mega 0043 0105 Melectronic 0124 Metronic 0002 0005 0006 0009 0062 00...

Страница 67: ...dea Electronique 0129 0222 Seemann 0013 0016 0082 0108 0225 SEG 0002 0010 0019 0039 0075 0086 0096 0108 0115 0118 0139 0229 0231 0234 0250 0258 0317 0384 Seleco 0025 0102 Septimo 0128 Servi Sat 0111 0123 Siemens 0017 0066 0091 0113 Silva 0032 Skantin 0123 Skardin 0013 0082 Skinsat 0116 SKR 0123 SKY 0125 Sky Digital 0044 Skymaster0005 0039 0052 0072 0086 0088 0104 0112 0118 0123 0139 0149 0158 0219...

Страница 68: ... 0063 0064 0065 0066 0067 0071 0078 0079 0080 0081 0121 0127 0161 0176 0272 0273 0274 0275 0276 0277 0278 0279 0280 0281 0295 0296 0308 0309 0312 0313 Aiwa 0023 0043 0090 0091 0092 0162 0163 0168 0169 0170 0199 0200 0201 0288 0289 0290 0291 Alba 0100 Denon 0058 0059 0060 0061 0072 0073 Denver 0028 0086 0087 0105 0106 DK digital 0007 Eltax 0005 Goodmans 0103 0104 Harman Kardon 0045 Hitachi 0022 004...

Страница 69: ......

Страница 70: ...GSM Mobile Portable Aureau service Type nr Product nr Printed in Belgium ...

Отзывы: