Philips 42PFL7422D Скачать руководство пользователя страница 8

_________________________

3

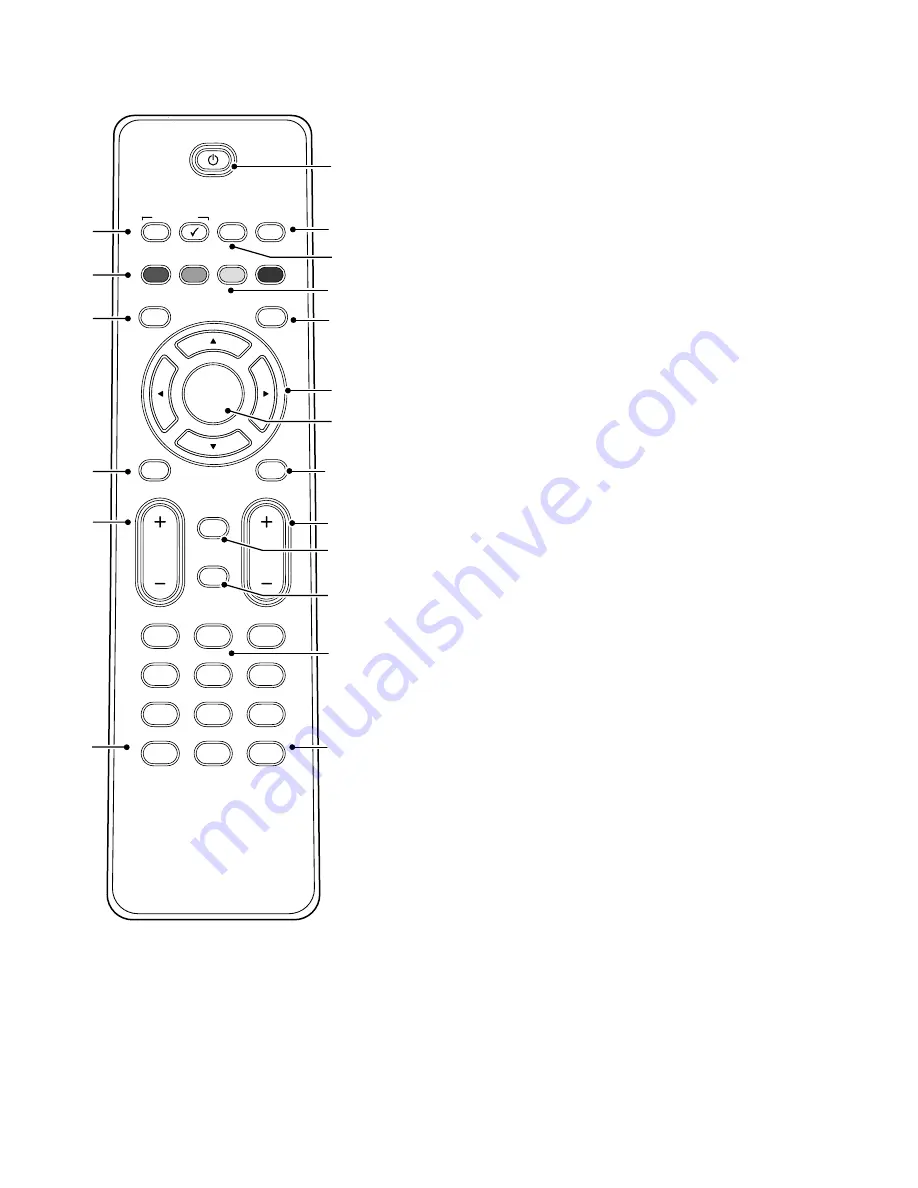
Use of the remote control RC 2033601/01

Due to the sensitivity of the remote control, you may experience a
delayed operation at start up of the TV. After a short while your remote
control will work smoothly.

1

POWER

Press to turn the TV on/off.

2

FAVORITES   
- VIEW   

To display the last selected list.You can create up to four 

favorite lists. See Chapter 

8 Create your favorite list

.

No function

3

CC

Select On, off or On during mute to activate/de-activate

Closed Captions. See Chapter 

6.1 Closed Captions

.

4

ACTIVE CTRL  

Press to select Active Control on/off.

See Chapter 

5.2.2 Adjust picture menu settings

.

5

Color buttons   

When functions are attached to the color buttons,

the color buttons are shown on screen.

6

DEMO   

Demo on/off.

7

OPTION   

To open and close the Quick access menu which

contains a few frequently used options, like Closed captions, Picture
format,... See Chapter 

3.1 Use of the Option button

.

8

INFO

Display information

: Press to display (when available) information

about the selected TV channel and program or accessory device.The
quality and accuracy of the information on the information banner
are transmitted from broadcasters.You may see a difference in
broadcast time if the broadcaster is from a different time zone area.

Display clock

: Select to activate/de-activate the clock display on the

screen.

9

Cursor buttons

Press the cursor buttons up/down, left/right to

navigate through the menus.

10

OK

- To activate a setting.

-  To display the list of channels stored (according to the selection

made in the Installation mode - Antenna or Cable, see Chapter 

7.3

Store TV  channels

).

-  Starts playing content in the Multimedia Browser application. See

Chapter 

10 Multimedia browser

.

11

MENU/EXIT

Settings menu on/off. See Chapter 

5.2 Use of the

TV menu settings

.

12

FORMAT

See Chapter 

3.2 Picture format

.

13

VOLUME   

Press + or - to adjust the volume.

14

Channel selection

-

To browse through the TV channels or sources stored and marked in
the selected Favorite channels list. See Chapter 

8 Create your

favorite list

;

-

To quickly browse through the list in the menus;

-

To select between Antenna or Cable TV channels, first make your
selection in the Installation menu, Channel installation, Installation
mode, see Chapter 

7.3 Store TV channels

.

15

MUTE

Interrupt the sound or restore it.

16

PREV CH   

Press to alternate between the currently viewed channel

and the previously viewed channel.

17

Numeric buttons

To select a TV channel.

18

SOURCE   

Press repeatedly to select 

AV1

,

AV2

,

AV3

,

HDMI 1

,

HDMI 2

,

HDMI 3

,

Side

or 

TV channels

according to where you

connected the accessory devices.

19

-

Type the dot (•) for digital channels.

6

FAVORITES

POWER

ACTIVE CTRL

CC

DEMO

OPTION

INFO

VIEW

OK

FORMAT

EXIT

MENU

1

2

3

4

5

6

7

8

9

0

.

SOURCE

MUTE

PREV CH

CH

VOL

12

10

1

2

6

7

11

13

8

9

4

3

14

17

18

19

15

16

5

Содержание 42PFL7422D

Страница 1: ...ich you qualify plus easy access to accessories from our convenient home shopping network Most importantly you can count on our uncompromising commitment to your total satisfaction All of this is our way of saying welcome and thanks for investing in a PHILIPS product P S To get the most from your PHILIPS purchase be sure to complete and return your Product Registration Card at once or register onl...

Страница 2: ...aged or B Objects have fallen or liquid has been spilled into the appliance or C The appliance has been exposed to rain or D The appliance does not appear to operate normally or exhibits a marked change in performance or E The appliance has been dropped or the enclosure damaged 17 Tilt Stability All televisions must comply with recommended international global safety standards for tilt and stabili...

Страница 3: ...m the displayed list 20 8 2 Select another favorite channel list 20 8 3 Create or modify a favorite list 20 9 Electronic Program Guide 21 10 Multimedia browser 21 10 1 To view content from a USB device 21 10 2 Multimedia Browser menu 21 11 To connect and operate accessory devices 23 11 1 Side panel overview 23 11 2 To make video and audio connections 24 11 3 Connect a recorder VCR DVD R 25 11 4 Co...

Страница 4: ...when black bars appear at the left and right side of the screen it is recommended to change to a picture format so that the picture fills the entire screen TV channel logo present a problem if they are bright and stationary Moving or low contrast graphics are less likely to cause uneven aging of the screen Stock market stickers presented at the bottom of the TV screen Shopping channel logos and pr...

Страница 5: ...t bracket with code VESA MIS F 600 400 M8 Consult your dealer for more information Locate the VESA screwholes on the back of the TV Should the plastic discs obstruct the VESA bracket you can unscrew these 4 discs VESA FDMI and the VESA Mounting Compliant logo are trademarks of the Video Electronics Standards Association _______________________ 1 8 Kensington Security Slot if present Your TV is equ...

Страница 6: ...sonnel ç For installers integrators Do not connect RS232 without level shifter _________________________ 2 1 2 Side connections 12 To connect devices with Video or S Video and Audio Left and Right AV cables For ex camera camcorder game audio 13 To connect your headphone 14 To connect a USB device According to your type of set 2 or 3 HDMI connectors are available 4 _________________________ 2 Getti...

Страница 7: ... best connection options See Chapter 11 2 To make audio and video connections Ò Select the source using the SOURCE button on the remote control Press the OK button to confirm your selection à For more information please refer to your cable box or satellite receiver box manual ç Watching Cable TV programs that don t require the cable box Since you ve connected the cable TV signal directly to the TV...

Страница 8: ...de activate the clock display on the screen 9 Cursor buttons Press the cursor buttons up down left right to navigate through the menus 10 OK To activate a setting To display the list of channels stored according to the selection made in the Installation mode Antenna or Cable see Chapter 7 3 Store TV channels Starts playing content in the Multimedia Browser application See Chapter 10 Multimedia bro...

Страница 9: ...Super zoom Not for HD Removes the black bars on the side of 4 3 broadcasts There is a minimal distortion 4 3 Not for HD Shows the classical 4 3 format Movie expand 14 9 Not for HD Scales classical 4 3 format to 14 9 Movie expand 16 9 Not for HD Scales classical 4 3 format to 16 9 Wide screen Stretches 4 3 format to 16 9 Unscaled Only for HD and PC Maximum sharpness Distortion may appear on borders...

Страница 10: ...stant will help you to select your preferred picture and sound settings Finally you will arrive at a complete setting which satisfies you Press the green color button on your remote control to enter the Settings assistant menu Select your location with the cursor up down If you choose Home it will start display the Settings assistant If you choose Retail store it will skip the Settings assistant T...

Страница 11: ...connected peripheral equipment to reset your picture and sound settings to the factory standard settings to update your TV software Software update allows you to update your current software º Press the cursor right to enter the highlighted menu item The content of the right panel is moved to the left panel and the right panel now shows the content of the newly highlighted item in the left panel ç...

Страница 12: ... Select Picture and press the cursor right The Picture menu is moved to the left panel º Use the cursor up down to select the Picture menu items Press the cursor right to enter the selected Picture menu item Use the cursor buttons to adjust the settings Press the cursor left to return to the Picture menu Contrast Adjusts the intensity of bright parts in the picture but keeps the dark parts unchang...

Страница 13: ...ettings and press the cursor right The TV settings menu is moved to the left panel Select Sound and press the cursor right The Sound menu is moved to the left panel º Use the cursor up down to select the Sound menu items Press the cursor right to enter the selected Sound menu item ç Dependent on the input signal one or more menu items may not be selectable Use the cursor buttons to adjust the sett...

Страница 14: ..._____ 6 1 Closed captions This displays the transmitted CC or CS text on the screen according to your chosen CC or CS service in the Caption or Digital caption service menu below This text can either be permanently displayed assuming that the service is available in the broadcast or only when mute is active Press the cursor right after having selected Closed captions Select On Off or On during mut...

Страница 15: ...s option to select the font style of caption display according to your own preference Select Default Monospaced serif Serif Monospaced sans serif Sans serif Casual Cursive or Small caps Text Select this option to select the text color or the opacity of the text box of caption display according to your own preference Select a color and one of the opacity options Background Select this option to sel...

Страница 16: ...ting of None Both will be locked When an item on the age based list is selected all items below that item of the same group are locked as well When you select a content based rating all identical content based ratings in the older age based categories are also selected ç You can lock unlock any number of ratings on the list without re entering your code Each ratings item has a box graphics in fron...

Страница 17: ...th the cursor down If no PIN code exists yet the menu item is set to Set PIN Follow the instructions on screen If a PIN code has previously been entered the menu item is set to Change PIN Follow the instructions on screen Enter your PIN with the digit buttons All number combinations from 0000 to 9999 are valid numbers Ò The Menu preferences menu reappears with a message confirming that the PIN has...

Страница 18: ... store TV channels à You will need this chapter only if you want to change the installation settings _________________________ 7 1 Installation menu This menu will adjust settings related to the installation of the TV channels Press the MENU button on the remote control The main menu appears Select TV menu and press the cursor right The TV menu is moved to the left Ò Select Installation and press ...

Страница 19: ... put the switch in the corresponding position Available channels Cable analog NTSC or digital QAM max from 1 to 135 Terrestrial analog NTSC or digital ATSC max from 2 to 69 If a tuned channel is not yet in the master channel map the TV will attempt to tune the channel and it will be added to the map If the channel is not acquired a message will appear that the channel is not available When you tun...

Страница 20: ... of your TV If you choose for Retail shop it will result in fixed settings of picture and sound The location Home will give full flexibility to change any predefined settings for picture and sound _________________________ 7 4 2 Select the volume bar This allows you to select the display of the volume bar Select Volume bar Press the cursor right to select On or Off Select On to activate the tempor...

Страница 21: ...ion menu Press the cursor right to select the Auto clock mode Ò Press the cursor right to instruct the TV to get the time automatically or manually ç Most of the TV channels are not transmitting clock information There are few cable channels but they are at the end of the channel ring There is no clock transmission in antenna channels In such cases either clock extraction is taking a long time or ...

Страница 22: ... first time after you have finished the installation it will bring up the full channel list In other situations it will bring up the last selected channel list _________________________ 8 1 To select a channel from the displayed favorite list Press the OK button The last selected channel list appears Use the cursor up down to select a channel Ò Press the OK button to display the selected channel _...

Страница 23: ...ears ÒUse the colored buttons to activate the available EPG features displayed at the bottom of the screen To quit the Program Guide page press the MENU button again ________________________ 10 Multimedia browser The Multimedia browser lets you display pictures or play audio files stored on a USB device The Multimedia browser application is invoked from the main menu Press the MENU button on the r...

Страница 24: ... at the bottom of the screen à The blue color button can if necessary be used to let the color buttons reappear ç The playback will continue to play even if temporarily switched to browser screens The audio will be stopped when another song starts playing or when the end has been reached Function buttons at the bottom of the screen Details to display a description of the selected file or directory...

Страница 25: ...____ 11 1 Side panel overview _____________________ 11 2 1 Camera Camcorder Game PC Do not connect cable 1a and 1b at the same time This may cause picture distortion Caution Before connecting a PC set the PC monitor refresh rate to 60Hz _________________________ 11 2 2 Headphone Select Headphone volume in the Sound menu to adjust the headphone volume See Chapter 5 2 3 Adjust sound menu settings Pr...

Страница 26: ...gital devices from different manufacturers have the possibility of differing output standards which may cause difficulties for the television to properly display à DVI to HDMI Your TV comes with all types of connectors with the exception of the DVI connector but some of your equipment may be equipped with this type In this case you ll need a DVI to HDMI adapter or a HDMI to DVI cable and separate ...

Страница 27: ... Definition Multimedia Interface connector à HDMI is the leading new standard for Digital Video and audio interconnection Sound and picture interruptions See Chapter 12 Problems _________________________ 11 6 Connect a DVD player DVD recorder Set top box game console with a DVI connector 11 6 1 With DIGITAL AUDIO OUT 11 6 2 With ANALOG AUDIO OUT ANTENNA VIDEO L R AUDIO AV 2 RF IN RF OUT CABLE RECO...

Страница 28: ...s to the AUDIO L and R input jacks of AV1 ç When using the S VIDEO connector do not connect any device to the AV1 video jack In case of mono equipment only the left loudspeaker reproduces sound Use a mono to stereo adapter not supplied for sound reproduction via all internal loudspeakers ________________________ 11 11 Connect digital source devices with Component Video Output connectors YPbPr This...

Страница 29: ... adjust the picture position to the center of the screen with the cursor buttons 27 ENGLISH DVD Set top box YPbPr AV1 AV3 1 AUDIO L R AV1 AV3 2b L R AUDIO Y Pb Pr VIDEO Y S VIDEO AUDIO L R Pb Pr VIDEO L R AUDIO AV 3 AV 1 AV 2 HDMI 1 AUDIO OUT L R ANALOG AUDIO IN OUT IN DIGITAL AUDIO L R DISPLAY SYNCHRONIZED HDMI 1 HDMI 2 AV 1 AV 2 AV 3 HDMI 1 HDMI 2 DISPLAY SYNC HDMI 2 DIGITAL AUDIO IN DIGITAL AUD...

Страница 30: ...rom your connected device to your TV Verify whether you selected the connected device in the Installation menu Select your connections and also select the respective audio input in the same Connections menu Limit the HDMI cable length to max 5 m Verify if the connected device is properly selected in the Installation menu Connections according to the connection you have made HDMI 1 or 2 No sound wh...

Страница 31: ...Disposal of your old product Your product is designed and manufactured with highly quality material and components which can be recycled and reused Like all LCD products this set contains a lamp with mercury Please inform yourself about the local separate collection system for electrical and electronic products Please act according to your local rules and do not dispose of your old products with y...

Страница 32: ...or drive name of the PM An absolute path to content will also be supported relative path pictures test1 jpg tamper jpg new bird jpg absolute path USB1 pictures1 foo_bar jpg C f1 jpg organization jpg General Format The format and syntax below will be used to create the slideshow file simple ascii text with the extension alb ALB Examples slshow1 alb summer_holiday_2004 ALB test alb The following syn...

Страница 33: ... to copy the content manually to a USB memory device using a personal computer Some digital cameras allow you to switch between PTP Picture Transfer Protocol or PC Link and USB Mass Storage Make sure that you select USB Mass Storage or PC Drive on your digital camera If your camera supports different interface settings be sure to try them one by one or contact the reseller of your camera to find o...

Страница 34: ...MI IN connectors allow the following PC modes PC 640x480 60 Hz 800x600 60 Hz 1024x768 60 Hz 1280x768 60 Hz 1360x768 60 Hz 1920x1080 60 Hz If necessary you can adjust the picture position to the center of the screen with the cursor buttons Due to legal requirements it is possible that with certain copy protected PCM audio qualities from a an accessory device connected to the HDMI input the Digital ...

Страница 35: ...emory device from the TV Step 2 USB Memory device to PC Insert the USB memory device into a PC linked to the internet Locate and open the file update htm on your device Ò Follow the instructions on the page displayed The software update is downloaded on the USB memory device on condition the software version is newer than the one currently installed Remove the USB memory device from your PC Step 3...

Страница 36: ...the TV software Updating software is only possible if the version of the new available software is different from the current one You can verify your current software version Select Software update in the TV menu Press the cursor right The Software update menu moves to the left panel Ò Select Current software info to observe the version and the description of the current software _________________...

Страница 37: ...u 12 Game 23 25 Getting started 4 Glossary 29 Headphone 23 volume 12 Home theater amplifier 27 Installation 16 Weak channel 17 First time 8 Kensington lock 3 Language 16 audio 11 Lock 13 after 14 channels 14 TV ratings 14 movie ratings 15 region ratings 15 Multimedia browser 21 Navigate through the menus 9 Noise reduction 11 On timer 16 Overview side panel 23 PC 27 Picture menu 10 Problems 28 Reco...

Страница 38: ...n a particular installation If this equipment does cause harmful interference to radio or television reception which can be determined by turning the equipment off and on the user is encouraged to try to correct the interference by one or more of the following measures Reorient or relocate the receiving antenna Increase the separation between the equipment and the receiver Connect the equipment in...

Страница 39: ...ited Warranty This warranty does not apply a to damage caused by accident abuse misuse misapplication or non Philips product b to damage caused by service performed by anyone other than Philips or Philips Authorized Service Location c to a product or a part that has been modified without the written permission of Philips or d if any Philips serial number has been removed or defaced or e product ac...

Страница 40: ...38 ...

Отзывы: