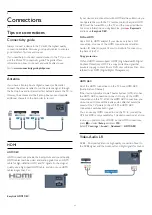
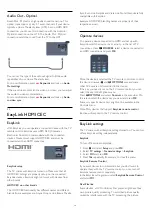
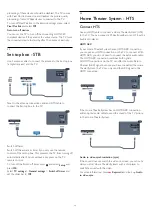
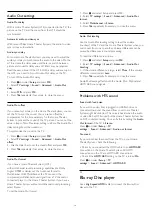
background image

Audio Out settings

Audio Out delay

With a Home Theater System (HTS) connected to the TV, the
picture on the TV and the sound from the HTS should be
synchronized.

Automatic audio to video sync


With recent Philips Home Theater Systems, the audio to video
sync is done automatically.

Audio sync delay


For some Home Theater Systems you may need to adjust the
audio sync delay to synchronize the audio to the video. On the
HTS, increase the delay value until there is a match between
picture and sound. A delay value of 180ms may be required.
Read the user manual of the HTS. With a delay value set up on
the HTS, you need to turn off Audio Out delay on the TV.

To turn off the Audio Out delay . . .

1 - 

Press 

 and select 

Setup

 and press 

OK

.

2 - 

Select 

TV settings

 > 

Sound

 > 

Advanced

 > 

Audio Out

delay

.

3 - 

Select 

Off

 and press 

OK

.

4 - 

Press 

, repeatedly if necessary, to close the menu.

Audio Out offset

If you cannot set a delay on the Home Theater System, you can
set the TV to sync the sound. You can set an offset that
compensates for the time necessary for the Home Theater
System to process the sound of the TV picture. You can set the
value in steps of 5ms. Maximum setting is -60ms. The Audio Out
delay setting should be turned on.

To synchronize the sound on the TV . . .

1 - 

Press 

 and select 

Setup

 and press 

OK

.

2 - 

Select 

TV settings

 > 

Sound

 > 

Advanced

 > 

Audio Out

offset

.

3 - 

Use the slider bar to set the sound offset and press 

OK

.

4 - 

Press 

, repeatedly if necessary, to close the menu.

Audio Out format

If you have a Home Theater System (HTS)
with multichannel sound processing capabilities like Dolby
Digital, DTS® or similar, set the Audio out format to
Multichannel. With Multichannel, the TV can send the
compressed multichannel sound signal from a TV channel or
connected player to the Home Theater System. If you have a
Home Theater System without multichannel sound processing,
select Stereo.

To set the Audio Out format . . .

1 - 

Press 

 and select Setup and press OK.

2 - 

Select 

TV settings

 > 

Sound

 > 

Advanced

 > 

Audio Out

format

.

3 - 

Select 

Multichannel

 or 

Stereo

.

4 - 

Press 

, repeatedly if necessary, to close the menu.

Audio Out leveling

Use the Audio Out leveling setting to level the volume
(loudness) of the TV and the Home Theater System when you
switch over from one to another. Volume differences can be
caused by differences in sound processing.

To level the difference in volume . . .

1 - 

Press 

 and select 

Setup

 and press 

OK

.

2 - 

Select 

TV settings

 > 

Sound

 > 

Advanced

 > 

Audio Out

Leveling

.

3 - 

If the volume difference is large, select 

More

. If the volume

difference is small, select 

Less

.

4 - 

Press 

, repeatedly if necessary, to close the menu. 

Audio Out leveling affects both the Audio Out - Optical and
HDMI ARC sound signals.

Problems with HTS sound

Sound with loud noise


If you watch a video from a plugged in USB flash drive or
connected computer, the sound from your Home Theater
System might be distorted. This noise is heard when the audio
or video file has DTS sound but the Home Theater System has
no DTS sound processing. You can fix this by setting the 

Audio

Out format

 of the TV to 

Stereo

.

Press 

 and select 

Setup

 > 

TV

settings

 > 

Sound

 > 

Advanced

 > 

Audio out format

.

No sound


If you cannot hear the sound from the TV on your Home
Theater System, check the following . . .

• Check if you connected the HDMI cable to an 

HDMI ARC

connection on the Home Theater System. All HDMI
connections on the TV are HDMI ARC connections.
• Check if the 

HDMI ARC

 setting on the TV is turned 

On

.

Press 

 and select 

Setup

 > 

TV

settings

 > 

Sound

 > 

Advanced

 > 

HDMI ARC

.

4.5

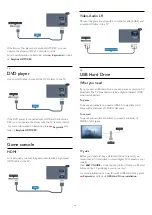
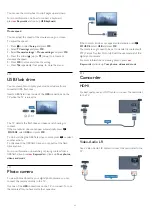
Blu-ray Disc player

Use a 

High speed HDMI

 cable to connect the Blu-ray Disc

player to the TV.

14

Содержание 40PFG6309

Страница 1: ...Register your product and get support at www philips com welcome 40PFG6309 48PFG6309 User Manual ...

Страница 2: ... 1 What you need 28 9 2 Using the TV guide 28 9 3 Recordings 28 9 4 Receiving TV guide data 28 10 Sources 30 10 1 Sources list 30 10 2 From standby 30 10 3 EasyLink 30 11 Timers and clock 31 11 1 Sleeptimer 31 11 2 Clock 31 11 3 Switch off timer 31 12 3D 32 12 1 What you need 32 12 2 The 3D glasses 32 12 3 Care of the 3D glasses 33 12 4 Watch 3D 33 12 5 Optimal 3D viewing 33 12 6 Health warning 33...

Страница 3: ...64 21 1 Software update 64 21 2 Software version 64 21 3 Open source software 64 21 4 Open source license 64 22 Troubleshooting and support 70 22 1 Troubleshooting 70 22 2 Register 71 22 3 Help 71 22 4 Online help 71 22 5 Consumer Care Repair 72 23 Safety and care 73 23 1 Safety 73 23 2 Screen care 74 24 Terms of use copyrights and licenses 75 24 1 Terms of use 75 24 2 Copyrights and licenses 75 I...

Страница 4: ... surf the Internet on TV In Help press Keywords and look up App gallery for more information 1 3 Rental videos To watch a rental video you don t need to leave your home Simply rent the latest movie from your regional online video store Start Smart TV and add the video store App to the Smart TV start page Open the video store App create your personal account select the movie and press play No fuss ...

Страница 5: ...you are watching a program or schedule a recording of an upcoming program In Help press Keywords and look up Pause TV or Recording for more information 1 8 Gaming If you select your game console in the Home menu the TV automatically switches to the settings ideal for gaming If you play a multi player game with split screens you can set the TV to show each screen as a full screen simultaneously Eac...

Страница 6: ...ht Also read the safety precautions before positioning the TV TP Vision Europe B V bears no responsibility for improper mounting or any mounting that results in accident or injury 2 3 Tips on placement Position the TV where light does not shine directly on the screen Dim lighting conditions in the room for best Ambilight effect Position the TV up to 15 cm away from the wall The ideal distance to w...

Страница 7: ...ble Insert the antenna plug firmly into the ANTENNA socket at the back of the TV You can connect your own antenna or an antenna signal from an antenna distribution system Use an IEC Coax 75 Ohm RF antenna connector 7 ...

Страница 8: ...e connection If you have devices in your wireless network that use the WEP security encryption system you cannot use WPS If you must use the WPS PIN code to connect select Scan instead of WPS Step 7 From the list of networks found select your wireless network and press OK If your network is not in the list because the network name is hidden you turned off the SSID broadcast of the router select Ma...

Страница 9: ...ver software supported for an overview of supported media server software Connect the router To connect and setup the router follow steps 1 to 5 1 Connect the router to the TV with a network cable Ethernet cable 2 Make sure that the router is turned on 3 Press and select Setup and press OK 4 Select Connect to network and press OK 5 Select Wired and press OK The TV constantly searches for the netwo...

Страница 10: ...p Wi Fi smart screen TV network name If you have more than one TV in your network you can rename the TVs here Netflix settings Adjust Netflix settings Clear Internet memory With Clear Internet Memory you clear all Internet files stored on your TV You clear your Philips Smart TV registration and parental control settings video store app logins Smart TV app favorites and Internet bookmarks and histo...

Страница 11: ...ned On on the TV and the connected device For more information on using EasyLink press Keywords and look up EasyLink CEC DVI to HDMI Use a DVI to HDMI adapter if your device only has a DVI connection Use one of the HDMI connections and add an Audio L R cable mini jack 3 5mm to Audio In for sound on the back of the TV Copy protection DVI and HDMI cables support HDCP High bandwidth Digital Content P...

Страница 12: ...nk Example HDMI CEC branding names are property of their respective owners Operate devices To operate a device connected to HDMI and set up with EasyLink select the device or its activity in the list of TV connections Press SOURCES select a device connected to an HDMI connection and press OK Once the device is selected the TV remote control can control the device However and OPTIONS keys and some ...

Страница 13: ...ff timer press and select Setup and press OK Select TV settings General settings Switch off timer and set the slider bar to Off 4 4 Home Theater System HTS Connect HTS Use an HDMI cable to connect a Home Theater System HTS to the TV You can connect a Philips Soundbar or an HTS with a built in disc player HDMI ARC If your Home Theater System has an HDMI ARC connection you can use any HDMI connectio...

Страница 14: ...ultichannel sound signal from a TV channel or connected player to the Home Theater System If you have a Home Theater System without multichannel sound processing select Stereo To set the Audio Out format 1 Press and select Setup and press OK 2 Select TV settings Sound Advanced Audio Out format 3 Select Multichannel or Stereo 4 Press repeatedly if necessary to close the menu Audio Out leveling Use ...

Страница 15: ...le with a composite cable CVBS and an audio L R cable to the TV 4 8 USB Hard Drive What you need If you connect a USB Hard Drive you can pause or record a TV broadcast The TV broadcast must be a digital broadcast DVB broadcast or similar To pause To pause a broadcast you need a USB 2 0 compatible Hard Drive with a minimum of 32GB of disk space To record To pause and record a broadcast you need a m...

Страница 16: ...our TV You can connect a keyboard and a mouse to the TV Use one of the USB connections to connect Install the keyboard To install the USB keyboard turn on the TV and connect the USB keyboard to one of the USB connections on the TV When the TV detects the keyboard for the first time you can select your keyboard layout and test your selection If you select a Cyrillic or Greek keyboard layout first y...

Страница 17: ...ess SOURCE select USB and press OK To stop watching the USB flash drive content press or select another activity To disconnect the USB flash drive you can pull out the flash drive anytime For more information on watching or playing content from a USB flash drive press Keywords and look up Your photos videos and music 4 11 Photo camera To view photos stored on your digital photo camera you can conn...

Страница 18: ...e TV back to the ideal TV watching or gaming setting To set the TV to the ideal setting manually 1 Press and select Setup and press OK 2 Select TV settings Picture Advanced Activity style and press OK 3 Select Game for gaming or select Computer for watching a movie and press OK 4 Press repeatedly if necessary to close the menu Remember to set the Game or computer setting back to Computer when you ...

Страница 19: ...n Off To turn the TV Off press the Joystick on the right of the TV on the back The red indicator light is off The TV is still connected to the main power but consumes a minimum of energy To turn off the TV completely disconnect the power plug When disconnecting the power plug always pull the power plug never the cord Ensure that you have full access to the power plug power cord and outlet socket a...

Страница 20: ...open or close program info 4 BACK To switch back to the previous channel you selected To close a menu without changing a setting To go back to the previous Smart TV page 5 HOME To open or close the home menu 6 EXIT To switch back to watching TV 7 OPTIONS To open or close the Options menu 8 OK key To confirm a selection or setting 9 Arrow navigation keys To navigate up down left or right 10 MULTIVI...

Страница 21: ...ry door in the direction shown by the arrow 2 Replace the old batteries with 2 type AAA R03 1 5V batteries Make sure the and ends of the batteries line up correctly 3 Reposition the battery door and slide it back until it clicks Remove the batteries if you are not using the remote control for a long time Safely dispose of your old batteries according to the end of use directions For more informati...

Страница 22: ...o stations from channel number 1001 onwards Channel list Favorite channels You can create a favorite channel list that only holds the channels you want to watch With the Favorite channel list selected you will only see your favorite channels when you switch through channels Create your favorite channel list 1 While watching a TV channel press LIST to open the channel list 2 Select the channel and ...

Страница 23: ...rental age rating is set for all channels To set an age rating 1 Press and select Setup and press OK 2 Select Channel settings Child lock Age ratings lock and press OK 3 Enter a 4 digit Child lock code If you did not set a code yet select Set code and press OK Enter a 4 digit Child lock code and confirm Now you can set an age rating 4 Set the age and press OK 5 Press repeatedly if necessary to clo...

Страница 24: ...en the Picture format menu 2 Select a format from the list and press OK The following formats can be available according the picture on screen Basic Fill screen Fit to screen Advanced Last setting Move Zoom Stretch Native Undo Closed captioning CC and language Closed captions You can display closed captions at all times or only when the TV is muted To open Closed captions press CC Note Digital TV ...

Страница 25: ...ate channels 1 Press and select Setup and press OK 2 Select Search for channels and press OK 3 Select Update channels and follow the instructions on screen The update may take a few minutes Reinstall channels You can search for and reinstall channels and leave all other TV settings untouched Alternatively you can do a full new TV installation If a child lock code is set you will need to enter this...

Страница 26: ...to TV and press OK You might be asked to enter the Child lock code of this TV 5 The TV notifies you if the channel list is copied to the TV successfully Unplug the USB memory device To an already installed TV 1 Verify the country setting of the TV To verify this setting press and select Setup and press OK Select Search for channels Reinstall channels and press OK Press and later Cancel to leave th...

Страница 27: ...ct Help and press OK to open on screen Help Look up topics in the alphabetical list Setup Select Setup to install channels or adjust TV settings TV Select TV and press OK to watch TV channels Smart TV Select Smart TV and press OK to open the Smart TV start page Source Select Source and a connected device in the list underneath the icon Press OK to switch to the selected device TV guide Select TV g...

Страница 28: ...tion comes from the broadcaster you can press to view the schedule of one of the next days Press to go back to the previous day Alternatively you can press OPTIONS and select Change day Select Previous day Today or Next day and press OK to select the day of the schedule Set a reminder You can set reminders that alert you of the start of a program with a message on screen To set a reminder select t...

Страница 29: ...ide information from the Internet To set the TV guide information 1 Press and select TV guide 2 Press key 3 Select From the broadcaster or From the Internet 4 Press repeatedly if necessary to close the menu Missing recordings If some recordings have disappeared from the list of recordings the TV guide info data might have changed Recordings made with the setting From the broadcaster become invisib...

Страница 30: ...on values specific settings or the position within the Sources menu When you connect a new device to the TV the icon of the device jumps to the front of the Sources menu If the TV does not detect the device automatically select the connection you used to connected the device and adjust the Device type and name Original name and icon To restore the device icon to its original name and type icon pre...

Страница 31: ...h clock transmission data you can change the time zone if Auto clock mode Automatic is selected 1 In the Clock menu select Time zone 2 Select your time zone then press OK Set the clock manually You can set the date and time manually Before you start set the clock mode to Manual 1 In the Clock menu select Date or Time then press OK 2 Set the time or date with the Navigation buttons 3 Select Done th...

Страница 32: ... 3D watching remain Turn off To turn off the 3D glasses press The LED light blinks red 4 times When the 3D glasses do not receive 3D signals for 2 minutes the glasses turn off automatically 3D transmitter Make sure the receiver lens in the center of the glasses can receive the 3D signals Also clear objects away from the 3D transmitter on the TV 1 3D transmitter on the TV 2 3D receiver on the 3D gl...

Страница 33: ...ll change this preference in the Setup menu TV settings 3D Switch to 3D Start 3D When the TV switches to 3D or when a notification is shown that 3D is available put on your 3D glasses If the TV cannot detect the 3D signal the 3D signal tag is missing the 3D program is shown as a double image on the screen To switch to 3D adjust the 3D settings and select 3D Side by side or 3D Top bottom according ...

Страница 34: ... you normally wear corrective glasses or use contact lenses wear the 3D glasses together with these glasses or lenses Keep the glasses away from small children to avoid the swallowing of small parts or batteries Parents should monitor their children during 3D viewing and ensure they do not experience any discomfort as mentioned above Watching 3D is not recommended for children under six years of a...

Страница 35: ... split screens you can set the TV to show each screen as a full screen Each player sees only his part of the game full screen The TV uses 3D technology to show both screens What you need To play a two player game with this TV you need 2 active 3D glasses Philips PTA507 PTA508 PTA509 PTA517 PTA518 or PTA519 Also the game console must be connected with HDMI Play a two player game To start a two play...

Страница 36: ...browse files from a computer you can only browse the files and folders as they are organized on the computer The menu bar Navigate to the menu bar and select the type of file you want to watch or play Select Photos Music or Videos Alternatively you can open the Folders view and browse your folders to look for a file Sorting To browse your photos by date month year or alphabetically by name press S...

Страница 37: ... press Info To view info on a video playhead position duration title date etc select the video and press INFO Press again to hide the info Options Press OPTIONS Subtitles If available you can switch between Subtitles Off Subtitles On or Automatic Shuffle Plays your videos in a random order Repeat Plays a video once or continuously To close Browse USB or Browse network press and select another acti...

Страница 38: ...another activity on TV press SOURCES to open the Sources menu and select a connected device Block a device The first time you receive a request to connect from a device you can block the device This request and all requests in the future from this device will be ignored To block a device select Block in the request window and press OK Unblock all devices All previously connected and blocked device...

Страница 39: ...roadcast When you switch to another digital channel the broadcast of the new channel is buffered and the broadcast of the previous channel is cleared When you switch to a connected device a Blu ray Disc player or digital receiver the USB Hard Drive stops buffering and the broadcast is cleared Also when you switch the TV to standby the broadcast is cleared While recording a program on the USB Hard ...

Страница 40: ...ome time buffer at the end of the program You can add extra buffer if needed 3 Select Schedule and press OK The program is scheduled for recording A warning will appear automatically when overlapping recordings are scheduled If you plan to record a program in your absence remember to leave the TV switched to standby and the USB Hard Drive turned on List of recordings To view the list of recordings...

Страница 41: ...er of days before it expires Failed recording When a scheduled recording was prevented by the broadcaster or when the broadcast was interrupted a recording is marked as Failed Delete a recording To delete a made recording select the recording in the list press OPTIONS and select Delete recording For more information press Keywords and look up Record a program 41 ...

Страница 42: ...s not connected Skype will not start Sign in Sign in to Skype with your Skype Name and password If you don t have a Skype Name yet you have to create a new Skype account To sign in to Skype 1 Press to open the Home menu 2 Select Skype and press OK to start Skype and open the Sign in page 3 Select the Skype Name text field and enter your Skype Name To open the on screen keyboard select the text fie...

Страница 43: ...e on your computer Start Skype on your computer sign in with your Skype Name and Password and open your Skype profile You can change your profile picture add a mood message or set the privacy settings Microsoft account If you have a Microsoft account you can use this account to sign in to Skype on TV To sign in with a Microsoft account 1 On the Skype Sign in page select Sign in with Microsoft acco...

Страница 44: ...try to enter a name To open the on screen keyboard press OK When you re done press OK 4 Skype will search for the contact you are looking for and will show the search results 5 Select the contact you want and press OK to send a contact request 6 Write the request and press OK Skype will send the request message to your new contact If the contact accepts the request the Skype Name of the new contac...

Страница 45: ...Off and press OK To turn it back on select Video On and press OK To mute your microphone select Mic Off and press OK To turn it back on select Mic On and press OK While you are making a video call you can change the viewpoint of the camera For more information on changing the viewpoint press Keywords and look up Skype camera zoom pan and tilt Make a Voice call Make a Voice call to call without vid...

Страница 46: ...Record a Voicemail When you call a contact and they can t take the call you can leave a voicemail To record a voicemail 1 Call a contact If your call was not answered Skype will propose to send a Voicemail 2 Select Yes and speak your message 3 To stop recording select End call and press OK Play a Voicemail A contact can send a voicemail message to you If a voicemail was sent to you a small icon wi...

Страница 47: ...u select Settings and press OK 3 Select Blocked contacts and press OK To manage your blocked contacts press OPTIONS Voicemail You can set some preferences for sending voicemails If you allow a contact to send you a voicemail when you can t take the call check the box of Send unanswered calls to voicemail Leave the box unchecked if you do not want to receive voicemails If you allow a contact to sen...

Страница 48: ...ne to store the camera viewpoint and to go back to your Skype call 17 10 Sign out When you sign out of Skype you are signing out of your Skype account Your Online status will change to Offline Your contacts will not be able to call you To sign out 1 Press Back from anywhere within Skype to return to the Skype menu 2 Select Sign out in the Skype menu and press OK The TV will ask you to quit Skype o...

Страница 49: ... your email address select Continue and press OK 3 Confirm the email address Parental control To lock Adult 18 rated apps 1 Turn on Smart TV parental control by selecting Enable and then pressing OK 2 Enter an unlock PIN code of your choice 3 Confirm your PIN code Adult 18 rated apps are now locked To open a locked app select the app and press OK The TV will ask you to enter your 4 digit code 18 4...

Страница 50: ...f an App page On an App page press OPTIONS and select Security info If a lock is shown next to the loading animation at the bottom of the screen while loading a page the transfer is secured Feedback on an App Select the App and press Feedback to select a like or don t like button and send a suggestion or remark to us You can also report an App malfunction Manage your Apps From the list of Apps on ...

Страница 51: ...et App opens the World Wide Web on your TV On your TV you can view any Internet website but most of them are not tailored for a TV screen Some plug ins e g to view pages or videos are not available on your TV Internet pages are shown one page at a time and full screen 18 5 Multi view While you are on a Smart TV App or the Internet you can watch the current TV channel Multi view opens a small scree...

Страница 52: ...me time Press Keywords and look up Channel update or Channels reinstall Channel settings In the Channel settings menu you can set your language preferences Set an age rating to prevent children from watching a rated program and set or change your Child lock code Languages Press Keywords and look up Audio language or Closed captions Channel installation Press Keywords and look up Channel installati...

Страница 53: ...2 Select TV settings Picture Color 3 Press right and adjust the value with up or down 4 Press repeatedly if necessary to close the menu Contrast With Contrast you can adjust the contrast of the picture If you are watching 3D pictures this setting is switched to 3D contrast To adjust the contrast 1 Press and select Setup and press OK 2 Select TV settings Picture Contrast 3 Press right and adjust th...

Страница 54: ...Dynamic contrast 3 Press right and select Maximum Medium Minimum or Off 4 Press repeatedly if necessary to close the menu Brightness With Brightness set the level of brightness of the picture The Brightness setting is intended for expert users We recommend that other users adjust brightness with the Contrast setting To adjust the level 1 Press and select Setup and press OK 2 Select TV settings Pic...

Страница 55: ...4 Press repeatedly if necessary to close the menu Location If the TV is located in a store you can set the TV to display an in store promotion banner The Picture style is set to Vivid automatically The automatic Switch off timer is turned off To set the TV to Shop location 1 Press and select Setup and press OK 2 Select TV settings General settings Location and press OK 3 Select Shop and press OK 4...

Страница 56: ...elect TV settings Sound Advanced Auto volume leveling 3 Press right and select On or Off 4 Press repeatedly if necessary to close the menu Delta volume For analog TV and HDMI source only Delta volume is a fine volume adjustment for individual channels With Delta volume you can increase the volume for channels with a weaker audio signal or decrease the volume for channels with a stronger audio sign...

Страница 57: ...first installation this setting is set to either On a TV stand or Wall mounted If you have changed the placement of the TV since then adjust this setting accordingly for best sound reproduction 1 Press and select Setup and press OK 2 Select TV settings General settings TV placement and press OK 3 Select On a TV stand or Wall mounted and press OK 4 Press repeatedly if necessary to close the menu 19...

Страница 58: ... bulbs 4 Configure bulb Network In this first step you will prepare the TV to find the Philips hue bridge The TV and the Philips hue bridge must use the same network Connect the Philips hue bridge to the router the router of the network the TV is using Turn on the hue bulbs To start the configuration 1 Press Ambilight and turn Ambilight On 2 Press and select Setup and press OK 3 Select TV settings...

Страница 59: ...bs To adjust the Ambilight hue Immersion 1 Press and select Setup and press OK 2 Select TV settings Ambilight Ambilight hue Immersion and press OK 3 Press up or down to adjust 4 Press repeatedly if necessary to close the menu Info In View configuration see the current Ambilight hue configuration such as which network you are using and how many bulbs are connected To view the current Ambilight hue ...

Страница 60: ...App installed the Ambilight changes color via your mobile devices If the TV is not connected to your mobile device with the installed Philips TV Remote App the Ambilight displays the default color 3 Press repeatedly if necessary to close the menu Lounge light hue If you installed Ambilight hue you can let the hue bulbs follow Lounge light from Ambilight The Philips hue lamps will expand the Lounge...

Страница 61: ... de pilhas e baterias Não descarte as pilhas e baterias no lixo doméstico O descarte inadequado de pilhas e baterias pode representar riscos ao meio ambiente e à saúde humana Para contribuir com a qualidade ambiental e com a saúde a Envision dispõe de pontos de coleta em suas Assistências Técnicas Para evitar o vazamento de pilhas ou baterias o que pode resultar em danos à saúde ambientais e ao pr...

Страница 62: ...n off Switch off timer Inactive devices off 20 5 Dimensions and weights 40PFG6309 without TV stand Width 911 3 mm Height 528 mm Depth 56 3 mm Weight 7 94 kg with TV stand Width 911 3 mm Height 587 3 mm Depth 231 8 mm Weight 9 17 kg 48PFG6309 without TV stand Width 1081 9 mm Height 629 1 mm Depth 62 8 mm Weight 11 kg with TV stand Width 1081 9 mm Height 682 7 mm Depth 222 6 mm Weight 12 4 kg 20 6 C...

Страница 63: ... L4 1 VC 1 is supported up to Advanced Profile L3 Wi Fi Certified Miracast This TV supports WiDi 4 x devices Supported media server software DMS PC Microsoft Windows XP Vista or Windows 7 You can use any DLNA certified media server software Microsoft Windows Media Player Mac OS X You can use any DLNA certified media server software Mobile devices Philips MyRemote iOS Android Interoperability and p...

Страница 64: ...he power switch on the TV The TV turns itself off for 10 seconds and then back on again Please wait The TV software has been updated You can use the TV again To prevent an accidental update of the TV software delete the autorun upg file from the USB memory device Update from Internet If the TV is connected to the Internet you may receive a message from TP Vision to update the TV software You need ...

Страница 65: ...rg libmng 1 0 10 libmng THE reference library for reading displaying writing and examining Multiple Image Network Graphics MNG is the animation extension to the popular PNG image format This piece of software is made available under the terms and conditions of the libmng license which can be found below Source http sourceforge net projects libmng files u Boot loader 1 3 4 Used by boot loader and o...

Страница 66: ...ttp www gnu org software libc mtd utils 1 The aim of the system is to make it simple to provide a driver for new hardware by providing a generic interface between the hardware drivers and the upper layers of the system Hardware drivers need to know nothing about the storage formats used such as FTL FFS2 etc but will only need to provide simple routines for read write and erase Presentation of the ...

Страница 67: ...ms and conditions of the alsa license which can be found below Source http www alsa project org lvm2 2 02 89 DM_VERITY This piece of software is made available under the terms and conditions of the lvm2 license which can be found below Source ftp sources redhat com pub lvm2 releases encfs 1 3 2 A library provides an encrypted filesystem in user space Source http www arg0 net encfs boost 1 15 0 A l...

Страница 68: ...l Source http procps sourceforge net index html psmisc 22 13 This PSmisc package is a set of some small useful utilities that use the proc filesystem We re not about changing the world but providing the system administrator with some help in common tasks Source http psmisc sourceforge net sed 4 1 5 sed stream editor isn t an interactive text editor Instead it is used to filter text i e it takes te...

Страница 69: ...oyd yajl 2 0 1 0 gf4b2b1a tar gz df6a751e7797b9c2182efd91b5d64017 lloyd yajl 2 0 1 0 gf4b2b1a tar gz HMAC SHA1 0 1 keyed hash message authentication code HMAC is a specific construction for calculating a message authentication code MAC involving a cryptographic hash function in combination with a secret cryptographic key As with any MAC it may be used to simultaneously verify both the data integri...

Страница 70: ...connected and reconnected to the power supply the startup screen is displayed at the next startup To turn on the TV from standby press on the remote control or the TV The standby light keeps on blinking Disconnect the power cable from the power outlet Wait 5 minutes before you reconnect the power cable If the blinking reoccurs contact Philips TV Consumer Care Wrong menu language Change the languag...

Страница 71: ...hown When an HDMI CEC audio device is connected this behavior is normal Photos videos and music from a USB device do not show Make sure that the USB storage device is set to Mass Storage Class compliant as described in the storage device s documentation Make sure that the USB storage device is compatible with the TV Make sure that the audio and picture file formats are supported by the TV Choppy p...

Страница 72: ...email You can download new TV software or the manual to read on your computer 22 5 Consumer Care Repair For support and repair call the Consumer Care hotline in your country Find the telephone number in the printed documentation that came with the TV Or consult our website www philips com support TV model number and serial number You might be asked to provide the TV product model number and serial...

Страница 73: ...e full access to the power plug power cord and outlet socket at all times Risk of injury or damage to the TV Two people are required to lift and carry a TV that weighs more than 25 kg or 55 lbs If you mount the TV on a stand only use the supplied stand Secure the stand to the TV tightly Place the TV on a flat level surface that can support the weight of the TV and the stand When wall mounted ensur...

Страница 74: ...nlight heat or extreme humidity If condensation occurs it will disappear spontaneously while the TV is playing for a few hours The condensation moisture will not harm the TV or cause malfunction 23 2 Screen care Never touch push rub or strike the screen with any object Unplug the TV before cleaning Clean the TV and frame with a soft damp cloth and wipe gently Avoid touching the Ambilight LEDs on t...

Страница 75: ...ures not recommended or authorized in this manual shall void the warranty Pixel characteristics This LCD LED product has a high number of color pixels Although it has effective pixels of 99 999 or more black dots or bright points of light red green or blue may appear constantly on the screen This is a structural property of the display within common industry standards and is not a malfunction CE c...

Страница 76: ...to é não tem direito à proteção contra interferência prejudicial mesmo de estações do mesmo tipo e não pode causar interferência a sistemas operando em caráter primário Microsoft Windows Media Windows Media is either a registered trademark or trademark of Microsoft Corporation in the United States and or other countries Microsoft PlayReady Content owners use Microsoft PlayReady content access tech...

Страница 77: ...EMS LIMITED the Owner You are permitted to use the Software only in conjunction with this product Kensington Kensington and Micro Saver are registered US trademarks of ACCO World Corporation with issued registrations and pending applications in other countries throughout the world Other trademarks All other registered and unregistered trademarks are the property of their respective owners 77 ...

Страница 78: ... Color Color temperature 53 Connectivity guide 11 Consumer Care 72 Contact Philips 74 Contrast 57 Contrast Brightness 56 Contrast Contrast modes 54 Contrast Dynamic contrast 54 Contrast Gamma 54 Contrast Video contrast 54 CVBS connection tips 11 D DVI connect 11 E EasyLink 12 EasyLink connection 13 EasyLink settings 12 Eco settings 61 F Facebook 49 G Game console connect 15 Game or computer 57 Gam...

Страница 79: ...n 54 Shop location 57 Skype auto sign in 46 Skype camera zoom pan and tilt 48 Skype contacts 44 Skype install camera 42 Skype menu 43 Skype Microsoft account 43 Skype missed calls 46 Skype new account 42 Skype receiving a call 48 Skype sign in 42 Skype video call 45 Skype what you need 42 Skype what 42 Sleep timer 31 Smart TV about 49 Smart TV internet 51 Smart TV Multi view 53 Smart TV open 51 Sm...

Страница 80: ...ce Philips and the Philips shield emblem are registered trademarks of Koninklijke Philips N V and are used under license from Koninklijke Philips N V All registered and unregistered trademarks are property of their respective owners 2014 TP Vision Europe B V All rights reserved www philips com Powered by TCPDF www tcpdf org ...

Отзывы: