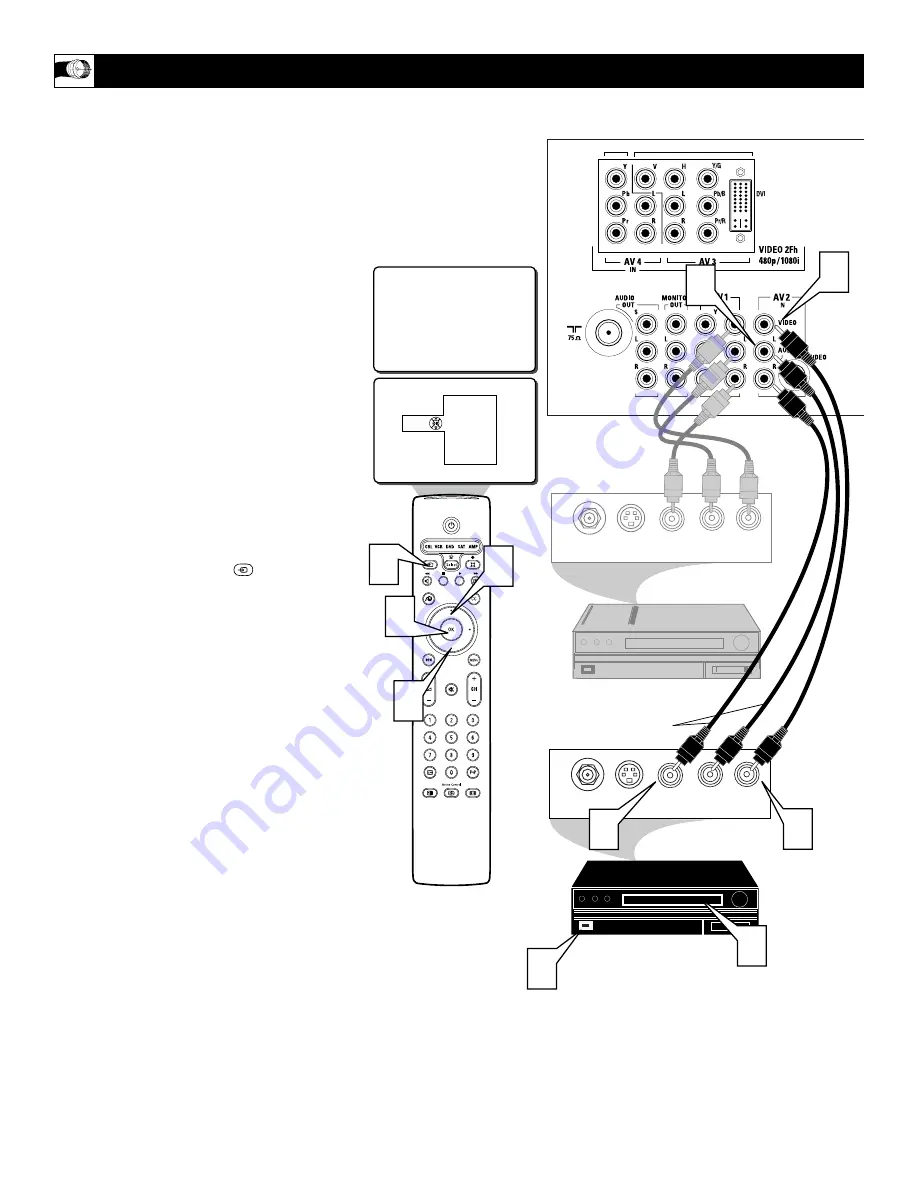
AV2
Source
TV
AV1: VCR
AV2: Recorder
AV3: DVD
AV4: HD
SIDE: Camera
AUDIO OUT
R L
S-VIDEO
OUT
ANT/CABLE
OUT
VIDEO
OUT
1
AUDIO OUT
R L
S-VIDEO
OUT
ANT/CABLE
OUT
VIDEO
OUT
3
4
5
9
2
6
7
8
7
AUDIO IN
(RED/WHITE)
SECOND VCR
or ACCESSORY DEVICE
(EQUIPPED WITH VIDEO
AND AUDIO OUTPUT JACKS)
VIDEO IN
(YELLOW)
BACK OF 2ND VCR
BACK OF TV
8
T
he TV’s audio/video input jacks allow you
connect multiple accessory devices at one
time to different sets of input jacks.. Follow
the easy steps below to connect an additional
accessory device to the AV 2 Input Jacks locat-
ed on the back of the TV.
1
Connect the VIDEO (yellow) cable
to
the VIDEO AV2 IN jack on the back of
the TV.
2
Connect the AUDIO (red and white)
cables
to the AUDIO (left and right)
AV2 IN jacks on the rear of the TV.
3
Connect the VIDEO (yellow) cable
to
the VIDEO OUT jack on the back of
the VCR.
4
Connect the AUDIO (red and white)
cables
to the AUDIO (left and right)
OUT jacks on the rear of the VCR.
5
Turn the VCR (accessory device) and
the TV ON.
6
Press the SOURCE button
on
the remote control to display the
SOURCE menu.
7
Press the CURSOR UP or DOWN
button
to select the AV2 option.
8
Press the OK button
to confirm your
selection. The TV will change to the
AV2 channel.
9
With the VCR (or accessory device)
ON and a prerecorded tape (or other
media depending on type of accessory
device being used) inserted,
press the
PLAY button
to view the tape on the
television.
U
SING THE
AV 2 I
NPUT
J
ACKS
FIRST VCR
CONNECTED TO AV1 INPUTS
Содержание 34PW9819/99
Страница 62: ...RENEWED 90 DAY LIMITED WARRANTY ...


