background image

29

Connect Peripheral Equipment

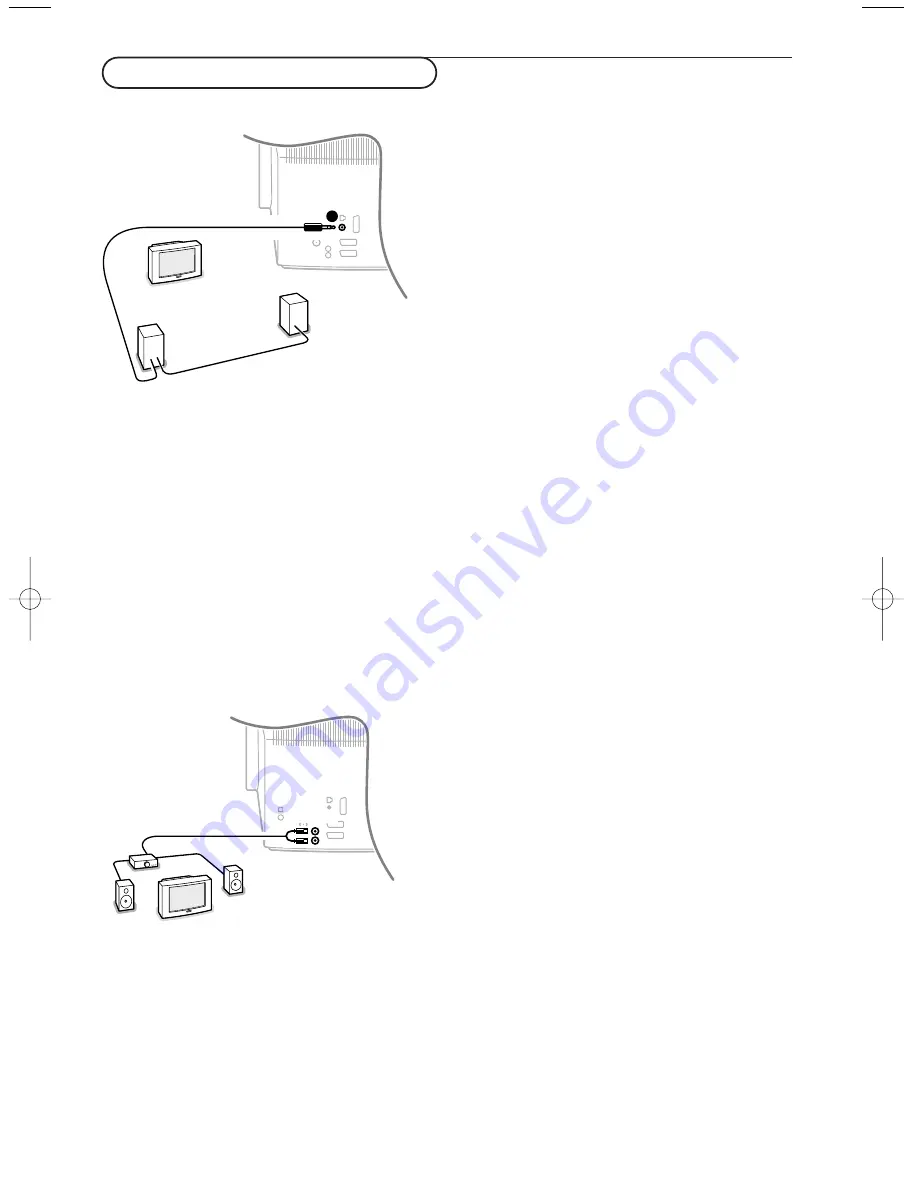
Extra loudspeakers / Amplifier

REAR multimedia loudspeakers

You can enjoy Dolby Pro Logic Surround sound by
connecting two rear loudspeakers to be connected to
the Dolby Surround output at the back of your TV.

&

Connect two rear loudspeakers with built in amplifiers
or an audio amplifier with rear loudspeakers.
Connect the audio cables to the rear loudspeakers and
to the Dolby surround output at the back of your
TV as shown.
There is only one output for both speakers.

Note: Switch off the TV and the rear loudspeakers before

connecting them.

The surround output 

S

has a 3.5 mm stereo jack.

é

Select Surround speakers - On in the Setup menu.
See p. 9.
See Surround sound modes in the Sound menu, p. 13
for the available Surround modes.
Rear Surround Sound loudspeakers should always be
located behind or to either side of the listener at
about 1 m above the listener.

Adjust the volume of the rear loudspeakers when
audio distortion occurs.
Use the Test tone function in the Speakers menu, see
p. 9, to have a reference of the loudness of the
separate loudspeakers.

Note: Once you have adjusted the volume of the rear
loudspeakers, do not change it while watching TV as the
whole configuration operates with the volume adjustment of
your TV.

Stereo amplifier and two extra FRONT speakers

To enhance the sound reproduction of your TV you can
connect two extra front loudspeakers via an external
amplifier.

&

Connect the audio cables to the audio input of your
amplifier and to 

AUDIO L

and 

R

at the back of your TV.

The output level is controlled by the volume control
of your TV.

Note: Switch off the TV and your audio amplifier before
connecting them. Set the audio amplifier’s volume to
minimum.

é

Select Centre mode On in the Setup, Speakers
menu. See p. 9. See Surround mode in the Sound
menu, p. 13 for the available Surround modes.

Adjust the volume of the audio amplifier.
Use the Test tone function in the Setup, Speakers
menu, see p. 9 to have a reference of the loudness of
the separate loudspeakers.

Note: Once you have adjusted the volume of the amplifier,
do not change it while watching TV as the whole
configuration operates with the volume adjustment of your
TV.

If extra front speakers are connected and selected, all
internal TV speakers produce centre sound in the surround
modes Dolby Pro Logic and Dolby 3 Stereo.

S

AUDIO

2150.2 gb (16X24) RC2  26-06-2002  10:47  Pagina 29

Содержание 32PW8887

Страница 1: ...ips do not solve your TV problem you can call your Local Philips Customer or Service Centre See the supplied World wide guarantee booklet Please have the Model and Product number which you can find at the back of your television set or on the packaging ready before calling the Philips helpline Model Product No Operation Using the built in DVD player Loading a disc 21 Playing a DVD or Video CD 22 P...

Страница 2: ... mains plug of the TV in the wall socket having a mains voltage of 220V 240V To prevent damaging the mains AC cord which could cause a fire or electric shock do not place the TV on the cord Switch the TV on Press the power switch A on the front of your TV A green indicator on the front of the TV lights up and the screen comes on If the indicator is red orange when acquiring NEXTVIEW information se...

Страница 3: ...cted the peripherals p 30 DVD disc MENU See p 22 V Volume Press or to adjust the volume Mute Interrupt the sound or restore it P Programme selection To browse through the TV channels and sources stored Only those channels which are in the favourite list can be selected with the P keys When in DVD mode use the P keys to browse through DVD chapters or audio tracks Ò π º Play control keys Used for DV...

Страница 4: ... of the room the contrast dynamic contrast brightness and colour picture settings are adjusted automatically The light sensor is active when the Active control function is switched to Medium or Maximum Press the h key repeatedly to select the Active Control values Off Minimum Medium recommended or Maximum Off Sharpness and Dynamic Contrast are controlled automatically Minimum Sharpness Dynamic Con...

Страница 5: ...chanism of pipes balls and a puck The animated mechanism constantly shows the current whereabouts and continually expands the view of the immediate neighbourhood The puck surrounds the ball indicating the user s current position in the menu hierarchy The puck is always present when the menu system is displayed The puck is divided into 4 parts They correspond to the directional controls up down lef...

Страница 6: ...exit with which the menu can be dismissed The explanation appears in different languages one at a time Choose your preferred language and press the OK key on the remote control Proceed with the Install menu The menu language in DVD mode is automatically adapted except for Russian and Greek see note é Use the cursor down to select Install Use the cursor right to select Language Follow the instructi...

Страница 7: ... the Automatic installation is complete the puck navigates to Install again If a cable system or a TV channel which broadcasts ACI Automatic Channel Installation is detected the search is stopped and the programme list appears Without ACI broadcast the channels are numbered according your language and country selection You can use Reshuffle to renumber them See p 8 It is possible that the cable co...

Страница 8: ...ss OK to confirm Press the cursor left repeatedly when you have finished the name giving of the selected channel or peripheral Select another programme number and repeat steps to Reshuffle the programme list According to your preference you can change the order of the stored TV channels Select Reshuffle in the INSTALLATION menu and press the OK key é Follow the instructions on screen Select Favour...

Страница 9: ...est Tone menu item when speaker adjustments are complete and turn the control Off S t e r e o 3 S t e r e o 3 D S u r r o u n d H a l l P r o L o g i c Availability of Speaker menu items Test tone Front left volume Front right volume Centre volume Surround volume Centre mode Surround speakers Volume controls Center Mode See Connect Peripheral Equipment Extra Loudspeakers Amplifier p 29 If no Exter...

Страница 10: ...te control a TV channel which broadcasts teletext may transmit the name of the TV channel or the programme title When selected No the programme title will only appear after pressing the i key and not after the selection of a TV channel Teletext level 2 5 Some broadcasters offer the opportunity to see more colours other background colours and nicer pictures in the teletext pages Select Teletext lev...

Страница 11: ...e stored the programme coming from your decoder Select Status Select the input used to connect your decoder None EXT1 or EXT2 Select None if you do not want the selected programme number being activated as a decoder programme number Decoder Programme Status Setup Decoder Demo Auto demo Teletext Install Main menu Picture Speakers NEXTVIEW Active control Dealer demo Digital options Light sensor Comb...

Страница 12: ...redefined factory settings see p 10 Sound menu Press the cursor right to select Sound Select the menu items in the Sound menu with the cursor up down and adjust the settings with the cursor left right Remember control settings are at normal mid range levels when the bar scale is centred Note Some menu items are only available in case of a Cinema Link configuration and when the Cinema Link is activ...

Страница 13: ...akers are connected Surround Modes Dependent on the sound signal broadcasted select one of the Surround modes Stereo This mode reproduces only the left and right front sound signals You only hear a stereo sound if the broadcast which you are receiving is transmitted in stereo or nicam stereo Dolby 3 Stereo optimal with Dolby Surround broadcasting The sound signal is now distributed over the front ...

Страница 14: ...ding the DVD player Select Custom lock and press the cursor right The items Age lock and Category lock are available when NEXTVIEW broadcast is available Select Age lock if you want to lock programmes related to a certain age off 2 4 18 Select Programme lock if you want to lock the programmes from a certain TV channel or external Select Category lock if you want to lock programmes related to a cer...

Страница 15: ... W e d0 5 T h u0 6 F r i0 7 S a t0 8 puck function keys NEXTVIEW guides BBC1 18 00 BBC News BBC2 18 00 The Simpsons CNN 18 00 World News FR2 18 00 On a tout essayé CH5 18 15 Tomorrow Never Dies M e n u 1 8 0 0 C h a n n e l T h e m e Mon 05 Feb 18 00 Using NEXTVIEW Teletext guide Call Teletext NEXTVIEW guide Press the æ key on the remote control to call the Teletext NEXTVIEW guide A menu appears w...

Страница 16: ...e right to select the programmes If available a summary or commentary on the programme is displayed at the bottom of the screen Use the cursor up down to scroll through the programmes Press one of the colour keys to select one of the basic functions if available review record remind watch lock Press one of the grey red green yellow or blue keys to activate a Teletext Guide NEXTVIEW function The ke...

Страница 17: ...the night Note it may be necessary to put the TV in standby mode when all NEXTVIEW information is outdated e g when returning from holiday When in Teletext Guide mode select a TV channel with the cursor up down and press OK é Move the cursor up to the top of the channel list where the name of the selected TV channel reappears In the Teletext index page look for the programme guide page of the day ...

Страница 18: ...vided into two parts the left side for the normal main picture the right side for teletext broadcast by the selected TV channel Press the b key again to return to a full screen picture Quickly run through the teletext pages Press the cursor up down or the P key to run through the previous or the following pages Select the previously selected teletext page Press the 0 key Note Only possible when te...

Страница 19: ...ave entered a wrong page number or when the page is not available Enter another page number Enlarge Press q repeatedly to display the upper part the lower part and then to return to the normal page size When the upper part is displayed you can scroll the text line by line using the cursor up down Hypertext With hypertext you can select and search for any word or number on the current teletext page...

Страница 20: ...ht and press OK é Select Accept and press OK again The message Searching appears When the word is found it is highlighted in the teletext page To continue the search press the OK key twice When a word is not found a message appears To search for a new word select Keyboard and press OK Select the new word Reveal Reveals conceals hidden information on a page such as solutions to riddles and puzzles ...

Страница 21: ...sc cannot be played and you will have to remove it Press the OPEN CLOSE Ï button on the front of the TV or when in DVD mode the key on the remote control to open the disc tray é Place your disc in the tray label side up Press the OPEN CLOSE Ï button or when in DVD mode the key on the remote control again to close the disc tray 21 Using the DVD player Introduction to DVD Video The Universal DVD Vid...

Страница 22: ... title chapter DVD discs are divided into different chapters to allow certain scenes to be accessed directly Press the T C key to access the Title or Chapter menu directly Use the P keys to go to the previous or next chapter Disc menu Press the disc MENU key to summon the menu of the DVD disc Its contents are entirely dependent on the DVD disc It allows access to different sections such as choice ...

Страница 23: ...lay your favourite tracks To stop playing favourite tracks position the FTS setting to off è To clear the Program line use the cursor down to select Clear all and press OK To remove a tracknumber from the Program line select the tracknumber in the Program line and press OK 23 Using the DVD player VCR AUX º Ò π Q R v b M a h AUDIO SUBTITLE T C S MODE RESUME TV DVD MENU SETUP i U æ Ì 0 q 1 2 3 4 5 6...

Страница 24: ... or forwards frame by frame Press π to resume normal play Slow motion fast motion Select N for slow motion or for fast motion and press the cursor down Use the cursor left right to select the desired speed To resume normal speed press π Angle Some DVDs include sequences recorded from several camera angles Generally a special icon will appear Select D on the menu bar and use the cursor up down to s...

Страница 25: ...5 minutes PBC Playback Control to activate or deactivate the possibility to directly select a title on certain Video or Super Video CDs Help text when set to on help text describes the symbols selected in the top menu bar Favourite Track Selection This function allows you to programme a selection of your favourite chapters from the DVD into the memory 25 Using the DVD player Press the SETUP key On...

Страница 26: ...hen the Child lock function is switched on you will be asked to enter your code to authorise the playing of the DVD or Video CD Insert a disc The child lock dialogue appears é You will be asked to enter your secret code for Play once or Play always If you select Play once the disc can be played as long as it is in the player and the television remains on and in DVD mode If you select Play always t...

Страница 27: ...e Decoder p 11 You can also connect your decoder directly to EXTERNAL 1 or 2 with a eurocable CABLE 1 4 2 EXT 2 3 Connect the aerial cables 1 2 and to obtain the optimum picture quality eurocable 3 as shown If your recorder is provided with the EasyLink function the eurocable supplied with it should be connected to EXTERNAL 2 to benefit from the EasyLink functionality except Digital Sources Record...

Страница 28: ...ust be between 8 and 4000 Ohm The headphone socket has a 3 5 mm jack In the Sound menu select Headphone volume to adjust the headphone volume Note The surround mode is always stereo when the headphone is connected Side connections 1 3 2 Connect your digital equipment with a eurocable 1 to one of the euroconnectors EXT1 EXT2 or EXT3 or with a cinch cable to the VIDEO input at the right side of the ...

Страница 29: ...rate loudspeakers Note Once you have adjusted the volume of the rear loudspeakers do not change it while watching TV as the whole configuration operates with the volume adjustment of your TV Stereo amplifier and two extra FRONT speakers To enhance the sound reproduction of your TV you can connect two extra front loudspeakers via an external amplifier Connect the audio cables to the audio input of ...

Страница 30: ...l and speaker connections have to be done via the external surround receiver Attention The sound info on screen will not correspond with the actual sound reproduction No sound will be heard when a TV channel or external source is blocked via the Child lock menu see p 15 If you want to connect more equipment to your TV consult your dealer DIGITAL AUDIO OUT OPT OUT COAXIAL Equipment connected with a...

Страница 31: ...eiver VCR AUX º Ò π Q R v b M a h AUDIO SUBTITLE T C S MODE RESUME TV DVD MENU SETUP i U æ Ì 0 q 1 2 3 4 5 6 7 8 9 0 V P MENU OK B MODE CHILD MOVIE SPORT NEWS If your Recorder is equipped with NEXTVIEWLink and you tagged one or more programmes to be recorded automatically in the NEXTVIEW mode it is not necessary for the TV to be in the standby mode or switched on for the recording to start Record ...

Страница 32: ... starts recording the programme you are watching Switching programme numbers on your TV does not disturb recording When recording a programme from a peripheral connected to EXTERNAL 1 3 or SIDE you can not select another TV programme on the screen To watch TV programmes again press the programme number you want to select twice Attention the recording is stopped and your recorder switches to standb...

Страница 33: ...r is in standby During sound transmission the indicator turns to green 10 15 min after the sound transmission of the TV has stopped the indicator turns back to red to indicate the low power standby To switch the active speaker off use the POWER switch WIRELESS MODULE Appendix Wireless Surround speaker system Setup Speakers menu Press the MENU key on the remote control Use the cursor down to select...

Страница 34: ... is properly connected See Surround Modes p 13 Remote control If your TV no longer responds to the remote control the batteries may be dead or the wrong mode TV or other peripheral see p 31 is selected You can still use the MENU key and the keys at the top of your TV The DVD player doesn t work Make sure that the disc is not scratched and it is clean Clean the disc with a soft cloth wiping from th...

Страница 35: ...r equipment NEXTVIEW NEXTVIEW is a new feature to assist the TV and VCR user in selecting the programmes she or he likes to watch from a television programme guide on the screen It enables the user to see a description of every programme and mark interesting programmes to be reminded auto TV on or recorded NEXTVIEWLink Recorder required Smart Picture and Sound Controls Keys on the remote control t...

Страница 36: ......

Отзывы: