19
Y
our television comes with an on-screen
clock. During normal operation, the clock
appears on the screen when the STATUS/EXIT
button is pressed or if the TIMER DISPLAY
control is turned ON.
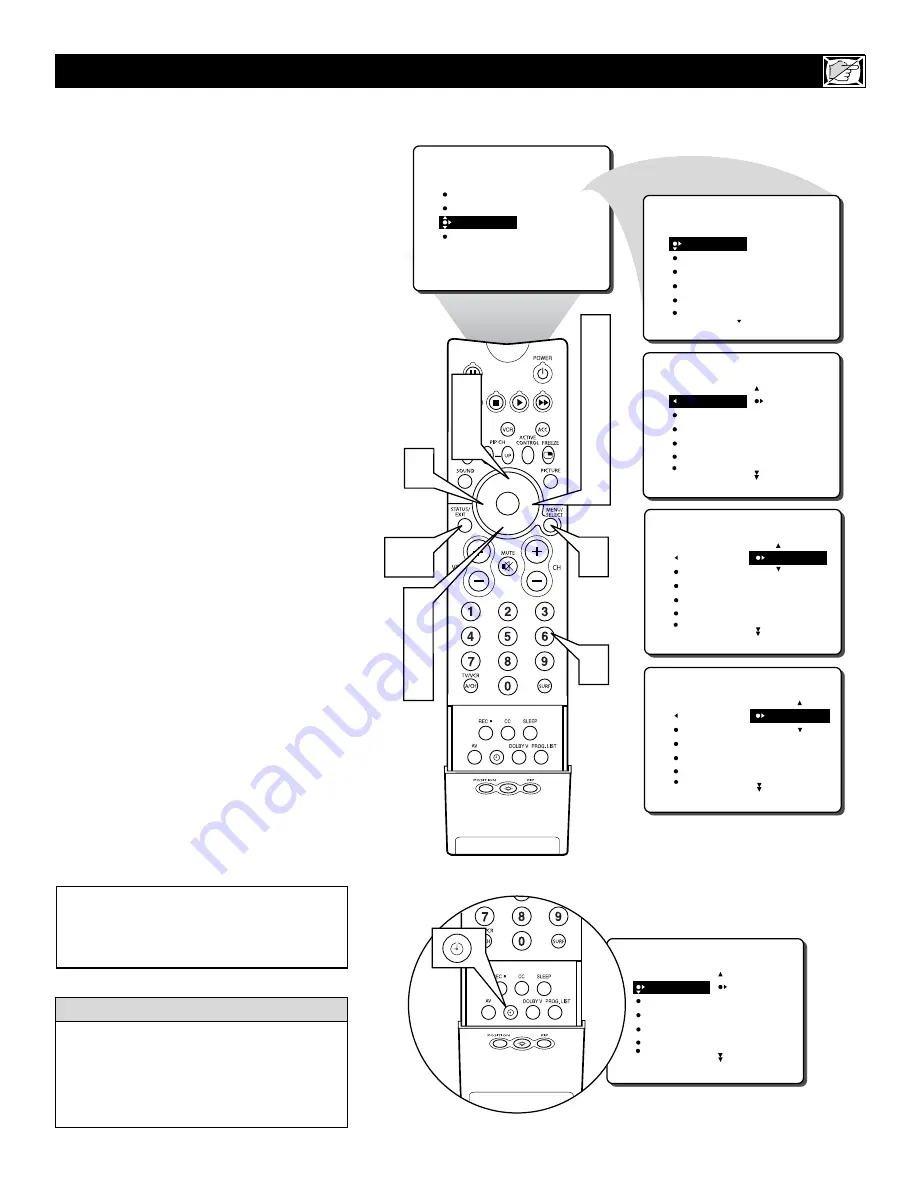
1
Press the MENU button
on the
remote control to show the onscreen
menu.
2
Press the CURSOR DOWN button
twice to highlight FEATURES.
3
Press the CURSOR RIGHT button
and
the menu will shift to the left. TIMER will
be highlighted.
4
With TIMER selected, press the CUR-
SOR RIGHT button
again to shift the
display left and highlight the TIME con-
trol.
5
Press the CURSOR RIGHT button
again to highlight the time indicator area.
6
Press the CURSOR LEFT or CURSOR
RIGHT button
to select the position or
digit you wish to enter.
7
Press the CURSOR UP or CURSOR
DOWN button
to select the digits for the
time.
Or press the NUMBERED but-
tons
to enter the correct time.
8
Press the CURSOR RIGHT button
to
move to the AM or PM position.
9
Press the CURSOR UP or DOWN
button
to set AM or PM.
Press the STATUS/EXIT button
to
remove the menu from the screen.
S
ETTING THE
TV C
LOCK
U
SING THE
T
IMER
C
ONTROL
PICTURE
SOUND
FEATURES
INSTALL
TIMER
ACTIVE CTRL
AutoLock
PIP
CLOSED CAP
FEATURES
TIMER
ACTIVE CTRL
AutoLock
PIP
CLOSED CAP
TIME
START TIME
STOP TIME
CHANNEL
ACTIVATE
FEATURES
TIME
_ _:_ _ AM
START TIME
STOP TIME
CHANNEL
ACTIVATE
TIMER
TIME
10:30 AM
START TIME
STOP TIME
CHANNEL
ACTIVATE
TIMER
FEATURES
FEATURES
FEATURES
TIME
10:_ _ AM
START TIME
STOP TIME
CHANNEL
ACTIVATE
TIMER
FEATURES
10
1
3
4
5
6
8
2
7
9
6
7
9
7
Remember, be sure to press
0
first and then
the hour number for single-digit entries.
The TV’s clock settings may be lost when the
TV is unplugged (or when AC power to the set
is interrupted).
H
ELPFUL
H
INT
10
TIME
_ _:_ _ AM
START TIME
STOP TIME
CHANNEL
ACTIVATE
TIMER
FEATURES
NOTE:
The
TIMER Controls
can also be
accessed by
pressing the CLOCK button
on the remote control
. See lower diagram
on this page.


