background image

Supported XML-tags

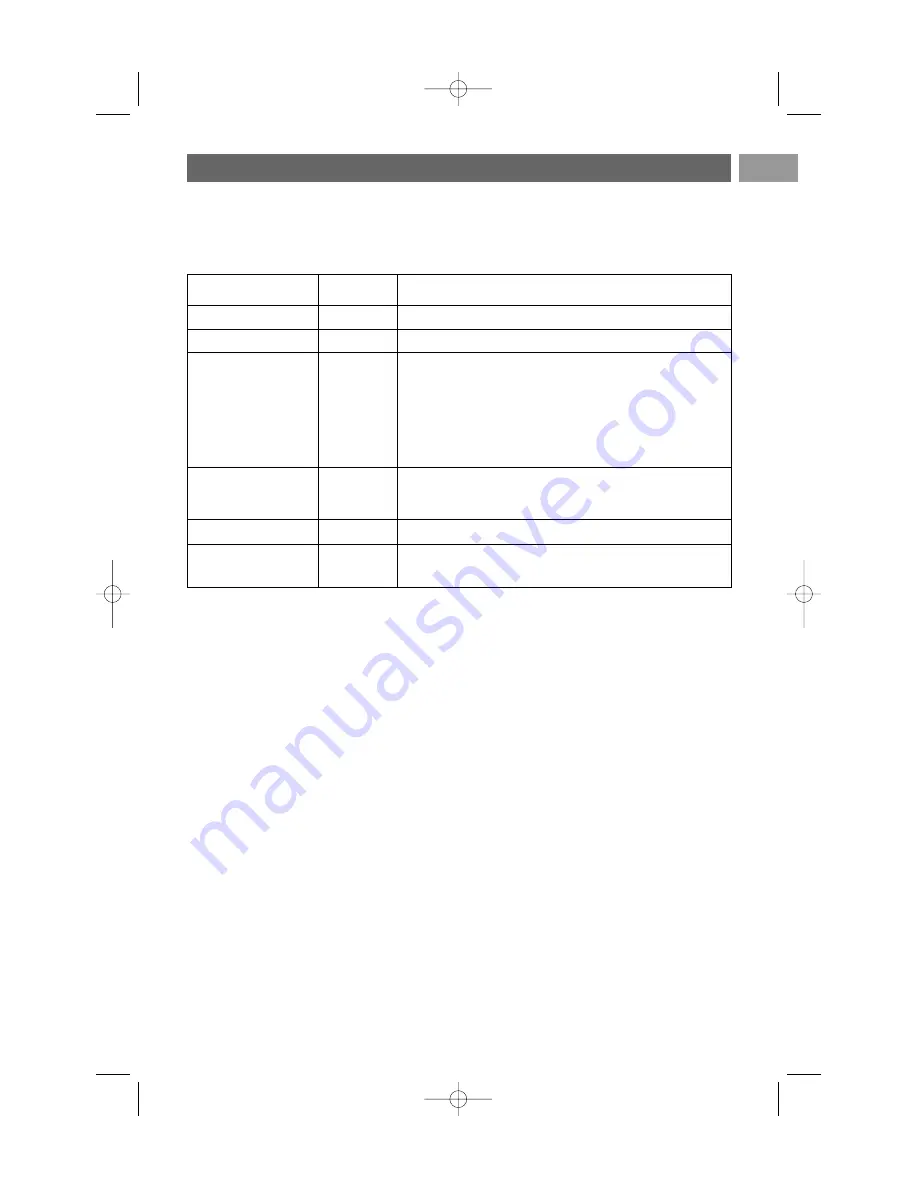
The following table gives a description of the XML syntax.

Annex 2  (Continued)

51

EN

Tag Name

philips-slideshow

title

audio

slide-duration

slides

slide

Use

mandatory

optional

optional

optional

mandatory

optional

Description

Philips slideshow signature including the version.

The title of the playlist.

The audio-URL following this tag will define the music playing
in the background during the slideshow.
A single song or playlist (.m3u & .pls) are the only valid audio
references. Other reference will not result in any audio
playback. If a single song is referenced the song will be
repeated forever. If a playlist is referenced the playlist will be
played in sequence with a repeat at the end of the playlist.

The default display time (in 0,1 second) of a slide. The TV
application isn’t obliged to support this tag. The TV application
can force the use of one or multiple predefined display times.

Identifies the slides to show.

Identifies the URL of the individual slide.

2564.1 en  04-09-2006  14:19  Pagina 51

Содержание 32PF9431

Страница 1: ...ome Cinema amplifier 43 Select connected equipment 44 Record with your recorder 44 Audio and video equipment keys 45 Troubleshooting 46 Annex 1 Philips TV software upgrade with portable memory 48 Annex 2 Philips TV Slideshow Format with background music 51 Annex 3 Philips TV Digital camera and USB issues 52 Annex 4 Issues referring to connected peripherals with a HDMI conector 53 Index 54 Recyclin...

Страница 2: ... as possible Their long time contact with the screen causes deformations and colour fading A characteristic of LCD and Plasma Display Panels is that displaying the same image for a long time can cause a permanent after image to remain on the screen This is called phosphor burn in Normal use of the TV should involve the showing of pictures that contain constantly moving and changing images that fil...

Страница 3: ...s at the bottom of the TV and in a wall socket or hang the TV on the wall before all connections are made L Pr H R Pb V Y R B G Pr Pb L Y R S VIDEO S VIDEO AUDIO AV2 AV3 AV1 VIDEO VIDEO 75 DIGITAL AUDIO IN AUDIO VGA PC viaRGB HV HDMI 1 HDMI 2 ANTENNA 75 o DIGITAL AUDIO OUT o DISPLAY SYNCHRONIZED o o o o o AUDIO L R VIDEO OUT MONITOR L Pr H R Pb V Y R B G Pr Pb L Y R S VIDEO S VIDEO AUDIO AV2 AV3 A...

Страница 4: ... socket Getting started Continued EN 4 Tip for best quality use the suppressor cable supplied Warning verify that the mains supply voltage corresponds to the voltage printed on the sticker at the rear of the TV USB Overview of the side connector panel Connect the antenna Connect the mains Remote control Insert the 2 batteries supplied Type R6 1 5V Be sure the and ends of the batteries line up corr...

Страница 5: ... Demo menu on or off Colour keys When functions are attached to the colour keys the colour keys are shown on screen To select a page in Teletext mode OPTION To open and close the Quick access menu which contains a few frequently used options like Picture format When in teletext press repeatedly to enlarge the teletext page display See Teletext p 33 a no function Cursor keys Press the cursor keys u...

Страница 6: ...lation menu Select your connections p 26 0 Previous channel Press to alternate between the currently viewed and the previously viewed TV channel Ò π Audio and Video equipment keys See Audio and Video equipment keys p 45 See Multimedia browser functional keys p 29 CANCEL no function no function FAV To display the channels list You can create up to four favourite lists Use of the remote control RC43...

Страница 7: ...on 4 Use the cursor keys to make a selection 5 Press the OPTION key to exit Subtitles See Adjust feature menu settings p 19 Picture format See Use of the TV menu settings Adjust picture menu settings p 16 Equalizer See Use of the TV menu settings Adjust sound menu settings p 17 Clock Select to activate deactivate the clock display on the screen DVD STB TV VCR AUX MENU SELECT DEMO BROWSE a OPTION O...

Страница 8: ...hannel selection and volume adjustment you can still change some of the basic settings with the keys at the right side of your TV Press the power switch B to switch the TV on or off The MENU key can be used to summon the TV menu without the remote control Use the VOLUME and keys and the PROGRAM CHANNEL and keys to select menu items the MENU key to confirm your selection MENU PROGRAM CHANNEL VOLUME...

Страница 9: ...stallation All available TV channels are searched for and stored automatically This will take a few minutes 3 Press the red colour key when the search is completed Note if you choose to install the channels at a later time select the Automatic installation in the TV menu Installation Channels p 22 to scan available channels Note if the TV has already been installed before and or you want to change...

Страница 10: ... completed and how many screens there are in total The Settings assistant will step sequentially through the following settings Picture and Sound 5 Press the green colour key again to store all the settings and to return to the TV installation menu 6 Press the green colour key again to finish the First time installation procedure and to display the first stored TV channel Note when you skip or sto...

Страница 11: ...play your personal multimedia files Multimedia is only present when a USB device is connected See Multimedia browser p 29 2 Use the cursor up down to highlight and select a menu item 3 Use the cursor right to enter the highlighted menu item The right panel shows the content of the highlighted menu item 4 Use the cursor up down to select a menu item TV settings allows you to adjust your preferred p...

Страница 12: ...ngs Features Installation Exit Use of the TV menu settings 1 Press the MENU BROWSE key on the remote control The main menu appears on the screen 2 Select TV menu and press the cursor right The TV menu is displayed 3 Select TV settings and press the cursor right The TV settings menu is moved to the left 4 Press the MENU BROWSE key to exit the menu To make it easier to change the settings of the TV ...

Страница 13: ...idual settings for picture and sound This allows you to reset your settings for viewing and listening to predefined factory settings 1 Select Reset to standard and press the cursor right A menu appears which allows you to select one of the standard settings for viewing and listening Current shows your current settings for viewing and listening If you select Natural it allows you to set your pictur...

Страница 14: ...ness Adjusts the light output of the complete picture which will mainly affect the darker areas of the picture Colour Adjusts the saturation level of the colours to suit your personal preference Hue Compensates for the colour variations in NTSC encoded transmissions Sharpness Adjusts the sharpness of fine details in the picture Tint Increases or decreases Warm red and Cool blue colours to suit per...

Страница 15: ...etting as it fully processes the image to make every single pixel the best it can be improving contrast sharpness picture depth and colour reproduction and brilliance from every source including High Definition Select On or Off in order to activate de activate Pixel plus Digital natural motion Reduces the field and line flicker and reproduces smooth movement especially in movies Select Off Minimum...

Страница 16: ...picture formats Auto format Super zoom 4 3 Movie Expand 14 9 Movie Expand 16 9 or Wide screen Auto format makes the picture fill the screen as much as possible In case of subtitles in the bottom black bar Auto format makes the subtitles visible In case of a broadcaster logo in the corner of the top black bar the logo disappears from the screen Super zoom removes the black bars on the sides of 4 3 ...

Страница 17: ...ws you to adjust the sound output level Balance Allows you to adjust the output of the right and left speakers to obtain the best stereo reproduction for your listening position Dual I II Allows you to select per channel Dual I or Dual II when dual sound transmission is available Mono Stereo Allows you to select per TV channel Mono or Stereo sound when stereo broadcasts are available Surround mode...

Страница 18: ...verall level This will also reduce the dynamics of sound Delta volume Allows you to correct for any permanent volume differences between TV channels or external sources Auto surround When switched On this allows the TV to automatically switch to the best surround sound mode the broadcaster transmits Settings assistant Reset to standard Picture Sound Info TV menu TV settings Sound Headphone volume ...

Страница 19: ...V channel 1 Switch on teletext and select the proper subtitle page from the index 2 Switch off teletext 3 Select Subtitle On to display the subtitles on the selected TV channels A symbol will indicate that the mode is on On during mute to automatically display the subtitles only when the sound has been muted with the key on the remote control Sleeptimer This sets a time period after which the TV a...

Страница 20: ...al 4 digit access code that is used in the different lock functions of the TV Select Set or Change code If no PIN code exists yet the menu item is set to Set code Follow the instructions on screen If a PIN code has previously been entered the menu item is set to Change code Follow the instructions on screen Enter your code with the digit keys All number combinations from 0000 to 9999 are valid num...

Страница 21: ... you to get an idea of the features that are part of the television 1 Select Demo 2 Press the cursor right 3 Select a desired demo 4 Press the OK key to start the demo The selected demo is played once 5 Press the red colour key to stop the demo and to return to the demo menu 6 Press the red colour key to exit the demo menu EN 21 Info TV menu Features Subtitle Sleeptimer Childlock Set Change code O...

Страница 22: ... the cursor up down 3 Press the OK key to confirm your selection After language is set correctly you can now search for and store the TV channels Select Channels in the TV Installation menu Automatic installation The TV will scan the entire frequency spectrum All available TV channels are searched for and stored automatically This will take a few minutes When the search is complete the menu will i...

Страница 23: ...nd 7 Select Store current channel if you want to store the fine tuned frequency under the current channel number Press the cursor right and confirm with the OK key 8 Select Store as new channel if you want to store the fine tuned frequency under a new channel number Press the cursor right and confirm with the OK key 9 Use the rearrange menu to rename or reshuffle the channels See next page How to ...

Страница 24: ... stored channel or external so that it is no longer possible to tune to This also allows you to reinstall an earlier uninstalled channel 1 Select the channel you want to uninstall 2 Press the green colour key to uninstall the selected channel The uninstalled channel is indicated in the list by an icon in front of the uninstalled channel 3 Press the green colour key again to reinstall the uninstall...

Страница 25: ...nel information Select Minimum to activate the display of reduced channel information Select Normal to activate the display of extended channel and programme information For example information on the programme input signal quality of connected peripheral equipment the screen format and sound mode ratings remaining time of the sleeptimer setting Display a Programme title This allows you to display...

Страница 26: ...nnect this with a single cable to the TV s Digital Audio In connector In the Connections menu assign the Digital Audio In to the corresponding external input to which your peripheral equipment is connected In addition to accepting audio input via Digital Audio In the TV can output encoded Dolby Digital audio via the DIGITAL AUDIO OUT connector to an external amplifier or receiver If your amplifier...

Страница 27: ...ress the green colour key on your remote control to confirm you have read the message Once you have confirmed the message will not pop up again If however you want to see the last broadcasted announcement again select Announcement in the Software upgrade menu This allows you to reset most of the predefined factory states 1 Select and press the cursor right 2 Press the OK key to erase settings and ...

Страница 28: ...6 Use the cursor up down to select a channel 7 Press the OK key to check or uncheck the highlighted channel and to add it to or remove it from your selected favourite list 8a Press the green colour key again to leave the Edit mode The modified favourite channel list appears Press the FAV key again to exit With the P key you will be able to browse through the TV channels of the selected list 8b Pre...

Страница 29: ...See To make video and audio connections Side panel overview p 35 When a USB device is inserted the Multimedia browser menu is displayed automatically See further To remove the USB device 1 Press the MENU BROWSE key on the remote control to switch off the main menu 2 Remove the USB device Multimedia Browser EN 29 DVD STB TV VCR AUX MENU 1 2 3 4 5 6 SELECT DEMO BROWSE a OPTION OK B i b b P V MENU BR...

Страница 30: ...y on the remote control Multimedia Browser Continued EN 30 Note press the green colour key to display all the image files in the current directory as thumbnails when browsing pictures Press the green key again to display the image files in a list Tip the blue colour key can if necessary be used to let the colour keys reappear Notes your TV supports slide shows with background music See Annex 2 Phi...

Страница 31: ...rsor up down Additionally you can shift the selected zoom window over the screen with the cursor keys Full small screen to toggle between a full or a small screen Multimedia function keys on the remote control Ò to fast rewind displaying content to stop playing content π to play a single file start a slide show playback of a folder or other collection to pause playing content to fast forward displ...

Страница 32: ...layed Select with the cursor up down left right the desired subject and press the OK key Select subpages When a selected teletext page consists of different subpages a list of available subpages appears on the screen Press the cursor left or right to select the next or previous subpage Picture Teletext 1 Press the b key 2 Press the b key to show Teletext on the right of the screen 3 Press the b ke...

Страница 33: ... size Teletext Continued EN 33 The Teletext menu offers various functions to control teletext 1 Switch teletext on and press the MENU BROWSE key to activate the menu 2 Press the cursor up down to select the menu items 3 Press the OK key to activate 4 Press the MENU BROWSE key to leave the teletext menu Reveal Reveals conceals hidden information on a page such as solutions to riddles and puzzles Cy...

Страница 34: ... your TV comes with all types of connectors with the exception of the DVI connector but some of your equipment may be equipped with this type In this case you ll need a DVI to HDMI adapter or a HDMI to DVI cable and separate audio cables all available at your local dealer Warning be sure to connect the DVI output connector first then connect to the HDMI input on your TV Note cables are often colou...

Страница 35: ...sert the plug into the headphone socket L as shown 2 The headphone impedance must be between 8 and 4000 Ohm The headphone socket has a 3 5 mm jack In the Sound menu select Headphone volume to adjust the headphone volume USB See Multimedia browser p 29 To make video and audio connections Side panel overview EN 35 Warning do not connect cable 1 and 2 at the same time This may cause picture distortio...

Страница 36: ... AUDIO OUT o DISPLAY SYNCHRONIZED o o o o o AUDIO L R VIDEO OUT MONITOR VGA DVI DVI DVI CABLE RGB H V AUDIO L R YPbPr AV1 AUDIO L R VIDEO or S VIDEO AUDIO L R AV1 AV3 YPbPr DIGITAL AUDIO IN DIGITAL AUDIO IN HDMI HDMI To make video and audio connections Rear panel overview 36 EN VCR DVD player Satellite receiver 1 DVD recorder 1VCR 2 DVD recorders 2VCRs PC DVI PC VGA DVD player Cable box DVD player...

Страница 37: ...socket of your recorder 2 Connect another RF cable 2 from the output OUT of your recorder to the TV s input CABLE ANTENNA 75 ø x jack 3 Better playback quality can be obtained if you also connect the Video Audio Left and Right only for stereo devices AV cables 3 to the VIDEO AUDIO L and R input jacks of AV2 If your recorder has an S VHS video jack For improved picture quality connect an S video ca...

Страница 38: ...ut OUT of your recorder to the TV s input 75 ø x jack 4 To obtain better picture quality also connect the Video or S Video Audio left and Audio right cables of both devices to AV1 VIDEO or S VIDEO AUDIO L and R 3 and to AV2 VIDEO or S VIDEO AUDIO L and R 5 Notes In case of mono equipment only the left loudspeaker reproduces sound Use a mono to stereo adaptor not supplied for sound reproduction via...

Страница 39: ...onnector do not connect any device to the AV2 VIDEO or AV1 VIDEO input that you are using AV1 AV3 L Pr H R Pb V Y R B G Pr Pb L Y R S VIDEO S VIDEO AUDIO AV2 AV3 AV1 VIDEO VIDEO DIGITAL AUDIO IN AUDIO VGA PC viaRGB HV DVD STB 2 1 DIGITAL AUDIO IN AV1 AV3 YPbPr With Component Video Connectors with digital audio 1 Connect the three separate component video cables 1 to the YPbPr jacks on the DVD play...

Страница 40: ...ed Although the abbreviations may vary the letters B and R stand for the blue and red component signals respectively and Y indicates the luminance signal Refer to the DVD player s instructions for use for definitions and connection details to get an optimal viewing it is advised to switch your equipment to the highest possible supported display modes Warning in case you notice scrolling images wro...

Страница 41: ...he cursor keys With a DVI connector 1 Connect the DVI to HDMI cable to one of the HDMI connectors of your TV 1 2 Connect the audio cable 2 to the DIGITAL AUDIO IN connector of the TV 3 Select the equipment you have connected in the Installation menu Select your connections p 26 and link it to HDMI 1 or 2 4 Also select Digital audio in in the same Connections menu DIGITAL AUDIO IN L Pr H R Pb V Y R...

Страница 42: ...fresh frequency of 60 Hz supported PC monitor modes VGA 640 x 480 SVGA 800 x 600 XGA 1024 x 768 L Pr H R Pb V Y R B G Pr Pb L Y R S VIDEO S VIDEO AUDIO AV2 AV3 AV1 VIDEO VIDEO DIGITAL AUDIO IN AUDIO VGA PC viaRGB HV HDMI 1 HDMI 2 o o HDMI DVI 1 DIGITAL AUDIO IN 2 L Pr H R Pb V Y R B G Pr Pb L Y R S VIDEO S VIDEO AUDIO AV2 AV3 AV1 VIDEO VIDEO DIGITAL AUDIO IN AUDIO VGA PC viaRGB HV AV1 RGB H V 1 AV...

Страница 43: ...at the bottom of the TV Analogue Home Cinema amplifier Connect your Home Cinema amplifier to the AUDIO OUT L and R connectors 2 at the bottom of the TV DIGITAL AUDIO OUT o DISPLAY SYNCHRONIZED o o o AUDIO L R VIDEO OUT MONITOR Tip to avoid visible delay between picture and sound use the DIGITAL AUDIO OUT connector to connect your Home Cinema amplifier DIGITAL AUDIO OUT 1 AUDIO OUT 2 2564 1 en 04 0...

Страница 44: ...ENU 1 2 3 4 5 6 BROWSE a OPTION OK b P V MENU BROWSE Record a TV programme You can record a TV programme using your recorders tuner without affecting your TV 1 Select the channel number on your recorder 2 Set your recorder to record See the handbook for your recorder Record a programme from MONITOR OUT You can record a programme on your recorder from the TV tuner via MONITOR OUT 1 Switch on the de...

Страница 45: ... selection 0 to 9 digit entry cursor up down to select the next or the previous disc CD cursor left right to select the previous or following track CD 0 to select a DVD title chapter index AUX b to select your choice of subtitle language DVD Audio and video equipment keys EN 45 DVD STB TV VCR AUX MENU 1 2 3 4 5 6 7 8 9 0 SELECT DEMO BROWSE a 0 OPTION AV MHEG CANCEL OK B i b b P V v π Ò FAV Notes I...

Страница 46: ...emote is set correctly for the equipment your are using not function Verify if the batteries are not dead Replace the batteries You can still use the keys at the right side of the TV Select TV mode on your remote control When pressing a key and some key leds are blinking with a higher speed and lower intensity than in a normal working condition and your TV does not react on the key press remove th...

Страница 47: ...owser on your PC 2 Follow the procedure to find the information and the software related to your TV 3 Select the latest software upgrade file and download it to your PC 4 Decompress the ZIP file and copy the file autorun upg to the root directory of the USB portable memory To verify the version of the TV software Before you start the software upgrade procedure it is advised to check what the curre...

Страница 48: ...ove the USB portable memory during the software upgrade procedure in case of a power drop during the upgrade procedure don t remove the USB portable memory from the TV The TV will continue the upgrade as soon as the power comes back if you try to upgrade to a software version lower than the current version a confirmation will be asked Downgrading to older software should only be done in case of re...

Страница 49: ... key to start the upgrade Your TV will restart and will automatically go to the upgrade mode After a few seconds it will display the status of the upgrade procedure 4 When the software upgrade was successful remove the USB portable memory and restart your TV with the power switch B at the side of the TV Your TV will start up with the new software Annex 1 Continued EN 49 Warning if you try to upgra...

Страница 50: ...tent are based on a relative path starting from the directory where the slideshow is stored This path includes the device or drive name of the PM An absolute path to content will also be supported relative path pictures test1 jpg tamper jpg new bird jpg absolute path USB1 pictures1 foo_bar jpg C f1 jpg organization jpg General Format The format and syntax below will be used to create the slideshow...

Страница 51: ...the slideshow A single song or playlist m3u pls are the only valid audio references Other reference will not result in any audio playback If a single song is referenced the song will be repeated forever If a playlist is referenced the playlist will be played in sequence with a repeat at the end of the playlist The default display time in 0 1 second of a slide The TV application isn t obliged to su...

Страница 52: ...ice using a personal computer Some digital cameras allow you to switch between PTP Picture Transfer Protocol or PC Link and USB Mass Storage Make sure that you select USB Mass Storage or PC Drive on your digital camera If your camera supports different interface settings be sure to try them one by one or contact the reseller of your camera to find out the correct setting USB Memory Device Issues D...

Страница 53: ...ntent outputted via HDMI from being copied It provides a secure digital link between a video source DVD PC etc and your TV Content is encrypted at the source peripheral equipment to prevent unauthorised copies from being made Proper working is only guaranteed with HDMI compliant consumer products Limit the cable length to max 5 m Digital peripheral equipment from different manufacturers have the p...

Страница 54: ...menu language 22 mono stereo 17 MPEG reduction 16 multimedia browser 29 mute key 5 navigate through the menus 11 on screen language 9 on screen information 6 on timer 21 option key 7 OK key 5 OSD 25 PC 42 picture adjustment menu 14 picture format 16 PIN code 20 pixel plus 15 preferences menu 25 previous channel 6 programme title 25 quick access menu 7 rear panel overview 36 rearrange channel list ...

Страница 55: ...rial and components which can be recycled and reused When this crossed out wheeled bin symbol is attached to a product it means the product is covered by the European Directive 2002 96 EC Please inform yourself about the local separate collection system for electrical and electronic products Please act according to your local rules and do not dispose of your old products with your normal household...

Страница 56: ...56 2564 1 en 04 09 2006 14 19 Pagina 56 ...

Отзывы: