background image

6

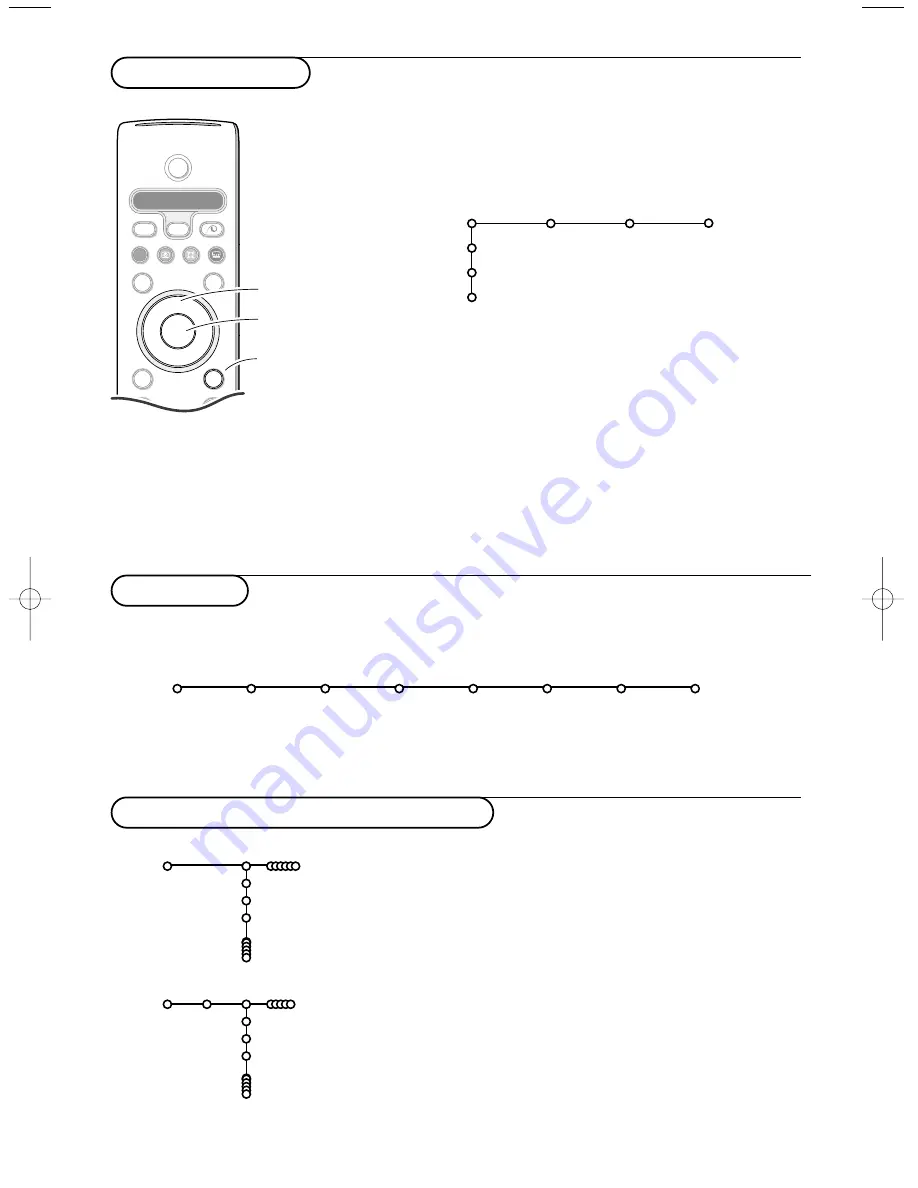
To use the menus

&

Press the 

MENU

key on the remote control to summon the

main menu. At any moment you can exit the menu by
pressing the 

MENU

key again.

Note: If you have connected equipment with Cinema Link, more
menu items are present.

é

Use the cursor in the up/down direction to select the 

TV

,

Setup

,

Demo

or 

Install

menu. Use the cursor left/right to

select 

Picture

,

Sound

or 

Features

.

Note: Sometimes not all the menu items are visible on the screen
(indicated by a cluster of blue balls). Use the cursor down or right
to reveal all items.

Use the cursor in the left/right direction to select the menu
item.

Use the cursor up/down again to select the control you
want to select or to adjust.

Note: Items temporary not available or not relevant are displayed
in a light grey colour and cannot be selected.

B

b

¬

+

-

V

+

-

P

v

Select

VCR DVD SAT AMP CD

MENU

OK

Ò

®

π

S

®

®

®

®

æ

cursor to select
adjustments

OK

key to

activate

return or switch
main menu on/off

TV

Setup

Demo

Install

Picture         Sound          Features

Installation

&

Press the 

MENU

key on the remote control.

é

Use the cursor down to select 

Install

.

Use the cursor right to select 

Language

.

Follow the instructions on screen.

Use the cursor up/down to select your preferred language
and press the 

OK

key to confirm your selection.

(

Use the cursor right to select 

Country

.

§

Select the country where you are now located and press
the 

OK

key.

Select 

Other

when none of the countries applies.

è

Proceed with the Install menu.

Install

Language    Country    Automatic      Manual     Give name   Reshuffle  Favourite

install         install                                   programmes

The installation menu contains the following items:

EasyLink

If your video recorder has an EasyLink function, during installation, the language, country and available channels are
automatically transmitted to the video recorder.

Language

English

Deutsch

Français

Install

Country

Austria

Belgium

Croatia

Install

Select the menu language and country

2209.1 gb  11-02-2003  10:17  Pagina 6

Содержание 28PW9618

Страница 1: ...tv ...

Страница 2: ......

Страница 3: ...ed on the type plate on the rear panel of the TV If the mains voltage is different consult your dealer Important This apparatus is fitted with an approved moulded 13 Amp plug To change a fuse in this type of plug proceed as follows 1 Remove fuse cover and fuse 2 Fit new fuse which should be a BS1362 5A A S T A or BSI approved type 3 Refit the fuse cover In order to maintain conformity to the EMC d...

Страница 4: ......

Страница 5: ...th the television and the video cassette recorder provided both are fitted with the EasyLink function and connected with the eurocable supplied with your video recorder R End of life directives Philips is paying a lot of attention to producing environmentally friendly in green focal areas Your new TV contains materials which can be recycled and reused At the end of its life specialised companies c...

Страница 6: ...y metals mercury and cadmium Please check on how to dispose of exhausted batteries according to local regulations Switch the TV on Press the power switch A on the front of your TV An indicator on the front of the TV lights up and the screen comes on If the TV is in standby mode red indicator press the P keys on the remote control 2 Keys on top of the TV Should your remote be lost or broken you can...

Страница 7: ...ult to channel 1 in the factory The indicator on the receiver box shows that the speakers are in standby During sound transmission the indicator turns to green 10 15 min after the sound transmission of the TV has stopped the indicator turns back to red to indicate the low power standby The system has already been configured in the factory to work properly In rare circumstances interference from ex...

Страница 8: ...rround mode Press this key repeatedly to select another available surround mode Ì Cinema Go See separate Cinema Link booklet supplied æ NEXTVIEW on off p 17 Press the b key to show NEXTVIEW Teletext Guide on the right half of the screen S Freeze Replay Photo finish To freeze the picture See also p 10 x Pixel Plus demo on off In the right part Pixel Plus and Digital Natural Motion are switched on b...

Страница 9: ...ntrol see p 13 q Picture format Press this key repeatedly or press the cursor up down to select another picture format Auto format Super zoom 4 3 Movie Expand 14 9 Movie Expand 16 9 Subtitle zoom or Wide screen Auto format makes the picture fill the screen as much as possible In case of subtitles in the bottom black bar Auto format makes the subtitles visible If subtitles are only partly visible p...

Страница 10: ...K Ò π S æ cursor to select adjustments OK key to activate return or switch main menu on off TV Setup Demo Install Picture Sound Features Installation Press the MENU key on the remote control é Use the cursor down to select Install Use the cursor right to select Language Follow the instructions on screen Use the cursor up down to select your preferred language and press the OK key to confirm your s...

Страница 11: ...hannel Make your choice with the cursor and press the OK key After language and country are set correctly you can now search for and store the TV channels in two different ways using Automatic Installation or Manual Installation tuning in channel by channel Select your choice with the cursor right Automatic install Install Start Install Manual installation Automatic installation Searching for and ...

Страница 12: ...ighlighted character in the name entered Shift to display upper or lowercase characters on the keyboard Special to display special characters on the keyboard Press OK to confirm Press the cursor left repeatedly when you have finished the name giving Select another programme number and repeat steps to Give name Reshuffle the programme list p π Space Delete ABCDEFG 123 HIJKLMN 456 OPQRSTU 789 VWXYZ ...

Страница 13: ...the surround speakers To avoid interference in picture the wireless transmitter might be automatically switched off In rare cases when no RF surround sound is possible or when there is too much interference use the wired back up solution with a 3 5 mm stereo jack In this case select Off in the Wireless surround menu item See Connect Peripheral equipment Wired rear loudspeakers p 22 To front To sur...

Страница 14: ...creens PIP is selected the TV shows a full screen of video with a pip window of video on top if it PIP3 or PIP12 is selected the TV will display 3 or 12 pip screens Freeze format Freeze format allows you to select among three options Freeze Replay or Photo finish to be activated when you press the S key on the remote control See p 4 Note Continuing to hold the S key down will also cycle the TV thr...

Страница 15: ...nd receiver to the TV see p 23 the loudspeakers of the TV can act as centre speaker making a separate centre speaker unnecessary Select Centre input On or Cinema Link in case you have connected a Cinema Link Surround receiver When having selected On you can adjust the Centre in volume with the cursor left right to correct volume level differences of the external audio receiver and speakers Note Th...

Страница 16: ...before adjusting the picture settings see Select TV setup General p 10 Smart picture Select Smart picture to display a list of predefined picture settings each corresponding with specific factory settings Personal refers to the personal preference settings of picture in the picture menu Digital options Pixel Plus is the most ideal setting doubles the horizontal resolution and increases the number ...

Страница 17: ...d Equalizer Volume Headphone volume Surround mode Dual I II Mono Stereo Nicam Analogue Delta volume Night mode TV Active Control The TV continuously measures and corrects all incoming signals in order to provide the best picture possible Press the h key on the remote control é The Active Control menu appears Press the cursor up down to select the Active Control values Off Minimum Medium recommende...

Страница 18: ...se of a Cinema Link receiver configuration connected only the surround modes of the external receiver can be selected Dolby Digital When you have connected a DVD player or a Laser Disc player see Connect Peripheral equipment Digital equipment p 21 you can enjoy MultiChannel Surround Sound in your home when playing discs recorded in Dolby Digital In addition to the centre the left and right interna...

Страница 19: ...ou have to re enter your code each time you enter the child lock menu Important You have forgotten your code See p 11 Select one of the menu items of the child lock menu Lock if you want to lock all channels and externals Custom lock and press the cursor right The items Age lock and Category lock are only available when NEXTVIEW broadcast is available Select Age lock if you want to lock programmes...

Страница 20: ...al sources in the highlighted screen Scan PIP3 or PIP 12 Navigate to the lowest PIP to display and press the cursor down to display a following series of PIP screens Define the position and the size of the single PIP screen Select a Dual screen mode with a single PIP screen é Press the cursor down to highlight the PIP screen A PIP menu appears with which you can define the position and the size of...

Страница 21: ...enu General NEXTVIEW provider p 10 This logo is only displayed during a NEXTVIEW transmission or when one of the externals is selected No logo indicates a teletext programme guide Programme name and broadcast time Review Record Remind Watch Lock M o n0 3 M o n0 3 T u e0 4 W e d0 5 T h u0 6 F r i0 7 S a t0 8 puck function keys NEXTVIEW guides BBC1 18 00 BBC News BBC2 18 00 The Simpsons CNN 18 00 Wo...

Страница 22: ...the function is not available Review this menu provides a list of programmes that are marked as reminders those that have to be recorded and those that are locked This menu can be used to change or remove marked programmes Record to programme the recording of the video recorder if it has a NEXTVIEWLink function and is connected to EXT 2 Remind automatically switch on the TV if it is in standby or ...

Страница 23: ...e by line using the cursor up down Active screen selection When in dual screen picture teletext enter the desired page number with the P key then press the MENU key then select the left screen with the blue ball at the top You can now select a compressed or full screen view of picture teletext with the q key Hypertext With hypertext you can quickly jump to a pagenumber or search for a specific wor...

Страница 24: ...ress the OK key Press the cursor left repeatedly to return to the Teletext menu again Searching a word Type in the word on screen or select a word from the history list on the right and press OK é Select Accept and press OK again The message Searching appears To cancel the searching or to search for a new word select Keyboard and press OK When a word is not found a message appears When the word is...

Страница 25: ...nect your decoder directly to EXT 1 or 2 with a eurocable Other equipment except digital sources Connect the aerial cables 1 2 and 3 as shown only if your peripheral has TV aerial in output Better picture quality can be obtained if you also connect eurocable 5 to EXT 2 and a eurocable 4 to EXT 1 3 or 4 é Look for the test signal of your peripheral in the same way as you do for a recorder When a re...

Страница 26: ...rround sound is possible or when there is too much interference you can still enjoy Dolby Pro Logic II and Dolby Digital surround sound by connecting the wireless receiver box to the TV with a stereo cinch to stereo 3 5 mm jack cable Connect the not supplied cable to the AUDIO IN TV connector 4 at the wireless receiver box and the R and L surround outputs at the back of the TV é Select Off in the ...

Страница 27: ...e TV mode If your EasyLink recorder has the system standby function when you press the B key for 3 seconds both TV and the recorder are switched to standby Ò p π Ï Rwd Play Stop Play Ffw Rec Eject Recorder Ò p π Ï Prev Play Stop Play Next Eject DVD Connect audio receiver MultiChannel surround receiver with or without digital input connectors Connect a MultiChannel surround receiver to the AUDIO OU...

Страница 28: ...nguage DVD RDS news TA AMP to shuffle play CD b to select a DVD title RDS display AMP info on screen CD i display information MENU to switch the menu on or off P for chapter channel track selection 0 to 9 digit entry 0 tape index VCR select a DVD chapter select a frequency AMP U VCR timer Q surround on off AMP CD cursor up down to select the next or the previous disc CD cursor left right to select...

Страница 29: ... the cause of digital image distortion In this case select the Soft setting using the Picture menu Smart Picture without changing the picture settings manually No sound No sound on any channel Check the volume isn t at minimum Is the sound interrupted with the mute key Check if your speaker configuration corresponds with the selections made in the Setup menu Speakers p 9 No sound from the connecte...

Страница 30: ...ess receiver box at least 15 cm above ground level The distance between the TV and the wireless receiver box should be 2 m External RF equipment mobile telephones or people moving around close to the TV may disturb the sound transmission When no RF surround sound is possible or when there is too much interference try to switch to another wireless channel or use the wired back up solution See Wired...

Страница 31: ...UROPE CHANNEL FREQ MHz E2 48 25 E3 55 25 E4 62 25 E5 175 25 E6 182 25 E7 189 25 E8 196 25 E9 203 25 E10 210 25 E11 217 25 E12 224 25 S1 105 25 S2 112 25 S3 119 25 S4 126 25 S5 133 25 S6 140 25 S7 147 25 S8 154 25 S9 161 25 S10 168 25 S11 231 25 S12 238 25 S13 245 25 S14 252 25 S15 259 25 S16 266 25 S17 273 25 S18 280 25 S19 287 25 S20 294 25 H1 303 25 H2 311 25 H3 319 25 H4 327 25 H5 335 25 H6 343...

Страница 32: ...Printed in Belgium 3104 315 2209 1 English ...

Отзывы: