background image

3

IMPORTANT SAFETY INSTRUCTIONS

Read before operating equipment

1.

Read these instructions.

2.

Keep these instructions.

3.

Heed all warnings.

4.

Follow all instructions.

5. 

Do not use this apparatus near water.

6. 

Clean only with a dry cloth.

7.

Do not block any of the ventilation openings. Install in accordance
with the manufacturers instructions.

8. 

Do not install near any heat sources such as radiators, heat regis-
ters, stoves, or other apparatus (including amplifiers) that produce
heat.

9. 

Do not defeat the safety purpose of the polarized or grounding-
type plug. A polarized plug has two blades with one wider than
the other. A grounding type plug has two blades and third ground-
ing prong. The wide blade or third prong are provided for your
safety. When the provided plug does not fit into your outlet, con-
sult an electrician for replacement of the obsolete outlet.

10.

Protect the power cord from being walked on or pinched particu-
larly at plugs, convenience receptacles, and the point where they
exit from the apparatus.

11.

Only use attachments/accessories specified by the manufacturer.

12.

Use only with a cart, stand, tripod, bracket, or table 

specified by the manufacturer, or sold with the app-

aratus. When a cart is used, use caution when moving      

the cart/apparatus combination to avoid injury from tip-over.

13.

Unplug this apparatus during lightning storms or when unused for
long periods of time.

14. 

Refer all servicing to qualified service personnel. Servicing is
required when the apparatus has been damaged in any way, such
as power-supply cord or plug is damaged, liquid has been spilled
or objects have fallen into apparatus, the apparatus has been
exposed to rain or moisture, does not operate normally, or has
been dropped.

15.

This product may contain lead and mercury. Disposal of these
materials may be regulated due to environmental considerations.
For disposal or recycling information, please contact your local
authorities or the Electronic Industries Alliance: www.eiae.org

16. Damage Requiring Service 

- The appliance should be serviced

by qualified service personnel when:

A.

The power supply cord or the plug has been damaged; or

B.

Objects have fallen, or liquid has been spilled into the appli-
ance; or

C.

The appliance has been exposed to rain; or

D.

The appliance does not appear to operate normally or
exhibits a marked change in performance; or

E.

The appliance has been dropped, or the enclosure damaged.

17. Tilt/Stability

- All televisions must comply with recommended

international global safety standards for tilt and stability properties
of its cabinet design.
• Do not compromise these design standards by applying exces-
sive pull force to the front, or top, of the cabinet which could ulti-
mately overturn the product.
• Also, do not endanger yourself, or children, by placing electron-
ic equipment/toys on the top of the cabinet. Such items could
unsuspectingly fall from the top of the set and cause product dam-
age and/or personal injury. 

18. Wall or Ceiling Mounting 

- The appliance should be mounted to

a wall or ceiling only as recommended by the manufacturer.

19. Power Lines 

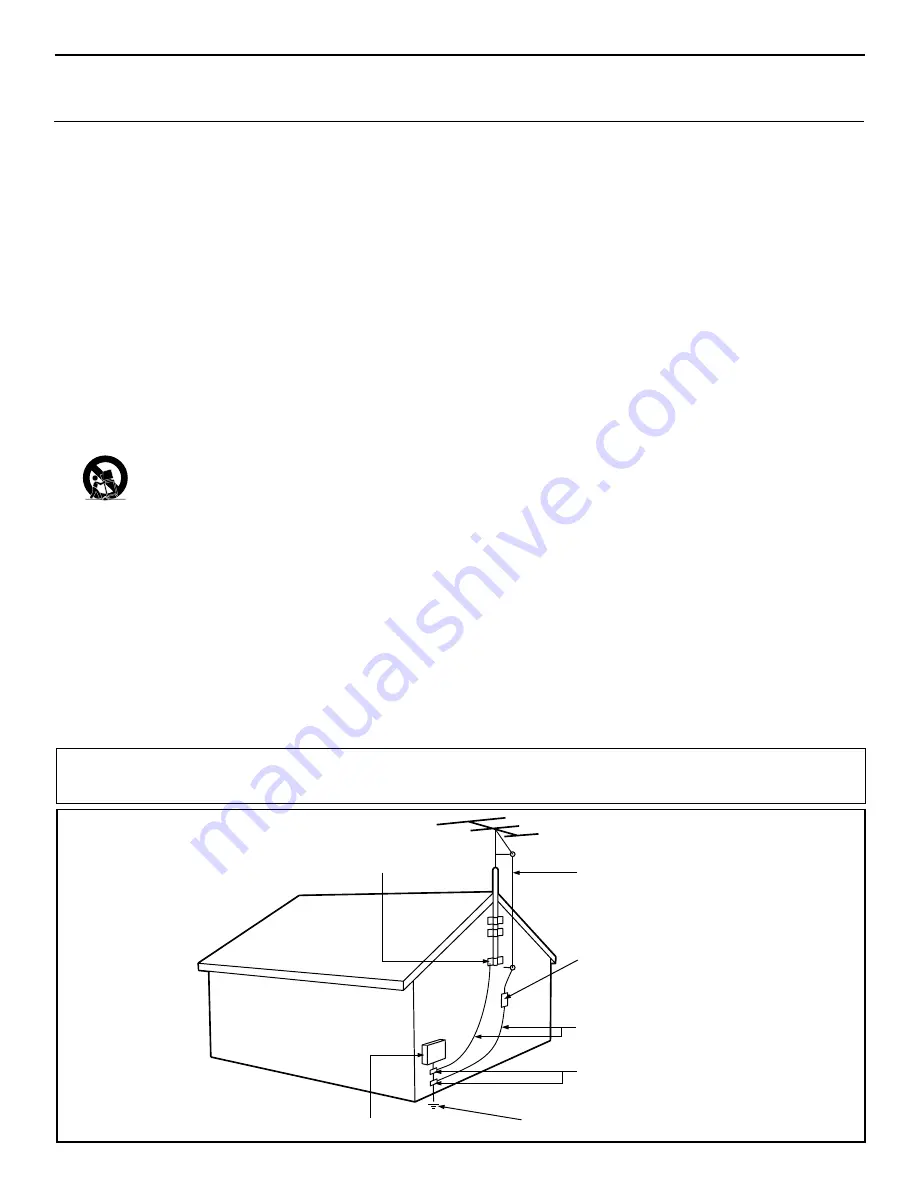
- An outdoor antenna should be located away from

power lines.

20. Outdoor Antenna Grounding 

- If an outside antenna is connected to

the receiver, be sure the antenna system is grounded so as to provide
some protection against voltage surges and built up static charges.
Section 810 of the National Electric Code, ANSI/NFPA No. 70-
1984, provides information with respect to proper grounding of
the mast and supporting structure, grounding of the lead-in wire to
an antenna discharge unit, size of grounding connectors, location
of antenna-discharge unit, connection to grounding electrodes, and
requirements for the grounding electrode. See Figure below.

21.   Object and Liquid Entry

- Care should be taken so that objects

do not fall and liquids are not spilled into the enclosure through
openings.
a) Warning: To reduce the risk of fire or electric shock, this appa-
ratus should not be exposed to rain or moisture and objects filled
with liquids, such as vases, should not be placed on this apparatus.

22.   Battery Usage CAUTION - 

To prevent battery leakage that may 

result in bodily injury, property damage, or damage to the unit:
• Install all batteries correctly, with + and - aligned as marked on
the unit.
• Do not mix batteries (old and new or carbon and alkaline, etc.).
• Remove batteries when the unit is not used for a long time.

ANTENNA LEAD IN WIRE

ANTENNA DISCHARGE UNIT 

(NEC SECTION 810-20)

GROUNDING CONDUCTORS 

(NEC SECTION 810-21)

GROUND CLAMPS

POWER SERVICE GROUNDING ELECTRODE SYSTEM 

(NEC ART 250, PART H)

GROUND CLAMP

ELECTRIC SERVICE EQUIPMENT

Example of Antenna Grounding
as per NEC - National Electric Code

Note to the CATV system installer:

This reminder is provided to call the CATV system installer's attention to Article 820-40 of the NEC

that provides guidelines for proper grounding and, in particular, specifies that the cable ground shall be connected to the grounding system of the
building, as close to the point of cable entry as practical.

Содержание 27PT8302/37

Страница 1: ...ick Use Guide first for quick tips that make using your Philips product more enjoyable If you have read your instructions and still need assistance you may access our online help at www p4c philips com or call 1 888 PHILIPS 1 888 744 5477 while with your product 3121 235 22331 Color TV Color TV Model No Serial No ...

Страница 2: ...on Card at once For Customer Use Enter below the Serial No which is locat ed on the rear of the cabinet Retain this information for future reference Model No __________________________ Serial No ________________________ Know t h e s e safetys y m b o l s This bolt of lightning indicates unin sulated material within your unit may cause an electrical shock For the safety of everyone in your househol...

Страница 3: ...maged 17 Tilt Stability All televisions must comply with recommended international global safety standards for tilt and stability properties of its cabinet design Do not compromise these design standards by applying exces sive pull force to the front or top of the cabinet which could ulti mately overturn the product Also do not endanger yourself or children by placing electron ic equipment toys on...

Страница 4: ... allows direct connections with VCRs DVDs or other devices providing quality TV picture and sound playback Audio Volume Leveler AVL Control keeps the TV sound at an even level Peaks and valleys that occur during program changes or commercial breaks are reduced making for a more consistent com fortable sound AutoLock allows you to block the viewing of certain channels or programs with certain ratin...

Страница 5: ... change the other onscreen text features such as Closed Captioning CC with TV shows HELPFUL HINT TUNER MODE The Tuner Mode allows you to change the Tv s signal input to Cable Antenna or Auto Mode It s important for the TV to know what type of sig nal is connected either Antenna or Cable 1 Press the MENU SELECT button on the remote control to show the onscreen menu 2 Press the CURSOR DOWN button re...

Страница 6: ...e Quick Use Guide for making connections HELPFUL HINT OK 1 2 3 4 5 6 7 8 0 9 Select SLEEP ACTIVE CONTROL CC AV CLOCK MENU EXIT PICTURE SOUND STATUS SELECT PIC SIZE MAIN FREEZE QuadraSurf TM PROGRAM LIST TV VCR REC SAP A CH SAT VCR AMP ACC DVD VOL CH MUTE Power 3 5 6 1 2 4 6 7 8 Menu Picture Brightness Sound Color Features Contrast Install Sharpness Color Temp Menu Picture Language Sound Tuner Mode...

Страница 7: ...R DOWN buttons to scroll through a list of options 8 After you have selected a name for the channel press the CURSOR RIGHT button to save the name in the TV s memory it will appear in the upper left hand corner of the screen 9 Press the STATUS EXIT button to remove the menu from the screen OK 1 2 3 4 5 6 7 8 0 9 Select SLEEP ACTIVE CONTROL CC AV CLOCK MENU EXIT PICTURE SOUND STATUS SELECT PIC SIZE...

Страница 8: ...e first character A through Z 0 through 9 Press the CURSOR RIGHT but ton and repeat for the second third fourth and fifth characters 8 Press the STATUS EXIT button to remove the menu from the screen OK 1 2 3 4 5 6 7 8 0 9 Select SLEEP ACTIVE CONTROL CC AV CLOCK MENU EXIT PICTURE SOUND STATUS SELECT PIC SIZE MAIN FREEZE QuadraSurf TM PROGRAM LIST TV VCR REC SAP A CH SAT VCR AMP ACC DVD VOL CH MUTE ...

Страница 9: ...le for adjustments when tuned to the AV1 AV2 AV3 Inputs Brightness adds or subtracts light from the darkest part of the picture Color adds or eliminates color Contrast improves the detail of the lightest parts of the picture Sharpness improves the detail in the picture Color Temp offers NORMAL COOL or WARM picture preferences Normal will keep the whites white Cool will make the whites bluish and W...

Страница 10: ... SELECT PIC SIZE MAIN FREEZE QuadraSurf TM PROGRAM LIST TV VCR REC SAP A CH SAT VCR AMP ACC DVD VOL CH MUTE Power Menu Picture Brightness Sound Color Features Contrast Install Sharpness Color Temp Menu Sound Treble 65 Bass Balance AVL Dynamic Bass OR Bass 60 OR Menu Picture Treble Sound Bass Features Balance Install AVL Dynamic Bass Balance 0 AVL Off On OR Incr Surround Mono Spatial Dolby Virtual ...

Страница 11: ... enter the desired start up channel You can also press the CUR SOR RIGHT or CURSOR LEFT buttons to enter the desired start up channel Activate Set the timer to turn itself On Once or Daily or Off Press the CURSOR UP or CURSOR DOWN buttons to select Once Daily or Off Display Press the CURSOR RIGHT or CUR SOR LEFT to toggle between On or Off If On is selected the time will be displayed all the time ...

Страница 12: ...ent time You can also use the CURSOR RIGHT or CURSOR LEFT but tons to change channels one at a time If TIME FOUND appears the process is finished If not follow the onscreen instructions and try another channel Press the STATUS EXIT button when finished to remove the onscreen menu from the TV screen NOTE If the AutoChron control is unable to find the time being transmitted on any channels you may h...

Страница 13: ...pe of pro gramming contains one or more of the follow ing Moderate violence V some sexual situa tions S infrequent coarse language L or some suggestive dialogue D TV 14 Parents Strongly Cautioned This program contains some material that many parents would find unsuitable for children under 14 years of age This type of programming contains one or more of the following intense violence V intense sex...

Страница 14: ... screen briefly and the highlight bar goes back to AutoLock Press the STATUS EXIT button to remove the menu from the screen SETTING UP AN AUTOLOCK ACCESS CODE Menu Picture Timer Sound Auto Lock Features Close Caption Install Rotation Wide Screen Menu Features Timer Access Code Auto Lock Menu Features Timer Access Code Auto Lock xxxx Incorrect Wide Screen Menu Features Timer Access Code Auto Lock C...

Страница 15: ...U SELECT button on the remote control to show the onscreen menu 2 Press the CURSOR UP or CURSOR DOWN button to highlight Features 3 Press the CURSOR RIGHT button to display the Features menu 4 Press the CURSOR DOWN button to highlight the AutoLock control 5 Press the CURSOR RIGHT button again display the AutoLock menu 6 Enter your four digit ACCESS CODE Correct will flash very briefly and the Auto...

Страница 16: ...ked You may view the blocked programming and turn OFF the AutoLock feature by using the Clear All control or by entering your access code 1 Press the MENU SELECT button on the remote control to show the onscreen menu 2 Press the CURSOR UP or CURSOR DOWN button to highlight Features 3 Press the CURSOR RIGHT button to display the Features menu 4 Press the CURSOR DOWN button to select the AutoLock co...

Страница 17: ...LECT button on the remote control to show the onscreen menu 2 Press the CURSOR UP or CURSOR DOWN button to highlight Features 3 Press the CURSOR RIGHT button to display the Features menu 4 Press the CURSOR DOWN button to highlight the AutoLock control 5 Press the CURSOR RIGHT button again to highlight Access Code 6 Enter your four digit Access Code Correct will flash very briefly and the menu will...

Страница 18: ...R UP or CURSOR DOWN button to highlight Features 3 Press the CURSOR RIGHT button to display the Features menu 4 Press the CURSOR DOWN button to highlight the AutoLock control 5 Press the CURSOR RIGHT button again to highlight Access Code 6 Enter your four digit Access Code Correct will flash very briefly and the menu will move to the left with the AutoLock menu now accessible 7 Press the CURSOR DO...

Страница 19: ...o highlight Features 3 Press the CURSOR RIGHT button to display the Features menu 4 Press the CURSOR DOWN button to highlight the AutoLock control 5 Press the CURSOR RIGHT button again to highlight Access Code 6 Enter your four digit Access Code Correct will flash very briefly and the menu will move to the left with the AutoLock menu now accessible 7 Press the CURSOR DOWN button repeatedly until B...

Страница 20: ...low 1 Press the STATUS EXIT button on the remote control TWICE Your AutoLock settings will appear on the screen NOTE If you have blocked specific subratings such as V for violence in the TV PG category these blocked subratings will not appear in the review The subratings however are still blocked according to your selections 2 After a few seconds the settings will leave the screen automatically or...

Страница 21: ...e MENU SELECT button on the remote control to show the on screen menu 2 Press the CURSOR UP or CURSOR DOWN twice to highlight Features 3 Press the CURSOR RIGHT and the menu will shift to the left 4 Press the CURSOR DOWN repeated ly until the Format control is highlight ed 5 Press the CURSOR RIGHT button to enter the Format menu 6 Press the CURSOR UP or CURSOR DOWN repeatedly to toggle among the sc...

Страница 22: ...red this feature uses onscreen text boxes to show dialogue and conversa tions while the TV program is in progress 1 Press the MENU SELECT button on the remote control to show the on screen menu 2 Press the CURSOR UP or CURSOR DOWN twice to highlight Features 3 Press the CURSOR RIGHT button the menu will shift to the left 4 Press the CURSOR DOWN repeated ly until the Closed Caption control is highl...

Страница 23: ...TROLS In rare cases the video supplied to the TV screen might show slightly tilted one way or another The Tilt Adjust control will allow you to correct the problem by adjusting the screen in a clockwise or counterclockwise direction 1 Press the MENU SELECT button on the remote control to show the on screen menu 2 Press the CURSOR UP or CURSOR DOWN twice to highlight Features 3 Press the CURSOR RIG...

Страница 24: ... feature can help eliminate slightly speckled pic tures an indication of signal noise in the pic ture 1 Press the MENU SELECT button on the remote control to show the onscreen menu 2 Press the CURSOR UP or CURSOR DOWN twice to highlight Features 3 Press the CURSOR RIGHT button to display the Features menu 4 Press the CURSOR DOWN button repeatedly until the Dynamic NR con trol is highlighted 5 Pres...

Страница 25: ...control to ADD the channel to one of the SURF lists 3 Press the corresponding COLORED Red Green Yellow or Blue button to add the channel to that button s Surf list Up to ten channels per button can be stored Repeat steps 1 through 3 to add additional channels up to 10 to each of the the SURF lists To remove a channel from one of the SURF lists 4 Press the COLORED QuadraSurf button until the desire...

Страница 26: ...iley face with the first programmed channel for that surf list 2 While the colored smiley face still appears on the screen press the same COLORED button on the remote to tune the second channel programmed for that specific surf list 3 Repeatedly pressing the same COL ORED button while the smiley face appears will tune all the programmed channels for that specific surf list After the last channel i...

Страница 27: ...PIC SIZE MAIN FREEZE QuadraSurf TM PROGRAM LIST TV VCR REC SAP A CH SAT VCR AMP ACC DVD VOL CH MUTE Power Off 1 On Display Logo 2 Display On 12 Stereo active control 14 Stereo Active Control Brightness Contrast Sharpness Dyna Contrast Dyna NR Dyna Color 48 38 47 62 74 61 The Program List Control will allow you to quickly overview all the programmed channels that have been placed into the tele visi...

Страница 28: ... five seconds press the SLEEP button repeatedly to pick the amount of time 15 minute increments up to 60 minutes then 30 minute increments up to 90 minutes then 60 minute increments up to 240 minutes before the TV will turn itself off An onscreen countdown will appear during the last minute before the TV shuts itself off Have you ever wished you could freeze the picture on the television broadcast...

Страница 29: ...ss color picture sharpness tint and color temperature levels The Personal AutoPicture settings are the ones that you made through the PICTURE options within the onscreen menu 1 Press the PICTURE button on the remote control The current AutoPictureTM setting will appear in the middle of the screen 2 Press the PICTURE button repeatedly to select either Personal Movies Sports Weak Signal or Multimedi...

Страница 30: ... MODE s LED will light for 2 seconds then begin to flash 3 Repeat the steps above to continue through the MODEs until the desired MODE is selected To select an accessory that has been programmed into the Universal ACC mode follow the steps below 4 Press the SELECT button until the ACC device LED light is ON it will only stay active lit for two seconds 5 Within two seconds of selecting the ACC mode...

Страница 31: ...esponds to the type of accessory device you are using Digit 2 Cable Digit 3 VCR Digit 4 DVD Digit 5 SAT Again the ACC device light will blink once to confirm the correct procedure 4 Press the NUMBERED button to enter the 4 digit code number from pages 32 34 Again the ACC device light will blink once to confirm the correct procedure 5 Once the remote is in the correct ACC MODE follow steps 4 7 on p...

Страница 32: ...2034 Goldstar 2017 2018 2053 2079 Goodmans 2001 2017 2034 2059 2075 Gradiente 2001 2008 Graetz 2005 2021 2037 2057 Granada 2025 2035 2037 Grandin 2001 2017 2034 Grundig 2003 2005 2007 2010 2034 2035 2048 2050 2054 2069 2071 2075 Hanseatic 2017 Harley Davidson 2001 Harman Kardon 2018 2035 Harwood 2034 HCM 2034 Headquarter 2025 Hinari 2004 2034 2057 2072 Hi Q 2026 Hitachi 2001 2004 2021 2022 2043 20...

Страница 33: ...untronic 2001 Sylvania 2001 2015 2023 2035 Symhonic 2001 Tashiko 2001 Tatung 2001 2021 2035 Teac 2001 2021 TEC 2011 Technics 2015 2042 2054 Teknika 2001 2015 2007 2017 Teleavia 2021 Telefunken 2021 2047 2058 2064 2074 Tenosal 2034 Tensai 2001 2066 Thomas 2001 Thomson 2021 2064 2074 Thorn 2016 2021 2037 TMK 2051 2057 Toshiba 2021 2023 2024 2035 2074 Totelevision 2017 2057 Towada 2066 Uher 2057 Unit...

Страница 34: ...002 4009 4010 4023 Fidelity 4016 Finlux 4005 4024 4032 4037 Fracarro 4061 Freecom 4034 FTE Humax 4060 Fube 4030 4031 4034 Galaxis 4019 4057 4060 General Instrument 4012 Gold Box 4059 Gooding 4048 Goodmans 4010 Grundig 4008 4010 4048 G sat 4009 Hinari 4009 Hirschimann 4008 4032 4039 4040 4049 Hitachi 4037 Houston 4053 Huth 4013 4015 4019 4026 Intervision 4050 Invideo 4061 ITT 4005 Johansson 4022 JV...

Страница 35: ...apes or fast rewind DVD discs For some accessory devices the STOP button may have to be pressed first then REWIND In playback mode hold down the button to view the picture moving rapidly in reverse Stop Button Press to stop the playback of a tape or disc in playback rewind fast forward and so on Record Button Hold the REC ord Sap and PLAY buttons down to begin a VCR recording Power Button Press to...

Страница 36: ...batteries Remote Does Not Work Continued Clean the remote control and the remote control sensor win dow on the TV Check the TV power cord Unplug the TV wait 10 seconds then reinsert the plug into the outlet and push the POWER button again Be sure the fuse is not blown on the AC power strip if one is being used Check to be sure the TV outlet is not on a wall switch TV Displays Wrong Channel or No C...

Страница 37: ...even aging of the picture tube Stock market tickers presented at the bottom of the TV screen Shopping channel logos and pricing displays bright and shown constantly or repeatedly in the same location on the TV screen Placement of the TV To avoid cabinet warping cabinet color changes and increased chance of set failure do not place the TV where temperatures can become excessively hot for example in...

Страница 38: ...ast Control 9 Dynamic NR Nosie Reduction 24 Feature Highlights 4 Format Controls 21 Freeze Control 28 Incr edible Surround Control 10 Index 37 Language Control 5 Name Conrol 7 8 Permanent OSD 24 Picture Control 9 Program List Control 27 QuadraSurf Controls 25 26 Registration of TV Information 2 Remote Control Use with Accessory Devices Code Entry Method of Identification 31 Mode Selection 30 Direc...

Страница 39: ...RENEWED 90 DAY LIMITED WARRANTY ...

Отзывы: