background image

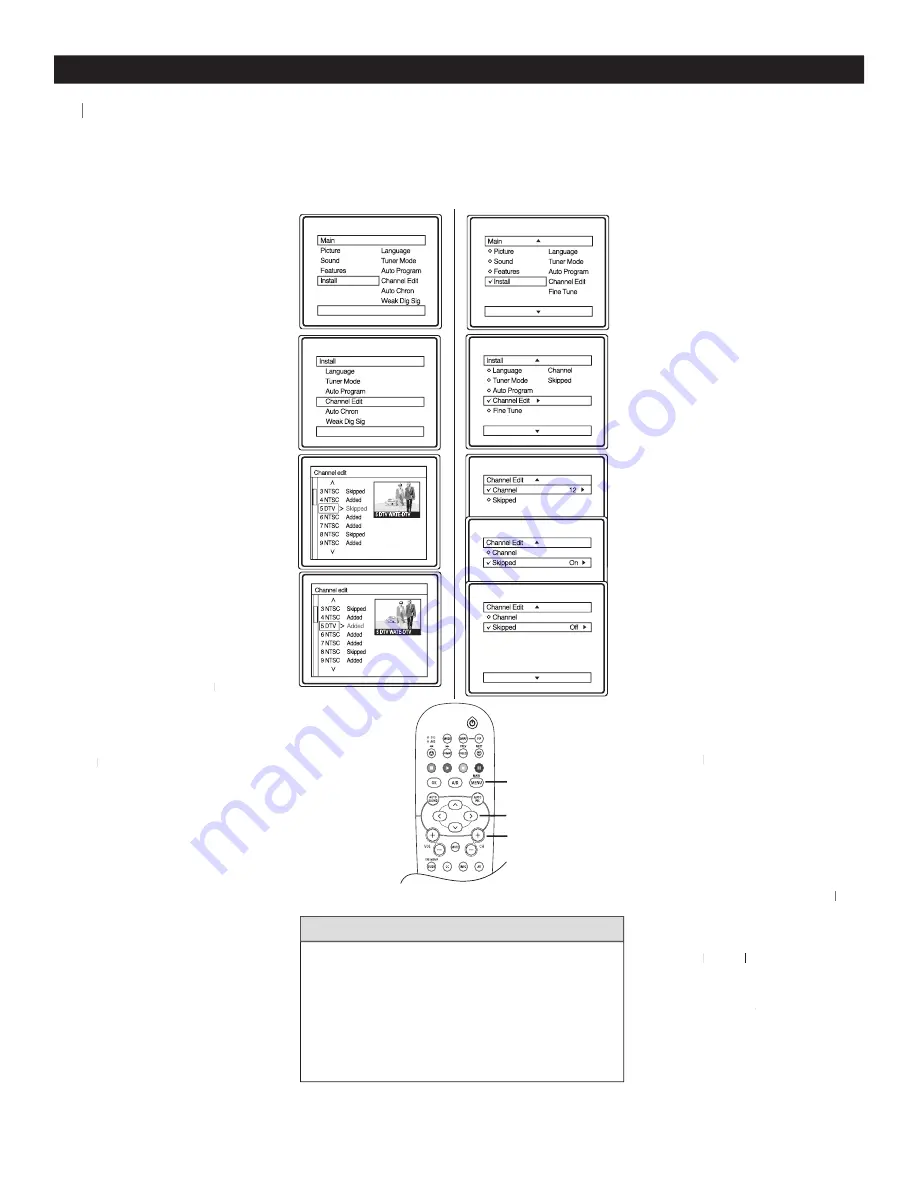
CHANNEL EDIT (ADD OR DELETE CHANNELS)

1  

Press 

MENU

 on the remote  

  control to display the  


  onscreen menu.

2


Press 

CURSOR

<

 or 

to  

  scroll though the onscreen    

  menu until you see 

Install


  highlighted. 

3


Press 

CURSOR

>  to  


  display the Install menu  


  features. 

4


Press 

CURSOR 

<

 or 

>

to scroll through the 

Install features until you see 

Channel Edit

 highlighted.

5


Press 

CURSOR

>  to  


  display the 

Channel Edit    

options.

6


With the 

Channel Edit


Channel Edit

Channel Edit

options displayed and  


Channel

 highlighted, you can  

use the 

CURSOR


CURSOR

CURSOR

<

 or 

to scroll through all available 

channels that you wish to add 

or delete (Skipped) from the TV   

memory. 

7


Use 

CURSOR

>

to scroll the  

to

to

  menu to highlight the channel    

  you wish to add or skip.

8


Now use 

CURSOR

>  

to toggle between 

tt

Added 

or 

Skipped

.  If 

Skipped

 is  

selected, the channels will be 

skipped when scrolling channels 

with the 

CH+

 or 

CH-

.   If 

Added

 is selected, the channels 

will not be skipped when 

scrolling channels with the  


CH+

 or 

CH-

.  

9


When finished, press 

MENU


  three times to exit the menu  

  from the TV screen.

In analog mode, an “X” will be displayed in 
front of any channel number to indicate that the 
channel has skipped. When the 

CH+

or 

CH-

buttons are used, those channels will be skipped.
To switch between Digital and Analog channels, 
use the 

A/D

button on the Remote Control.

H

ELPFUL

 H

INTS

11

C

hannel Edit lets you ADD or DELETE channels from the list of channels stored in the TV memory. 

C

C

1  

Press 

MENU

 on the remote  

  control to display the  


  onscreen menu.

2


Press 

CURSOR

<

 or

>

to  

  scroll through the onscreen   

  menu until you see  

Install


  highlighted. 

3


Press 

CURSOR

>  to      

  display the Install menu  


  features. 

4


Press 

CURSOR

<

 or

>

to scroll through the 

Install features until you see 

Channel Edit

highlighted.

5


Press 

CURSOR

>  to  


  display the Channel Edit  


  options.

6


With the Channel Edit 

options displayed and  

Channel

 highlighted, you can 

use the 

CURSOR

<

 or

to 

scroll through all the available    

channels that you wish to add or  

delete (Skipped) from the TV    

memory.    

         You can also use the numeric 

buttons to go directly to a 

specific numbered channel that 

you want to add or skip.  Or, 

you can also use the 

CH+

 or 

CH-

 to quickly scan through 

CH-

CH-

the channels that have not been 

skipped. 

7


Use 

CURSOR


CURSOR

CURSOR

>

 to  

scroll the menu until 

SKIPPED


  is highlighted.

8


Now use 

CURSOR

>  to    

  toggle between 

On

 and 

Off

.  If 

Off

Off

On

 is selected the channels will  

  be skipped when scrolling  


  channels with the 

CH+

 or  


CH-

 . If 

CH-

CH-

Off

 is selected the    

Off

Off

  channels will not be skipped    

  when scrolling channels with the  

CH+

 or 

CH-

 .  

CH-

CH-

9


When finished, press 

MENU

  three times to exit the menu  

  from the TV screen.

Follow these steps for Digital Mode

Follow these steps for Analog Mode

CH +  -

MENU

>

>

< >

Digital Mode

Analog Mode

Содержание 26PW9100D - Hook Up Guide

Страница 1: ...yable If you have read your instructions and still need assistance you may access our online help at www usasupport philips com or call 1 888 PHILIPS 744 5477 while with your product and Model Serial number STOP For Customer Use Enter below the Serial No which is located on the rear of the cabinet Retain this information for future reference Model No __________________________ Serial No __________...

Страница 2: ...se be sure to complete and return your Product Registration Card at once Know these safety symbols This bolt of lightning indicates uninsulated material within your unit may cause an electrical shock For the safety of everyone in your household please do not remove product covering The exclamation point calls attention to features for which you should read the enclosed literature closely to preven...

Страница 3: ... been dropped or the enclosure damaged 17 Tilt Stability All televisions must comply with recommended international global safety standards for tilt and stability properties of its cabinet design Do not compromise these design standards by applying excessive pull force to the front or top of the cabinet which could ultimately overturn the product Also do not endanger yourself or children by placin...

Страница 4: ...l channel Attention Quick Tips before you start 1 When the television is powered on for the first time it will always be in Digital Mode 2 Pressing the A D button on the remote control toggles the TV between Digital and Digital and Digital Analog Mode 3 Select the correct Tuner mode in the television on screen menu before starting the Auto Programing refer to page 9 4 It is necessary to Auto Progr...

Страница 5: ...s air pollution and lowers utility bills Active Control AutoPicture AutoSound AutoChron and Incredible Surround are trademarks of Philips Consumer Electronics Company Copyright 2001 Philips Consumer Electronics Manufactured under license from Dolby Laboratories Dolby and the double D symbol are trademarks of Dolby Laboratories Active Control continuously measures and corrects all incoming signals ...

Страница 6: ...SWAP Button To swap program on the main screen with program in the PIP window FROWNIE Button To delete channels from the Favorite lists FREEZE Button To freeze picture on the TV screen Ê Æ and Buttons Used with an external device when the ACC mode is selected Press Stop Ê Play Æ Record or Pause MENU Button To display the main menu AUTO PIC Button To select from five pre defined picture settings Pe...

Страница 7: ...n menu mode use these buttons to make adjustments or selections 3 Press CHANNEL or to select TV to select TV channels 4 Point the remote control towards the remote sensor window on the front of the TV when using the remote control 5 Press MENU button on the remote to display the onscreen menu 3 REMOTE CONTROL How to load the supplied batteries into the remote control 1 Remove the battery compartme...

Страница 8: ...only makes the TV on screen Menu items appear in English Spanish or French text It does not change the other on screen text features such as Closed Caption CC TV programmes HELPFUL HINT 8 F For French and Spanish speaking TV owners an onscreen Language option is present With the Language control you For French and Spanish speaking TV owners an onscreen Language option is present With the Language ...

Страница 9: ...R or to scroll though the onscreen menu until you see Install highlighted 3 Press CURSOR to display the Install menu features 4 Press CURSOR or to scroll through the Install features until you see Tuner Mode highlighted 5 Press CURSOR to select Antenna or Cable 6 When finished press MENU twice to exit the menu from the TV screen 1 Press MENU on the remote control to display the onscreen menu 2 Pre...

Страница 10: ...o select only the TV stations in your area when the CHANNEL buttons are pressed Yto select only the TV stations in your area when the CHANNEL buttons are pressed Y 1 Complete the antenna or cable signal connection before activating AUTO PROGRAM 2 Press MENU on the remote control to display the onscreen menu 3 Press CURSOR or to scroll though the onscreen menu until you see Install highlighted 4 Pr...

Страница 11: ...FUL HINTS 11 Channel Edit lets you ADD or DELETE channels from the list of channels stored in the TV memory Channel Edit lets you ADD or DELETE channels from the list of channels stored in the TV memory C 1 Press MENU on the remote control to display the onscreen menu 2 Press CURSOR or to scroll through the onscreen menu until you see Install highlighted 3 Press CURSOR to display the Install menu ...

Страница 12: ...display the Search for Time Enter Channel option Use the numeric buttons on the numeric buttons on the numeric remote control to enter the channel you want to seek the time 9 When finished press MENU on the remote control three times to exit the menu from the TV screen 1 Press MENU on the remote control to display the onscreen menu 2 Press CURSOR or to scroll though the onscreen menu until you see...

Страница 13: ...f you program your channels when the signal is not being sent or is weak it will not be saved in your channel setup However using the WEAK DIG SIGNAL feature here you can add those channels with weak or no signals to your channel list Adding or deleting WEAK DIG SIGNAL can only be done in Digital Mode INFORMATION BANNER CHANNEL BANNER SIZE 1 Press MENU on the remote control to display the onscreen...

Страница 14: ...n menu until you see Install highlighted 3 Press CURSOR to display the Install menu features 4 Press CURSOR to scroll through the Install features until you see Fact CH Reset highlighted 5 Press CURSOR to follow the instructions in the menu to reset the TV 6 When finished press MENU button on the remote control three times to exit 14 MENU MENU Emergency Alert lets you display or discard emergency ...

Страница 15: ...ontrol adjust natural skin tones in the picture quality Note Tint is not available in Digital Mode Color Temp Control Color Temp Control to select Normal Cool or Warm picture preferences For Normal whites will mainain their whiteness Cool will make the whites bluish and Warm will make the whites reddish Contrast Control Contrast Control Contrast Control when set to On the Contrast control helps to...

Страница 16: ... 2 Bass Press CURSOR or to adjust the bass levels The control will enhance the low frequency sounds 3 Balance Press CURSOR or to adjust the level of sound coming from the left and 3 sound coming from the left and 3 right speakers 4 AVL Auto Volume Leveler Press CURSOR CURSOR CURSOR or to turn the control On or Off When turned Off When turned Off On AVL will level out the sound being heard when sud...

Страница 17: ...te the picture on the screen clockwise or counter clockwise Note The amount of rotation will be minimal Note The amount of rotation will be minimal Note 6 Press MENU twice to exit the menu from the TV screen Somet Somet S imes the video transmitted to the TV screen might appear slightly tilted The Rotation control lets you correct the problem by adjusting the screen in a clockwise or counterclockw...

Страница 18: ...e use CH or CH to select DTV which is the last viewed digital channel In Analog Mode use the NUMERIC buttons or the CH or CH buttons to enter the startup channel Activate Set the timer to turn itself Off Off Off Once or Daily Press the CURSOR or to select Once Daily or Off Off Off Display Display Press the CURSOR or to toggle between On or Off If Off If Off On is selected the time will be displaye...

Страница 19: ...ther channel a digital channel in the PIP window The Double Window PIP feature divides the screen in half displaying the main picture and PIP window into equal size windows left side showing the main picture and right side showing the PIP picture The SWAP PIP feature interchanges the picture on the main screen and the PIP window and vice versa The CH or CH selects all the available channels on the...

Страница 20: ...hannels in the 1 PIP window 2 Press the Numeric buttons on the remote control to select available channels on the main screen 3 Press A D button to switch between Digital and Analog channels 3 NUMERIC BUTTONS A D Note PIP feature can display one channel an analog channel on the main screen while showing another channel a digital channel in the PIP window or vice versa It cannot show both analog or...

Страница 21: ...ng the A V inputs Channel Block After an access code has been programmed you cannot block individual channels including the A V inputs Channel Block Clear All Lets you clear all channels being blocked from your viewing set with the Channel Block Control Block All Lets you block ALL channels except A V inputs No Rating Unrated ALL programing with no content advisory data can be blocked if NO RATING...

Страница 22: ...lay the onscreen menu 2 Press CURSOR or until you see Features highlighted 3 Press CURSOR to display the Features menu options 4 Press CURSOR or or until you see Auto Lock highlighted 5 Press CURSOR The screen will display Access Code 6 Using the NUMERIC buttons enter 0711 XXXX appears on the Access Code screen as you press the NUMERIC buttons Incorrect Code will appear on the screen and you will ...

Страница 23: ...ice HELPFUL HINTS A After your personal access code has been set see previous page you are now ready to select the channels you want to block Once you have entered your access code and the AutoLock feature is displayed on the screen 1 After Setting your personal access code see previous page press CURSOR or until you see Block Channel highlighted 2 Press CURSOR or to select the channels you wish t...

Страница 24: ...ow these steps for Digital Mode Follow these steps for Analog mode OK OK MENU MENU Digital Mode Analog Mode Analog Mode Analog 1 Press CURSOR until you see Block by Rating highlighted 2 Press the CURSOR to display the Movie Rating options G PG PG 13 R NC17 or X 3 Press CURSOR or or to highlight any of the Movie Rating options When highlighted all these options can be turned On which will allow blo...

Страница 25: ...ow Off viewing 4 Press OK to turn the rating option On or Off Off Off 5 If the TV Y7 TV PG TV 14 or TV MA sub menu is accessed press CURSOR or to select one of the options Block All V S L D or FV Follow these steps for Digital Mode OK 25 Digital Mode Analog Mode Analog Mode Analog 1 Press CURSOR until you see TV Rating highlighted 2 Press the CURSOR to display the TV Rating options TV Y TV Y7 TV G...

Страница 26: ...mote control Follow these steps for Digital Mode Follow these steps for Analog mode OK 1 Press MENU on the remote control to display the onscreen menu 2 Press CURSOR until you see Features highlighted 3 Press CURSOR to enter Features menu options 4 Press CURSOR until you see Sleep highlighted 5 Press CURSOR repeatedly to select the amount of time 15 30 45 60 90 120 180 or 240 minutes before the TV...

Страница 27: ...rove sharpness in the picture While in the 16 9 Zoom and 16 9 format options you can press CURSOR or to nudge the picture up or down Note 4 3 and 4 3 Expand format options are only available for model 32PT9100D 16 9 and 16 9 Zoom format options are only available for widescreen models 26PW9100D 30PW9100D and 30PW9110D M Many times while watching movies from a DVD player the image is shown in lette...

Страница 28: ...ms on the TV screen Designed to help the hearing impaired this feature uses onscreen text boxes to show dialogue and conversations while the TV program is in progress 1 Press CC to display the current Closed Caption setting 2 Press CC repeatedly to choose from the 12 Closed Caption options Off CC Mute CS1 to 6 and CC1 to CC4 3 When finished press MENU on the remote control to exit the menu from th...

Страница 29: ... followed by CURSOR to enter Caption Size options menu 5 Press CURSOR to highlight Close Caption display size options Default Small or Large The text size will be displayed at the right hand corner of the menu to help you make your choice 6 When finished press MENU on the remote control three times to exit the menu from the TV screen MENU Caption Option lets you select the default option or option...

Страница 30: ...y you choose to set the Sound Menu Controls will become your Personal setting 30 1Your remote control also has an A CH Alternate Channel button Pressing this button will toggle between the Current and previously selected channel ALTERNATE CHANNEL A CH AUTO PIC AUTO SOUND Whether you re watching a movie or a sporting event your TV has automatic video control settings to match your Whether you re wa...

Страница 31: ... 6 Press FROWNIE again to confirm your decision to remove the channel from the Surf list Repeat steps 4 6 to remove other channels from Surf lists QUADRASURF will display the channel number with a colored to indicate the Colored button it to indicate the Colored button it to indicate the Colored button it to indicate the Colored button it will read Remove item Press will read Remove item Press wil...

Страница 32: ... and the AUTO SOUND button on the remote control simultaneously and hold them down As you continue to hold down the buttons the remote will run through its programmed code list with a command for the VCR or DVD to STOP or PLAY For Cable Boxes and Satellite Receivers the command will be to CHANGE CHANNELS 5 When the STOP command appears release the two buttons For Cable Boxes and Satellite Receiver...

Страница 33: ...2081 Goldhand 2034 Goldstar 2017 2018 2053 2079 Goodmans 2001 2017 2034 2059 2075 Gradiente 2001 2008 Graetz 2005 2021 2037 2057 Granada 2025 2035 2037 Grandin 2001 2017 2034 Grundig 2003 2005 2007 2010 2034 2035 2048 2050 2054 2069 2071 2075 Hanseatic 2017 Harley Davidson 2001 Harman Kardon 2018 2035 Harwood 2034 HCM 2034 Headquarter 2025 Hinari 2004 2034 2057 2072 Hi Q 2026 Hitachi 2001 2004 202...

Страница 34: ...nkai 2070 Sunstar 2001 Suntronic 2001 Sylvania 2001 2015 2023 2035 Symhonic 2001 Tashiko 2001 Tatung 2001 2021 2035 Teac 2001 2021 TEC 2011 Technics 2015 2042 2054 Teknika 2001 2015 2007 2017 Teleavia 2021 Telefunken 2021 2047 2058 2064 2074 Tenosal 2034 Tensai 2001 2066 Thomas 2001 Thomson 2021 2064 2074 Thorn 2016 2021 2037 TMK 2051 2057 Toshiba 2021 2023 2024 2035 2074 Totelevision 2017 2057 To...

Страница 35: ...31 4036 4061 Emanon 4034 Ferguson 4002 4009 4010 4023 Fidelity 4016 Finlux 4005 4024 4032 4037 Fracarro 4061 Freecom 4034 FTE Humax 4060 Fube 4030 4031 4034 Galaxis 4019 4057 4060 General Instrument 4012 Gold Box 4059 Gooding 4048 Goodmans 4010 Grundig 4008 4010 4048 G sat 4009 Hinari 4009 Hirschimann 4008 4032 4039 4040 4049 Hitachi 4037 Houston 4053 Huth 4013 4015 4019 4026 Intervision 4050 Invi...

Страница 36: ...gital video connectivity standard designed as a successor to DVI can transmit both uncompressed digital audio and video signals protected by HDCP digital copy protection Letterbox A method of presenting widescreen images on a standard screen television In order to preserve the aspect ratio of the original video content the picture is scaled down so that it fits the available width of the televisio...

Страница 37: ...fore being connected to the television If so bypass the external device and connect the signal directly to your television Refer to page 10 for Automatic Program Installation Cannot receive channels above 13 after Auto Programming If signal source used is Antenna the channels need to be re installed Refer to page 10 for Automatic Program Installation Can t get the AV channels on the TV screen Pres...

Страница 38: ...from the TV wait 10 seconds then reinsert the plug into the wall outlet Power On the TV again Plug the power cord directly to the wall socket and not via an extension cord If you need to use an extension cord check that the fuse on the AC power strip is not blown General Television is not responding to remote control Check the remote control if necessary Ensure the batteries are inserted according...

Страница 39: ...me excessively hot for example in direct sunlight or near a heating appliance Be sure to allow a free flow of air to and from the perfo rated back cover of the set Cleaning To avoid possible shock hazard be sure the TV is unplugged from the electrical outlet before cleaning Regularly dust the TV with a dry nonscratching duster to keep the TV clean When cleaning the TV take care not to scratch or d...

Страница 40: ...Picture tube 2D Comb Filter Scavem Auto Picture 5 modes Active Control Color Contrast Sharpness Control SOUND Sound Power Output RMS Sound Enhancement CONVENIENCE ON SCREEN DISPLAY LANGUAGES English French Spanish CONNECTIVITY Rear Side WEIGHT DIMENSIONS Weight incl Packaging Weight excl Packaging Visible diagonal screen size 2 x 10w Virtual Dolby Picture in Picture Electronic Program Guide Easy t...

Страница 41: ...7 Freeze Controls 17 Glossary 36 Guide To Digital TV 4 Incr edible Surround Control 16 Index 40 Language Control 8 Picture Control 15 PIP Control 19 20 Quadrasurf 31 Registration of TV Information 2 Remote Control Use with Accessory Devices Code Entry for Accessories 32 Search Method for Accessories 32 Direct Entry Code for Accessories 33 35 How to Correct Tilted Image 17 Safety Information 2 3 Se...

Страница 42: ...acement because of improper installation connections to improper voltage supply abuse neglect misuse accident unauthorized repair or other cause not within the control of Philips A product that requires modification or adaptation to enable it to operate in any country other than the country for which it was designed manufactured approved and or authorized or repair of products damaged by these mod...

Страница 43: ... subject to change without notice Trademarks are the property of Koninklijke Philips Electronics N V or their respective owners 2005 Koninklijke Philips Electronics N V All rights reserved www philips com 3139 125 33642 ...

Отзывы: