Philips 26PFL5322S Скачать руководство пользователя страница 24

EN-20

Teletext is an information system broadcast 
by certain channels which can be consulted 
like a newspaper. It also offers access to 
subtitles for viewers with hearing problems 
or who are not familiar with the transmis-
sion audio language

.

I I

3

4

2

2

1

5

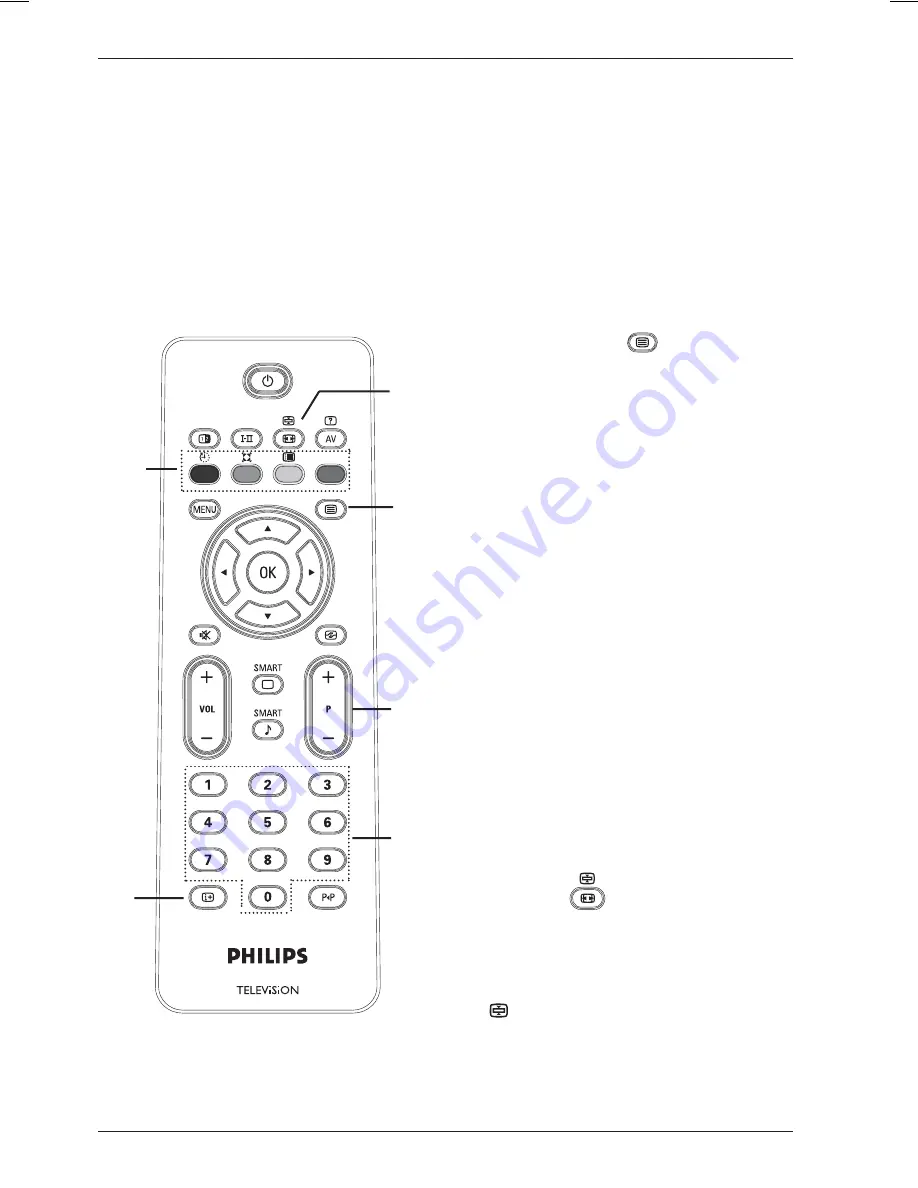
16 Teletext

Teletext On/Off  

To switch on  the teletext display. A 
contents page appears with a list of items 
that can be accessed. Each item has a 
corresponding 3 digit page number. If 
the selected channel does not broadcast 
teletext, the indication 100 is displayed 
and the screen remains blank. To exit 
teletext, press the 

 key again.

Select a page
Enter the number of a teletext page by 
using the 0 to 9 keys or P –/+ keys. For 
example:, to access page 120, enter 120. 
The number is displayed at the top left  
corner of the screen. When the page is 
located, the counter stops searching and 
the page is displayed. Repeat this opera-
tion to view another page. If the counter 
continues to search, the page is not 
being transmitted. If this happens, select 
another number. 

Direct access
Colour areas are displayed at the bottom 
of the screen. The 4 colour keys are used 
to access the items or corresponding 
pages. The colour areas fl ash when the 
item or the page is not yet available.

Contents
This returns you to the contents page 
(usually page 100 or hit list menu).

Page hold  

Certain pages contain sub-pages which 
are automatically displayed successively. 
This key is used to stop or resume 
sub-page progression. The indication 

 appears top left. Use the

 Í Æ 

keys 

to select previous or next sub-page..

1.

2.

3.

4.

5.

Содержание 26PFL5322S

Страница 1: ...www philips com support EN USER MANUAL 26PFL3312S 26PFL5322S 26PFL7332S 32PFL3312S 32PFL5322S 32PFL5332S 37PFL3312S 37PFL5322S 42PFL3312S 42PFL5322S ...

Страница 2: ...9 free Ireland 01 601 1777 local Italy 840320086 0 08 min Luxemburg 40 6661 5644 local Netherlands 0900 8407 0 10 min Norway 2270 8111 local Poland 0223491504 local Portugal 2 1359 1442 local Slovakia 0800004537 free Spain 902 888 784 0 10 min Sweden 08 5792 9100 local Switzerland 0844 800 544 local UK 0870 900 9070 local This information is correct at the time of press For updated information see...

Страница 3: ... to be recycled Apply to the local authorities for correct disposal Disposal of your old product Your product is designed and manufactured with highly quality material and components which can be recycled and reused When this crossed out wheeled bin symbol is attached to a product it means the product is cov ered by the European Directive 2002 96 EC Please inform yourself about the local sepa rate...

Страница 4: ...paratus is fitted with an approved moulded 13 AMP plug Should it become necessary to replace the mains fuse this must be replaced with a fuse of the same value as indicated on the plug Remove fuse cover and fuse Replace the fuse The replacement fuse must comply with BS 1362 and have the ASTA approval mark If the fuse is lost contact your re tailer in order to verify the correct type Refit the fuse...

Страница 5: ...Smart Picture and Smart Sound EN 18 Smart picture EN 18 Smart sound EN 18 15 Picture Format EN 19 16 Teletext EN 20 17 Using the TV as a PC Monitor EN 22 Connecting a PC to the TV EN 22 Adjusting TV settings in PC Mode EN 22 Picture menu for PCs EN 22 Feature menu for PCs EN 22 18 Using the TV in HD Mode EN 23 Connecting HD equipment EN 23 Controlling TV settings in HD modeEN 23 Picture menu for H...

Страница 6: ... and stationary Moving or low contrast graphics are less likely to cause uneven aging of the screen Stock market stickers presented at the bottom of the TV screen 1 Introduction Shopping channel logos and pricing displays bright and shown constantly or repeatedly in the same location on the TV screen Examples of still pictures also include logos computer images time display teletext and images dis...

Страница 7: ...ure the surface is level and that it can withstand the weight of the TV If you wish to hang your TV on a wall do not hang the TV yourself Your TV must be hung by qualified technician Improper hanging can cause the TV to be unsafe Before you hang your TV on a wall ensure the wall is suitable to carry the weight of the TV The connections do not have to be made before you hang the TV but the cables m...

Страница 8: ...he TV and face downward 1 2 3 1 2 3 4 The following connectors are located on the rear of the TV 5 EXT 2 CVBS S VIDEO 4 EXT 1 RGB TV aerial socket Insert the aerial plug into the TV aerial socket HDMI 1 HDMI 2 To connect to a set top box DVD player recorder high definition equip ment or personal computer EXT4 YPbPr To connect to peripheral equipment EXT 1 RGB To connect to peripheral equipment EXT...

Страница 9: ...Connecting the aerial Insert the aerial plug firmly into the 75 ohms aerial socket at the bottom of the TV and in the wall aerial socket Connecting and disconnecting the mains Warning Plasma TV is a Class 1 apparatus It must be connected to a mains socket out with a protective earthing connection Warning Verify that the mains supply volt age in your home corresponds to the voltage printed on the s...

Страница 10: ... TV menus Cursors Up Down Left Right Î ï Æ Í These 4 keys select and adjust menu items Picture format see page 19 Display source list Used to select TV or peripheral equip ment on EXT 1 EXT 2 EXT 3 EXT 4 HDMI 1 or HDMI 2 Use the Î ï keys to select source and the Æ key to confirm your selection Programme List To display exit the list of programmes Use the Î ï keys to select a programme and the Æ ke...

Страница 11: ...lection Active Control Automatically adjusts the picture setting for optimal picture quality continuously under any signal conditions See page 16 Programme P Selects next or previous available channel source Numerical keys For direct access to programmes For a two digit programme number the 2nd digit must be entered shortly after the first digit before the dash disappears Previous Present programm...

Страница 12: ...ll the available TV programmes will be stored This operation takes a few minutes The display shows the progress of the search and the number of programmes found Important To exit or interrupt the search before it is completed press the menu key If you interrupt search during auto store not all channels will be stored To store all channels you must perform a complete auto store search again ATS Aut...

Страница 13: ...ogram A B CH D DK E F FI 1 2 3 4 5 6 Press the Æ key to confirm your selection You can now store channels automatically Press the Í key to return to the menu Press the Î ï keys repeatedly to select Auto Store Press the Æ key to start automatic searching for channels All of the avail able channels are stored The operation takes a few minutes To exit or interrupt the search before it is complete pre...

Страница 14: ... Tune Store 1 2 3 4 System Press the Î ï keys to select one of the following regions and press the Æ key to confirm selection Europe automatic detection France LL standard UK I standard West Europe BG standard East Europe DK standard Search Press the Æ key The search starts Once a programme is found the scanning stops and its name is displayed if avail able Go to the next step If you know the freq...

Страница 15: ... Press the Î ï keys to select the pro gramme number you want to move Press the Æ key to enter sorting mode The arrow cursor now points to the left Install Language Country Auto Store Manual Store Sort Name Fav Program 100 001 002 003 004 005 006 007 008 1 2 3 4 5 Press the Î ï keys to select the new programme number and press the Í key to confirm your choice The arrow points to the right and sorti...

Страница 16: ...Auto Store Manual Store Sort Name Fav Program Press the Î ï keys to select the channel you want to name Press the Æ key to move to the first name display area Press the Î ï keys to select the characters maximum of 5 characters and press the Í Æ keys to move around the name display area 1 2 3 4 5 6 106 Install Language Country Auto Store Manual Store Sort Name Fav Program 001 002 003 004 005 006 00...

Страница 17: ...e your favourite channels and skip other channels When a channel is skipped you cannot access it by using the P keys of the remote control You can access the programme by using the digit 0 9 keys only Press the h key Press the Î ï key repeatedly to select Install and the Æ key to enter the Install menu Language Country Auto Store Manual Store Sort Name Fav Program Main Picture Sound Features Insta...

Страница 18: ... by using the Í Æ Î ï or digit 0 9 keys Press key on the remote control to put the TV set in standby mode The TV will automatically come on at the programmed time If you leave the TV set on it will change channel at the Start Time and will go to standby mode at the Stop Time The following list describes the timer op tions Sleep To select a time period after which the TV switches to standby mode Se...

Страница 19: ...tal Lock Lock Program Change Code Clear All Lock All 001 002 003 004 005 006 007 008 106 In the Parental Lock menu use the Î ï Í Æ Digit 0 9 and h keys to access and activate the Parental Lock functions The following list describes the options Lock Program to lock an individual program Press Æ key to enter Lock Program mode and the Î ï keys to select the program to lock or unlock Press the Í Æ key...

Страница 20: ... activate or deacti vate ON or OFF option To return to previous menu press the Í key To exit the menu press the h key 1 2 3 4 5 6 7 Active control This feature automatically and continuously adjusts the picture setting to provide opti mal picture quality in any signal conditions Press the h key Press the Î ï keys repeatedly to se lect Features and press the Æ key to enter Features menu Press Î ï k...

Страница 21: ... left and right speakers AVL Automatic Volume Leveller To limit sudden increases in sound especially on programme change or advertising slots Incr Surround Select between Incredible Surround and Stereo when in stereo transmission Select between Mono and Spatial when in Mono transmission This menu adjusts the picture and sound settings Press the h key Press the Î ï keys to select Picture or Sound P...

Страница 22: ...ed for bad quality signals Suitable for living room viewing Multimedia Best for graphical applications Personal Pictures settings set up by using the Picture menu in the main menu 14 Smart Picture and Smart Sound Smart sound The Smart Sound feature offers feature offers the following sound settings Movies Music Voice and Personal Press the button repeatedly to cycle through the settings The Person...

Страница 23: ...icture is enlarged to 16 9 format This mode is recommended when displaying pictures which have black bands at the top and bottom letterbox format In this mode large parts of the top and the bottom of the picture are clipped off Subtitle zoom This mode is used to display 4 3 pictures using the full surface of the screen leaving the sub titles visible Part of the top of the picture is clipped off Su...

Страница 24: ... keys For example to access page 120 enter 120 The number is displayed at the top left corner of the screen When the page is located the counter stops searching and the page is displayed Repeat this opera tion to view another page If the counter continues to search the page is not being transmitted If this happens select another number Direct access Colour areas are displayed at the bottom of the ...

Страница 25: ...d colour areas displayed at the bottom of the screen you can store 4 Favourite pages on the first 40 channels which can then be ac cessed using the coloured keys red green yellow blue Once set these Favourite pages will become the default every time teletext is selected To store the Favourite pages proceed as follows Press the key to change to Favourite page mode Use the keys to enter the teletext...

Страница 26: ...ture menu for PCs The picture menu comprises the follow ing features Brightness Contrast Colour Temp Contrast Horizontal Shift and Verti cal Shift The Brightness Contrast Colour Temp Contrast features work in the same way as described in Picture and Sound Settings on page 17 The Horizontal Shift feature allows you to adjust horizontal position of the image The Vertical Shift feature allows you to ...

Страница 27: ... switch to the selected source 1 2 3 4 Controlling TV settings in HD mode Press the h key Press the Î ï keys to select a Picture or Sound setting Press the Æ key to enter the Pic ture or Sound setting Press Î ï keys to adjust the Picture or Sound setting To return to previous menu press the Í key To exit the menu press the h key Picture menu for HD mode The picture menu comprises the follow ing fe...

Страница 28: ...is available in the Features menu The Mode Selection feature allows you to select between PC and HD mode Supported formats for HD mode The following standard definition SD for mats are supported 480i 576i The following HD formats are supported 480p 480i 576p 576i 720p 1080i Note Your Philips TV is HDMI compliant If you do not get a good picture please change the video format on your device DVD pla...

Страница 29: ...ting Other Equipment Overview of connections HDMI 1 HDMI 2 AUDIO IN L R Y Pb Pr EXT 4 SERV C VCR DVD Satellite receiver Cable Box VCR VCR Decoder DVD Decoder Decoder DVD Computer VCR DVD Decoder Home Cinema DVD VCR Cable ...

Страница 30: ...t signal and store the test signal in programme number 0 For information see Manual Store on page 10 and the user manual of your recorder 1 2 3 1 1 2 Bottom of TV Recorder Cable Connecting a decoder and a VCR As shown in the figure below connect a Eurocable to your decoder and to the euroconnector port of your recorder For information see the user manual of your recorder Alternately you can connect...

Страница 31: ... For information see Manual Store on page 10 and the user manual of your recorder 1 5 4 2 3 Recorder Bottom of TV Rear of TV Recorder Cable 1 2 3 4 1 2 Connecting a satellite receiver Connecting with a Eurocable As shown in the figure below connect aerial cables 1 and 2 Connect the satellite receiver to EXT1 and EXT2 with Eurocable 3 Press the key on the remote con trol display Source list Press th...

Страница 32: ...wing figure connect the three separate component video cables 1 to the YPbPr jacks on the DVD player and to the Y yellow Pb blue and Pr red jacks of EXT4 on the TV Connect the audio cable to the DVD s audio L and R jacks and to the L R AUDIO jack of EXT4 2 1 2 3 1 2 Press the key on the remote con trol The source list is displayed Press the ï key to select EXT4 and press the Æ key to confirm your ...

Страница 33: ...n and the signal standard of the peripheral equipment see the user manual for the equipment Connecting a PC Note The digital output of the PC can be connected via DVI to HDMI cable Connec tion by VGA is not supported Before you connect your PC to the TV configure your PC with a monitor refresh frequency of 60 Hz Connecting a PC with a DVI connector As shown in the following figure connect 1 your P...

Страница 34: ... the S VIDEO input 1 and AUDIO L R inputs 3 Warning Do not connect cables 1 and 2 at the same time Connecting both cables 1 and 2 can cause picture distortion 3 2 1 Side of TV 1 2 3 Connect headphones As shown in the figure below insert the headphones plug into the headphone socket at the side of the TV Press the key on the remote con trol The source list is displayed Press the ï key to select EXT...

Страница 35: ... have chosen the right TV system For information about TV systems see Manual Store on page 10 Check the signal strength by pressing the key No picture Verify that the supplied cables are connected properly Verify that you have selected the correct source Verify that the child lock is not activated No sound on certain channels Ensure that you have chosen the right TV system For information about TV...

Страница 36: ...al equipment fails Digital equipment can include a DVD player or set top box Check the user manual of the digital equipment you are connecting Use a standard compliant high quality HDMI to DVI cable No sound or pic ture but the red light on the front panel is on Press the key on the remote control PC modes do not work Check whether connections are correct See page 29 Check whether the source is co...

Страница 37: ...untry A Austria B Belgium CH Switzerland D Germany DK Denmark E Spain F France FL Finland GB England GR Greece I Italy IRL Ireland L Luxembourg N Norway Abbreviation Country NL Netherlands P Portugal S Sweden CZ Czech Republic H Hungary HR Croatia PL Poland RO Romania RUS Russia SK Slovakia SLO Slovenia TR Turkey Others ...

Страница 38: ......

Страница 39: ......

Страница 40: ... 2007 Koninklijke Philips N V All rights reserved ...

Отзывы: