Philips 24PFT4233 Скачать руководство пользователя страница 19

17

EN

English 

Note


The MHL feature does not fully support all mobile 

devices.

c

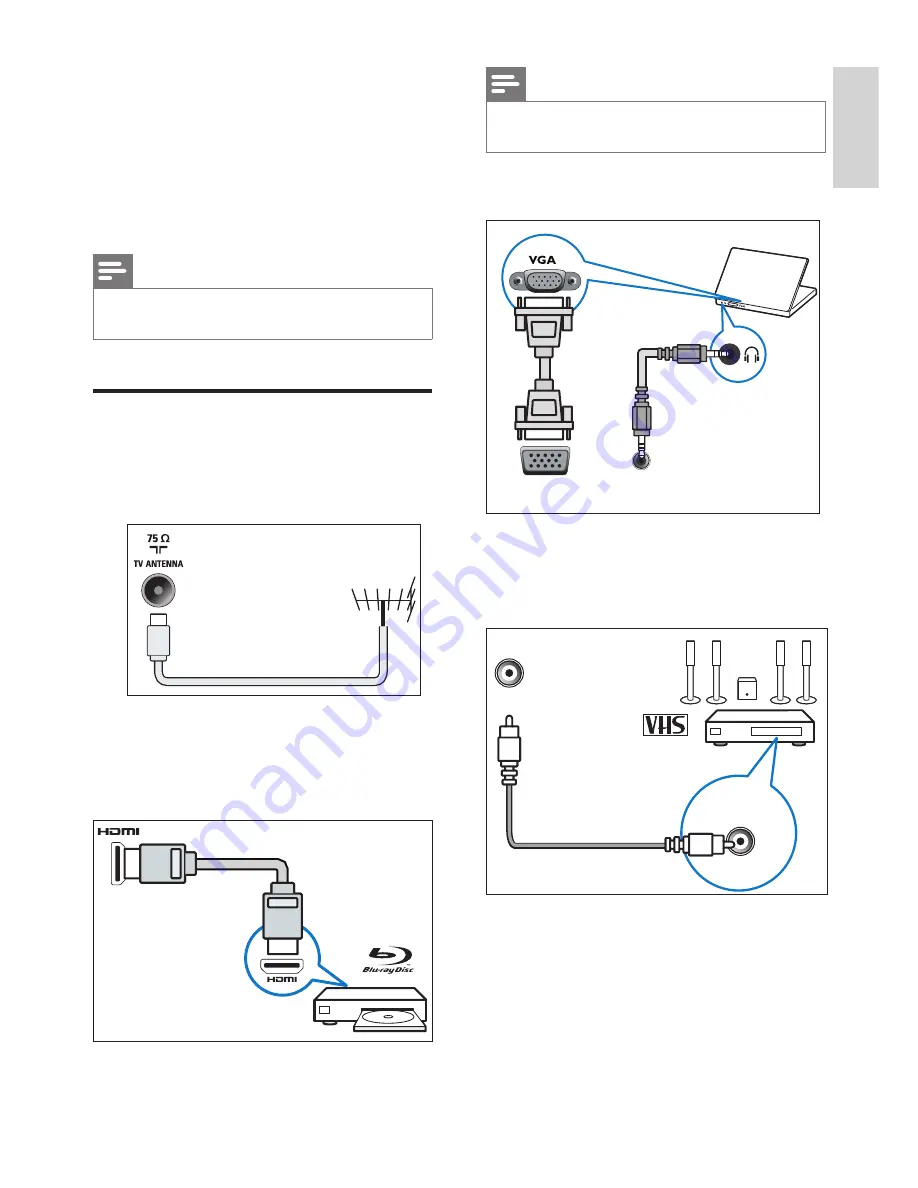
  PC inputs (VGA and audio)

VGA

AUDIO IN

VGA / DVI

d

 SPDIF

Digital audio signal output for digital audio 

equipment.

SPDIF

OUT

7 Connecting  

the TV

This section explains how to connect devices 

with different connectors.

Note


You can use different connection types to connect 

devices to the TV.

Rear ports

a

  Antenna/cable TV

Input for an antenna, cable or satellite signal


b

  HDMI 1 (MHL)/HDMI 2 (ARC)

Digital audio and video input from high 

definition devices such as Blu-ray players.

Содержание 24PFT4233

Страница 1: ...24PFT4233 Register your product and get support at www philips com welcome EN User Manual ...

Страница 2: ......

Страница 3: ... multimedia files from USB devices12 Updating theTV software 13 Restoring factory settings 13 6 Setting up channels 14 Setting up channels automatically 14 Swapping channels 14 Renaming channels 14 EPG 14 Recording option 15 Time shift option 15 7 Connecting the TV 17 Rear ports 17 Side ports 18 Connecting to a computer 19 Using Philips EasyLink 20 8 Product information 21 Display resolutions 21 M...

Страница 4: ...ime without being obliged to adjust previously supplied products The material in this manual is adequate for the intended use of the system If the product or its individual modules or procedures are used for purposes other than those specified herein their validity and suitability must first be confirmed TPVision Europe B V warrants that the material itself does not infringe upon any patents from ...

Страница 5: ...ly be swallowed Keep these batteries out of reach of small children at all times Risk of overheating Never install theTV in a confined space Leave a space of at least 4 inches 10 cm around theTV for ventilation Ensure that the ventilation slots on theTV are not covered by curtains or other objects 2 Important Please read and make sure you understand all instructions before using theTV Damage cause...

Страница 6: ...isconnect theTV from the power outlet and antenna before lightning storms During lightning storms never touch any part of the TV power cable or antenna Risk of damage to hearing Avoid the use of earphones or headphones at high volume for prolonged periods Low temperatures If theTV is transported in temperatures below 5 C 41 F unpack theTV and wait for it to reach room temperature before connecting...

Страница 7: ...lcome Control panel 1 2 4 3 5 a Volume Without the key menu the volume down function is available b Volume Without the key menu the volume up function is available c Channel When there is no keyboard menu switch to the next channel function when the keyboard menu appears move up and down the appropriate options d Channel When there is no keyboard menu switch to the prior channel function when the ...

Страница 8: ...IST Access or exit from theTV channel list j CH Channel Changes channels scrolls up down through the options in USB mode k Mute Mute or restore audio l 0 9 Numeric buttons 0 9 Select channel m TEXT Enable or disable teletext n SUBTITLE Select the subtitles o Volume Adjust volume p BACK Return to the previous menu or exit from a certain function and switch to the previous channel or signal source q...

Страница 9: ...annel list 3 Press OK to watch the selected channel 4 Press to switch and return to the last watched channel 4 Using the TV This section helps you to perform basicTV operations Switching the TV on or off Standby indicator To switch on Plug in the power plug If the standby indicator is red press Standby On on the remote control To switch to standby Press Standby On on the remote control The standby...

Страница 10: ...he remote control To mute or unmute sound Press Mute Press again to restore the sound Watch connected devices Note Switch on the device before selecting it as an external signal source Use the Souces button SOURCES 1 Press SOURCES The source list appears 2 Press to select a device 3 Press OK to confirm TheTV switches to the selected device ...

Страница 11: ...s ColorTemperature Cool gives a bluish white hue Normal gives a white hue Users can customise the white hue when in PC mode Warm gives a reddish white hue Advance Control Noise Reduction filters and eliminates signal noise in the image Backlight adjusts the screen brightness when the backlight is set to a low value a brief white flicker may be seen when switching theTV on This is normal Dynamic Co...

Страница 12: ...the installation wizard menu Reset restores the default settings excluding password settings and channel information SoftwareVersion checks the current software version Adjusting the sound settings 1 Press Home and select Setup to enter the Setup menu Select Sound The Sound menu is displayed 2 Press to select and adjust the settings Smart Sound Standard gives balanced outstanding sound performance...

Страница 13: ... onscreen to change the password Locking channels 1 Press Home and select Setup to enter the Setup menu Then select Parental 2 Enter the password and select Parental Rating 3 Adjust the channel locking rating Changing the picture format 1 Press Home and select Setup to enter the Setup menu Then select Settings 2 Press to select Picture Format 3 Select a picture format 4 Press OK to confirm Summary...

Страница 14: ...e slide show will start playing from the selected photo 4 Repeat this step to adjust the channel ratings Parental Rating when channels are locked Enter the four digit password to access the channel blocking menu Enter the four digit password to view locked channels Enter the four digit password to access the parental lock menu Clear All this function will clear all previously saved locked channels...

Страница 15: ...elect Settings Reset 3 Select Yes and press OK If you wish to cancel select No and press OK 2 Press the following buttons to control the playback of photos or play or pause CH or CH view either the previous or the next photo Changing the slide show settings To start playing a slide show press Option and select one of the following options then press OK Rotate sets the images to rotate Duration set...

Страница 16: ...Then press the blue button to confirm Renaming channels You can rename channels Selecting a channel will display its name 1 Press Home and select Setup to enter the Setup menu 2 Press to select TV Channels Channel Edit The Channel Edit menu is displayed 3 Press to select the analogue channel you wish to rename Then press the OK button 4 Press to select the channel name then press the OK button to ...

Страница 17: ...Remind Press green key to set remind the program Info Press blue key to display the program information Schedule Press yellow key to view program status in schedule list Recording option In DTV mode press red dot on the remote control Record option menu will show on the screen and theTV system begin recording now 1 Press key to stop and quit the recording 2 Press Home select Utilities Recordings t...

Страница 18: ...sk When you resume playing the program can continue to be played Time shift options menu introduction Play the current video Fast back for the video press play key to play normally Fast forward for the video press play key to play normally Pause the video Stop and quit time shift function ...

Страница 19: ... audio equipment SPDIF OUT 7 Connecting the TV This section explains how to connect devices with different connectors Note You can use different connection types to connect devices to theTV Rear ports a Antenna cable TV Input for an antenna cable or satellite signal b HDMI 1 MHL HDMI 2 ARC Digital audio and video input from high definition devices such as Blu ray players ...

Страница 20: ...put for headphones Note Headphones can only be used as a low power audio output Do not connect high power active devices such as high power active speakers Side ports a AV input Video L R CVBS L R b USB Data input from a USB storage device ...

Страница 21: ...ions Note A separate audio cable is required when connecting via DVI orVGA HDMI cable 1 Set the resolution of the computer display to 480p 576p 720p 1080p 2 Press Home and select Setup to enter the Setup menu 3 Press to select Settings HDMI Mode and set the HDMI display mode to graphics or video 4 Adjust the picture format to achieve the best display results Press Home and select Setup to enter th...

Страница 22: ... On on the remote control TheTV and all connected HDMI devices will automatically enter standby mode VGA VGA AUDIO IN VGA DVI Using Philips EasyLink Making full use of your Philips EasyLink HDMI CEC compatible devices can enhance control features to achieve the best possible results HDMI CEC compatible devices connected through the HDMI connector can be controlled by aTV remote control To enable P...

Страница 23: ...Product information Product information is subject to change without notice For detailed product information please visit www philips com support Display resolutions Computer Formats Resolution refresh rate 640 x 480 60Hz 800 x 600 60Hz 1024 x 768 60Hz 1360 x 768 60Hz 1920 x 1080 60Hz Video Formats Resolution refresh rate 480i 60Hz 480p 60Hz 576i 50Hz 576p 50Hz 720p 50Hz 60Hz 1080i 50Hz 60Hz 1080p...

Страница 24: ...o leave a clearance gap of at least 2 2 inches or 5 5cm between the back of theTV to the wall Caution Please follow all instructions provided with theTV mount TPVision Europe B V bears no responsibility for improperTV mounting that results in accident injury or damage Model No Required Pixel Pitch mm Required Mounting Screws 24PFT4233 75 x 75 4 x M4 recommended length 12 mm ...

Страница 25: ... installed channels do not appear in the channel list Check that the correct channel list is selected Picture issues TheTV is on but there is no picture Check that the antenna is properly connected to theTV Check that the correct device is selected as theTV source There is sound but no picture Check that the picture settings are correctly set PoorTV reception from the antenna connection Check that...

Страница 26: ...k again If there are intermittent sound disruptions please check that output settings from the HDMI device are correct If you are using a HDMI to DVI adapter or cable please check if the audio cable that comes with the product is connected to AUDIO only for mini jacks Computer connection issues The computer display on theTV is not stable Check that your PC uses the supported resolution and refresh...

Страница 27: ...y use period exceeded Suggestive description of the Recycling Administrative Regulations for Waste Electrical and Electronics Products In order to care and protect the Earth in a better way please adhere to the national and applicable laws in relation to the recycling management of waste electrical and electronics products when the user no longer needs to use this product or when it has reached th...

Страница 28: ...26 EN 10 Warranty English Warranty Deutsch Garantie Français Garantie Indonesia Jaminan ไทย การรับประกัน TiếngViệt Bảo hành 简体中文 保修 繁體中文 保養 ﺍﻟﻌﺭﺑﻳﺔ ﺍﻟﻀﻤﺎﻥ Malay Waranti ...

Страница 29: ...te d impression Pour des informations à jour consultez la page www philips com support ไทย การรับประกัน เรียนลูกค า ขอขอบคุณที เลือกซื อผลิตภัณฑ ของ Philips สําหรับการรับประกันที มีผลบังคับใช กับ ผลิตภัณฑ นี โปรดอ างอิงเว บไซต ของ Philips www philips com guarantee ในกรณีที คุณ ไม มีอินเทอร เน ต โปรดติดต อศูนย บริการลูกค า Philips ประจําท องถิ นของคุณ รายละเอียดการ ติดต อจะแสดงอยู ในรายชื อศูนย บริ...

Страница 30: ...spective owners emblem are trademarks of Koninklijke Philips N V and are used under license from Koninklijke Philips N V 2018 TP Vision Europe B V All rights reserved philips com Australia 1300 998 851 Indonesia 0800 1 822822 Malaysia 1800 220 180 Singapore 新加坡 65 6286 7333 Philipines Pilipinas 632 84204970 Thailand ประเทศไทย 0 2746 5431 ...

Отзывы: