16
241P3 LCD
Color Adjustment
Alignment procedure
1. Turn on the LCD monitor
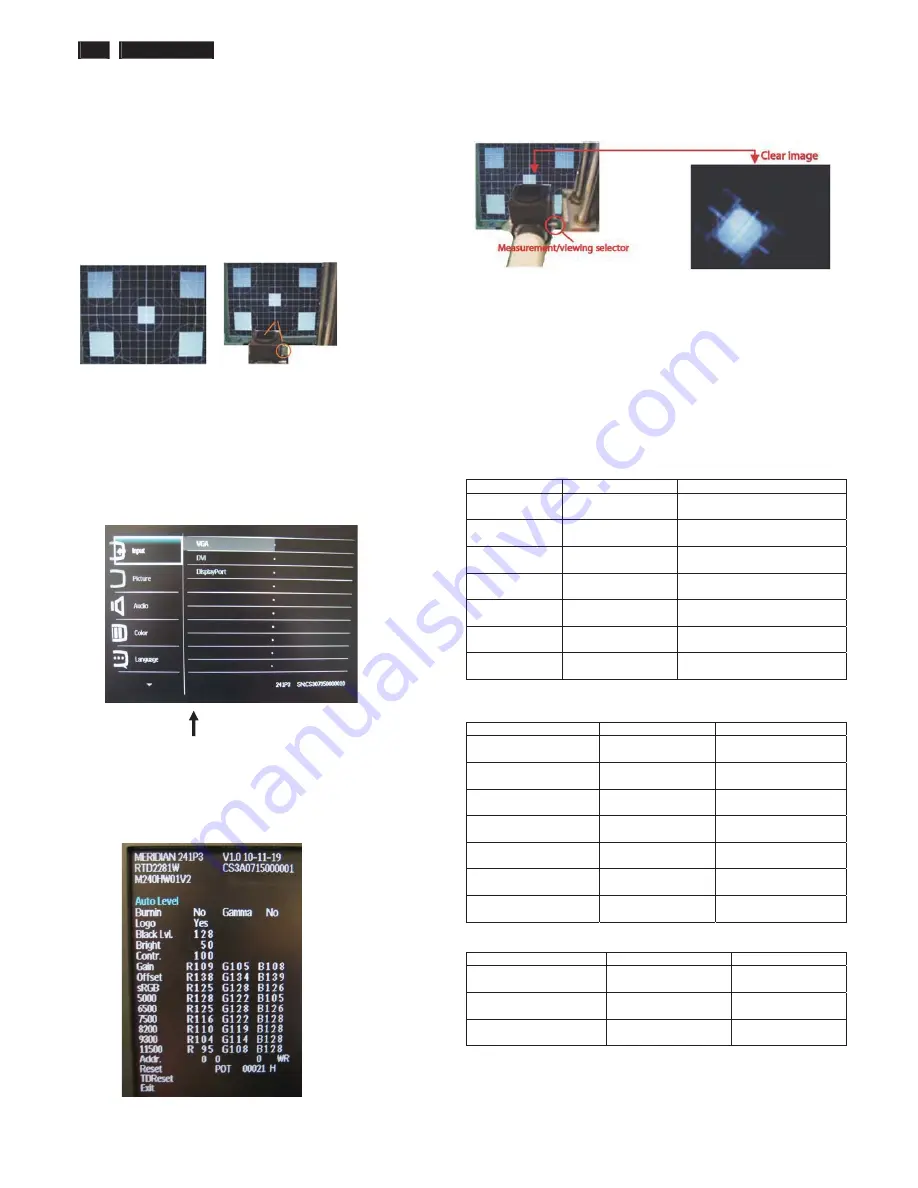
2. Turn on the Timing/pattern generator. See Fig.1
3. Preset LCD color Analyzer CA-1 10
-Remove the lens protective cover of probe CA-A30.
-Set measuring/viewing selector to measuring position for reset
analyzer .(zero calibration) as Fig.2
- Turn on the color analyzer (CA-1 10)
-Press 0-CAL button to starting reset analyzer .
Fig. 1 Fig.2
4. Access Factory Mode
1). Turn off monitor.
2).
[Push "AUT O" & "MENU" buttons at the same time and hold them]
+[Press "power" button untill comes out "Windows screen" ]
=> then release all buttons
3).Press "MENU button, wait until the OSD menu with
Characters
" MERIDIAN 241P3 V1.0 2010-11-19”
(below OSD menu)
come on the Screen of the monitor as shown in Fig3.
Factory Mode indicator
)LJ
4). Press button, then select factory mode indicator by "MENU" "LEFT"
or "RIGHT" button .Press"MENU" button to bring up submenu
windows as below:
)LJ
Fig.5
5.Display
Press "UP" or "DOWN" button to select . Change the value
by "UP" or "DOWN" key until the X, Y co-ordinates as below
5.1 Color temperature adjustment
There are six factory preset white color 11500K, 9300K, 8200K, 7500K,
6500K, sRGB, 5000K
Align by Philips PerfecTune (also called FGA) function.
Apply full white pattern, with brightness in 100 % position and the contrast
control at 50 % position.
The 1931 CIE Chromaticity (color triangle) diagram (x , y) coordinate for
the screen center should be:
Product specification
CIE coordinates
(x,y)
11500K
x = 0.270 ± 0.02
y = 0.281 ± 0.02
PerfectuneII
9300K
x = 0.283 ± 0.02
y = 0.297 ± 0.02
PerfectuneII
8200K
x = 0.291 ± 0.02
y = 0.306 ± 0.02
PerfectuneII
7500K
x = 0.298 ± 0.02
y = 0.314 ± 0.02
PerfectuneII
6500K/sRGB
x = 0.313 ± 0.02
y = 0.329 ± 0.02
PerfectuneII
sRGB
x = 0.313 ± 0.02
y = 0.329 ± 0.02
PerfectuneII
5000K
x = 0.345 ± 0.02
y = 0.357 ± 0.02
PerfectuneII
Production alignment spec
CIE coordinates
(x,y)
11500K
x = 0.270 ± 0.006
y = 0.281 ± 0.006
PerfectuneII
9300K
x = 0.283 ± 0.006
y = 0.297 ± 0.006
PerfectuneII
8200K
x = 0.291 ± 0.006
y = 0.306 ± 0.006
PerfectuneII
7500K
x = 0.298 ± 0.006
y = 0.314 ± 0.006
PerfectuneII
6500K/sRGB
x = 0.313 ± 0.006
y = 0.329 ± 0.006
PerfectuneII
sRGB
x = 0.313 ± 0.006
y = 0.329 ± 0.006
PerfectuneII
5000K
x = 0.345 ± 0.006
y = 0.357 ± 0.006
PerfectuneII
Quality Inspection specification
CIE coordinates
(x,y)
9300K
x = 0.283 ± 0.015
y = 0.297 ± 0.015
6500K/sRGB
x = 0.313 ± 0.015
y = 0.329 ± 0.015
sRGB
x = 0.313 ± 0.015
y = 0.329 ± 0.015
Содержание 224EL2SB/00
Страница 6: ...6 241P3 LCD Troubleshootingʳ ...
Страница 7: ...241P3 LCD 7 Troubleshooting ...
Страница 17: ...241P3 LCD 17 FAQs Frequently Asked Questions ...
Страница 18: ...18 241P3 LCD FAQs Frequently Asked Questions ...
Страница 21: ...241P3 LCD 21 Service tool Hardware PCM code 12NC 5E L8215 001 996510019769 ...
Страница 22: ...22 241P3 LCD Service tool Software FW writing tool RTD tool V6 7 DDC writing tool Q EDID V30 ...
Страница 26: ...26 241P3 LCD DDC Instructions Step 2 Press Open File then choose 241P3 DDC FILE Fig 5 ...
Страница 35: ...241P3 LCD 35 LULQJ LDJUDP ...
Страница 36: ...36 241P3 LCD ORFN LDJUDP ...
Страница 40: ...S calar Diagram C B A 40 241P3 LCD ...
Страница 43: ...241P3 LCD 43 3 Power Diagram C B A ...
Страница 45: ...Control Diagram C B A 241P3 LCD 45 ...
Страница 47: ...5 5 4 4 3 3 2 2 1 1 4 4 3 3 2 2 1 1 H1 H O L E V 8 1 2 3 4 5 6 7 8 9 USB Diagram C B A 241P3 LCD 47 ...
Страница 49: ...USB Diagram C B A 241P3 LCD 49 ...
Страница 50: ...USB Diagram C B A 50 241P3 LCD ...
Страница 84: ...Form No QTY 0 0B 003 32 031205 1 84 241P3 LCD Exploded View ...


