background image

2

3

S - VIDEO

VIDEO

AUDIO

4

P

RESENTATION


OF


THE

 LCD TV

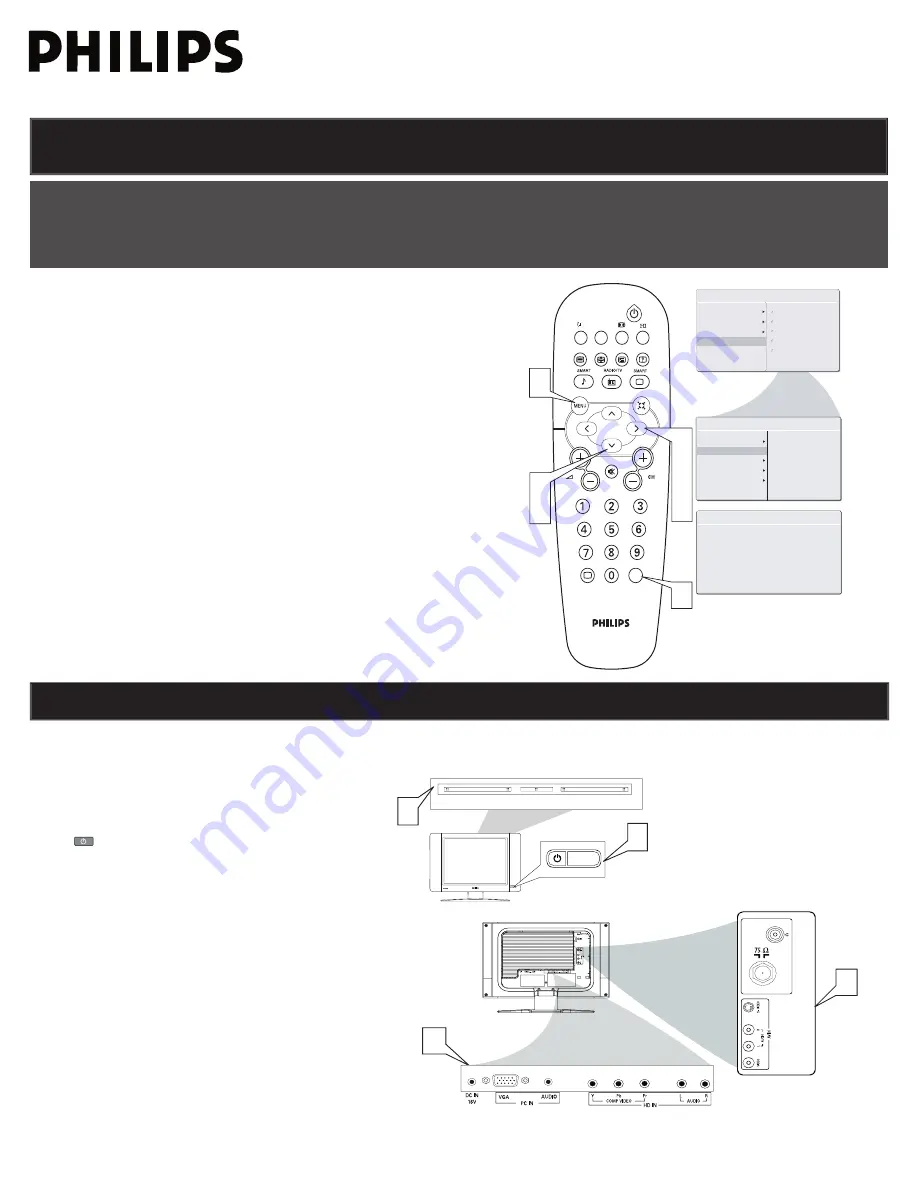
Television Keys

• / - : To adjust sound level.

• C / - : To select programs.

• MENU : To access or close onscreen menu. 

Power button, LED light and infrared sensor

•        : To switch the TV on or off.

• Aim remote control at infrared sensors to activate 

  TV controls.

Rear connectors

Remove the cable cover to access the connectors at 
the rear of the LCD TV.

Bottom connectors

Located at the bottom of the set.

1

2

3

4

-            

Volume

         +

-     Channel     +

Menu

2

1

TV C

HANNEL

 I

NSTALLATION

INSTALL

START

?

AUTO PROGRAM

LANGUAGE

MANUAL STORE
CHANNEL SETTING
FACTORY RESET

AUTO PROGRAM

LANGUAGE

MANUAL STORE

CHANNEL SETTING

FACTORY RESET

A/CH

AV

i

+

2

1

3

5

PICTURE

AUDIO

FEATURES

INSTALL

MAIN CONTROLA

AUTO STORE

PLEASE WAIT

PROG.FOUND

0

FREQUENCY

MHZ

3

4

1

Please follow these steps to install TV channels: 

Select a TV source via AV button on your remote control.
Press the CURSOR RIGHT button to confi rm.

Press MENU button on your remote control to open the onscreen menu. 

Press CURSOR DOWN to move to INSTALL, press CURSOR RIGHT on your 

remote control to enter INSTALL. 

Press CURSOR DOWN to move to AUTO PROGRAM. 

Press CURSOR RIGHT to start auto install the TV Channels. 

1

2

3

4

For more detailed explanation of AUTO PROGRAM, please refer to 

AUTO PROGRAM section on page 5. 

5

Immediately after unpacking and plugging in your new television, run the auto program function 
to set up the TV for the broadcast or cable channels available in your area. If you do not run the 
auto program function to set up the channels , your television may not operate properly.

Quick Start Guide

Содержание 20TA1600/98

Страница 1: ...V 2 ACCESSORIES 3 BATTERY INSTALLATION 3 REMOTE CONTROL OPERATION 3 ANTENNA TV 4 BASIC CABLE TV CONNECTION 4 TUNER MODE CONTROL 5 AUTO PROGRAM SETTING UP CHANNELS 5 CABLE BOX WITH RF IN OUTPUTS 6 CABLE BOX WITH AUDIO VIDEO OUTPUTS 6 S VIDEO CONNECTIONS 7 HD CONNECTIONS 7 PC MONITOR INPUTS 8 INSTALLING LCDTV ON THE WALL The stand of your LCD TV complies with the VESA standard if you intend to insta...

Страница 2: ...STALL MAIN CONTROLA AUTO STORE PLEASE WAIT PROG FOUND 0 FREQUENCY MHZ 3 4 1 Please follow these steps to install TV channels Select a TV source via AV button on your remote control Press the CURSOR RIGHT button to confirm Press MENU button on your remote control to open the onscreen menu Press CURSOR DOWN to move to INSTALL press CURSOR RIGHT on your remote control to enter INSTALL Press CURSOR DOW...

Страница 3: ...und is muted Number buttons Press the number buttons for direct access to the TV channels For a 2 digit channel enter the 2nd digit after enter 1st digit Information button Press to see the current channel number on the TV screen Unused key Power button Press to turn the LCD TV on or off I II button Sound mode Press repeatedly to select Mono Stereo Dual I Dual II Nicam Mono Nicam Stereo Nicam Dual...

Страница 4: ...the steps below to connect your cable signal to your new television Direct cable connections Direct cable connections Connect the Cable TV signal to one end of the supplied L Adapter as shown and connect the other end of the adapter to the TV jack on the LCD TV Plug the DC adapter into the DC IN 16V jack on the LCD TV Plug the power cable into an outlet and switch TV set on Run the AUTO PROGRAM fu...

Страница 5: ...st be connected to your LCD TV HELPFUL HINT HELPFUL HINT HELPFUL H 5 You can also choose to tune your TV channels Manual tuning allows you to store each programme manually MANUAL STORE OF TV CHANNEL Press the MENU button on the remote control to show the onscreen menu Press the CURSOR DOWN button to highlight the INSTALL menu then press CURSOR RIGHT to enter Select the MANUAL STORE then press the ...

Страница 6: ...ne end of the cables to the left and right Audio Out jacks of the Cable Box Connect the other end of that cable to the Audio jack on the side of the LCD TV Audio cables are usually marked with red and white and are available from Philips or electronics retailers The right audio jack is red and the left audio jack is white Match the cable colors to the jack colors Plug the DC adapter into the DC IN...

Страница 7: ... The S Video connection on the rear of the LCD TV can provide you with better picture detail and clarity for the playback of accessory sources such as DBS digital broadcast satellite DVD digital video discs video games and VHS VCR video cassette recorder tapes than the normal antenna picture connections Connect an S Video cable to the S VIDEO jack of the other equipment DVD Player Camcorder etc an...

Страница 8: ... connections are not required the LCD TV can reproduce the computers audio out by an AUDIO ADAPTER to the Audio output jack on the computer if available while connecting the other ends of the Audio cables to the PC AUDIO Jacks on the bottom of the TV Plug the DC Adapter into the DC IN 16V jack on the LCD TV Plug the power cable into an outlet Turn on the LCD TV and PC Press the AV button until PC ...

Отзывы: