3
C
ONNECTING
P
ERIPHERAL
E
QUIPMENT TO THE
LCD T
ELEVISION
C
ONNECTING THE
DVD P
LAYER
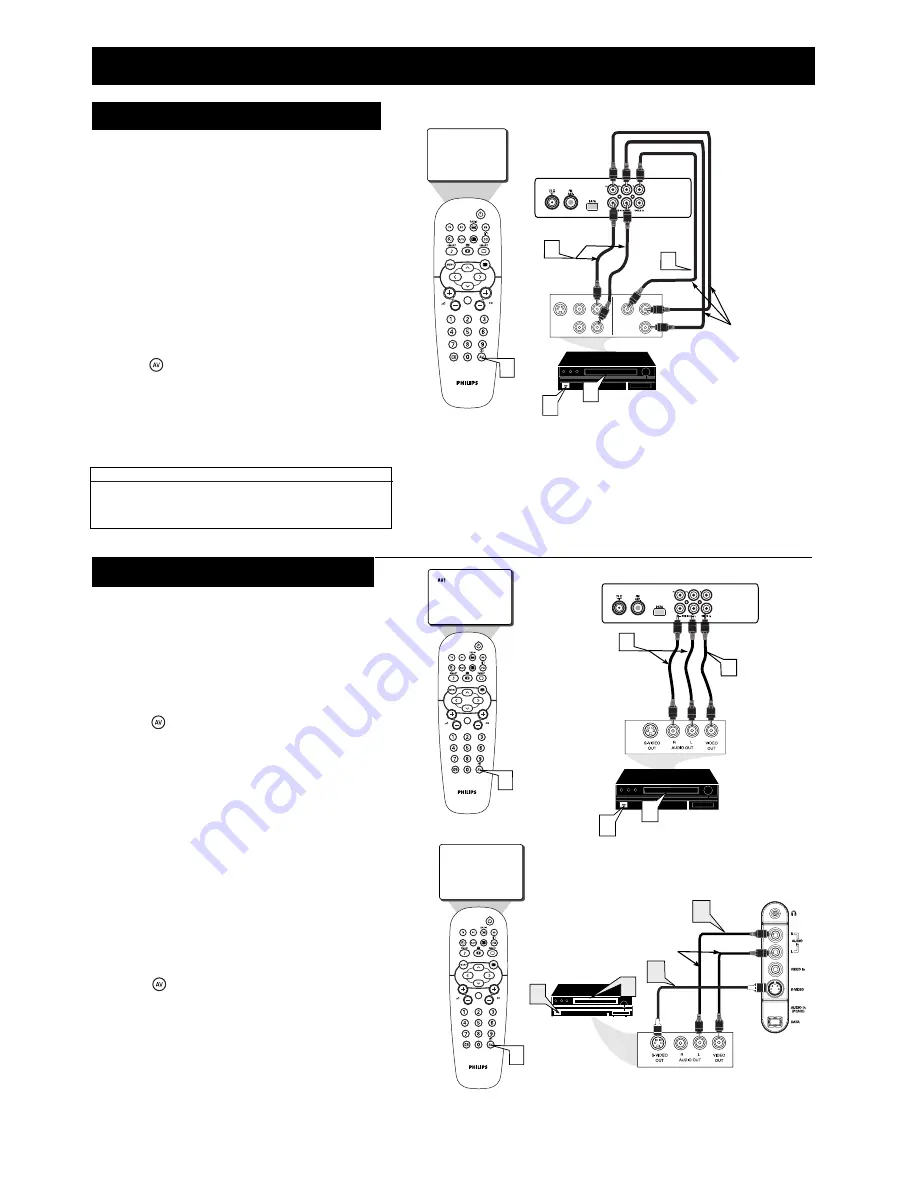
omponent Video inputs provide the highest possible color and
picture resolution in the playback of digital signal soure
material, such as with DVD players.
Connect the
COMPONENT VIDEO
Input (
Y-green,
Pb-blue, Pr-red
) sockets at the bottom of the TV to
the
COMPONENT (Y, Pb, Pr) VIDEO OUT
of the
DVD player (or similar device). When using the Component
Video Inputs, it is best not to connect a signal to the AV1 In
Video socket. The Component Video Input connection will
dominate over the AV1 Video Input.
Connect the
left
and
right
AV1 Input of the TV to the
Audio
red
and
white
) output jacks on the rear of the
DVD player.
Switch on the TV and DVD player.
Press the (AV) button on the remote control repeatedly
until
CVI
channel is selected.
CVI
will appear at the upper
left corner of the TVs screen.
Insert a DVD disc into the DVD player and press
É
(PLAY)
button on the DVD player.
NOTE
: The Audio/Video cables needed for this connection
are not supplied with your TV.
HELPFUL HINT
The description for the component video outputs may differ depending
on the DVD player or accessory device used (forexample, Y, Pb, Pr or
Y, B-Y, R-Y or Y, Cr, Cb). Refer to your DVD or accessory device user
manual for definition and connection details.
C
3
5
CVI
S-VIDEO
OUT
OUT
OUT
L
AUDIO
VIDEO
COMP VIDEO
Pb
Pr
Y
R
ACCESSORY DEVICE
(Equipped with Component
Video Outputs)
Jack Panel at
bottom of TV
Audio Cables
(Red/White)
2
Component Video
Cables
(Green/Blue/Red)
1
4
C
ONNECTING THE
VCR P
LAYER
Y
ou can view the playback of VCR tapes or Video Discs by using the
AUDIO/VIDEO INPUT sockets at the bottom of the TV to a VCR or
similar accessory device that has AUDIO/VIDEO
OUTPUT sockets.
Connect the
AV1
Input sockets at the bottom of the TV to the
AUDIO/ VIDEO OUT
output sockets of the VCR player
(or similar device).
Switch on the TV and VCR player (or similar device).
Press the (AV) button on the remote control repeatedly
until
AV1
channel is selected.
AV1
will appear at the upper left
corner of the TVs screen.
Insert a VCR pre-recorded tape into the VCR player and press
É
(PLAY) button.
NOTE
: The Audio/Video cables needed for this connection are
not supplied with your TV.
I
f your VCR is equipped with S-Video socket,
connect the S-Video Input
socket instead of the normal Video Input. S-Video connection gives you
better picture detail and clarity.
Connect the
S-VIDEO
Input socket at the
rear
of the TV
to the
S-VIDEO
output socket of the VCR player.
Connect the
AV2
input sockets at the rear of the TV to the
AUDIO LEFT
and
RIGHT
output sockets of the VCR
Switch on the TV and VCR player (or similar device).
Press the (AV) button on the remote control repeatedly
and select
AV2
channel.
Insert a VCR pre-recorded tape into the VCR player and press
É
(PLAY) button.
NOTE
: The Audio/Video cables needed for this connection
are not supplied with your TV.
VCR
BACK OF VCR
Jack Panel at bottom of TV
3
5
1
Audio Cables
(Red/White)
Video Cable
(Yellow)
2
2
3
5
Audio
Cables
(Red /
White)
1
S-Video
Cable
3
VCR
BACK OF VCR
3
1
2
3
4
5
1
2
3
4
1
2
3
4
5
AV2


