background image

24

A

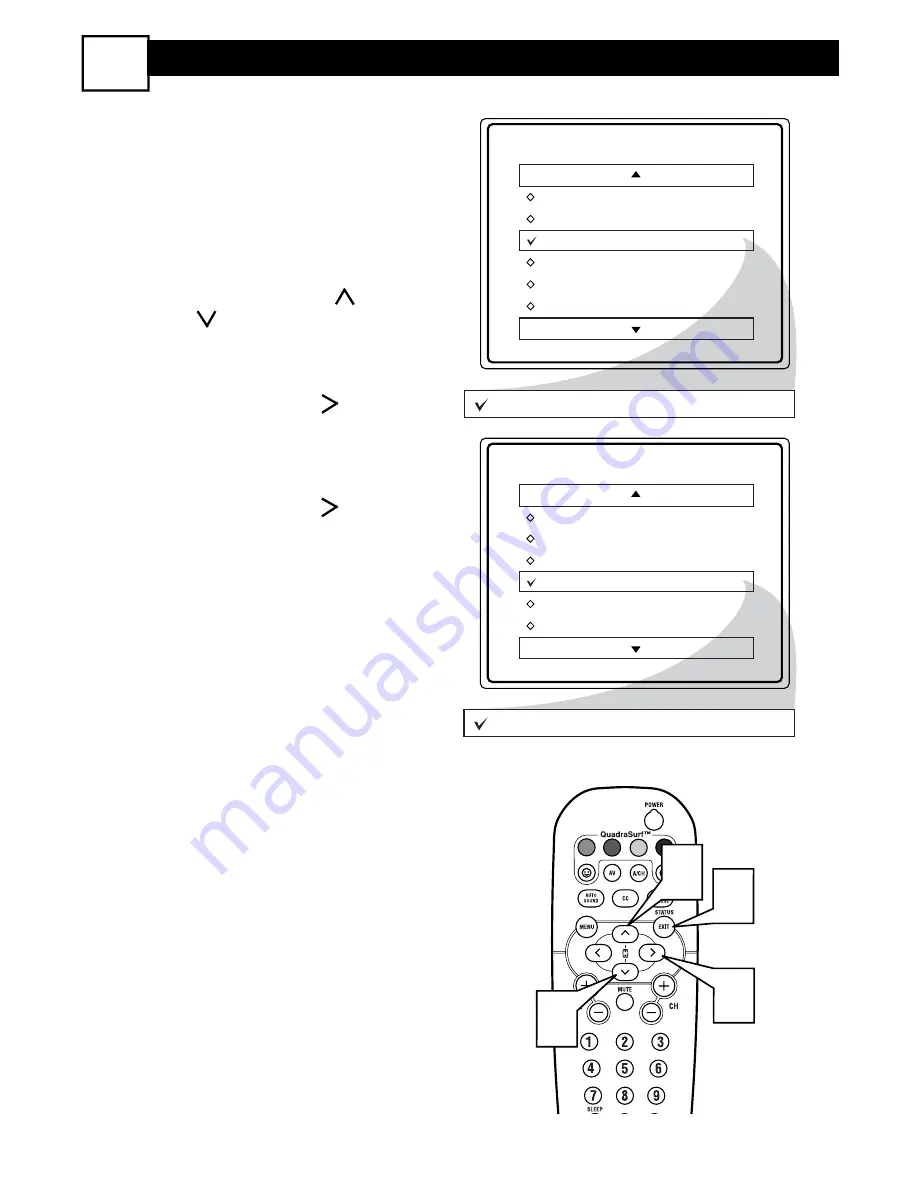
fter blocking specific channels there
may come a time when you want to

block or clear all the channels at the
same time. 
Once you’ve entered your access code
and the AutoLock™ features are dis-
played on the screen:

1

Press the CURSOR UP

or

DOWN      buttons to select either
CLEAR ALL or BLOCK ALL.

2

If CLEAR ALL is selected, press
the CURSOR RIGHT

button

to clear all blocked channels. All
channels will be viewable.

If BLOCK ALL is selected, press
the CURSOR RIGHT

button

to turn the control ON or OFF.
When ON is selected, ALL avail-
able channels will be blocked from
viewing.

3

When finished, press the STA-
TUS/EXIT button 
to remove the
menu from the screen.

NOTE: If you ever forget your code, the
0, 7, 1, 1 code is the factory default and
can be used to enter and create a new
access code.

AutoLock

Block Channel

Setup Code

Clear All

Block All

Movie Rating

TV Rating

Clear ?

Stop Time

Channel

Activate

Display

Clear All

Cleared

AutoLock

Block Channel

Setup Code

Clear All

Block All

Movie Rating

TV Rating

Off

Block All

On

VOL

1

1

2

3

B

LOCKING OR

C

LEARING

A

LL

C

HANNELS AT THE

S

AME

T

IME

20

Содержание 20-FAUX FLAT COLOR TELEVISION 20PS40S

Страница 1: ...ur new product We can guide you through Connections First time Setup or any of the Features We want you to start enjoying your new product right away CALL US BEFORE YOU CONSIDER RETURNING THE PRODUCT Visit us on the web at www philips com Important Return your Warranty Registration Card within 10 days See why inside 3141 055 22001 Printed in China ...

Страница 2: ...G TO PREVENT FIRE OR SHOCK HAZARD DO NOT EXPOSE THIS EQUIPMENT TO RAIN OR MOISTURE CAUTION To prevent electric shock match wide blade of plug to wide slot and fully insert ATTENTION Pour éviter les chocs électriques introduire la lame la plus large de la fiche dans la borne correspondante de la prise et pousser jusqu au fond CAUTION RISK OF ELECTRIC SHOCK DO NOT OPEN CAUTION TO REDUCE THE RISK OF ...

Страница 3: ...nce has been dropped or the enclosure damaged 17 Tilt Stability All televisions must comply with recommended international global safety standards for tilt and stability properties of its cabinet design Do not compromise these design standards by applying excessive pull force to the front or top of the cabinet which could ultimately overturn the product Also do not endanger yourself or children by...

Страница 4: ...6 10 Monitor Output Jacks 8 9 12 13 S Video Input Jacks 7 11 AutoLock Controls Access Code 18 22 Block All Channels 20 24 Block Channels 19 23 Clear All Blocked Channels 20 24 Movie Ratings 21 25 Other Blocking Options 23 27 TV Ratings 22 26 Understanding AutoLock 17 21 Subject Panel No Page No AutoPicture Control 26 30 AutoSound Control 27 31 Basic Remote Operation 4 8 Basic Television Operation ...

Страница 5: ...r to the 75Ω plug on the TV If you have a Cable Converter Box Connect the OUT put plug from the Converter to the 75Ω plug on the TV Be sure to set the TV for the type signal you ve connected see the Install Menu Controls section of this manual To set the TV to select only the channel numbers in your area see how to Program or Add channels in the TV s memory see the Auto Program section of this man...

Страница 6: ...he OUT put TO TV plug on the back of the Cable Box 3Connect the other end of the round coaxial cable to the 75Ω input on the back of the television Screw it down finger tight NOTE Set the OUTPUT CHANNEL SWITCH on the back of the cable box to CH 3 or 4 Tune the TV to the same chan nel and change channels at the cable box TO TV CABLE IN 4 2 3 OUTPUT CH 3 4 75 VIDEO L AUDIO R Monitor out S VIDEO AV1 ...

Страница 7: ...d of the Audio Left and Right Cable to the left and right Audio Out L R jacks on the cable box Connect the other end to the AV1 Audio L R Input jacks on the TV NOTE Use the Channel or buttons on the TV remote control to tune to the AV1 channel for the cable box signal Once tuned change channels at the cable box not the television 75 VIDEO L AUDIO R AV1 in S VIDEO CABLE IN TO TV VIDEO OUT L R AUDIO...

Страница 8: ...the CHANNEL UP or DOWN button to select TV channels REMOTE CONTROL 4Point the remote control toward the remote sensor win dow on the TV when operating the TV with the remote To load the supplied batteries into the remote 1 Remove the battery compartment lid on the back of the remote 2 Place the batteries 2 AA in the remote Be sure the and ends of the batteries line up correctly inside of case is m...

Страница 9: ... AUDIO red and white cables to the AUDIO left and right OUT jacks on the rear of the VCR 5Turn the VCR accessory device and the TV ON 6Press the AV button on the remote control to select the AV1 channel AV1 will appear in the upper left corner on the TV screen 7With the VCR or accessory device ON and a prerecorded tape CD DVD etc inserted press the PLAY button to view the tape on the tele vision A...

Страница 10: ... of the camera or accessory device 4Connect the AUDIO red and white cables to the AUDIO left and right OUT jacks on the rear of the camera or accessory device 5Turn the camera or accessory device and the TV ON 6Press the AV button on the remote control to select the FRONT chan nel FRONT will appear in the upper left corner on the TV screen 7With the camera or accessory device ON and a prerecorded ...

Страница 11: ...the AV1 in AUDIO L and R left and right jacks on the rear of the TV 2Connect other end of the S VIDEO CABLE to the S VHS S Video OUT jack on the back of the VCR Then connect the other ends of the AUDIO red and white CABLES to the AUDIO left and right OUT jacks on the rear of the VCR 3Turn the VCR and the TV ON 4Press the AV button on the remote to scroll the channels until SVHS appears in the uppe...

Страница 12: ...the TV to the R and L audio input jacks on your amplifier or sound sys tem Set the television s volume to a normal listening level 2Turn the TV and audio system ON To adjust the volume on the audio system you will need to change the volume at the external audio system not the television 75 VIDEO L AUDIO R Monitor out AV1 in S VIDEO AUX TV INPUT PHONO INPUT R L 1 2 1 Back of TV Audio Cables Red and...

Страница 13: ...other end to the VIDEO IN plug on the second VCR 2Connect one end of the red and white Audio cable from the Monitor Out AUDIO L and R plugs on the TV to the AUDIO IN plugs on the VCR 3Turn the Second VCR ON insert a black VHS tape and it s ready to record what s being viewed on the TV screen 75 VIDEO L AUDIO R Monitor out AV1 in S VIDEO ANTENNA OUT ANTENNA IN VIDEO AUDIO IN IN OUT OUT L R ANTENNA ...

Страница 14: ...e on the TV screen 10 MENU Button Press to display the on screen menu Also can be used to back out of the on screen menu until it disappears from the TV s screen 11 STATUS EXIT Button Press to dis play the current channel number If the on screen menu is displayed press the Status Exit button to remove it from the TV s screen 12 CURSOR or Buttons Press to navigate select and adjust controls within ...

Страница 15: ...15 REMOTE CONTROL BUTTONS 11 VOL 1 2 6 4 5 3 7 9 10 13 8 11 12 14 15 16 18 17 ...

Страница 16: ...ted deactivated by viewing the screen and simply pressing the proper button 1Press the MENU button on the remote control to show the onscreen menu 2Press the CURSOR UP or DOWN buttons on the remote to pick any of the onscreen menus 3Press the CURSOR RIGHT button on the remote control show the selected menu s controls 4Press the CURSOR UP or DOWN buttons on the remote to pick any of the displayed c...

Страница 17: ...ent This control can set the TV s onscreen menu to be shown in either English Spanish or French 2TUNER MODE CONTROL This control changes the TV s sig nal input to either ANTENNA CABLE or AUTO mode In the AUTO mode when the AUTO PROGRAM feature is activated the TV will automatically choose the correct mode 3AUTOPROGRAM CONTROL Your TV can automatically set itself for local area or Cable TV chan nel...

Страница 18: ... CUR SOR RIGHT or LEFT but tons until lightest parts of the picture show good detail 4SHARPNESS CONTROL Press the CURSOR RIGHT or LEFT buttons to improve detail in the picture 4TINT CONTROL Press the CURSOR RIGHT or LEFT buttons to obtain natural skin tones 5COLOR TEMP CONTROL Press the CURSOR RIGHT or LEFT buttons to select NOR MAL COOL or WARM picture pref erences NORMAL will keep the whites whi...

Страница 19: ...n changes in volume occur during com mercial breaks or channel changes 5INCR SURROUND Press the CURSOR LEFT or RIGHT buttons to select between Incr Surround or Stereo settings If Stereo or select Spatial or Mono If Mono 6ULTRA BASS Press the CURSOR LEFT or RIGHT buttons to turn Ultra Bass On or Off Ultra Bass will enhance the low frequency sound 7SOUND Press the CURSOR LEFT or RIGHT buttons to sel...

Страница 20: ...ighted 3Press the CURSOR RIGHT button to display the Features menu options AutoLock or Format 4Press the CURSOR DOWN button until the word Format is highlighted 5Press the CURSOR RIGHT or LEFT buttons to select one of the two options 4 3 or Expand 4 3 4 3 Standard format for the TV Expand 4 3 Enlarges the picture to fill out the entire screen area eliminating the letter box effect 6When finished p...

Страница 21: ...ntains material that parents may find unsuitable for children under the age of 13 MOVIE RATINGS Continued R Restricted This is programming is specif ically designed for adults Anyone under the age of 17 should only view this programming with an accompanying parent or adult guardian NC 17 No one under the age of 17 will be admitted This type of programming should be viewed by adults only X Adults O...

Страница 22: ...e numbered buttons INCORRECT CODE will appear on the screen and you will need to enter 0 7 1 1 again 7The screen will ask you to enter a New Code Enter a new 4 digit code using the NUMBERED but tons The screen will then ask you to CONFIRM the code you just entered Enter your new code again XXXX will appear when you enter your new code and then display the AutoLock menu options Proceed to the next ...

Страница 23: ...When ON is select ed the channel will be blocked 3Press the CH or CH button to select other channels you wish to block Repeat step 9 to block the new channel 4When finished press the STA TUS EXIT button to remove the menu from the screen NOTE If you ever forget your code the 0 7 1 1 code is the factory default and can be used to enter and create a new access code AutoLock Block Channel Setup Code ...

Страница 24: ...ted press the CURSOR RIGHT button to turn the control ON or OFF When ON is selected ALL avail able channels will be blocked from viewing 3When finished press the STA TUS EXIT button to remove the menu from the screen NOTE If you ever forget your code the 0 7 1 1 code is the factory default and can be used to enter and create a new access code AutoLock Block Channel Setup Code ClearAll BlockAll Mov...

Страница 25: ...ns When highlighted all these options can be turned ON which will allow block ing or OFF which will allow view ing 4Use the CURSOR RIGHT but ton on the remote to turn the rating option ON or OFF When a rating level is chosen to be blocked any higher level rating will also be blocked from viewing i e If R is selected to be blocked NC 17 and X will automatically be blocked NOTE If you ever forget yo...

Страница 26: ... RATING options also have sub ratings The ratings of TV Y7 TV PG TV 14 TV MA can be customized to block V violence FV fantasy violence S sexual situations L coarse language or D suggestive dialogue 4Press the CURSOR RIGHT but ton on the remote to turn the TV Y or TV G rating ON or OFF Or press the CURSOR RIGHT button to enter the sub menus for the TV Y7 TV PG TV 14 or TV MA ratings 5If the TV Y7 T...

Страница 27: ...for AutoLock When ON ALL blocking censoring will take place When OFF ALL blocking is disabled UNRATED ALL unrated programs based on the Movie Ratings or Parental TV Guidelines can be blocked if this feature is set to ON and the BLOCKING feature is set to OFF NO RATING ALL programming with NO content advisory data can be blocked if set to ON and the BLOCKING feature is set to OFF 3Press the CURSOR ...

Страница 28: ... screen text boxes to show dia logue and conversations while the TV program is in progress 1Press the CC button on the remote to display the current Closed Caption setting 2Press the CC button repeatedly to choose from the four Closed Caption options CC Off CC1 CC2 CC Mute 3When finished press the STATUS EXIT button to remove the menu from the TV s screen CC Mute CC Off CC1 CC2 CC Off VOL 1 2 3 ...

Страница 29: ... SLEEP button on the remote control and the SLEEP timer display will apprear on the screen 2Press theSLEEP button repeatedly to pick the amount of time 15 30 45 60 90 120 180 or 240 minutes before the TV will turn itself off NOTE An on screen count down will appear during the last minute before the TV shuts itself off If any button is pressed during the last minute of the countdown the Sleeptimer ...

Страница 30: ...E button repeatedly to select either PER SONAL MOVIES SPORTS WEAK SIGNAL or MULTIMEDIA picture settings NOTE The way you choose to set the Picture Menu Controls will become your PERSONAL setting Personal Movies Sports Weak Signal Multimedia VOL 1 2 MOVIES Preset picture options for watching Video Tapes or DVDs SPORTS Preset picture options for watching sporting events WEAK SIGNAL Preset picture op...

Страница 31: ...screen 2Press the AUTO SOUND button repeatedly to toggle between the four settings PERSONAL THE ATRE MUSIC or VOICE NOTE The way you choose to set the Sound Menu Controls will become your PERSONAL setting Personal VOL 1 2 Voice Music Theatre THEATRE Preset sound options for watching movies MUSIC Preset sound options for musical programming where there is little dialogue VOICE Preset sound options ...

Страница 32: ...urf list Up to ten channels per button can be stored Repeat steps 1 through 3 to add addition al channels up to 10 to each of the the SURF lists To remove a channel from one of the SURF lists 4Press the COLORED Quadra Surf button until the desired chan nel appears The screen will display the channel number with a colored Smiley face to indicate the Colored button it relates to 5While the Smiley fa...

Страница 33: ... will display a smiley face with the first programmed channel for that surf list 2While the colored smiley face still appears on the screen press the same COLORED button on the remote to tune the second channel programmed for that specific surf list 3Repeatedly pressing the same COL ORED button while the smiley face appears will tune all the pro grammed channels Pressing the COL ORED button again ...

Страница 34: ...RENEWED 90 DAY LIMITED WARRANTY ...

Отзывы: