background image

14

1

2

3

4

5

6

7

8

9

0

A/CH

POWER

CC

STATUS

EXIT

SLEEP

MUTE

MENU

CLOCK

SURF

SMART

PICTURE       SOUND

CH+

CH–

VOL+

VOL–

3

1

2

3

4

PICTURE

SMARTLOCK
SETUP
CC

BRIGHTNESS

COLOR
PICTURE
SHARPNESS
TINT
CONTRAST PLUS

BRIGHTNESS

COLOR

PICTURE
SHARPNESS
TINT
CONTRAST PLUS

BRIGHTNESS
COLOR

PICTURE

SHARPNESS
TINT
CONTRAST PLUS

BRIGHTNESS
COLOR
PICTURE

SHARPNESS

TINT
CONTRAST PLUS

BRIGHTNESS
COLOR
PICTURE
SHARPNESS

TINT

CONTRAST PLUS

BRIGHTNESS
COLOR
PICTURE
SHARPNESS
TINT

CONTRAST PLUS

OFF

BRIGHTNESS
COLOR
PICTURE
SHARPNESS
TINT

CONTRAST PLUS

ON

OR

T

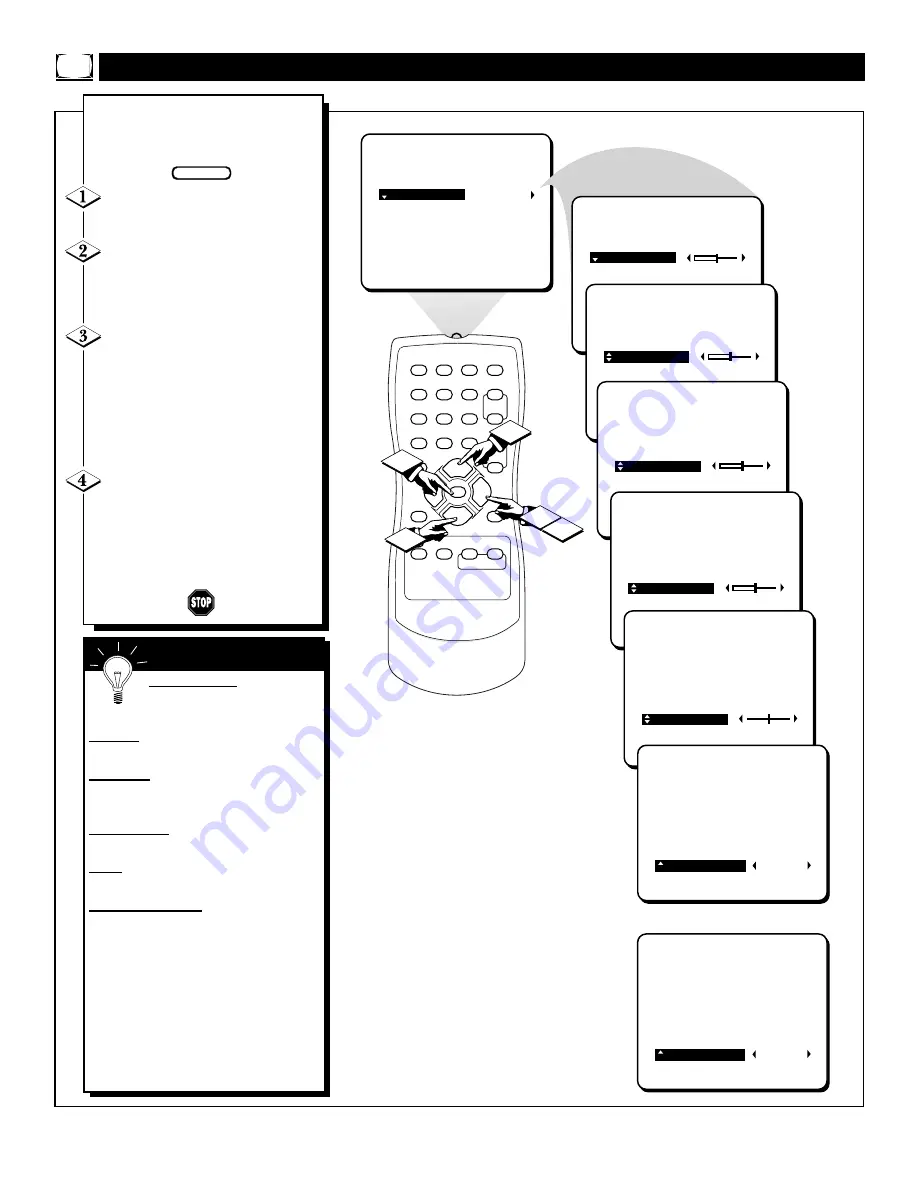
o adjust your TV picture con-

trols, select a channel and follow

the steps shown below:

Press the MENU button on the

remote to display the onscreen menu. 

With PICTURE highlighted,

press the CURSOR RIGHT

©

button to display the PICTURE
adjustment options.

Press the CURSOR UP

▲ 

or

DOWN 

buttons until the word

BRIGHTNESS is highlighted (or,
COLOR, PICTURE, SHARPNESS,
TINT, CONTRAST PLUS depend-
ing on the adjustment you want to
make).

Press the CURSOR RIGHT

©

or the CURSOR LEFT

§

buttons

to increase or decrease the brightness
(or other option) of the picture. 

Note: CONTRAST PLUS can only
be turned ON or OFF.

A

DJUSTING THE

TV P

ICTURE

BRIGHTNESS Press the

©

or

§

buttons until darkest parts of

the picture are as bright as you prefer.

COLOR Press the

©

or

§ 

buttons to

add or eliminate color.

PICTURE Press the

©

or

§

buttons

until lightest parts of the picture show
good detail.

SHARPNESS Press the

©

or

§

buttons

to improve detail in the picture.

TINT Press the

©

or

§

buttons to

obtain natural skin tones.

CONTRAST PLUS Press the

©

or

§

buttons to turn this option ON or OFF.
When Contrast Plus (Black Stretch) is
ON, it helps to “sharpen” the picture qual-
ity. The black portions of the picture
become richer in darkness and the whites
become brighter.

The onscreen menu will time out and dis-
appear from the screen when you finish, or
you can press the STATUS/EXIT button to
clear the menu from the screen.

S

MART

H

ELP

BEGIN

Содержание 19PR21C

Страница 1: ...Instructions for use Color Television 19PR21C1 3135 015 18301 ...

Страница 2: ... unit which may cause an elec trical shock For the safety of everyone in your household please do not remove product covering sThe exclamation point calls attention to features for which you should read the enclosed lit erature closely to prevent operating and maintenance problems WARNING TO PREVENT FIRE OR SHOCK HAZARD DO NOT EXPOSE THIS EQUIPMENT TO RAIN OR MOISTURE CAUTION To prevent electric s...

Страница 3: ...ibed in the operating instructions or as marked on the appliance 11 Power Cord Protection Power supply cords should be routed so that they are not likely to be walked on or pinched by items placed upon or against them paying particular attention to cords and plugs convenience receptacles and the point where they exit from the appliance 12 Cleaning The appliance should be cleaned only as recommende...

Страница 4: ...manual will necessarily match those found with your television system This is normal and does not require contacting your dealer or requesting service Here are a few of the special features built into this new Color Television SmartLock feature allows you to block the view ing of certain channel or external audio video con nections where you might not want your children viewing inappropriate mater...

Страница 5: ...t the Cable TV cable to the 75Ω plug on the TV If you have a Cable Converter Box Connect the OUT put plug from the Converter to the 75Ω plug on the TV BASIC CABLE TV SIGNAL CONNECTION BEGIN CABLE TV Cable TV Company Cable TV Signal Input Cable TV Converter Box Connection Round Cable 75Ω OR Jack Panel Remember Set the TV for the type signal you ve just connected Refer to the Cable Control on page 1...

Страница 6: ... end of the antenna wire is threaded screw it down tight BASIC ANTENNA SIGNAL CONNECTIONS BEGIN ANTENNA Remember Be sure to set the TV for the type sig nal you ve connect ed see the Cable section on page 11 of this manual To set the TV to select only the chan nel numbers in your area see how to Program or Add channels in the TV s memory on page 12 Auto Program sec tion To order any option al acces...

Страница 7: ...OUT OUT VOLUME CHANNEL MENU AUDIO VIDEO VOLUME VOLUME MENU MENU AUDIO AUDIO VIDEO VIDEO POWER CHANNEL CHANNEL POWER POWER This television is equipped with Mono Audio and Video input jacks located in the front of the TV s cabinet just left of the Channel and Volume buttons These inputs can be used to view the video from a Camcorder VCR or other accessory device When an accessory device is plugged i...

Страница 8: ...emote Sensor Window Front Audio Video Inputs Mono The Front Audio Video Input Jacks make it real easy to watch the playback of a video tape using a camcorder or any accessory device with Audio Video Output Jacks 2 POWER CHANNEL POWER CHANNEL To load the supplied batteries into the remote 1 Remove the battery compart ment lid on the back of the remote 2 Place the batteries 2 AA in the remote Be sur...

Страница 9: ... adjust the TV s onscreen menu Menu Button Press for the onscreen menu to appear Pressing the menu button after menu selections are made will eliminate the menu from the display Sleep Button Press to set the TV to automatically turn itself OFF Mute Button Press to turn the sound OFF on the TV Press again to return the sound to its previous level Clock Button Press for direct entry of the CLOCK fea...

Страница 10: ... buttons to scroll through the onscreen menu until the word SETUP is highlighted Press the CURSOR RIGHT button to display the SETUP menu features Press CURSOR UP or DOWN buttons to scroll the Setup features until the word LAN GUAGE is highlighted Press the CURSOR RIGHT button repeatedly to select ENG LISH or ESPANOL Spanish USING THE MENU LANGUAGE CONTROL BEGIN Remember The Language control only m...

Страница 11: ...on on the remote to show the onscreen menu Press the CURSOR UP or DOWN buttons to scroll through the onscreen menu until the word SETUP is highlighted Press the CURSOR RIGHT button to display the SETUP menu features Press CURSOR UP or DOWN buttons to scroll the Setup features until the word CABLE is highlighted Press the CURSOR RIGHT button to turn the CABLE mode ON or OFF SETTING THE CABLE TUNING...

Страница 12: ...the onscreen menu Press the CURSOR UP or DOWN buttons to scroll through the onscreen menu until the word SETUP is highlighted Press the CURSOR RIGHT button to display the SETUP menu features Press CURSOR UP or DOWN buttons to scroll the Setup features until the words AUTO PROGRAM are highlighted Press the CURSOR RIGHT button to start the Auto Program scanning of channels USING THE AUTO PROGRAM CON...

Страница 13: ...h the onscreen menu until the word SETUP is highlighted Press the CURSOR RIGHT button to display the SETUP menu features Press the CURSOR DOWN button to scroll the Setup features until the words CHANNEL EDIT are highlighted Press the CURSOR RIGHT button to toggle between SAVED or DELETED If SAVED is selected the channel will added to the television s memory and will be available using the Channel ...

Страница 14: ...ighlighted or COLOR PICTURE SHARPNESS TINT CONTRAST PLUS depend ing on the adjustment you want to make Press the CURSOR RIGHT or the CURSOR LEFT buttons to increase or decrease the brightness or other option of the picture Note CONTRAST PLUS can only be turned ON or OFF ADJUSTING THE TV PICTURE BRIGHTNESS Press the or buttons until darkest parts of the picture are as bright as you prefer COLOR Pre...

Страница 15: ...creen CLOCK menu SET CLOCK will be highlighted Enter the current time using the NUMBERED buttons If the first number is a single digit first enter a zero then the digit i e press 0 then press 8 Press the CURSOR RIGHT or CURSOR LEFT buttons to set either AM or PM time SETTING THE CLOCK FEATURE BEGIN Note If a power failure occurs the TV s CLOCK will have to be reset If no time is set the time will ...

Страница 16: ...ess the CURSOR CURSOR DOWN button until the words TIMER ACTIVE are highlighted Press the CURSOR RIGHT or CURSOR LEFT button to select ON if activating or OFF if deactivating the Timer control SETTING THE ON TIMER ACTIVE CONTROL BEGIN Remember Be sure to set the clock to the current time then set the time you want the tele vision to turn on using the START TIME control as described on page 18 The o...

Страница 17: ...ic channel that the television will tune to when the Timer Active control is turned ON Press the CLOCK button to display the Clock onscreen menu Press the CURSOR CURSOR DOWN button until the word CHANNEL is highlighted Press the number buttons to enter the start up channel you would like the television to start on The CH or buttons can also be used to select a Start Up Channel or the AV channel fo...

Страница 18: ... when the Timer Active control is turned ON Press the CLOCK button to display the Clock onscreen menu Press the CURSOR CURSOR DOWN button until the words START TIME are highlighted Enter the time to turn on the TV using the NUMBERED but tons If the first number is a single digit first enter a zero then the digit i e press 0 then press 8 Press the CURSOR RIGHT or CURSOR LEFT buttons to set either A...

Страница 19: ...ue and descriptions for the action on the captioned TV program will appear onscreen NOTE You can also set the Closed Caption by pressing the CC button on the remote When pressed repeatedly the screen will display the options CC OFF CC 1 CC 2 or CC MUTE SETTING THE TV FOR CLOSED CAPTIONING BEGIN NOTE Not all TV programs and product commercials are made for broadcast with Closed Caption CC informati...

Страница 20: ...e in 15 minute increments up to 90 minutes before the TV will turn itself off An onscreen count down will appear during the last minute before the TV shuts itself off USING THE SLEEP TIMER CONTROL BEGIN During the last 10 seconds of a SLEEP timer setting an onscreen display will read GOOD BYE The onscreen menu will time out and disappear from the screen when you finish or you can press the STATUS ...

Страница 21: ... Volume Bar will be seen each time the VOLUME buttons on the TV or remote are pressed Press the VOL button on the remote to display the onscreen Volume Bar The VOL button will increase the sound level coming from the television Press the VOL button on the remote to display the onscreen Volume Bar The VOL button will decrease the sound level coming from the television USING THE TV VOLUME BAR CONTRO...

Страница 22: ...se language or suggestive dialogue R Restricted This is programming is specifically designed for adults Anyone under the age of 17 should only view this programming with an accompanying parent or adult guardian It contains one or more of the following intense violence intense sexual situations strong coarse language or intensely suggestive dialogue NC 17 No one under the age of 17 will be admitted...

Страница 23: ...s the CURSOR UP or DOWN button until the word SMARTLOCK is highlighted Press the CURSOR RIGHT button to display the SMART LOCK REVIEW screen Press the CURSOR RIGHT button The onscreen display will read ACCESS CODE Using the NUMBERED but tons enter 0 7 1 1 XXXX appears on the Access Code screen as you press the numbered buttons If the 0 7 1 1 code is correctly entered proceed to step 7 If you enter...

Страница 24: ... number XXXX shows on the Access Code display as you press the NUMBERED buttons The onscreen menu will change with the word BLOCK highlighted Press the CURSOR RIGHT button to display the blocking options Press the CURSOR DOWN button to highlight MASTER DIS ABLE BLOCK UNRATED or BLOCK NO RATING MASTER DISABLE This is what might be called the master switch for SmartLock When in the ON position ALL b...

Страница 25: ...lay the SMART LOCK REVIEW screen Press the CURSOR RIGHT button ACCESS CODE will appear Using the NUMBERED but tons on the remote enter your Personal Access Code With the word BLOCK high lighted press the CURSOR RIGHT button With the words MOVIE RAT INGS highlighted press the CUR SOR RIGHT button to display the MOVIE RATINGS G PG PG 13 R NC17 or X When highlighted all these options can be turned ON...

Страница 26: ...age 7 and above It may be more appropriate for children who have acquired the develop ment skills needed to distinguish between make believe and reality This program ming may include mild fantasy and comic violence FV TV G General Audience Most parents would find this program suitable for all ages This type of programming contains little or no violence no strong language and little or no sexual di...

Страница 27: ...K UNRATED OFF BLOCK NO RATING OFF SMARTLOCK This control is where to enter the SMARTLOCK feature when changes need to be made or to change the Personal Access Code MOVIE RATINGS Shows all blocked Movie Ratings that were set within the MOVIE RATINGS feature All or some may be blocked at one time Note If a lower rating is blocked this will automatically cause the higher ratings to be blocked also ie...

Страница 28: ...ch SmartPicture setting is preset at the factory to automatically adjust the TV s Brightness Color Picture Sharpness Tint and Contrast Plus settings Press the SMART PICTURE button on the remote control The current SmartPicture setting will appear in the middle of the screen Press the SmartPicture button repeatedly to select either PER SONAL MOVIES SPORTS or WEAK SIGNAL picture settings Note The PE...

Страница 29: ...rcials are never the same With the SmartSound control turned ON you can have the TV level out the sound being heard This makes for a more consistent sound by reducing the peaks and valleys that occur during program changes or commercial breaks Press the SMART SOUND but ton on the remote control The cur rent SmartSound setting will appear in the middle of the screen ON or OFF Press the SMART SOUND ...

Страница 30: ...ile the channel number is still displayed Press the CURSOR RIGHT button to ADD the channel to the SURF list Repeat steps 1 through 3 to add additional channels up to five to the SURF list To remove a channel from the SURF list simply choose the chan nel with the numbered buttons and press the SURF button while the channel number is still displayed Then press the CURSOR RIGHT button and the channel...

Страница 31: ...k remote batteries Replace with AA Heavy Duty Zinc Chloride or Alkaline batteries if necessary Be sure to point the remote at the front of the television when sending commands Clean the remote sensor on the front of the remote control unit Unplug the television from the wall outlet wait 10 seconds and reinsert the plug into an outlet Power the television on again and try the remote once more Check...

Страница 32: ...l command signals are received Twin Lead Wire The more commonly used name for the two strand 300 Ohm antenna wire used with many indoor and outdoor antenna systems In many cases this type of antenna wire requires an additional adapter or balun in order to connect to the 75 Ohm Input terminals designed into the more recent Televisions and VCRs TROUBLESHOOTING TV Will Not Display Any Channel Above 1...

Страница 33: ...re Controls 14 Precautions Safety 3 Programming Channels Automatically 12 Remote Control 9 Requesting Service 34 36 Round 75Ω Cable 5 7 Safety Precautions 3 Sensor Remote 8 Set Up First Time Use 10 13 Sleep Timer 20 SmartLock Understanding the Feature 22 SmartLock Access Code Feature 23 SmartLock Blocking Options 24 SmartLock Movie Ratings 25 SmartLock Review 27 SmartLock TV Ratings 26 Smart Pictu...

Страница 34: ...e preuve d achat pour bénéficier d un service sans frais Pour les produits non couverts par la garantie contactez le centre le plus près de chez vous NOTA Si Ud reside en una de nuestras zonas para sucursales Philips de servicio al de fábrica ver directorio más abajo Ud puede comunicarse con la sucursal de servicio más cercana para obtener una reparación oportuna y eficaz de su producto Si su prod...

Страница 35: ... PARA LA RECEPCION DE PRODUCTOS NECESITADOS DE REPARACIONES COMUNICARSE CON EL CENTRO DE SERVICIO DE FABRICA MAS CERCANO PARA ESTOS LUGARES DENTRO DE UN RADIO DE 80 A 120 KM 50 A 75 MILLAS DEL CENTRO DE SERVICIO LOCAL GEORGIA Philips Factory Service of Georgia 200 N Cobb Pkwy Suite 120 Marietta GA 30062 770 795 0085 FLORIDA Philips Factory Service of Florida 1911 US Highway 301 North Tampa FL 3361...

Страница 36: ...E AVAILABLE Warranty service is available in all countries where the product is offi cially distributed by Philips Consumer Electronics Company In coun tries where Philips Consumer Electronics Company does not distribute the product the local Philips service organization will attempt to pro vide service although there may be a delay if the appropriate spare parts and technical manual s are not rea...

Отзывы: