background image

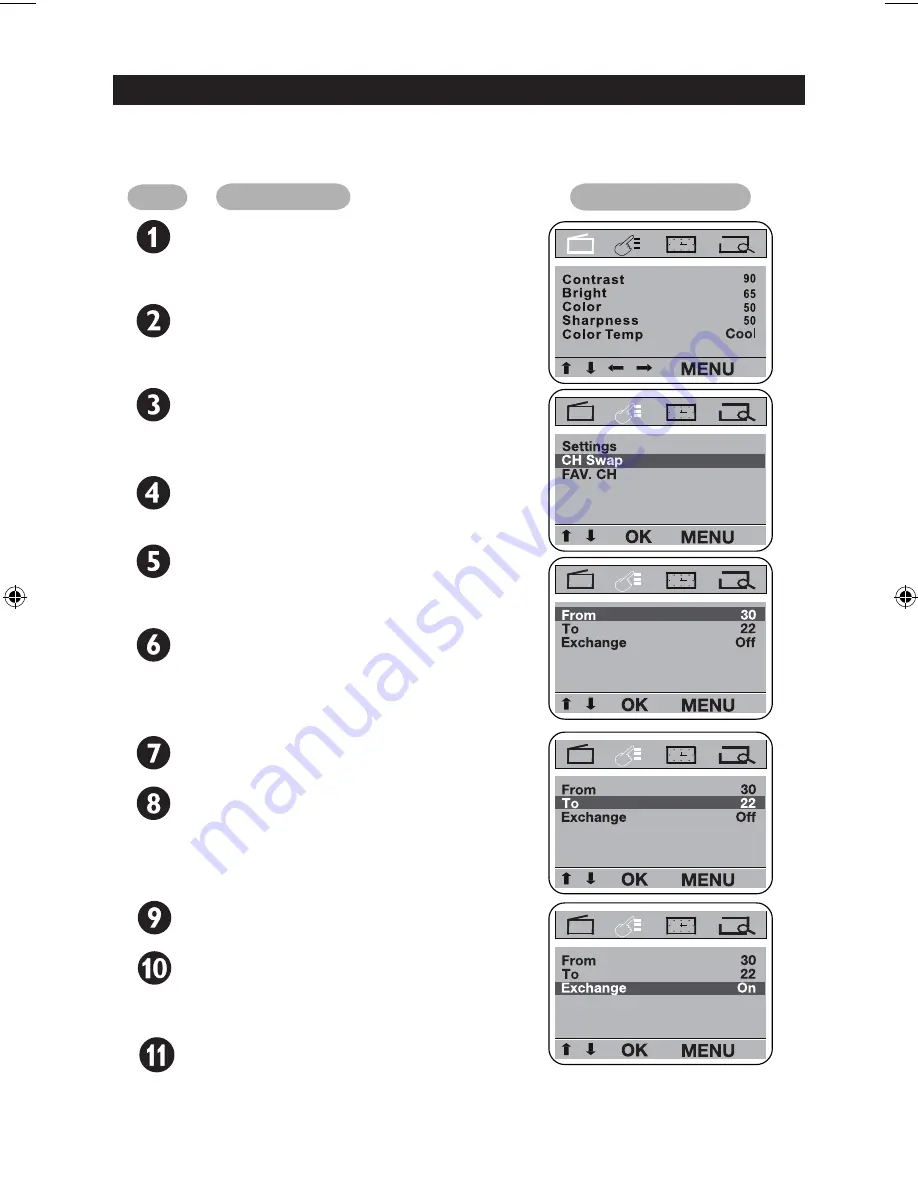
SWAPPING YOUR TV CHANNELS

After auto or manual searching of channels, you can reorder the channel numbers using the 
Channel Swap feature. 

Step

Press button

Result on screen

Enter main menu.

MENU

VOL+

Or

VOL-

Press repeatedly until the 
FEATURE main menu is 
selected.

Press repeatedly until 
CH Swap submenu is 
selected.

CH+

Or

CH-

OK

The CH Swap entries 
are displayed.

CH+

Or

CH-

Press to select From.

VOL+

Or

VOL-

Press to select to select 
the channel you want to 
change. 
Example: Channel 30

CH-

Press to select To.

VOL+

Or

VOL-

Press to select to select 
the channel you want to 
swap. 
Example: Channel 22

CH-

Press to select Exchange.

Press to select On.
Channel 30 is now 
swapped with channel 22.

OK

Exit menu from screen.

MENU

18

Содержание 15PT2527

Страница 1: ...Real FlatTelevision User Manual 21PT2217 21PT2327 ...

Страница 2: ...ls Storing your favourite channels Setting the Timer Specifications Recycling Directive To minimise harm to the environment the batteries supplied with the TV set do not contain mercury or nickel cadmium If possible when disposing of batteries use recycling means available to you Your TV set uses materials which are reusable or which can be recycled To minimise the amount of waste in the environme...

Страница 3: ...or heat Leave at least 5 cm around each side of TV set to allow for proper ventilation Avoid placing your set e g near the window where it is likely to be exposed to rain or water No objects filled with liquids should be placed on top the TV so as to avoid dripping or splashing of liquids on the set Tips Do not leave your set on standby mode for a prolonged period of time Switch off set to allow i...

Страница 4: ...tion at the rear of the TV Possible TV station problem Try another channel Good picture but no sound Try increasing the volume Check that the sound is not turned off If it is turned off press the Mute button on the remote control to restore sound Good sound but poor colour or no picture Try increasing the contrast and brightness setting Snowy picture and noise Check antenna connection at the rear ...

Страница 5: ...m is not representative of the actual plug and socket Switching on the set Press the main power button to switch on off theTV If the set is on standby indicator is lit press the Power button on the remote control to switch on set Disconnecting from the mains The mains switch on the TV is used as a dis connecting device Installing the remote control batteries Insert the correct type of batteries in...

Страница 6: ... TV Back of VCR withVideo and Audio output sockets Connection for viewingVCRs OUT OUT AUDIO VIDEO L R VIDEO AUDIO AV1 in Monitor out For Stereo models only CONNECTING AUDIO VIDEO RECORDING IN IN AUDIO VIDEO L R L R VIDEO AUDIO AV1 in Monitor out Connection for recording from theTV channel toVCR Connect the video and audio RCA cables from theVIDEO and AUDIO IN sockets of the VCR to the MONITOR OUT ...

Страница 7: ...IN sockets of the VCR to the MONITOR OUT on the rear of the TV AV sockets on rear ofTV VCR withVideo and Audio input sockets Set top box Cable IN Cable OUT Cable L R VIDEO AUDIO AV1 in Monitor out OUT OUT IN IN Video Antenna OUT IN L Audio R Connection for recording from cableTV toVCR Cable IN Cable OUT Cable VIDEO AUDIO AV1 in Monitor out OUT OUT IN IN Video Antenna OUT IN L Audio R For Stereo mo...

Страница 8: ...e favourite channel number Input button To select an input signal TV AV1 or AV2 SMART PICTURE button To select Personal Soft Natural or Rich picture MUTE button To turn on or turn off sound CH CH button To select channels in ascending or descending order In menu operation to highlight a menu item OK button To enter submenu or confirm menu operation SLEEP button To set sleep timer from 10 to 120 mi...

Страница 9: ...d To switch TV to Standby mode press the POWER button on the remote control Remote Sensor Acts as a sensor for activating the controls of the TV when remote control handset is aimed at it Volume buttons To turn up or turn down the TV sound Channel buttons Select channel in descending ascending order TIP You can enter the main menu by pressing both theVolume andVolume buttons at the same time Press...

Страница 10: ...n on your remote control to select an AV channel Enter main menu The Picture main menu is always selected by default Step Press button Result on screen To navigate the submenu items Example The Brightness submenu item is selected as shown To adjust the individual submenu items Example Press repeatedly to adjust the brightness level MENU The Main Menu top panel shows four symbols Picture Feature Ti...

Страница 11: ... screen Press repeatedly until the Settings submenu is selected Exit menu from screen MENU VOL Or VOL Press repeatedly until the FEATURE main menu is selected CH Or CH OK Enter Settings submenu CH Or CH Press repeatedly until the Language submenu is selected VOL Or VOL Press repeatedly to toggle between the available lan guages you want to select MENU 11 ...

Страница 12: ...NU VOL Or VOL Press repeatedly until the PRESET main menu is selected Press repeatedly until the Auto Store submenu is selected CH Or CH OK Auto searching will begin All available channels found will be stored from number 1 onwards When all frquency bands have been searched auto searching will stop The program of the first searched channel will be displayed VOL Exit menu from screen MENU 12 ...

Страница 13: ... repeatedly until Preset main menu is selected Select the frequency band VHFL VHFH UHF TUNINGYOUR CHANNELS MANUALLY Enter main menu MENU VOL Or VOL CH Or CH Press repeatedly until Channel submenu is selected VOL Or VOL Press repeatedly to select the Channel number Example to change to channel nuber 31 CH Or CH Press repeatedly until Band submenu is selected VOL Or VOL 13 ...

Страница 14: ...to start search upwards or VOL to search downwards from the current posi tion and frequency band Press VOL to stop manual searching upwards or VOL to stop manual searching downwards NOTE If the channel searched is not the one you want restart the search upwards or downwards by pressing VOL or VOL respectively Exit menu from screen MENU VOL Or VOL 14 ...

Страница 15: ...ption is weak Step Press button Result on screen Enter main menu MENU VOL Or VOL Press repeatedly until the PRESET main menu is selected Press repeatedly until FineTune submenu is selected CH Or CH VOL Or VOL Press VOL to fine tune upwards and VOL to fine tune downwards Exit menu from screen MENU 15 ...

Страница 16: ...ou are surfing the channels Step Press button Result on screen Enter main menu MENU VOL Or VOL Press repeatedly until the FEATURE main menu is selected Press repeatedly until Settings submenu is selected CH Or CH OK The Settings entries are displayed Press repeatedly to select ColorSys Snd Sys or AVL CH Or CH VOL Or VOL Press repeatedly to change the settings for ColorSys AUTO PAL or SECAM Snd Sys...

Страница 17: ... on screen Enter main menu MENU VOL Or VOL Press repeatedly until the PICTURE main menu is selected Press repeatedly to select Contrast Brightness Color Sharpness or ColorTemp CH Or CH VOL Or VOL Press to increase or decrease levels for Contrast Brightness Color and Sharpness VOL Or VOL Press to change settings for ColorTemp Normal Warm or Cool Exit menu from screen MENU 17 ...

Страница 18: ...selected Press repeatedly until CH Swap submenu is selected CH Or CH OK The CH Swap entries are displayed CH Or CH Press to select From VOL Or VOL Press to select to select the channel you want to change Example Channel 30 CH Press to select To VOL Or VOL Press to select to select the channel you want to swap Example Channel 22 CH Press to select Exchange Press to select On Channel 30 is now swapp...

Страница 19: ...repeatedly until Channel submenu is selected CH Or CH VOL Or VOL Press to select channel number to skip Example channel 20 Press repeatedly until Skip submenu is selected CH Or CH VOL Or VOL Press repeatedly until Skip is On Exit menu from screen MENU This feature lets you skip or edit channels which have bad or weak TV signal NOTE Once a channel is skipped you cannot access it by using the CH or ...

Страница 20: ...until FAV Ch submenu is selected CH Or CH OK The FAV Ch entries are displayed VOL Or VOL Example To store channel 8 in your favourite channel 1 Press to select FAV Ch1 CH Or CH Press repeatedly until 08 is selected Repeat steps 1 to 4 de scribed above to store the other favourite channels Exit menu from screen MENU DELETINGYOUR FAVOURITE CHANNELS Example To delete favourite channel 4 1 Highlight y...

Страница 21: ...repeatedly until the TIMER main menu is selected Example To set time to 18 00 hrs Press repeatedly until Time is 18 00 VOL Or VOL Example To set TV to turn off channel 11 at 22 00 hrs everyday Press repeatedly until Stop Time is selected CH Or CH Press repeatedly until Daily is selected VOL Or VOL Press so that 0 00 is selected CH Press repeatedly until 22 00 is selected VOL Or VOL 21 ...

Страница 22: ...el is selected CH Press repeatedly until Channel is set to 11 VOL Or VOL Exit menu from screen MENU Off The Start Stop Timer will not operate Daily The Start Stop Timer is set to turn the TV on or off everyday Once The Start Stop Timer is set to turn the TV on or off only once Channel The channel the TV will display at Start Time Stop Time You should set a time later than that set for Time NOTE Yo...

Страница 23: ...ements AutoVolume Leveller Convenience Sleeptimer Auto Store Fine Tuning Reception TV system PAL B G PAL B G PAL D K PAL I SECAM B G except 79 SECAM D K except 79 Video playback NTSC PAL Connectivity Rear AV1 CVBS In AV2 Monitor Out Antenna In 75 General Mains voltage frequency 100 240V 50 60 Hz 100 240V 50 60 Hz 56 220 240V 50 60 Hz 69 and 79 Power consumption 70 W 70 W Net weight 22 kg Gross wei...

Страница 24: ...ecifications are subject to change withoutnotice Trademarks are the property of Koninklijke Philips Electronics N V or their respective owners 2004 Koninklijke Philips Electronics N V All rights reserved www philips com ...

Отзывы: