


32
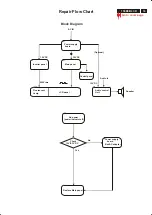
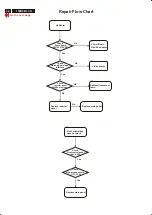
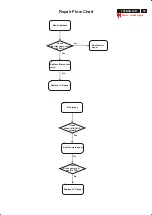
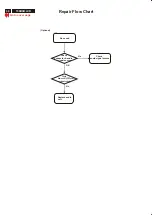
150B3B LCD
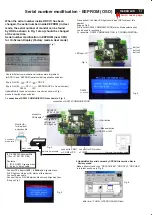
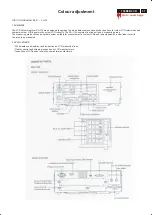
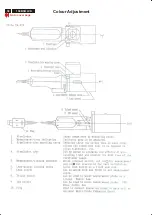
Serial number modification - EEPROM (OSD)
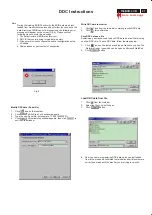
In DOS mode : (made directory already)
C:\WINDOWS>CD\
(press Enter)
C:\>CD IICRS232
(press Enter)
C:\IICRS232>CD RS232EXE (press Enter)
C:\IICRS232\RS232EXE>DIR (press Enter)
C:\IICRS232\RS232EXE>EDIT DDC.CFG (press Enter)
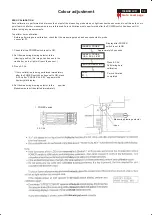
Config. setting "2 58 F0" as shown in Fig. 9 for 150P3 (HUDSON-II).
Check ComPort setting as shown in Fig. 10 for RS232 (9 pins) cable.
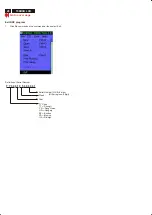
3. Serial number application - Barcode format setting
Fig. 6
PHIL15LG.P3 (LG panel)
PHL15LG.P3 (LG panel)
**************************************************************************
The file name of "DDC.HEX" has been defined by source code of
DDCRUN.EXE.
The contents of DDC.HEX are different as shown in Fig. 6 & 7.
Make sure to put "DDC.HEX (for example : ddc contents (Fig.6) of
PHL15LG.P3) together with "DDC.CFG" & "DDCRUN.EXE" each time.
It means [copy different DDC.HEX and put it together with
"DDC.CFG" & "DDCRUN.EXE"] each time for application of
serial number. CPT panel use PHL15CPT.P3/ DDC.HEX’s
****************************************************************************
Fig. 7
Fig. 8
Fig. 9
Fig. 10
Folder with "DDC.CFG","DDC.HEX",DDCRUN.EXE" as shown in Fig. 8.
C:\IICRS232\RS232EXE>DDCRUN (press Enter)
Bring up : definition of Barcode format setting as shown in Fig. 11.
C:\IICRS232\RS232EXE>DDCRUN PHLW_RD /T/YxxYWWSSSSSS
(press Enter)
Bring up : contents of DDCRUN as shown in Fig. 12.
Press Enter
Bring up : Fig. 14 to ask "Entry Factory mode". (Press Enter)
Bring up : Fig. 15, new series number write down success.
Press Enter
Bring up : Fig. 17 (a few seconds only)
Fig. 11
========>
Fig. 12
Fig. 14
"PHLW_RD (fixed name)" was
defined by source code of DDCRUN
for Philips models already.
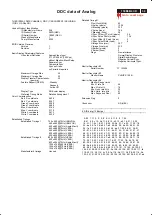
Fig. 16
Serial number - (Before)
<==Press "ESC" : Go back
to DOS mode. Then, finish.
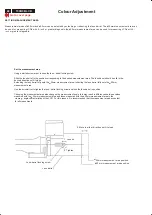
Access Factory Mode
Step 2 :
[Push Menu "
OK
" & "
AUTO
" buttons at the same time
and hold it ] + [Press power " " to turn on monitor button and
release it instantly], Bring up Fig. 16
Step 1 :
Turn off monitor.
As shown in Fig. 12 (1. write DDC data to monitor), press Enter
Bring up : contents for fill out Serial number as shown in Fig. 13.
Fig. 13
Number definition:TY 9218222222
9 is fixed, 2 for year 2002
18 for week
222222 is for new serial number
For example : Fill out TY 9218222222
======>
=====>
========>
Fig. 15
Fig. 17
<==Fill out "Q" : Quit
Serial number application.
Serial number - (After)
Fig. 18
Содержание 150B3B
Страница 28: ...38 150B3B LCD Go to cover page Colour Adjustment ...
Страница 36: ......
Страница 37: ......
Страница 38: ......
Страница 39: ......