background image

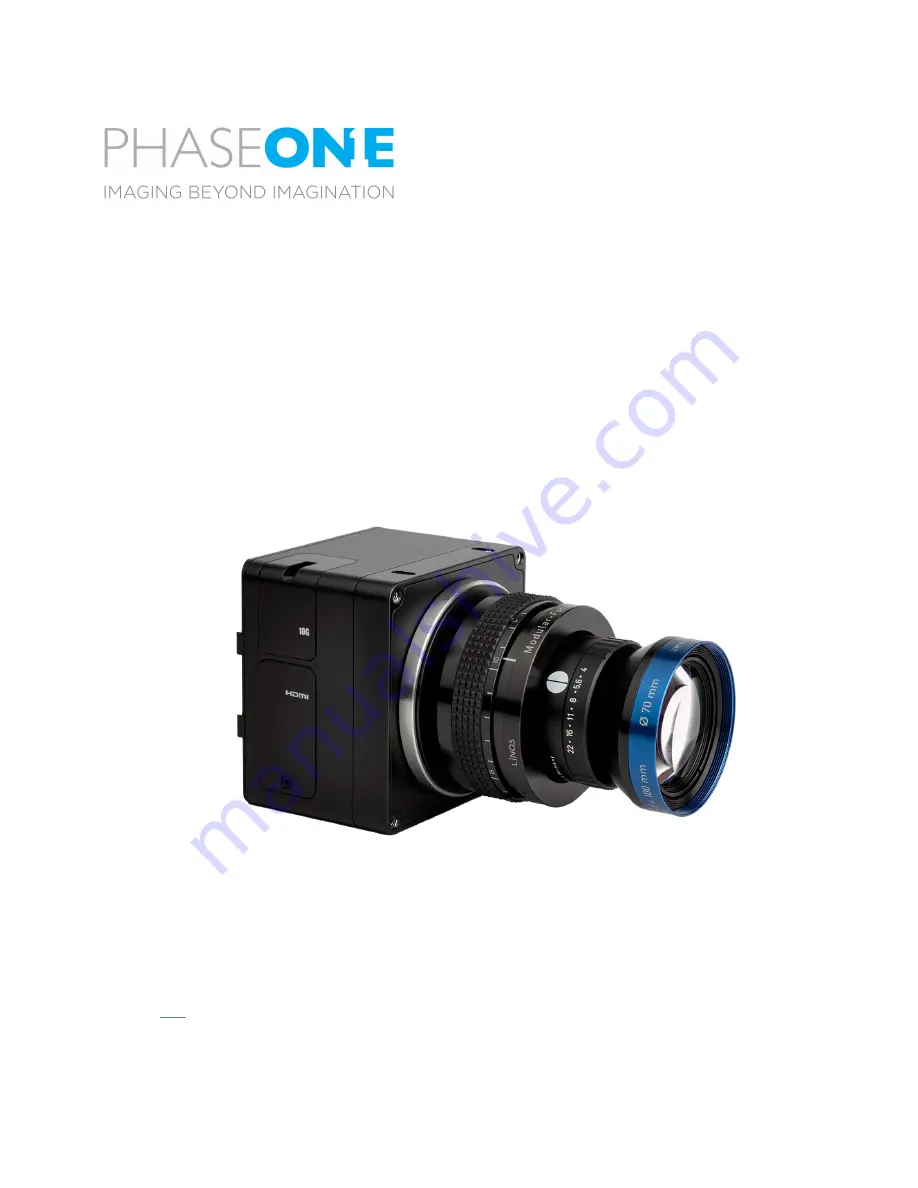
iXM-MV150F/iXM-MV100 Camera Systems 

Installation Guide 

Phase One 

iXM-MV150F / IXM-MV100

Machine Vision Cameras  

Installation Guide

This guide describes installation of your Phase One iXM-MV150F/iXM-MV100


camera system. As new features are 

introduced via firmware updates, the downloadable version of this document changes accordingly. Downloads are 

available 

HERE


Содержание iXM-MV100

Страница 1: ...MV100 Machine Vision Cameras Installation Guide This guide describes installation of your Phase One iXM MV150F iXM MV100 camera system As new features are introduced via firmware updates the download...

Страница 2: ...9 3 5 Software Activation of Black Reference 9 3 6 Wiring the Power Cable 10 3 7 Control Signal Electrical Interfaces 11 4 Preparing the Camera with Lens 12 4 1 Mounting a Lens onto M72mm MV Interface...

Страница 3: ...ing a new camera to Capture One 25 7 2 Verifying a camera s IP address 26 7 3 Verified hardware for 10G networking 27 7 4 Adapters 27 7 5 SFP modules 27 7 6 Media 27 7 7 iXM 10G Port Cover 27 7 8 Conf...

Страница 4: ...focus adapter P N 75048 iXM to M72 Adapter P N 75049 iXM Heat Sink kit P N 73217 iXM to MV Camera Tripod adapter P N 75050 IXM to SK Lenses adapter P N 73201 Lenses Focusing Accessories Inspec x L 10...

Страница 5: ...e screws four 17 M72 MV Interface 3 XQD card cover 4 XQD card cover screw 5 Storage LED 6 Operation LED 7 USB 3 1 port cover screw 8 USB 3 1 port cover 9 Data terminal A 10 Data terminal B 11 Power te...

Страница 6: ...gurable Delay Parameters for Global Reset GR Shutter Mode Software Configurable D1 Delay time 100us 100us Light trigger pulse ON to start integration sensor reset D2 Delay time 0 100us Light trigger p...

Страница 7: ...me Description Direction Level Notes 1 Orange Reserved Reserved Reserved Reserved Reserved 2 Green System Ready Camera ready for next capture Out VOH min 4 0V Io 10uA VOL max 0 8V Io 4mA 5 Volt Level...

Страница 8: ...nded to perform a new Black Reference calibration whenever you change the exposure time by more than 100ms or whenever the camera temperature changes by more than 100 C To perform a new Black Referenc...

Страница 9: ...f Prerecorded Uses a Factory set black calibration The camera uses this until the user creates a Black reference for the current session Create Create and use a Black reference Black Ref Create This s...

Страница 10: ...wer source only up to 8A single fault condition Attention La cam ra iXM MV150F iXM MV100 doit tre aliment e par une source d alimentation prot g e par un fusible d une capacit maximale de 8 Amp res Wi...

Страница 11: ...rawings contain component part numbers for reference Trigger in Triggers the iXM MV150F iXM MV100 camera for new capture cycle Black reference Triggers the iXM MV150F iXM MV100 camera for a black refe...

Страница 12: ...g a Lens onto M72mm MV Interface To mount a lens on the M72mm MV interface adapter Remove the cap from the back of the lens and set it aside Remove the cap from the camera body and set it aside Align...

Страница 13: ...standard To remove the M72 interface adapter Remove the M72 lens put a cap on it front and back and set it aside Use a 2mm hex driver to unscrew the four mounting screws on the top and bottom of the...

Страница 14: ...ing an SK Lens Adapter remove the M72 interface from the camera if installed Align the back of the lens adapter with the camera and fit the lens adapter into place Use a 2mm hex driver to screw the fo...

Страница 15: ...hat the three clamp cams only 2 shown in image are in the unlocked position If locked use a flat screwdriver to rotate each cam 90 degrees counter clockwise Figure 11 CAM Locked Figure 12 CAM Unlocked...

Страница 16: ...100 Camera Systems Installation Guide Page 16 5 Rotate the lens clockwise until it locks into place 6 Use a flat screwdriver to lock each of the three lens adapter clamp cams by rotating each cam cloc...

Страница 17: ...e lens clamp cams by rotating each clamp cams 90 degrees counter clockwise as illustrated above Push and hold the lens release button 1 toward the camera Rotate the lens counterclockwise 2 and lift ou...

Страница 18: ...a data terminal on the camera body 2 Connect the other end of the control cable to an external device Figure 14 Camera control cable 5 2 Connecting Power Cable To connect the camera to a power bus 1 I...

Страница 19: ...d computer Unscrew the bolt on the cover of the USB 3 1 port use a 2mm hex key Remove the cover and store it Insert the end of the USB 3 1 cable into the camera s USB 3 1 port Secure the USB 3 1 cable...

Страница 20: ...nector socket 5 5 Connecting an HDMI Cable To connect an HDMI cable to an iXM MV150F iXM MV100 camera 1 Remove the HDMI cover of the HDMI port use a 2mm Hex screwdriver 2 Insert an HDMI cable into the...

Страница 21: ...e One software or Phase One SDK Open Capture One The Capture Settings pane is in the left panel You can detach it and or expand it Figure 22 Capture One Interface Camera Settings includes all the gene...

Страница 22: ...Go to Camera settings Capture Setup 2 Click Shutter Mode 3 Select the shutter Mode to use ES LS GR Note LS is shown only if an LS lens is connected File Compression To set the File Compression 1 Go t...

Страница 23: ...s Action parameter and select Apply now Low Power Mode To set Low Power mode 1 Go to Camera settings Power Management Low Power Mode 2 Select the time to wait before entering low power mode Note Selec...

Страница 24: ...he screw on the XQD cover and remove it 2 Insert a XQD card with the brand label facing the backside of the camera as shown in the image below 3 Replace the XQD cover and tighten the XQD card screw ap...

Страница 25: ...tion available on that PC to optimize 10G performances see section Configuring Packets The IP address of each camera is factory set The default address is 192 168 1 XXX XXX refers to the last 3 digits...

Страница 26: ...r 6 If the camera does not connect over 10G disconnect it from 10G and reconnect it using a USB3 cable 7 2 Verifying a camera s IP address 7 Connect the camera to Capture One using a USB3 cable 8 Go t...

Страница 27: ...a 7 30m ASF 10G T Compatibility None Intel Cisco Model ASF 10G T Fiber 10Gb s SFP SR Transceiver 10GBase SR 850nm 300M for Intel Model AXS85 192 M3 7 6 Media Copper Cat 6e and better are required for...

Страница 28: ...bo Packets Setting Jumbo Packets is unique to each network card However in Windows 10 many cards share the procedure described below 1 Open the Network and Sharing Center 2 Click Change adapter settin...

Страница 29: ...iXM MV150F iXM MV100 Camera Systems Installation Guide Page 29 4 Click Configure for the network adapter and select Advanced tab...

Страница 30: ...Jumbo Frame and the required value for your system e g 9kB MTU 9 014 Bytes depending on the NIC 6 Click OK to all dialogs NOTE When you make this change the NIC loses network connectivity for a few s...

Страница 31: ...version of firmware and displays a download button if your camera requires an update 5 If displayed click the link to download the firmware The firmware is saved locally 6 From the Select Firmware dro...

Страница 32: ...estoring Firmware to Factory Version To restore the camera s firmware to the factory version camera settings are not affected 1 Open the XQD card cover see Using XQD Cards 2 Insert a pin into the hole...

Страница 33: ...he warnings are activated as per the Temperature Warnings table Note Thermal shutdown stops all active capturing All images not saved will be lost If the temperature falls below the warning level capt...

Страница 34: ...Industrial Support industrial phaseone com support aspx Download the latest version from industrial phaseone com downloads aspx Visit the website for additional information industrial phaseone com Ph...

Отзывы: