background image

12 Spare parts

Ordering and using spare parts

Spare parts for service work are grouped into packs. These vary according to pump ver-
sion.

● You can ask Pfeiffer Vacuum Service for spare parts pack order numbers.
● Have the full vacuum pump article number (with index where applicable) to hand. You 

can find it on the rating plate.

● Replace all parts contained in the pack.

12.1 Set of seals for version with RSSR

The set of seals contains:

● all sealing parts such as O-rings, radial shaft seal rings and supporting rings
● flat seals, square washers and annular profile seals

The protective sleeve and centering rings for connecting the roots pump to the suction and pressure 
sides are not included.

12.2 Set of seals for version with magnetic coupling

The set of seals contains:

● all sealing parts such as O-rings
● flat seals, square washers and annular profile seals

Centering rings for connecting the suction and pressure sides are not included.

12.3 Maintenance kit for version with RSSR

The maintenance kit contains:

● all sealing parts in the area of the radial shaft seal ring including the protective sleeve
● all sealing rings of the filling and drain screws and both O-rings for the device cover and cap
● the coupling buffer (toothed ring)

12.4 Maintenance kit for version with magnetic coupling

The maintenance kit contains:

● all sealing rings of the filling and drain screws and both O-rings for the device cover and cap
● the O-ring for the isolation shroud

Spare parts

46/54

Содержание OKTA 1000 M

Страница 1: ...OPERATING INSTRUCTIONS EN Translation of the Original OKTA 250 250 M 500 500 M Roots pump ...

Страница 2: ...feiffer vacuum de Further operating instructions from Pfeiffer Vacuum can be found in the Download Center on our website Disclaimer of liability These operating instructions describe all models and variants of your product Note that your product may not be equipped with all features described in this document Pfeiffer Vacuum constantly adapts its products to the latest state of the art without pri...

Страница 3: ...eatures 18 3 4 Scope of delivery 18 4 Transportation and Storage 19 4 1 Transporting the vacuum pump 19 4 2 Storing vacuum pump 20 5 Installation 21 5 1 Setting up vacuum pump 21 5 2 Filling up lubricant 21 5 3 Filling with sealing oil 22 5 4 Connecting vacuum side 23 5 5 Connecting the fore vacuum side 24 5 6 Connect to mains power supply 24 5 6 1 Connecting three phase motor with 6 pin terminal ...

Страница 4: ...neral disposal information 41 9 2 Dispose of Okta roots pumps 41 10 Malfunctions 42 11 Service solutions by Pfeiffer Vacuum 44 12 Spare parts 46 12 1 Set of seals for version with RSSR 46 12 2 Set of seals for version with magnetic coupling 46 12 3 Maintenance kit for version with RSSR 46 12 4 Maintenance kit for version with magnetic coupling 46 13 Accessories 47 13 1 Accessory information 47 13 ...

Страница 5: ...vals 33 Tbl 6 Troubleshooting 43 Tbl 7 Okta 250 accessories 47 Tbl 8 Okta 500 accessories 48 Tbl 9 Conversion table Pressure units 49 Tbl 10 Conversion table Units for gas throughput 49 Tbl 11 Technical data Okta 250 Standard M 50 Tbl 12 Technical data Okta 500 Standard M 51 Tbl 13 Dimensions Okta 250 Standard M 51 Tbl 14 Dimensions Okta 500 Standard M 52 List of tables 5 54 ...

Страница 6: ...onnection for low voltage 25 Fig 7 Star circuit for high voltage 25 Fig 8 Check of direction of rotation 26 Fig 9 Connection example with PTC thermistor tripping unit 27 Fig 10 Draining lubricant 34 Fig 11 Replacing sealing oil for radial shaft seal rings 36 Fig 12 Overflow valve 37 Fig 13 Installation instructions gear rim coupling 38 Fig 14 Dimension diagram Okta 250 Standard M 51 Fig 15 Dimensi...

Страница 7: ...ants These instructions apply for roots pumps of the following versions Pump type Pump designs Standard ver sion Standard version Standard motor The housing and all parts forming the suction chamber consist of GG and GGG Connection flanges are designed as ISO flanges Overflow valve for protection against thermal overload M version Changes to the standard design Version with magnetic coupling Speci...

Страница 8: ...l the stickers on the product along with their meanings Mod Okta 500 Weight 140 kg 3 D 35641 Asslar Made in Germany Mod No PP W31 n max 4500 1 min Oil P3 1 5 l S N max 840 m h 09 2020 Ser No 183 Rating plate example The rating plate is located on the front side above the sight glass Motor rating plate not shown Vor Inbetriebnahme Pumpe mit Öl füllen Fill the pump with oil before putting into opera...

Страница 9: ...eviations Abbreviation Explanation PTC Temperature dependent resistor Positive Temperature Coefficient M version Roots pumps with magnetic coupling RSSR Radial shaft seal ring WAF width across flats E Clearance between both coupling halves GGG Spheroidal graphite cast iron GG Cast iron with lamellar graphite FPM Fluoropolymer rubber PN Nominal pressure stage pressure nominal ISO International Orga...

Страница 10: ...operty Notes tips or examples indicate important information about the product or about this docu ment 2 2 Safety instructions All safety instructions in this document are based on the results of the risk assessment carried out in accordance with Machinery Directive 2006 42 EC Annex I and EN ISO 12100 Section 5 Where applica ble all life cycle phases of the product were taken into account Risks du...

Страница 11: ...Observe the permissible pressures and pressure differentials for the product Check the function of the exhaust line on a regular basis CAUTION Risk of injury from loss of stability During setup there is a risk of injury from tipping if the vacuum pump is not anchored on the stand ing surface Secure the vacuum pump using suitable lifting gear Wear personal protective equipment CAUTION Danger of inj...

Страница 12: ... and medical implants Make sure that such individuals do not enter the sphere of influence 2 m of the magnetic field Identify rooms in which magnetic couplings are openly accessible with the symbol No access for people with pacemakers Always keep disassembled couplings away from computers data carriers and other electronic components WARNING Health hazard through poisoning from toxic contaminated ...

Страница 13: ...the installation operation or maintenance of the product must read understand and adhere to the safety related parts of this document Infringement of conformity due to modifications to the product The Declaration of Conformity from the manufacturer is no longer valid if the operator changes the original product or installs additional equipment Following the installation into a system the operator ...

Страница 14: ...t invalidates all warranty and liability claims Improper use is any even unin tended use which is contrary to the product purpose and in particular Transport installation or operation of the vacuum pump in an impermissible spatial position Pumping media which are corrosive to materials of the vacuum pump Pumping of explosive media Pumping radioactive media Pumping media prone to exothermic reactio...

Страница 15: ...rk Only a trained electrician may carry out electrical engineering work Within the meaning of this docu ment electricians are people responsible for electrical installation commissioning troubleshooting and maintenance of the product and who have the following qualifications Qualification in the electrical engineering field in accordance with nationally applicable regulations Knowledge of this doc...

Страница 16: ... Pfeiffer Vacuum For optimal and trouble free use of this product Pfeiffer Vacuum offers a comprehensive range of courses and technical trainings For more information please contact Pfeiffer Vacuum technical training Safety 16 54 ...

Страница 17: ...he M series are equipped with a magnetic coupling 1 2 3 8 12 11 9 10 14 13 16 15 18 17 6 7 4 5 Fig 2 Design of standard version and M version 1 Vacuum flange 10 Sight glass motor side 2 Oiler for version with RSSR 11 Fore vacuum flange 3 Measurement connection vacuum side 12 Sealing gas connection motor side 4 Cardboard cover disk 13 Measurement connection fore vacuum side 5 Eye bolt 14 Sealing ga...

Страница 18: ...ta 500 Okta 500 M pressure surge protected 560 670 DN 100 DIN PN 16 DN 100 DIN PN 16 4 G 3 8 2 G 1 2 Tbl 4 Features of the roots pumps 3 4 Scope of delivery Roots pump Seals for the connection flanges for ISO flanges centering rings are included Cover disks for the connecting flanges Screw kit for the connection flange 2 eye bolts for lifting the roots pump Lubricant P3 standard version Motor side...

Страница 19: ...nnection flange once the pipes have been mounted Fill the gear and bearing chambers with lubricant only once the final installation posi tion is reached Preparations for transport Pfeiffer Vacuum recommends keeping the transport packaging and original protective cov er General information regarding safe transport 1 Observe weight specified on the rating plate 2 Where possible always transport or s...

Страница 20: ...in the roots pump interior are provided with corrosion protection Storage Pfeiffer Vacuum recommends storing the products in their original transport packaging Procedure 1 Vacuum seal both connection flanges 2 Store the roots pump only in dry dust free rooms within the specified ambient conditions 3 Evacuate and then fill the suction chamber with nitrogen to achieve the best corrosion protection f...

Страница 21: ...lling drain holes freely accessible 8 Ensure that the motor rating plate remains accessible at all times for a clear view of the voltage and frequency specifications 9 Maintain the minimum distances to bordering surfaces to guarantee sufficient air circulation 10 Fill with lubricant prior to first commissioning 5 2 Filling up lubricant WARNING Danger of poisoning from toxic vapors Igniting and hea...

Страница 22: ...witched off and flooded 5 3 Filling with sealing oil NOTICE Damage to the vacuum pump due to incorrect procedure when filling sealing oil Disassembly of the lubricator causes leakage in the system The lubricant expands when the roots pump heats up which could cause lubricant to leak if overfilled Use only the lubricator s filler flap to fill up While the roots pump is cold fill the lubricator no m...

Страница 23: ...rotective strainer start up strainer in the intake flange Ensure that this strainer is only removed when the risk of solid particles entering the vacuum pump can be excluded Observe any pumping speed decrease Required tools Ring spanner WAF 13 with flange DN 100 ISO F Ring spanner WAF 24 with flange DN 100 PN16 Procedure 1 Degrease the connection flange 2 Clear welded lines of any tinder loose par...

Страница 24: ...r if necessary 8 If an air trap is created in the system then install a condensate drain facility at the lowest point 5 6 Connect to mains power supply DANGER Danger to life from electric shock Touching exposed and voltage bearing elements causes an electric shock Improper connection of the mains supply leads to the risk of touchable live housing parts There is a risk to life Before the installati...

Страница 25: ...thout switch and mains cable 5 6 1 Connecting three phase motor with 6 pin terminal board NOTICE Property damage from high starting torque The specific load behavior of the vacuum pump requires direct on line starting at full motor power Engine damage occurs if a different starting circuit is used Always start the motor directly Never use a star delta start up circuit Ports U1 L2 V1 L1 and W1 L3 r...

Страница 26: ...t time check the roots pump direction of rotation 1 Switch the vacuum pump on briefly 2 to 3 seconds The motor and coupling must rotate clockwise see directional arrow on housing cover 2 If the direction of rotation is incorrect exchange the 2 phases on the connection cable 5 6 3 Connecting the PTC thermistor tripping unit Tripping units store the shut down Pfeiffer Vacuum recommends connecting mo...

Страница 27: ... sensor S1 OFF button H1 Tripping indicator S2 ON button M Motor 3 phase S3 RESET button 1 For devices with two relay outputs only K1 Contactor 2 For MSR type model only F1 F4 Fuses 3 Only for order no P 4768 052 FQ and P 4768 052 FE Procedure After shut down switch the tripping unit back on manually via the installed RESET button or via the external RESET S3 Switching on mains detected as automat...

Страница 28: ...ns the surface temperature of the vacuum pump can increase to above 70 C Provide suitable touch protection Supplementary Information for Roots pumps with special overflow valves Upon request you can obtain supplementary information PW0022 from Pfeiffer Vacuum Download Center Procedure for open non blocked overflow valves 1 The customer must provide an appropriate start up circuit e g contactor cir...

Страница 29: ...oes not exceed 1200 hPa Stop the sealing gas supply immediately after switching off the vacuum pump The set quantity of sealing gas influences effective pumping speed and achievable ultimate pressure Depending on the operating pressure the empirical value for the supplied sealing gas amount is be tween 1 for a high operating pressure and 8 for a lower operating pressure of the effective suc tion c...

Страница 30: ...and hands within their reach Wait until the vacuum pump comes to a complete standstill Secure the vacuum pump against re start NOTICE Property damage from impermissibly high sealing gas pressure Excessive sealing gas pressure leads to damage to the seals after switching on the vacuum pump Make sure that the sealing gas pressure inside the pump does not exceed 1200 hPa Stop the sealing gas supply i...

Страница 31: ...perature fluctuation If the housing cools down too quickly due to external influences there is a risk of contact being made between the rotor at warm operating temperature and the colder pump housing This will result in irreversible pump damage Avoid uneven cooling if you are going to switch the roots pump back on after a short period Vent the roots pump in order to achieve a temperature compensat...

Страница 32: ...mains 4 Secure the motor against unintentional reactivation 5 Remove the vacuum pump from the system if necessary 6 Dispose of used lubricant according to applicable regulations in each case 7 For maintenance work only dismantle the vacuum pump to the extend needed 8 Only clean the pump parts using industrial alcohol isopropanol or similar media 9 Avoid residues of cleaning agent inside the vacuum...

Страница 33: ...ning agent compatible with the process Changing lubricant and sealing oil Maintenance level 2 Checking coupling for dam age replacing toothed ring if necessary Changing radial shaft seal rings and protective sleeves Clean the gear chambers and replace the seals Maintenance kit with wearing parts of the coupling and the ra dial shaft seal rings Maintenance level 3 Dismantling and cleaning vac uum p...

Страница 34: ...ear protective equipment Use a suitable collection receptacle Pfeiffer Vacuum recommends determining the precise service life of the lubricant in the first operating year The usable life may deviate from the reference value specified depending on thermic and chemical loads or due to penetrating process media in gear and bearing chambers Safety data sheets You can obtain the safety data sheets for ...

Страница 35: ... optional Procedure 1 Pour in lubricant on both sides Fill level approx 5 mm below the middle of the inspection glass 2 Screw in the filler screws again Tightening torque max 32 Nm 7 4 Changing sealing oil NOTICE Damage to the vacuum pump due to incorrect procedure when filling sealing oil Disassembly of the lubricator causes leakage in the system The lubricant expands when the roots pump heats up...

Страница 36: ...nce to be carried out by Pfeiffer Vacuum Service during which all 3 radial shaft seal rings and the protective sleeve are replaced This damage leads to an inadmissibly high oil level in the bearing chamber Changing sealing oil 1 In general carry out a sealing oil change once a year 2 Open the filler flap on the oiler 3 Place the collection receptacle underneath 4 Unscrew the sealing oil drain scre...

Страница 37: ...from the vacuum and fore vacuum connections 2 Clean the suction chamber and the overflow channel with suitable brushes and cleaning agents 3 After cleaning completely remove remaining fluids using absorbent materials and dry the suction chamber 4 After cleaning mount all pipes 5 Screw in the drain screws 7 6 Cleaning the overflow valve 1 2 3 4 5 7 6 9 8 Fig 12 Overflow valve 1 Allen head screws 6 ...

Страница 38: ...the motor coupling there is a danger of clothing being caught and wound up When assembling the motor and coupling make sure that the coupling protection is seated cor rectly Wear correct clothing Coupling assembly Observe the installation instructions of the coupling manufacturer Required tools Allen key WAF 2 5 mm Allen key WAF 6 mm Calibrated torque wrench tightening factor 2 5 3 2 5 4 6 7 8 E 1...

Страница 39: ... people with pacemakers Always keep disassembled couplings away from computers data carriers and other electronic components NOTICE Damage to the magnetic coupling due to incorrect installation and removal The isolating shroud on the magnetic coupling is made of impact sensitive material synthetic or ce ramic If the motor is installed or removed incorrectly there is a risk of damage Attach the mot...

Страница 40: ...onger than 2 years we recommend you carry out maintenance and a lubri cant change prior to recommissioning 12 Please note the vacuum pump may not be stored in the vicinity of machines traffic routes etc as strong vibrations may damage the bearing 8 2 Recommissioning NOTICE Damage to the roots pump due to aging of the lubricant The useful life of the lubricant is limited max 2 years Prior to recomm...

Страница 41: ...s must be disposed of in accordance with the applica ble regulations relating to environmental protection and human health with a view to reducing natural resource wastage and preventing pollution 9 1 General disposal information Pfeiffer Vacuum products contain materials that you must recycle Dispose of our products according to the following Iron Aluminium Copper Synthetic Electronic components ...

Страница 42: ...llow the vacuum pump to cool if needed Suction chamber contami nated Clean suction chamber If necessary contact Pfeiffer Vacuum Service Gear gear wheels dam aged Switch off the vacuum pump immedi ately If necessary contact Pfeiffer Vacuum Service Bearing damage present Have the bearing changed Contact Pfeiffer Vacuum Service Motor faulty Change the motor Vacuum pump switches off after a while afte...

Страница 43: ...c coupling is de stroyed by demagnetiza tion Switch off the vacuum pump immedi ately and wait for it to come to a com plete standstill While the vacuum pump is at a stand still the magnets can realign with each other Slowly restart the vacuum pump and check the power transmission and vacuum pressure Vacuum pump losing oil A decreasing oil level in the oiler and an oil leak below the lantern indica...

Страница 44: ...lity You can find more detailed information and addresses on our homepage in the Pfeiffer Vacuum Service section You can obtain advice on the optimal solution for you from your Pfeiffer Vacuum representa tive For fast and smooth service process handling we recommend the following 1 Download the up to date form templates Explanations of service requests Service requests Contamination declaration a ...

Страница 45: ...oduct in suitable stable transport containers only e Maintain applicable transport conditions ERKLÄRUNG KONTAMINIERUNG 6 Attach the contamination declaration to the outside of the packag ing 7 Now send your product to your local Service Center 8 You will receive an acknowledgment quotation from Pfeiffer Vac uum Our sales and delivery conditions and repair and maintenance conditions for vacuum devi...

Страница 46: ...ump to the suction and pressure sides are not included 12 2 Set of seals for version with magnetic coupling The set of seals contains all sealing parts such as O rings flat seals square washers and annular profile seals Centering rings for connecting the suction and pressure sides are not included 12 3 Maintenance kit for version with RSSR The maintenance kit contains all sealing parts in the area...

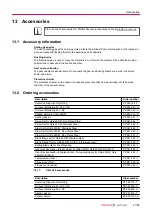
Страница 47: ... U Oil Level Monitoring 24 V DC PK 005 639 U Splinter Shield for Okta 250 M PK 300 010 X Sealing gas kit PP 027 401 T Screw Set for Okta 250 M Zinc Plated Steel PP 041 444 T Screw Set for Okta 250 M Stainless Steel PP 041 448 T Claw Set for Okta 250 M Stainless Steel PP 041 449 T Claw Set for Okta 250 M Zinc Plated Steel PP 041 450 T Claw Set for Okta 250 M Zinc Plated Steel PP 041 451 T Blank fla...

Страница 48: ...ta 500 M Okta 600 M Okta 800 M DN ISO K zinc plated steel PP 042 661 T Claw set for Okta 300 M Okta 500 M Okta 600 M Okta 800 M DN ISO K zinc plated steel PP 042 662 T Screw Set Zinc Plated Steel PP 042 663 T Blank flange set for Okta 300 M Okta 500 M Okta 600 M Okta 800 M Stainless steel PP 042 664 T Blank flange set for Okta 300 M Okta 500 M Okta 600 M Okta 800 M DN ISO K stainless steel PP 042 ...

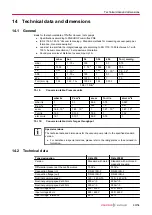
Страница 49: ...r l s 1 0 1 59 2 0 75 0 987 Pa m3 s 10 1 592 7 5 9 87 sccm 1 69 10 2 1 69 10 3 1 1 27 10 2 1 67 10 2 Torr l s 1 33 0 133 78 9 1 1 32 atm cm3 s 1 01 0 101 59 8 0 76 1 Tbl 10 Conversion table Units for gas throughput Special versions The technical data and dimensions for the vacuum pump refer to the specified standard version For deviations in special versions please refer to the rating plates or th...

Страница 50: ...otor Standard with motor and magnetic coupling Differential pressure at the overflow valve 75 hPa 75 hPa Connection flange in DN 100 ISO F DN 100 ISO F Connection flange out DN 100 ISO F DN 100 ISO F Nominal pumping speed 280 840 m h 280 840 m h Nominal pumping speed at 50 Hz 560 m h 560 m h Nominal pumping speed at 60 Hz 670 m h 670 m h Input voltage 50 Hz 230 400 V 230 400 V Input voltage 60 Hz ...

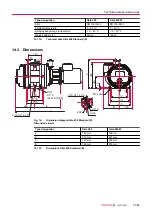
Страница 51: ...Okta 500 Standard M 14 3 Dimensions 96 200 222 170 B A Ø110 4x M8 16 20 15 140 Ø110 Ø134 Ø 70 H11 x 4 5 Ø 70 H11 x 4 5 220 260 150 D Ø12 4x 5 18 145 C 298 180 DN1 DN2 DN1 Fig 14 Dimension diagram Okta 250 Standard M Dimensions in mm Type designation Okta 250 Okta 250 M A 769 mm 799 mm B 297 mm 327 mm C 337 mm 298 mm D 183 mm 183 mm Tbl 13 Dimensions Okta 250 Standard M Technical data and dimension...

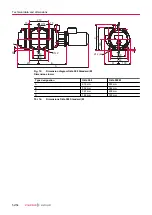
Страница 52: ...0 D 145 298 C 20 5 DN1 Fig 15 Dimension diagram Okta 500 Standard M Dimensions in mm Type designation Okta 500 Okta 500 M A 915 mm 950 mm B 352 mm 382 mm C 337 mm 298 mm D 183 mm 183 mm Tbl 14 Dimensions Okta 500 Standard M Technical data and dimensions 52 54 ...

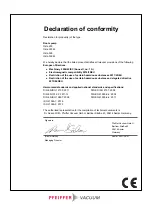
Страница 53: ... of the use of certain hazardous substances delegated directive 2015 863 EU Harmonized standards and applied national standards and specifications DIN EN ISO 12100 2011 DIN EN ISO 2151 2009 DIN EN 1012 2 2011 12 DIN EN 61000 6 2 2006 DIN EN ISO 13857 2008 DIN EN 61000 6 4 2011 ISO 21360 1 2016 ISO 21360 2 2012 The authorized representative for the compilation of technical documents is Dr Adrian Wi...

Страница 54: ...Notizen Notes ...

Страница 55: ......

Страница 56: ... PP0071 ed W Date 2108 P N PP0071BEN ...

Отзывы: