From the library of Superior Sewing Machine & Supply LLC - www.supsew.com
Страница 1: ...418 438 838 PFAFF Service Manual innovation madeby PFAFF...
Страница 2: ...he driving belt in the gearcase 23 14 Adjusting the hook bearing bracket 24 15 Preliminary adjustment of needle bar height 25 16 Oil distributor ring 26 17 Hook timing and hook to needle clearance 27...
Страница 3: ...s drained from the needle vibrating eccentric housing of the Raff 418 438 and 838 ItIstherefore necessary to fill this housing with 75 c c of oil see Section 26 before operating the machine for the fi...
Страница 4: ...required position the bearing plate Fig 1 0 1 has four holes Afterpositioning themeedle bar as requiredpush the pinintothe appropriateholeuntil itenters the recess behind the bearing plate thus blocki...
Страница 5: ...over and remove the cover Do not remove the needle bar lubricating wickfromits hole inthe cover sealing plate 2 Drainthe oilfromthe needle vibratingeccentric housing 1 0 2 From the library of Superior...
Страница 6: ...ve the latter by pulling it downwards 7 Unscrew alien screws 5 do not remove cover plate 6 it is stillconnected to oilwick9 8 Loosen clamp screw 7 and pullstabilizing rod 8 down a little 9 Remove plat...
Страница 7: ...e stitch width is set at 0 and the needle position lever is in its central position the needle must enter the needle hole exactly in the middle in sewing direction 1 S 2 R 3 B 4 L 5 Ti th 6 In 7 C Fro...
Страница 8: ...en screw 1 accessible from the back of the machine arm Loosen jam nut 2 und turn eccentric stud 3 so that Its lobe points downwafds Insert stabilizing rod 4 in the loop of oil wick 5 Position stabiliz...
Страница 9: ...ntric stud 3 accordingly 9 Making sure that stabilizing rod 4 is still in contact with eccentric stud 3 tighten clamp screw 7 securely 10 Remove the cylindricalpin from the hole inthe bearing plate 11...
Страница 10: ...its spring is relaxed 4 In this position tighten clamp screw 4 5 Move stitch width lever 6 to the right as far as itwill go i e towards 0 6 Turn on the master switch and let the machine run slowly Mo...
Страница 11: ...ite mark 3 of the stitch width lever 4 0 2 Movestitch width lever1 to the rightas far as itwill go Loosen screws 2 Adjust the stitch width scale untii the zero mark is opposite mark 3 of stitch width...
Страница 12: ...stitch width scale In this position move stop screw 3 which limitsthe maximum stitch width upwards as far as it willgo and tighten it Iffor certain sewing operations the machine is equipped with a nee...
Страница 13: ...lock ing lever does not fall out Pull locking lever 2 forward until it presses against stitch width lever 3 Inthis position use a screwdriverto turn hinge stud 4 until the locking lever has the right...
Страница 14: ...ys m I Turnthe needie position iever to its central positionand the stitch widthlever to 0 Bring the needle bar to b d c Loosen jam nut 1 Turn eccentric stud 2 until the needle Is centred In the needl...
Страница 15: ...needle bar from the bottom position on the right of its throw to t d c Insert cylindrical pin in hole 2 of the bearing plate to block the machine Move eccentric 2 sideways on its shaft untilthere is a...
Страница 16: ...on Turnthe balance wheel initsnormal direction ofrotation and letthe needle pierce the paper Raise the needle again a little and hold the paper in position Turn the stitch width lever to the maximum s...
Страница 17: ...direction In which the two outer needle punctures must be moved in orderto obtain a symmetrical stitch pattern make sure that the eccentric is not rotated in the process 12 Inthis position tighten sc...
Страница 18: ...nd fixitinpositionwithadhesive tape Turn the balance wheel Insewing direction untilthe needle pierces the paper Turnthe balance wheel inthe oppositedirection and letthe needle pierce the paperagain Tu...
Страница 19: ...in line with graduation mark 4 Turn miiied wheel 1 as far as it will go in the direction in which the reverse feed control moves downwards Loosen screw 2 and turn scale ring 3 so that the figure 0 is...
Страница 20: ...k 5 Place a 27 mm wrench on hexagon torsion nut 6 and thus hoid actuating shaft 7 firmlyin position Keep rotating the balance wheel and turn the wrench on the torsion nut until the feed dog stops movi...
Страница 21: ...nless insert a srewdriver in the slot of feed rock shaft crank 1 Loosen clamp screw 2 just enough to allow crank 3 to be turned on its shaft against resistance Turn the balance wheel and at the same t...
Страница 22: ...t d c 3 Insertthe cylindrical pinin hole 4 ofthe bearing plate toblockthe machine 4 Set the machine for its longest stitch 5 Move the reverse feed control up and down and turn feed driving eccentric...
Страница 23: ...n hole 4 of the bearing plate to block the machine 5 Tomake iteasierto recognise the dead centre positioninserta screwdriverinthe slotoflifting crank 3 6 Turn feed lifting eccentric 2 on Its shaft unt...
Страница 24: ...e wheel untilthe needle par is positioned 1 0 mm beyond its Ld c 4 Insert the cylindricalpin in hole 4 of the bearing plate to blockthe machine 5 Turn feed lifting eccentric 2 on its shaft until the f...
Страница 25: ...bushing 2 until the driving belt is positioned in the middie of the bobbin case opener driving gear 3 Making sure that eccentric bushing 2 is not moved tension the driving beit by turning the eccentri...
Страница 26: ...e bedplate and release the taper keyofhook bearing bracket 3 underneath this screw bytapping the head ofthe alien screw lightly witha hammer Screw on the hook bearing bracket gauge so that on Ci 438 a...
Страница 27: ...to t d c and insert the cylindrical pininhole 2 ofthe bearing plate Place the needle plate in the needle plate cutout Loosen screws 1 in the needle bar connecting stud Adjust the needle bar verticall...
Страница 28: ...wing hook on the hook shaft Bringthe needle bar to a position 2 mm beyond b d c but make sure the needle does not strike the sewing hook Loosen screw 1 of oil distributor ring 2 Making sure that the h...
Страница 29: ...by inserting the pin In hole 1 of the bearing plate Set the stitch width lever at 0 and the needle position lever at Itscentral position Turnthe sewing hook on Itsshaft until Its pointIs opposite the...
Страница 30: ...ye 18 0 1 V 18 0 2 Set the stitch widthlever at 0 and the needle positionlever to its leftposition Turn the balance wheel untilthe hook point is exactly opposite the needle Loosen both clamp screws 1...
Страница 31: ...bt 0 3 mm between the rightside of the bobbin case slot and the bobbin case position finger when the bobbin case opener is at its left point of reversal Fig 19 0 4 19 0 2 R 19 0 3 19 0 4 19 0 1 Turn b...
Страница 32: ...ien screw 4 7 Turn the balance wheel to bring the bobbin case opener to its left point of reversal 8 Turn the opener finger on its shaft making sure it still contacts the bobbin case base until there...
Страница 33: ...ar to a position 2 0 mm beyond b d c and in this position insert the pin in hole 1 to block the machine To facilitate determining the exact point of reversal insert a small screwdriver in the slot of...
Страница 34: ...0 1 Push slack thread control wire 1 on bushing 2 and hold itin position Bring the needle barto b d c Adjust the position of slack thread control wire 1 so that its bottom edge Is In line with the to...
Страница 35: ...sser bar byturning out regulating screw 1 untilthe presser foot is pressed against the needle plate only slightly Push the 7 mm thick part of the gauge under the presser foot from behind so that it is...
Страница 36: ...plate Lowerthe presser bar lifterto rest the presser foot on the gauge Push the feed bar upwards centre the feed dog inthe needle plate slots and hold itinthis position Tumfeed lifting crank 3 until...
Страница 37: ...mm beyond td c and insert the pinin hole 4 of the bearing plate to blockthe machine 2 Loosen screw 1 3 Lift presser foot by means of the lifting lever 4 Turn eccentric 2 until the teeth of the feed d...
Страница 38: ...168383 05 and 91 168384 05 should be replaced too 1 p b 23 0 1 Loosen screw 1 of the oil check valve Push actuating rod 2 to the left as far as it willgo Press push rod 3 into oil check valve 4 until...
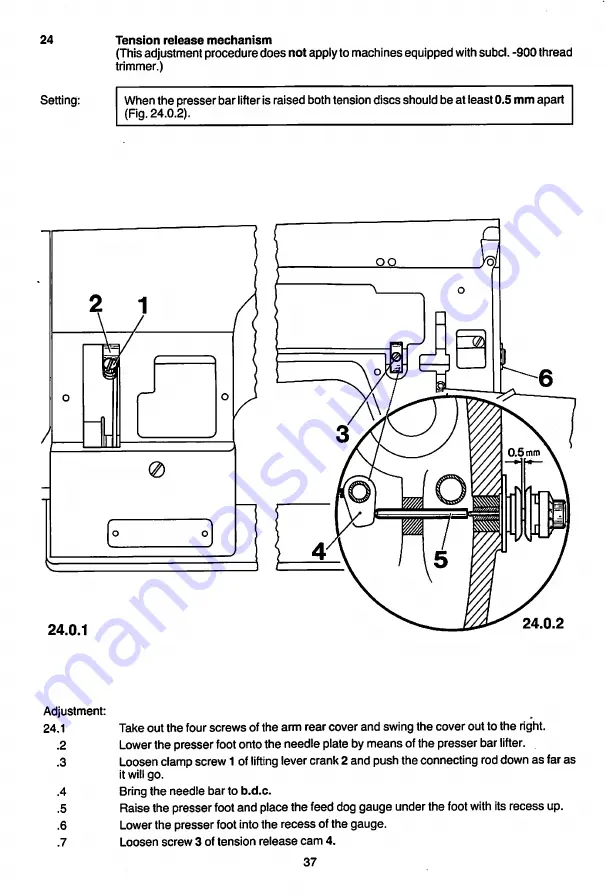
Страница 39: ...r cover and swing the cover out to the right 2 Lowerthe presser footontothe needle plate bymeans ofthe presser bar lifter 3 Loosenclampscrew1 oflifting levercrank2 and pushtheconnecting roddownas fara...
Страница 40: ...se pin 5 and tighten screw 3 Remove the feed dog gauge fromunder the presser footand lowerthe presser foot onto the needle plate again Tightenclampscrew 1 makingsure that retainingring6 onthe lifting...
Страница 41: ...2 0 mm s at 40 C and a density of 0 865 gW at 15 C No 280 1 120144 25 2 Clean the gasket face on the cover of the zigzag eccentric housing and the gasket of this cover 3 Screw on the cover making sure...
Страница 42: ...ofthe oilcheck valveas faras itwill go and then backabout half a turn Switch on the machine and run it for about one minute Remove needle plate and feed dog and take the needle out ofthe needle bar P...
Страница 43: ...wer the presser foot onto the feed dog gauge Loosen locknut 1 and turn stop screw 2 out a few turns Move the knee lever to the right until a noticeable resistance Is felt however the presser foot must...
Страница 44: ...perated just lightly A db f 0 0 28 0 1 Loosen locknut 1 of nut 2 Turn in nut 2 until there is a noticeable amount of play between it and forked con nection 3 when the knee lever is operated just light...
Страница 45: ...the bobbin winder is engaged but that friction wheel 3 will not be driven by drive wheel 2 when the bobbin winder is disengaged Tighten both screws 1 Place a bobbin on the winder spindle thread the m...
Страница 46: ...this position tighten both screws 1 of thread tension plate 2 evenly Check this adjustment see Setting Loosen both screws 4 of thread regulator 5 Push the thread regulator up as far as It will go Inth...
Страница 47: ...bar lubricating wick out of its hole in the cover sealing plate Set the stitch width lever at the widest zigzag stitch Loosen the two screws 1 of gear 2 Turn needle vibration cam 3 so that the needle...
Страница 48: ...he needle stitch all stitches of a complete pattern Hold the paper fast and tumthe balance wheeluntil the point ofthe ascending needle is positioned a littleabove the paper Set needle position lever 2...
Страница 49: ...ed under Setting is obtained 12 Tighten screw 5 13 Again unscrew the stitch width regulator plate 14 Tighten lockout 4 while retaining screw 5 with a screwdriver 15 Clean the stitch width regulator pl...
Страница 50: ...at center and stitchwidth lever4 atthe widestzigzagstitch Turn the balance wheel in its normal direction of rotation until the needle is at the extreme left of its throw and at bottom dead center Mov...
Страница 51: ...he balance wheel In Its normal direction of rotation until the needle is at the extreme right of Its throw and at bottom dead center 3 Move needle position lever 3 gradually toward the right while con...
Страница 52: ...Sr Innovation modeby PFAFF Pfaff D 6750 Koisersioutern Postfoch 3020 3040 Telefon 0631 2000 Telex45753 Telefox 0631 17202 i 296 2 i26i i From the library of Superior Sewing Machine Supply LLC www sup...