5
EN
Do not use the appliance
•
outdoors.
Do not use the appliance
•
with a higher temperature
setting than required. Reduce
the level of the temperature
setting during the process.
Before use, make sure that
•
your hair is fully dry. Hair is
most fragile and prone to
breakage when it is wet. If
you use the appliance on
damp hair, the cuticle will be
opened and the cortex will
be damaged.
Do not bring the appliance in
•
contact with artificial hair.
Do not cover the air outlets
•
with clothes, hair or hands.
The brush of the curling
•
attachment becomes very
hot during use. Only hold the
brush at the front by the
brush cap.
Cleaning and maintenance
Before you proceed, we need you to pay
attention to the following notes:
- Before cleaning or maintenance, switch off
the appliance, remove the mains plug from
the wall socket and wait until the appliance
has cooled down.
- Do not immerse the appliance in water or
any other liquids.
Regularly check the appliance for possible
•
damage.
Clean the outside of the appliance with a
•
soft, damp cloth. Thoroughly dry the
outside of the appliance with a clean, dry
cloth.
Remove the hairs from the curling
•
attachment using a soft brush. Clean the
curling attachment under running water.
Thoroughly dry the curling attachment
with a clean, dry cloth.
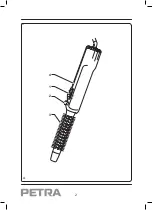
Description (fig. A)
Your 520001 Petra hair curler has been designed
for curling and waving your hair. The appliance
is equipped with two curling attachments
(16 mm / 20 mm). The appliance is suitable for
indoor use only. The appliance is suitable for
domestic use only.
1. Temperature switch
2. Roll-out button
3. Curling attachment
4. Handgrip
Assembly (fig. A)
Before you proceed, we need you to pay
attention to the following notes:
- Before assembly or disassembly, switch off
the appliance, remove the mains plug from
the wall socket and wait until the appliance
has cooled down.
Mounting and removing the curling
attachment (fig. A)
To mount the curling attachment (3), slide
•
the accessory over the front of the appliance
until the roll-out button (2) clicks into place.
To remove the curling attachment (3),
•
keep the roll-out button (2) pressed and
pull off the accessory with a slight twist.
Use (fig. A)
Mount the curling attachment (3) over the
•
front of the appliance.
Insert the mains plug into the wall socket.
•
To switch on the appliance, set the
•
temperature switch (1) to the "I" or "II"
position. Refer to the table below for the
correct settings. The appliance starts heating.


