


BodiLink Medial Knee/Thigh Support User Guide & Manual
6
Note: The pad may already be installed on the hardware.
IMPORTANT: The cover has
mounting screw holes
, which should be used to keep
the cover attached to the pad during use. During pad installation, the screws should go
through the holes in the mounting bracket, the cover, and the pad.
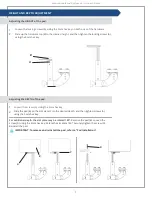
1
Line up the screws (A), the safety washers (B), and the slots on the mounting bracket (C)
with the holes (D) in the cover and the pad.
Notes: The seam of the foam and the seam on the cover should face away from the user. For
Oval Pads and Wedge Pads, the narrow end of the foam core should face the user.
2
Tighten the screws (A), using the 5mm hex key.
Note: Do not fully tighten the screws if you expect to adjust the pad depth while installing the
equipment on the wheelchair.
PAD INSTALLATION
Installing the Pad on the Mounting Hardware.
All required tools are provided.
The screws (A) should go through the
holes in the bracket, the
mounting screw
holes
in the cover*, and holes in the pad.
*Cover not shown.
Small Hardware with
2.5” x 3.5” (6.4cm x 8.9cm) Wedge Pad
D
C
B
A
Содержание BodiLink
Страница 1: ...BODILINK OPERATION MANUAL BODILINK MEDIAL KNEE THIGH SUPPORTS ...
Страница 2: ......
Страница 33: ......
Страница 34: ......
Страница 35: ......
Страница 36: ...permobilus com UM BODILINK MEDIAL KNEE THIGH SUPPORTS REV 2018 01 02 ...


