Perlick HC48RS4 Скачать руководство пользователя страница 11

Perlick is committed to continuous improvement. Therefore, we reserve the right to change specifications without prior notice 

11

Form No. Z2426 

Rev. 03.04.2022

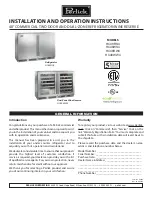
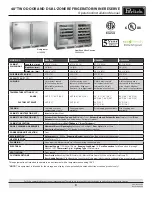
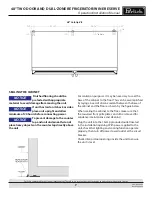
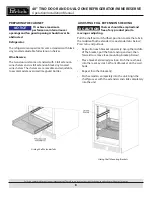
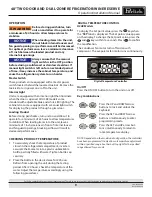
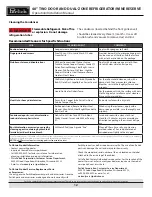
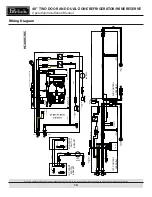
48” TWO DOOR AND DUAL-ZONE REFRIGERATOR/WINE RESERVE 

Operation/Installation Manual

Maintenance

WARNING

Shut off the electricity to the unit 

before cleaning the condenser and 

other routine maintenance.

CAUTION

NEVER use hydrochloric acid (muriatic 
acid) on stainless steel. Do not use 

abrasive cleansers or cloths on any interior or exterior 
surfaces or removeable parts.

CAUTION

Avoid damaging or crushing the con 
denser fins or tubing.

STAINLESS STEEL CARE & CLEANING

General

Stainless steel is a “passive” metal because it contains 

other metals like chromium, nickel and manganese that 

stabilize the atoms. Chromium provides an invisible 

passive film that covers the steel surface, acting as a 

shield against corrosion. As long as the film is intact and 

not contaminated, the metal is passive and stainless. 

If the passive film of stainless steel has been broken, 

equipment can start to corrode and rust.

Three materials or processes can br eak down stainless 

steel’s passive layer and allow corrosion to occur:

• 

Mechanical abrasion

• 

Deposits and water

• 

Chlorides

Mechanical abrasion


refers to items that will scratch a 

steel surface. Steel pads, wire brushes and scrapers are 

prime examples.

Water


comes out of the faucet in varying degrees of 

hardness. Hard water may leave spots. When allowed to 

sit, these deposits will break down the passive chromium 

layer and rust stainless steel. Other deposits from 

food preparation must be promptly removed with an 

appropriate cleaning agent.

Chlorides

 are found nearly everywhere. They are in water, 

food and table salt. Household and industrial cleaners are 

the worst offenders.

Preventing Stainless Steel Rust

Use non-abrasive tools to clean stainless steel products. 

Soft cloths and plastic scouring pads will not harm the 

steel’s passive layer.

Clean with polish lines. Some stainless steels have visible 

polishing lines or “grain”. When visible lines are present, 

always scrub in a motion parallel to the lines. When the 

grain cannot be seen, polish in a consistent straight 

pattern and not in a circular motion.

Use alkaline, alkaline chlorinated or non-chloride 

containing cleaners. While many traditional cleaners 

are loaded with chlorides, the industry is providing an 

ever-increasing choice of non-chloride cleaners. If you are 

not sure of chloride content in the cleaner being used, 

contact your cleaner supplier. If your present cleaner 

contains chlorides, ask your supplier for an alternative. 

Avoid cleaners containing quaternary salt; it also can 

attack stainless steel and cause pitting and rusting.

Keep food equipment clean. Use alkaline, alkaline 

chlorinated or non-chloride cleaners at recommended 

strength. Clean frequently to avoid build-up of hard, 

stubborn stains. The single most likely cause of damage 

is chlorides in the water. Remember, adding heat to 

cleaners that contain chlorides dramatically increases 

their effect on stainless steel.

If chlorinated cleaners are used, immediately rinse and 

wipe equipment and supplies dry. The sooner you wipe 

standing water, especially when it contains cleaning 

agents, the better. After wiping equipment down, allow 

it to air dry. Oxygen helps maintain the stainless steel 

passive film.

Glass panels may be cleaned using any standard glass 

cleaner available on the market.

To clean interior and exterior non-metallic surfaces and 

removable parts, wash with mild solution of soap and 

lukewarm water with a little baking soda. Rinse and dry 

thoroughly. Avoid getting water on the lights, controllers, 

fan motors and unfinished wood wine rack faces.

Содержание HC48RS4

Страница 1: ...ler Name Address___________________________ ______________________________________________ ______________________________________________ ______________________________________________ Phone Number__________________________________ Introduction Congratulations on your purchase of a Perlick commercial underbarproduct Thismanualhasbeenpreparedtoassist you in the installation of your cabinet and to a...

Страница 2: ...6 Preparing the Cabinet 8 Adjusting Full Extension Shelving 8 Operation 9 Checking Product Temperature 9 Digital Temperature Control 9 Programming Button Definitions 10 LED Functions 10 Maintenance 11 Troubleshooting 13 Wiring Diagrams 14 SAFETY PLEASE READ all instructions completely before attempt ing to install or operate the unit Take particular note of the DANGER WARNING and CAUTION informati...

Страница 3: ...e tapping not available Wine tapping not available Wine tapping not available CABINET CONSTRUCTION INT Interior Stainless Steel CABINET CONSTRUCTION EXT Exterior Sides Exterior Top and Grill Stainless Steel Exterior Back and Exterior Bottom Stainless Steel Door Exterior Customer Choice see below under Customer Options CABINET INSULATION Polyurethane Ecomate Wall Thickness 2 Door Thickness 2 DOORS ...

Страница 4: ... CORPORATION NOT TO BE COPIED OR USED DETRIMENTAL TO OUR INTERESTS DR DATE 1 28 2016 JMP SCALE 1 12 J Dwg 95000 95316 slddrw SHEET 2 OF 2 95316 REVISIONS JMP PROPERTY OF THE PERLICK CORP A 50 1270 Area in which electrical outlet must be located 12 1 4 311 24 15 16 634 Min clearance for door swing 22 559 44 1118 11 3 4 298 20 5 8 523 6 7 16 164 6 3 16 158 9 5 8 245 26 9 16 674 18 1 8 460 18 3 16 46...

Страница 5: ...Remove all crating material before operating Carefully inspect cabinet for hidden damage If damage is discovered file your claim immediately with the transport company Perlick is not responsible for damage in transit DANGER Do not use or store flammable liquids ie gasoline or vapors near the appliance to avoid fire INSTALLATION NOTICE The unit must NOT be totally enclosed or damage may occur Air c...

Страница 6: ...ce may result in fire INSTALLING CASTERS OR LEGS OPTIONAL Attach bracket assembly to the bottom of the cabinet base using the 20 Philips head machine screws provided Attach casters or legs to the mounting bracket with 20 Philips head screws provided NOTICE To comply with NSF requirements cabinet must be sealed to floor or on legs casters or rollers PLACING THE CABINET To assure maximum performance...

Страница 7: ...e counter top directly above the unit For sanitation purposes it may be necessary to seal the base of the cabinet to the floor This can be accomplished by laying a bead of silicone sealant between the base of the cabinet and the floor as shown by the figure below When sealing the cabinet to the floor make sure that the louvered front grille plate can still be removed for condenser maintenance and ...

Страница 8: ...nd six full extension black vinyl coated wine shelves The shelves are removable and adjustable to accommodate oversized magnum bottles ADJUSTING FULL EXTENSION SHELVING CAUTION Shelves should be emptied and free of any product prior to moving or adjusting Pull the shelf out to its furthest position Locate the tabs in the middle of both extenders see extender tabs below Press tabs and pull out Repo...

Страница 9: ...ate for a minimum of 24 hours to allow temperatures to stabilize When loading items into the unit leave a minimum of 1 inch clearance in front of internal louvers and fan guard openings blocking airflow will result in decreased performance CHECKING PRODUCT TEMPERATURE 1 To accurately check the temperature of product stored in the refrigerated compartment insert an accurate thermometer into a plast...

Страница 10: ... label AP1 will appear 2 Browse the various applications AP1 AP2 AP3 AP4 using the and keys 3 Select the desired application using the key AP3 in the example or cancel the procedure by pressing the key alternatively wait for the timeout 4 If the operation is successful the display will show y if not it will show n 5 After a few seconds the instrument will return to the main display Power on Select...

Страница 11: ...ers are the worst offenders Preventing Stainless Steel Rust Use non abrasive tools to clean stainless steel products Soft cloths and plastic scouring pads will not harm the steel s passive layer Clean with polish lines Some stainless steels have visible polishing lines or grain When visible lines are present always scrub in a motion parallel to the lines When the grain cannot be seen polish in a c...

Страница 12: ...y Cleaner Turco Scale 4368 or Permag 57 Swab and soak with a clean cloth Let stand for 15 minutes or more according to directions on package then rinse and wipe dry Rust dicoloration or corrosion caused by cleaning agents containing hydrochloric muriatic acid or chlorine bleach 3M Scotch Pad type A grade fine Clean off the surface soil using cleaning methods above Then rub discolored or corroded a...

Страница 13: ...oor opening occurred Has warm product just been placed in the unit On hot days and in warm room temperatures the system will run longer Condensation forms inside the refrigerated compartments This is normal during high humidity and frequent door openings Are the doors closing and sealing properly Condensation forms on the outside of the unit During periods of high humidity some condensation might ...

Страница 14: ...NET LIGHT MACHINE COMPARTMENT BLACK BLACK BLACK BLACK BLACK BLACK EVAPORATOR FAN CONDENSER FAN CONTROL MASTER POWER SWITCH DC DRIVER 2 DC DRIVER 1 1 1A I320 C 14 10 AMP 5 15P CORD END NOT USED CAP ENDS GROUNDED ABOVE CONDENSER FAN 1B 1 1A 1026854 WHITE BLACK RED WHITE RED BLUE NORMAL CLOSED NORMAL OPEN 1026973 1 WHITE BLACK LIGHT SWITCH EVAPORATOR SENSOR WHITE RED RED BLACK 68755 CABINET LIGHT 1B ...

Страница 15: ...ROL DC DRIVER 2 DC DRIVER 1 I320 C 14 10 AMP 5 15P CORD END GROUNDED ABOVE CONDENSER FAN 1B 1 1A 1026854 WHITE BLACK RED WHITE RED BLUE 1026973 1 WHITE BLACK LIGHT SWITCH EVAPORATOR SENSOR WHITE RED RED BLACK 68755 CABINET LIGHT 1B 1 1A WHITE RED BLUE LIGHT SWITCH BLUE BROWN DC DRIVER 3 WHITE BLACK RED BLACK RED BLACK CENTER FAN WHITE BLACK BLUE BLUE WHITE BLACK BLACK BLACK WHITE BLUE BLACK WHITE ...

Страница 16: ...PERLICK CORPORATION 8300 W Good Hope Road Milwaukee WI 53223 800 558 5592 perlick com Form No Z2426 Rev 03 04 2022 ...

Отзывы: