


Form No. Z2266
Rev. 01.04.09
4
Perlick is committed to continuous improvement. Therefore, we reserve the right to change specifications without prior notice.
General information –
Single Door Cooler Series
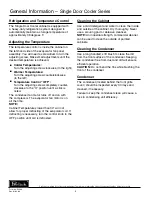
Refrigeration and Temperature Control
The Single Door Cooler cabinet is equipped with
a heavy-duty refrigeration system designed to
automatically maintain a storage temperature of
approximately 38 degrees F.
Adjusting the Temperature
The temperature control is inside the cabinet on
the left-hand side of the evaporator fan panel
assembly. You will need a screwdriver to turn the
adjusting screw. make small adjustments until the
desired temperature is achieved.
■
Colder Temperatures:
Turn the adjusting screw clockwise (to the right).
■
Warmer Temperatures:
Turn the adjusting screw counterclockwise
(to the left).
■
Temperature Control “OFF”:
Turn the adjusting screw completely counter-
clockwise to the “o” position until a click is
noted.
The condenser fan motor turns off and on with
the compressor. The evaporator fan motor is on
all the time.
NOTE:
Cabinet Temperatures lower than 34° will not
allow for proper defrosting of the evaporator coil. if
defrosting is necessary, turn the control knob to the
oFF position until coil is defrosted.
Cleaning the Cabinet
Use a mild detergent and water to clean the inside
and outside of the cabinet. Dry thoroughly. Never
use a scouring pad or abrasive cleanser.
NOTE:
an industrial strength, commercial cleaner
can be used to clean the outside of painted
cabinets.
Cleaning the Condenser
Use a long handled, stiff brush to clean the dirt
from the front surface of the condenser. Keeping
the condenser free from dust and dirt will ensure
efficient operation.
CAUTION:
Do not bend the fins while brushing the
front of the condenser.
Condenser
The condenser (located behind the front grille
cover) should be inspected every 30 days and
cleaned, if necessary.
Failure to keep the condenser clean will cause a
loss in condensing unit efficiency.


