70mm
10mm
A1
A3
A2
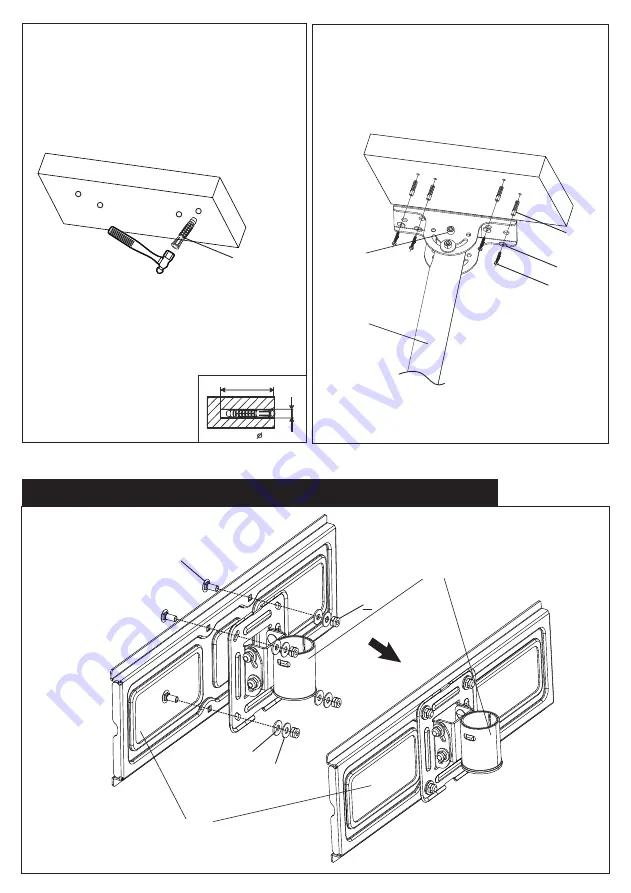
STEP 4 Attach the connector [3] to the TV Plate [1]
6
[5]
[2]
c
h
B1
f
[1]
[3]
Страница 1: ...ail supportus perlesmith com US CA DE UK FR IT ES JP AU Thank you for choosing our product We strive to provide the best quality and services for our customers Would you kindly share your experience on Amazon if you are satisfied Should you have any issues please don t hesitate to contact us ...
Страница 2: ...supportus perlesmith com Not all parts and hardware included will be used Carefully read all instructions before attempting installation If you do not understand the instructions or have any concerns or questions please contact customer service at supportus perlesmith com This product may contain moving parts Use with caution Do not use this product for any purpose or in any configuration not expli...
Страница 3: ... Screws M8 x 15mm M8 x 45mm x4 x4 E1 E2 B2 Spacers L5mm x8 x2 x4 x7 x2 x1 x2 C Washers M6 x11 B1 Hardware for Attaching Wall Plate to Wall CAUTION M8X65 Lag Bolts x4 A3 x4 A1 Wall Anchor Philips Screws M4 x 30mm F x4 These anchors are for concrete or brick walls ONLY DO NOT use them in drywall or wood studs a f b c d e 2 Plastic Washer 16x6 4x1 5 x4 h M6 Bolt x1 g Allen Wrench 5x5 ...
Страница 4: ...e next step Avoid potential personal injury or property damage All lag bolts A1 MUST BE firmly tightened to prevent unwanted movement of the U Bracket 2 X STEP 2 Attach U Bracket 2 to the Ceiling For wood stud installation follow STEP 2A For concrete installation follow STEP 2B 3 Attach the U bracket 2 to Tube 5 a b a b c e g B1 5 2 ...
Страница 5: ...Avoid potential personal injuries and property damage Anything covering the ceiling must not exceed 5 8 in 16 mm Nominal wood stud size common 2 x 4 in 51 x 102 mm minimum 1 x 3 in 38 x 89 mm Stud center must be verified 4 5 2 7 32 in 5 5mm Wood Drill 7 ...
Страница 6: ...WARNING Wall Anchor A3 WARNING Ensure the U Bracket 2 is securely fastened to the ceiling before continuing on to the next step WARNING Anything covering the ceiling must not exceed 5 8 in 16 mm Mount the U Bracket 2 directly onto the concrete surface Minimum solid concrete thickness 203 mm 8 in Minimum concrete block size 203 x 203 x 406 mm 8 x 8 x 16 in 5 25 64 in 10mm Concrete Drill 7 ...
Страница 7: ...70mm 10mm A1 A3 A2 STEP 4 Attach the connector 3 to the TV Plate 1 6 5 2 A3 c h B1 f 1 3 ...
Страница 8: ...ed to determine if LCD LED TVs are compatible with wall mounts Hand thread screws into the threaded inserts on the back of your TV to determine which screw diameter M4 M6 or M8 to use When attaching brackets 4 to the flat screen be careful not to over tighten screws and be sure that screws do not bottom out in the mounting holes Too Short Too Long Correct Correct STEP 5 7 Attach the TV plate assemb...
Страница 9: ...Step 7 Attach Brackets 4 to TV D1 B1 E1 or F D2 B1 B2 C E2 B2 C For TV with a curved back or obstruction 8 For TV with a flat back 4 4 or ...
Страница 10: ...locking Step 8 HEAVY You will Need Assistance with this Step 9 ...