background image

IDS-206 Switches Quick Start Guide P/N 5500355-10 (Rev A)


Wiring the Terminal Block 


Connecting the switch to ground (optional) 

If your installation requires additional grounding, refer to the Hardware Installation 
Guide for information on connecting ground. 

Connecting power to the switch 

You may connect both sets of power inputs to provide redundant power. 


1.


Ensure the power source is off prior to connection.


2.


Using a pair of 12-20AWG wires, strip them both 7-8mm (5/16”).


3.


Loosen the terminal block screws and connect positive (+) / negative (-) wires 
in the +/- terminals.


4.


Tighten terminal screws (0.51Nm torque). Ensure the wires are securely 
fastened.


5.


Re-insert the terminal block connector if removed. Turn power on at source. 
Check LED indicators for status.


6.


Connect P2 (power source 2, beginning at Step 1.


For complete wiring instructions and for all Hazardous Locations and 
general safety warnings consult the Hardware Installation Guide. 


Inserting an SFP Module 

Before connecting fiber cable to the switch, the SFP must be installed, following the 
procedure below. 

1.


Carefully align the SFP with the slot, ensuring the latching mechanisms will 
line up. Also ensure the bale on the SFP is closed. 

2.


Slide the SFP until the connector is seated in the slot and latched.  If you are 
unable to fully insert the SFP, reverse the orientation and retry. 


Содержание IDS-206

Страница 1: ...s intended for first time setup or for product evaluation purposes Complete details can be found in the following guides at www perle com downloads IDS 206 Hardware Installation Guide IDS Managed Switches User Guide IDS Managed Switches CLI Guide What s in the box The IDS switch Quick Start Guide this document Hardware Overview ...

Страница 2: ...ghten terminal screws 0 51Nm torque Ensure the wires are securely fastened 5 Re insert the terminal block connector if removed Turn power on at source Check LED indicators for status 6 Connect P2 power source 2 beginning at Step 1 For complete wiring instructions and for all Hazardous Locations and general safety warnings consult the Hardware Installation Guide Inserting an SFP Module Before conne...

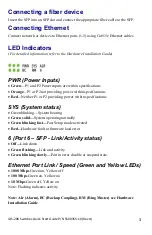
Страница 3: ... power within specifications Red Neither P1 or P2 providing power within specifications SYS System status Green blinking System booting Green solid System operating normally Green blinking fast Fast Setup mode activated Red Hardware fault or firmware load error 6 Port 6 SFP Link Activity status Off Link down Green flashing Link and activity Green blinking slowly Port in error disable or suspend st...

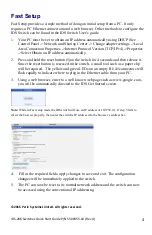
Страница 4: ...on is recessed in the switch a small tool such as a paper clip will be required The yellow and green LEDs on an empty RJ 45 connectors will flash rapidly to indicate where to plug in the Ethernet cable from your PC 3 Using a web browser enter to a well known webpage such as www google com you will be automatically directed to the IDS Get Started screen Note While in Fast setup mode the IDS switch ...

Отзывы: