background image


13 


TIGHTENING WHEEL NUTS 

– cont’d


NOTE:

 Release the trigger switch 

IMMEDIATELY when the impact mechanism 
“rattles”. 


6. 

Proceed with tightening the remaining 
wheel nuts as noted above.


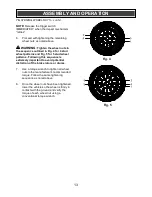
      WARNING:


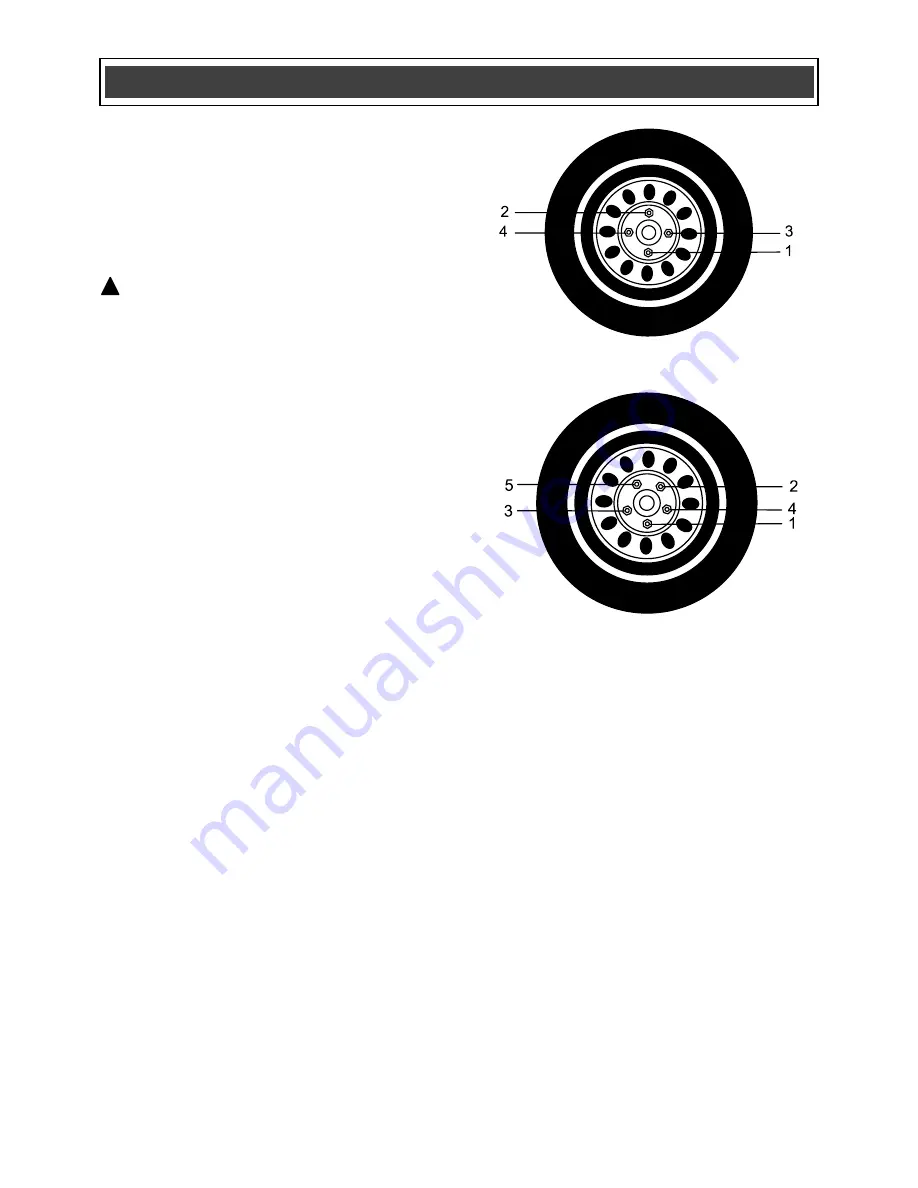
Tighten the wheel nuts in 

the sequence outlined in Fig. 4 for 4 stud 
wheel patterns and Fig. 5 for 5 stud wheel 
patterns.


Following this sequence is 

extremely important to avoid potential 
distortion of the brake rotors or drums.


7. 

Use a torque wrench to tighten all wheel 
nuts to the manufacturer’s recommended 
torque. Follow the same tightening 
sequence as noted above. 
 

8. 

Once the wheel nuts have been tightened, 
lower the vehicle so the wheel is firmly in 
contact with the ground and verify the 
torque of each wheel nut using a 
conventional torque wrench. 


ASSEMBLY AND OPERATION 

Fig. 4 


Fig. 5 


Содержание 241-9891

Страница 1: ...res 8 5 A Speed 2 600 RPM no load Impact speed 2 700 BPM Torque 440 ft lbs in reverse 320 ft lbs in forward Square drive 1 2 Weight 9 lb 8 oz 4 3 kg Need Assistance Call us on our toll free customer s...

Страница 2: ...6 Power tool use and care 6 Service 6 Specific safety rules 7 Extension cord safety 8 Symbols 9 Know your impact wrench 10 Accessories 10 Assembly and operation 11 13 Installing impact sockets 11 Forw...

Страница 3: ...ant eyewear can cause serious injury if broken during operation of a power tool SAVE THESE INSTRUCTIONS FOR REFERENCE WARNING Use hearing protection particularly during extended periods of operation o...

Страница 4: ...by power sanding sawing grinding drilling and other construction activities may contain chemicals that are known to cause cancer birth defects or other genetic abnormalities These chemicals include L...

Страница 5: ...outdoor use Use of a cord suitable for outdoor use reduces the risk of electric shock If operating a power tool in a damp location is unavoidable use a residual current device RCD protected supply Us...

Страница 6: ...nding of moving parts breakage of parts and any other condition that may affect the power tool s operation If damaged have the power tool repaired before use Many accidents are caused by poorly mainta...

Страница 7: ...used with an impact wrench They may shatter and possibly cause serious injury Before each use check the impact sockets and accessories for excessive wear or cracks Worn or damaged sockets or accessori...

Страница 8: ...operly wired and in good condition Replace a damaged extension cord immediately or have it repaired by a qualified electrician before using it Keep the extension cord away from sharp objects excessive...

Страница 9: ...2 No 60745 1 60745 2 2 V Volts A Amperes Hz Hertz W Watts kW Kilowatts Microfarads L Litres kg Kilograms H Hours N cm2 Newtons per square centimeter Pa Pascals Min Minutes S Seconds Alternating curren...

Страница 10: ...Before using any accessory carefully read the instructions or the owner s manual for the accessory Impact sockets Impact extensions Impact adapters Impact nut drivers Impact screwdriver bits WARNING...

Страница 11: ...ter clockwise direction to loosen the fastener REMOVING FASTENERS One of the most common uses for the impact wrench is to remove car wheel nuts for rotating the tires Car wheel nut removal is used for...

Страница 12: ...e It may also break the fastener NOTE Once the wheel nut has been removed release the trigger switch The tool will turn OFF TIGHTENING WHEEL NUTS This impact wrench can be used to tighten wheel nuts a...

Страница 13: ...tud wheel patterns Following this sequence is extremely important to avoid potential distortion of the brake rotors or drums 7 Use a torque wrench to tighten all wheel nuts to the manufacturer s recom...

Страница 14: ...d result in a hazardous condition leading to possible serious injury It will also void the warranty LUBRICATION All of the bearings in this tool are lubricated with a sufficient amount of high grade l...

Страница 15: ...sh holder 6 Carefully grasp the braided copper brush wire 8 and lift the carbon brush 9 from the brush holder INSTALLING NEW MOTOR BRUSHES 7 Once the old carbon brush has been removed use a SOFT DRY b...

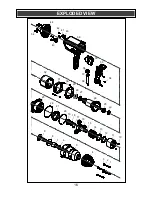
Страница 16: ...16 EXPLODED VIEW 1 4 5 6 7 8 9 10 11 12 13 14 15 16 17 18 19 21 23 29 30 31 25 26 27 32 34 33 35 37 36 39 40 42 44 41 2 3 24 38 43 20 22 28 34...

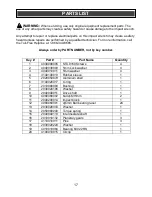
Страница 17: ...t by key number Key Part Part Name Quantity 1 4030090005 ST4 9 50 Screws 4 2 4040030003 5mm Lock washer 4 3 4040010011 5mm washer 4 4 3140100013 Rubber sleeve 1 5 2020050079 Aluminum shell 1 6 3140020...

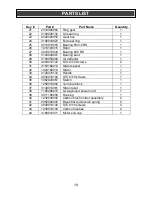
Страница 18: ...1 30 4003010122 ST3 9 70 Screws 2 31 3150160214 Stator spacer 1 32 1020180014 Stator 1 33 3120070132 Handle 1 34 4030010106 ST3 9 19 screws 7 35 1062020067 Switch 1 36 1250010002 Terminal block 1 37...

Страница 19: ...imited to blades brushes belts bits light bulbs and or batteries 2 shall be void if this tool is used for commercial and or rental purposes and 3 does not cover any losses injuries to persons property...

Отзывы: