


Page 14
OPERATION
6. Put a drop of good-quality machine oil
onto the inner bushing washer and outer
blade washer where they will contact
the blade.
7. Place a new saw blade inside the lower
blade guard, onto the spindle shaft and
against the inner bushing washer.
NOTICE: The teeth of the blade should
point upward at the front of the saw.
8. Replace the outer blade washer.
9. Depress and hold the spindle-lock
button as you replace the blade
screw and hand-tighten the screw
in a clockwise direction. Use the
blade wrench to tighten the blade
screw securely.
WARNING:
A 7-1/4 inch blade
is the maximum blade capacity of the
saw. Use only 7-1/4 inch blades when
replacing a worn or damaged blade. Never
use a blade that is too thick to allow the
outer blade washer to engage with the
flats on the spindle. Thicker blades will
prevent the blade screw from securing the
blade on the spindle, resulting in serious
personal injury.
WARNING:
Be sure to wear
protective work gloves while handling
a saw blade. The blade can injure
unprotected hands.
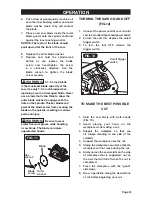
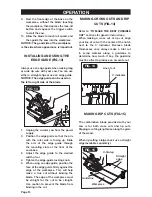
FIG. 11
Outer
washer
Hex
wrench
Blade
Blade
screw
TURNING THE SAW ON AND OFF
(FIG.12)
1. Connect the power cord of your circular
saw to a standard household power outlet.
2. To turn the saw ON, depress the on/off
trigger switch.
3. To turn the tool OFF, release the
trigger switch.
FIG. 12
On/off trigger
switch
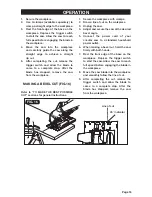
TO MAKE THE BEST POSSIBLE
CUT
1. Hold the saw firmly with both hands
(FIG. 13).
2. Avoid placing your hand on the
workpiece while making a cut.
3. Support the workpiece so that you
are always standing to one side of the
cut (kerf).
4. Support the workpiece near the cut.
5. Clamp the workpiece securely so that the
workpiece will not move during the cut.
6. Always place the saw weight on the side
of workpiece that is supported, not on
the side that will fall off when the cut is
completed.
7. Place the workpiece with the “good”
side down.
8. Draw a guideline along the desired line
of cut before beginning your cut.
Содержание 241-0987
Страница 20: ...05 2015 2015 Menard Inc Eau Claire WI 54703 ...


