


11
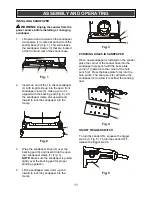
INSTALLING SANDPAPER
WARNING:
Unplug the sander from the
power source before installing or changing
sandpaper.
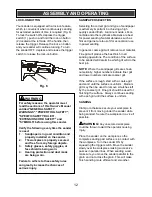
1.
Lift upward and outward on the sandpaper
clamp arms (1) located at each side of the
sander base (2) (Fig. 1). This will release
the sandpaper clamps (3) that are located
at the front and rear of the sander base.
2.
Insert one end of the 1/3 sheet sandpaper
(4) with its grit side up into the open front
sandpaper clamp (5), making sure it is
aligned with the backing pad (Fig. 2). Lift
the sandpaper clamp arm upward and
inward to lock the sandpaper into the
clamp.
3.
Wrap the sandpaper sheet (4) over the
backing pad (6) and insert it into the open
rear sandpaper clamp (7) (Fig. 3).
NOTE:
Make sure the sandpaper is pulled
tightly over the backing pad for proper
sanding operation.
4.
Lift the sandpaper clamp arm up and
inward to lock the sandpaper into the
clamp.
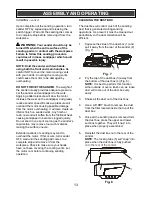
PUNCHING HOLES IN SANDPAPER
When new sandpaper is installed on the sander,
place the corner of the sander base into the
sandpaper hole punch with the base plate
corner (1) nested into the corner of the hole
punch (2). Press the base plate firmly into the
hole punch. The sharp pins (3) will pierce the
sandpaper (4) to allow it to extract the sanding
dust.
ON/OFF TRIGGER SWITCH
To turn the sander ON, squeeze the trigger
switch (1) Fig. 5). To turn the sander OFF,
release the trigger switch.
ASSEMBLY AND OPERATING
!
Fig. 2
Fig. 3
Fig. 4
Fig. 5
Fig. 1
Содержание 241-0971
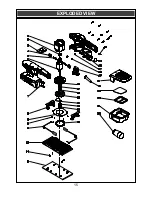
Страница 15: ...15 EXPLODED VIEW...