Performance Tool W50003 Скачать руководство пользователя страница 4

OPERATION

4

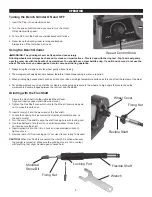
Turning the Bench Grinder ON and OFF

1.  Insert the Plug into an electrical outlet.

2.  Turn the speed control Knob clockwise to turn the motor

  ON and adjust its speed.

3.  To turn OFF, turn the Knob counterclockwise until it clicks.

4.  Never leave the bench grinder running unattended. 

  Always turn off the tool when not in use.

Using the Bench Grinder

     WARNING: The grinding wheel can fly apart and cause injury.

Grinding wheels must always be checked for cracks or imperfections . This is done with the ring test . Tap the wheel gently 

near the outer rim with the handle of a screwdriver. You should hear a clear bell-like ring. If a dull thud occurs, do not use the 

wheel. The wheel may be damaged and could come apart during operation.

1. Always bring the workpiece into the wheel gently, without jarring.

2. The workpiece will quickly become heated, therefore frequent quenching in water is required.

3. When grinding high speed steels such as drill and tool bits, avoid high temperature buildup as this can affect the temper of the steel.

4. For small workpieces such as drill bits or chisels, avoid applying pressure to the wheel at a high angle that could cause the 

  workpiece to become lodged between the tool rest and the wheel.

Grinding with the Flex Shaft

1.  Secure the Flex Shaft into the right side Wheel Cover.  

  Align and insert exposed shaft into wheel cover. 

2.  Tighten the Flex Shaft connector nut onto the Wheel Cover making sure 

  not to cross thread the nut.

To insert a rotary bit into the wand end of the flex shaft:

1.  Locate the Locking Port just under the directional indicator arrow on 

  the end of wand.

2.  Turn the end of the shaft to align the shaft locking hole with locking port.

3.  Use the shaft end of another bit or a small screwdriver to insert into 

  port and secure the shaft.

4.  Insert desired bit into the 1/8 in. chuck and use provided wrench to 

  tighten chuck.

5.  Remove tool or bit from locking port. Your wand is now ready to be used.

CAUTION: When Flex Shaft is connected the rotary bit is active whenever 

  the grinder is turned on. Make sure the grinding stone is not in contact 

  with anything that might be damaged or cause harm.

Fixing Nut

Speed Control Knob

Wheel Cover

Flexible Shaft

Mounted 

Stone Bit

Fixing Nut

Flexible Shaft

Wrench

Locking Port

Содержание W50003

Страница 1: ...tem Number W50003 WARNING READ UNDERSTAND AND FOLLOW ALL INSTRUCTIONS AND WARNINGS BEFORE OPERATING THIS TOOL FAILURE TO DO SO MAY RESULT IN PERSONAL INJURY AND OR PROPERTY DAMAGE AND WILL VOID WARRANTY Some dust created by power sanding contains chemicals known to the State of California to cause cancer birth defects or other reproductive harm An example of this type of chemical is lead from lead...

Страница 2: ...rking condition Keeping the tool clean dry free of grime will add to its life and performance EXTENSION CORD GUIDELINES Use only 3 wire extension cords that have 3 prong grounding type plugs and 3 prong receptacles that accept the tool s plug Only UL listed extension cords should be used with this product Improper use of extension cords may cause inefficient operation of your tool which can result...

Страница 3: ...ways make sure the safety shields and wheel guards are in place at all time MAKE SURE the grinding wheels are of the proper speed RPM rating for the grinder FREQUENTLY QUENCH THE WORKPIECE in water to prevent overheating be careful not to get water on the bench grinder USE THE TOOL REST to steady the work piece If the tool rest is not used the torque of the spinning grinding wheel may pull the wor...

Страница 4: ...eel 4 For small workpieces such as drill bits or chisels avoid applying pressure to the wheel at a high angle that could cause the workpiece to become lodged between the tool rest and the wheel Grinding with the Flex Shaft 1 Secure the Flex Shaft into the right side Wheel Cover Align and insert exposed shaft into wheel cover 2 Tighten the Flex Shaft connector nut onto the Wheel Cover making sure n...

Страница 5: ... Cord Plug 50 Cord Bushing 51 Base Plate 52 Rubber Foot 53 Flat Washer 54 Screw MAINTENANCE Dressing the Grinding Wheel Note New wheels frequently are not true and during operation will often become grooved glazed build up out of round or misshapen You will need a grinding wheel dresser for this operation not included 1 Stand to the side of the wheel for this operation 2 If the wheel is new let it...

Страница 6: ...erformance or reliability nor shall these warranties apply to any product or part which has been subject to misuse neglect accident or wear and tear incident to normal use and service PERFORMANCE TOOL does not authorize any other person to make any warranty or to assume any liability in connection with its products Except for warranties of title and the limited express warranties set forth above P...

Отзывы: