


WARNING: For your own safety, turn switch “OFF” and remove
plug from power source outlet before adjusting and maintaining
your bench grinder. If power cord is worn, cut, or damaged in
any way, have it replaced immediately.
CARE FOR GRINDING WHEELS
In normal use, grinding wheels may become cracked, grooved,
rounded at the edges, chipped, out of true or loaded with foreign
material. Cracked wheels should be replaced IMMEDIATELY.
WHEEL REPLACEMENT
If you must replace a wheel, be sure to obtain one with a safe rated
speed as high as the RPM marked on your grinders nameplate and
with a 1/2” center hole. A 6” diameter wheel should be a maximum of
3/4” wide. Check new wheels for cracks and maintain the existing
sequence of retaining hardware. Be sure the tool is unplugged before
attempting repairs. Your bench grinder will accept most polishing and
buffing wheels.
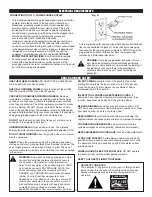
To replace the grinding wheel:
1. Turn the power switch to “OFF” and unplug the power cord from the
power source.
2. Move eyeshields to “UP” position for easy access to the tool rests.
3. Remove the wheel cover by loosening the 3 screws holding the wheel
cover to the bench grinder.
4. Using a small wooden wedge, place it between the abrasive wheel and
the tool rest to prevent the wheel from turning.
5. With a 3/4” wrench, loosen the wheel nut in a clockwise direction for
the left side and a counterclockwise direction for the right side.
6. Remove the outer flange and grinding wheel from the arbor shaft.
7. Replace with grinding wheels that are rated at a higher RPM rating
than the bench grinder.
NOTE: DO NOT remove the label on the side of the abrasive wheel. Be
sure the grinding wheel and both flanges are properly seated on the
spindle shaft.
8. To install a new grinding wheel, reverse the removal procedure.
NOTE: DO NOT over tighten the lock nut as this may cause damage to the
grinding wheel and may cause personal injury to the operator.
MAINTENANCE
STAR
WASHER
SPINDLE
SHAFT
OUTER
FLANGE
SCREW(S)
WHEEL
GUARD COVER
WHEEL
NUT
GRINDING
WHEEL
INNER
FLANGE
HEX NUT(S)
6” Bench Grinder
OFF ON
CLEAN your bench grinder only after the power switch is in the
“OFF” position and unplugged from the power source. Turn the
grinding wheels slowly and inspect for damaged or trapped debris
and dust build up. Use a clean dry rag or brush to remove debris
or dust build up.
NEVER use flammable materials to clean bench grinder.
NO LUBRICATION is required. Your bench grinder has sealed
lubrication bearings in the motor housing.
WORKLIGHT:
1.
Turn the power switch to “OFF” and unplug the power cord from the
power source.
2. Make sure the bench grinder has a chance to cool down to avoid
personal injury when replacing light bulb (bulb not included).
3. To remove the bulb, turn counterclockwise. To install new bulb, turn
clockwise.
Note: To avoid the risk of fire, never use a bulb with a wattage higher
than 40 watts.
WARNING: The use of any other accessories is not
recommended and may result in serious injury.
PROTECT YOUR EYES.
The operation of any power tool can result in foreign objects being
thrown into the eyes which can result in severe eye damage. Always
wear eye protection during power tool operation.
SAFETY GLASSES
PLEASE WEAR
FORESIGHT IS BETTER
THAN NO SIGHT
5
WARNING: TO REDUCE
THE RISK OF FIRE USE
ONLY TYPE A BULB.
MAXIMUM 40 WATT, 120V
TO
INSTALL BULB
TO
REMOVE BULB
40 WATT
WORKLIGHT
BULB


