

6
OPERATION
Preparing the Soldering Tip
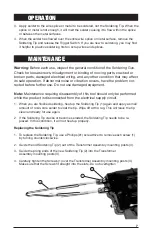
1. Using a Phillips (#1) screwdriver, check that the Soldering Tip screws (2) are not loose.
Do not overtighten as you may strip the threads.
2. Set the Soldering Gun on the workbench, and plug the Line Cord into an electrical outlet.
3. Press on the Trigger Switch (12) until the Soldering Tip (1) heats up.
Preparing the Metal to be Soldered
1. If wires are to be soldered, thoroughly clean or scrape the wires so that only the clean
copper is showing. Make the wire splice.
2. If other metals are to be soldered, thoroughly clean or scrape the metal surfaces. It may
be necessary to apply acid flux (not supplied) to the metal surfaces before soldering.
Caution: If soldering on printed circuit boards, too much heat can soften the plastic form
and loosen the metal eyelet connections. Use minimal heat, or solder with a low wattage
soldering pencil. Never use acid core solder on wiring circuits.
Soldering
1. Press on the Trigger Switch (12) until the Soldering Tip (1) heats up.
2. Brush on solder flux (not included), as needed, to the workpiece. Place the Soldering
Tip to the joint, wiring splice, or metal to be soldered.
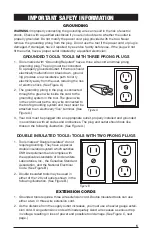
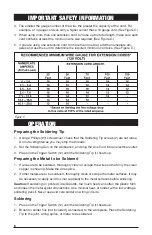
3. The smaller the gauge number of the wire, the greater the capacity of the cord. For
example, a 14 gauge cord can carry a higher current than a 16 gauge cord. (See Figure C.)
4. When using more than one extension cord to make up the total length, make sure each
cord contains at least the minimum wire size required. (See Figure C.)
5. If you are using one extension cord for more than one tool, add the nameplate am-
peres and use the sum to determine the required minimum cord size. (See Figure C.)
IMPORTANT SAFETY INFORMATION
Figure C


