background image

42

5

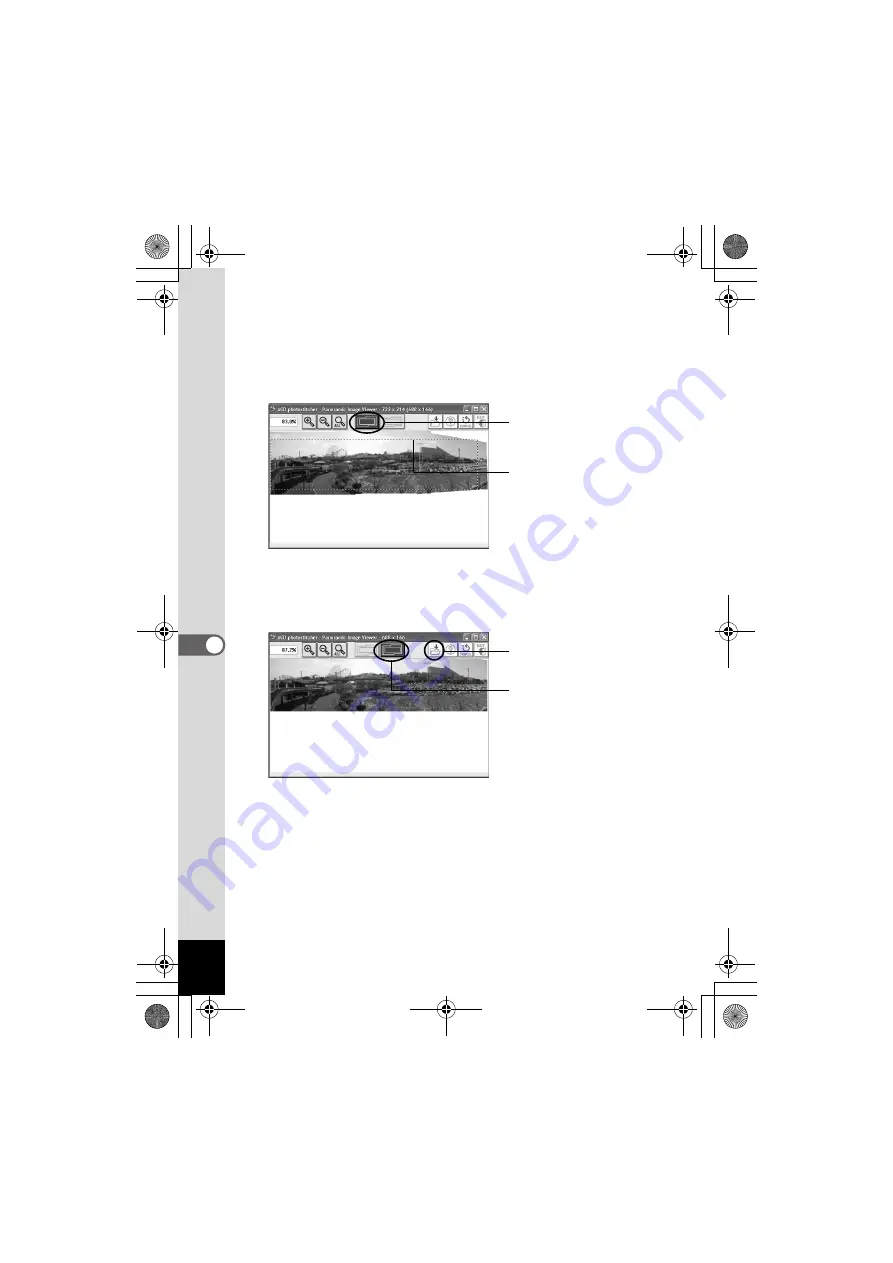
Trim the image.

Move the mouse pointer over the dotted lines. It changes into a 

 symbol. Hold down the left mouse button and drag the dotted lines 

to adjust the image trimming position (

A

).

After the position has been adjusted, click the [Trimming] button (

B

).

6

Save the image.

After confirming the trimming, click the [Save] button to save the 
image. To cancel the trimming, click the [Cancel Trimming] button.

(

B

) Click the [Trimming] 

button.

(

A

) Trim the image.

[Save] button

[Cancel Trimming] button

e_00_pc_kb353.book  Page 42  Tuesday, August 10, 2004  1:56 PM

Содержание Optio S50

Страница 1: ...Enjoying Your Digital Camera Images On Your PC PC Connection Manual e_00_pc_kb353 book Page 1 Tuesday August 10 2004 1 56 PM...

Страница 2: ...her brands or product names are trademarks or registered trademarks of their respective companies This product supports PRINT Image Matching III PRINT Image Matching enabled digital still cameras prin...

Страница 3: ...16 Transferring Images to a Macintosh 23 Viewing Images and Movies 25 Starting ACDSee for PENTAX 25 Displaying a List of Images and Movies 26 Viewing a Full Size Image or Movie 33 Editing Images and M...

Страница 4: ...slot PC card adapter or a card reader Remove the card from the camera When transferring images on the card to a computer with another device make sure to review the user manual accompanying that devi...

Страница 5: ...he operating manual of the software you are using for details on how to use images and movies on your website Images transferred to the computer can be saved onto a CD R or other media ACDSee for PENT...

Страница 6: ...ns for enjoying your digital camera pictures and movies on your computer The following software is included in the CD ROM S SW26 provided Windows ACDSee for PENTAX Image viewing editing software ACD F...

Страница 7: ...Disk space 40MB minimum Display adapter capable of displaying a minimum of 256 colors Internet Explorer 5 5 or later Some formats may require viewing with QuickTime 6 0 or later DirectX 9 0 or later...

Страница 8: ...dows 98SE Me NT 2000 XP Home Edition Professional CPU Pentium or higher recommended Memory 128MB minimum QuickTime 6 0 or later is required to play movies with the provided software ACDSee for PENTAX...

Страница 9: ...an Japanese OS Mac OS 9 2 or higher requires QuickTime 6 0 or higher and the latest version of CarbonLib CPU PowerPC 266MHz or higher Memory 8MB minimum Hard Disk space 6MB minimum The classic system...

Страница 10: ...indows When multiple accounts have been setup in Windows 2000 or Windows XP log on with an account that has administrative rights before installing the software Installing the Image Processing Softwar...

Страница 11: ...In this case follow the instructions below to update Internet Explorer before installing the software 1 Cancel installation of ACDSee Click OK and then click Finish to exit the installation window 2 I...

Страница 12: ...layed country or region and then follow the instructions to register your product Thank you very much for your cooperation The panoramic image software ACD photostitcher the image layout and printing...

Страница 13: ...M S SW26 icon 4 Double click the Install ACDSee icon The PENTAX Software Installer screen appears Double click the Master Installer icon to display the PENTAX Software Installer screen 5 You can choos...

Страница 14: ...If the message CarbonLib xxxxx could not be found appears during installation You must add the extension file CarbonLib to the Extension folder in the System folder in order to install the provided s...

Страница 15: ...Connection Manual A world map for Internet Product Registration is displayed If your PC is connected to the Internet click the displayed country or region and then follow the instructions to register...

Страница 16: ...the OK button Setting Up Your Digital Camera Setting the USB Connection Mode to PC Do not connect the camera to your PC while PictBridge is selected for the USB Connection mode If you connect the came...

Страница 17: ...annot be identified Turn off the camera and remove the USB cable from your Macintosh computer MacOS 10 2 Nothing is displayed on the camera and your Macintosh computer Turn off the camera and remove t...

Страница 18: ...nd connect it to the PC with the USB cable Confirm that the SD Memory Card is inserted in the camera when copying the images in the SD Memory Card 3 Turn your camera on The Device Detector screen appe...

Страница 19: ...s connected to your computer in PictBridge USB Connection mode the digital camera will not be properly recognized as a storage device In that case disconnect the USB cable from your camera and PC foll...

Страница 20: ...er The first time ACDSee for PENTAX is run Components missing ACDSee has detected that you do not have the following software installed on your computer Ghostscript 7 0 or later may appear If you will...

Страница 21: ...digit number 9 Select Copy To from the Edit menu The Copy Files screen appears If the SD Memory Card has a volume label the volume label name appears instead of untitled A new unformatted SD Memory Ca...

Страница 22: ...20 10 Click More and select the destination folder 11 Click OK The image is copied to the PC e_00_pc_kb353 book Page 20 Tuesday August 10 2004 1 56 PM...

Страница 23: ...USB Mass Storage Device and click Stop The Stop a Hardware device screen appears 3 Select USB Mass Storage Device and click OK A message appears indicating that the hardware can be safety removed 4 Di...

Страница 24: ...appears indicating that the hardware can be safely removed 4 Click OK 5 Disconnect the camera from your PC If the camera removable disk is being used by an application such as ACDSee for PENTAX the ca...

Страница 25: ...S X on the desktop The drive name can be changed Transferring Images to a Macintosh Connecting the Camera and Macintosh If the SD Memory Card has a volume label the volume label name appears instead o...

Страница 26: ...directly displayed on the Macintosh from a camera connected to the Macintosh For information on how to directly view the camera images see p 32 To edit images first transfer them to your Macintosh Di...

Страница 27: ...CDSee for PENTAX folder on the desktop 2 Double click the ACDSee for PENTAX program icon ACDSee for PENTAX starts and an image list Browser appears Select Exit from the File menu in the Browser or the...

Страница 28: ...ration of functions within the Browser c Menu bar You can select and execute the various functions and settings of ACDSee for PENTAX by selecting the menu items from the menu bar d Browser toolbar Bro...

Страница 29: ...ve or delete items select what file types or folders to display in the File pane and sort your images You can customize the toolbar for easy use by turning the button labels on or off adding or removi...

Страница 30: ...d buttons e Navigation pane Navigation pane displays a folder tree of the folders on your computer external drive or peripheral device f Preview pane Preview pane displays the image selected in the Fi...

Страница 31: ...can change the file information that is displayed 1p 31 Thumbnails Displays image file thumbnails Large Icons Displays large icons and file names Small Icons Displays small icons and file names List D...

Страница 32: ...the numeric keypad on the keyboard Categories assigned to the numeric keypad 0 Extension 1 Name 2 Size 3 Type 4 Date 5 Image Properties 6 Description Forward Reverse Changing the Image List Order Clic...

Страница 33: ...rrow and drag the edge to adjust the row width To view images stored in other folders select a folder from the folder tree in the Navigation pane of the Browser or directly specify a folder in the pat...

Страница 34: ...in the File pane Directly enter in the path box the path of the folder containing images you want to view Images in that folder appear in the File pane Also click to the right of the path box to displ...

Страница 35: ...rations of functions within the Viewer c Menu bar You can select and execute the various functions and settings of ACDSee for PENTAX by selecting the menu items from the menu bar d Viewer toolbar View...

Страница 36: ...can select and execute the various functions and settings of ACDSee Media Window by selecting the menu items from the menu bar You can select the image size of the movie from the View menu When the V...

Страница 37: ...ently displayed frame of a movie to the clipboard Click Properties to display information of the movie or audio file being played back e Preview pane Preview pane displays and plays back movies f Oper...

Страница 38: ...ng software started from ACDSee for PENTAX To start ACD FotoCanvas select the image you want to edit in the File pane of the Browser and then select the Activities menu Edit Editor FotoCanvas You can...

Страница 39: ...enu to adjust the tool settings 2 Click or drag the mouse cursor over the image to paint or draw shapes or text You can use the color options on the upper right hand side of the window to select the p...

Страница 40: ...ith the background image Blend mode and the transparency opacity 4 Click outside of the dotted line of the pasted image The pasted image is attached to the original image This section introduces sever...

Страница 41: ...image look like a painting and create other interesting effects Images edited with ACD FotoCanvas can be saved with various image file formats 1 Select File menu Save As 2 In the Save Image As dialog...

Страница 42: ...ges After selecting the images select Extras from the Activities menu and select PhotoStitcher from the submenu The PhotoStitcher is not enabled if two or more images are not selected Panorama Image S...

Страница 43: ...ition has been adjusted click the STITCH button B 4 Select the stitching method You can choose from Big Plane or Cylinder for the stitching method Here you will create a flat panorama Click the Big Pl...

Страница 44: ...trimming position A After the position has been adjusted click the Trimming button B 6 Save the image After confirming the trimming click the Save button to save the image To cancel the trimming clic...

Страница 45: ...e layout palette in the Alignment window window 2 B 5 Set the stitching method Click the Stitching method button in the window 2 C to open the stitching settings window You can choose from Big Plane o...

Страница 46: ...image Click the Trim button in the Stitching result window to display the dotted lines around the image A Move the mouse pointer over the dotted lines It changes into a symbol Hold down the mouse butt...

Страница 47: ...45 10 Save the image Click the Save button in the Stitching result display window window 3 to save the image e_00_pc_kb353 book Page 45 Tuesday August 10 2004 1 56 PM...

Страница 48: ...e Start menu desktop icon or ACDSee for PENTAX 1 Select the ACDSee for PENTAX Activities menu Create ACD Showtime The ACD Showtime for PENTAX startup window appears When an image or movie file is sele...

Страница 49: ...ct The project currently opened in the Edit Show window closes If the project has not been saved a prompt appears asking if you want to save it With ACD Showtime for PENTAX you can add video images an...

Страница 50: ...iles can be rearranged is called the Timeline 2 Drag and drop video and images and rearrange them When loading an audio track you can drag the audio track to the point in the Timeline where you want t...

Страница 51: ...ime 1 Select the video to edit The Video menu appears on the left sidebar of the Edit Show window 2 Select Effects or Trim from the Video menu Select Effects to create various special effects and imag...

Страница 52: ...dit function You can select from the following editing functions in the Image menu Rotate Flip Rotates the image 90 degrees or flips the image vertically or horizontally Crop Cut an area of the image...

Страница 53: ...ut These effects are called transitions 1 Click the Toggle View Mode button The timeline changes to the display shown on the right 2 Select a transition Click and select a Transition The Transition me...

Страница 54: ...sting the slider The actual transition effect and duration can be previewed by clicking the Preview button to play back the show You can adjust the playback time and the volume balance of music and ot...

Страница 55: ...dow Click the Play button to preview the adjusted starting time and playback time Synchronizing the music audio starting time with the movie or image starting time When there are multiple movies or im...

Страница 56: ...age that has the same starting point 1 Click the right mouse button on an audio track in the timeline 2 Select Trim to slide from the menu The playback time of music audio is shortened to synchronize...

Страница 57: ...together Make sure to save your project often The completed show can be saved as a digital video file with a format such as Windows Media Video AVI or MPEG 1 Saving a project 1 Click Save from the Pr...

Страница 58: ...on wmv as your computer may not be able to recognize the video file If you accidentally delete or change the file extension select the video file format from Format to automatically assign the appropr...

Страница 59: ...the printing options 4 Click Print You can create and print contact sheets thumbnails of your images You can add captions to each image page headers and footers and change the size of images 1 In the...

Страница 60: ...older as the currently viewed image The Print dialog box is displayed when either is selected 2 Select or change the printing options 3 Click Print You can insert the date into an image file and print...

Страница 61: ...d select the Activities menu Print FotoSlate The FotoSlate window appears 2 Click Add Page from the toolbar of the FotoSlate window 3 Select the template you want to use for the layout from the Add Pa...

Страница 62: ...be entered Double click this area to display the Enter Text window and then enter the text The font size text color and orientation can be selected 6 Print the image Click the Print button on the too...

Страница 63: ...es To select several images hold the Ctrl key on the keyboard while clicking on all the pictures you want to send 2 Select Share from the Activities menu then select E mail The Send E mail dialog box...

Страница 64: ...riend wants to play back a movie that you created on your computer Boot the video software and select the video file you want to play by selecting the File menu Open then begin playback Playing Your M...

Страница 65: ...lp menu if you have problems operating the software 1 Select Search Topics from the Help menu The Help window appears 2 Select the Contents Index or Search tab to search for the item you are looking f...

Страница 66: ...s displayed 2 Click Connect Now ACDInTouch is a service for sending information directly to ACDSee for PENTAX When you connect information is sent to you so that you can read up to date information di...

Страница 67: ...Memo e_00_pc_kb353 book Page 65 Tuesday August 10 2004 1 56 PM...

Страница 68: ...Cedex FRANCE PENTAX Benelux B V for Netherlands Spinveld 25 4815 HR Breda NETHERLANDS http www pentax nl for Belgium Luxembourg Weiveldlaan 3 5 1930 Zaventem BELGIUM http www pentax be PENTAX Schweiz...

Отзывы: