background image

176

Pl

ayb

ack F

u

n

cti
o

n

s an

d

 Im

ag

Ed
iti

n

g

6

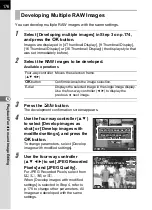
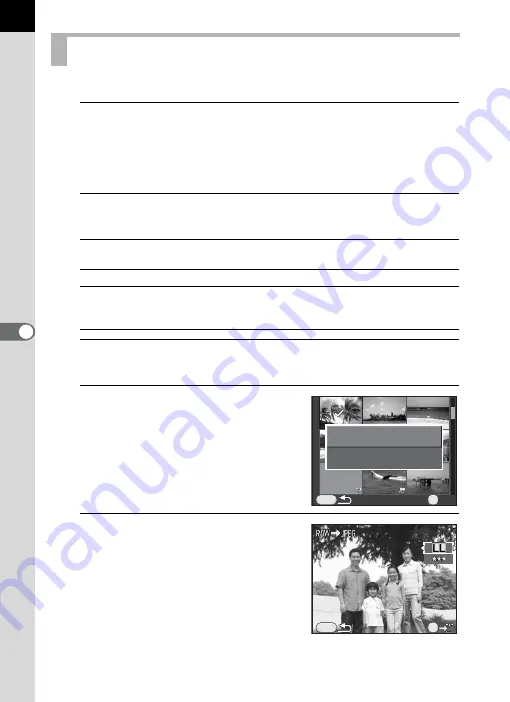
You can develop multiple RAW images with the same settings.

1

Select [Developing multiple images] in Step 3 on p.174, 
and press the 

4

 button.

Images are displayed in [4 Thumbnail Display], [9 Thumbnail Display], 
[16 Thumbnail Display] or [36 Thumbnail Display] (the display style that 
was set immediately before).

2

Select the RAW images to be developed.

Available operations

3

Press the 

m

/

c

 button.

The development confirmation screen appears.

4

Use the four-way controller (

23

to select [Develop images as 
shot] or [Develop images with 
modified settings], and press the 

4

 button.

To change parameters, select [Develop 
images with modified settings].

5

Use the four-way controller 
(

2345

) to set [JPEG Recorded 

Pixels] and [JPEG Quality].

For JPEG Recorded Pixels, select from 

W

X

Y

, or 

Z

.

When [Develop images with modified 
settings] is selected in Step 4, refer to 
p.175 to change other parameters. All 
images are developed with the same 
settings.

Developing Multiple RAW Images

Four-way controller 
(

2345

)

Moves the selection frame.

4

 button

Confirms/cancels the image selection.

E-dial

Displays the selected image in the single image display.
Use the four-way controller (

45

) to display the 

previous or next image.

MENU

OK

OK

Develop images as shot

Develop images as shot

Develop images with

Develop images with

modified settings

modified settings

OK

MENU

OK

JPEG Recorded Pixels

JPEG Recorded Pixels

Содержание K-01

Страница 1: ...ww pentax fr PENTAX RICOH IMAGING DEUTSCHLAND GmbH Julius Vosseler Strasse 104 22527 Hamburg GERMANY http www pentax de PENTAX RICOH IMAGING UK LTD PENTAX House Heron Drive Langley Slough Berks SL3 8PN U K http www pentax co uk PENTAX RICOH IMAGING AMERICAS CORPORATION 633 17th Street Suite 2600 Denver Colorado 80202 U S A http www pentaximaging com PENTAX RICOH IMAGING CANADA INC 1770 Argentia Ro...

Страница 2: ...ountries SDXC Logo is a trademark of SD 3C LLC This product includes DNG technology under license by Adobe Systems Incorporated The DNG logo is a either registered trademark or trademark of Adobe Systems Incorporated in the United States and or other countries HDMI the HDMI logo and High Definition Multimedia Interface are trademarks or registered trademarks of HDMI Licensing LLC in the United Sta...

Страница 3: ... Windows PC or a Macintosh hereafter In this manual the term battery ies refers to any type of batteries used for this camera and its accessories We have paid close attention to the safety of this camera When using this camera we request your special attention regarding items marked with the following symbols Warning Do not disassemble or modify the camera High voltage areas are present inside the...

Страница 4: ...can cause a fire electric shock or camera breakdown The specified voltage is 100 240V AC Do not disassemble or modify the product This can cause a fire or electrical shock If the generation of smoke or strange odor from the product or other abnormality occurs immediately discontinue using and consult a PENTAX Service Center Continued use can cause a fire or electrical shock If water should happen ...

Страница 5: ... to smoke Be careful not to burn yourself during removal Keep wires hairpins and other metal objects away from the and contacts of the battery Do not short the battery or dispose of the battery in fire This can cause an explosion or fire If any leakage from the battery should come in contact with skin or clothes it may cause irritation to the skin Wash the affected areas thoroughly with water Prec...

Страница 6: ...emperatures or high humidity Do not leave the camera in a vehicle as the temperature can get very high Do not subject the camera to strong vibrations shocks or pressure Use a cushion to protect the camera from vibrations of motorcycles automobiles or ships The temperature range for camera use is 0 C to 40 C 32 F to 104 F The monitor may appear black at high temperatures but will return to normal a...

Страница 7: ...d and the card from being formatted by the camera or computer The SD Memory Card may be hot when removing the card immediately after using the camera Do not remove the SD Memory Card or turn off the power while the card is being accessed This may cause the data to be lost or the card to be damaged Do not bend the SD Memory Card or subject it to violent impact Keep it away from water and store away...

Страница 8: ...Card you should ensure that the data on the card is completely deleted or the card itself is destroyed if it contains any personal or sensitive information The data on your SD Memory Card should be managed at your own risk Regarding Product Registration In order to better serve you we request that you complete the product registration which can be found on the CD ROM supplied with the camera or on...

Страница 9: ... the Direct Keys 31 Using the Control Panel 32 Using the Menus 33 Getting Started 37 Attaching the Strap 38 Inserting the Battery 39 Charging the Battery 39 Inserting Removing the Battery 40 Battery Level Indicator 41 Approximate Image Storage Capacity and Playback Time when Using a Fully Charged Battery 42 Using the AC Adapter Optional 42 Inserting Removing an SD Memory Card 45 Attaching a Lens 4...

Страница 10: ...u Items 69 Movie Menu Items 71 Custom Setting Menu Items 72 Selecting the Appropriate Capture Mode 74 Auto Picture Modes 75 Scene Modes 76 Exposure Modes 78 Setting the Exposure 79 Setting the Sensitivity 79 Changing the Exposure Mode 81 Adjusting the Exposure 84 Locking the Exposure Before Shooting AE Lock 87 Selecting the Metering Method 88 Reducing the Image Noise Noise Reduction 89 Focusing 92...

Страница 11: ...116 Interval Movie 119 Playing Back Movies 121 Editing Movies 123 Shooting Settings 125 Setting a File Format 126 Aspect Ratio 126 File Format 127 JPEG Recorded Pixels 128 JPEG Quality 129 Color Space 129 Setting the White Balance 130 Adjusting the White Balance Manually 132 Correcting Images 133 Brightness Adjustment 133 High Dynamic Range Image Capture 135 Lens Correction 138 Setting the Image F...

Страница 12: ...ages 162 Deleting Multiple Images 163 Deleting Selected Images 163 Deleting All Images 164 Processing Images 165 Changing the Number of Recorded Pixels Resize 165 Cutting Out Part of the Image Cropping 166 Processing Images with Digital Filters 167 Joining Multiple Images Index 172 Developing RAW Images 174 Developing One RAW Image 174 Developing Multiple RAW Images 176 Connecting the Camera to an...

Страница 13: ...Changing the Naming System for Folders 201 Creating New Folders 201 Setting the Photographer Information 202 Setting the DPOF Settings 204 Connecting to a Computer 207 Manipulating Captured Images on a Computer 208 Saving Images on a Computer 209 Setting the USB Connection Mode 209 Connecting the Camera and a Computer 210 Using the Provided Software 211 Installing the Software 211 Using the Flash ...

Страница 14: ... Settings 226 Functions Available with Various Lens Combinations 232 Setting the Focal Length 234 Using the Aperture Ring 235 Cleaning the CMOS Sensor 237 Removing Dust by Shaking the CMOS Sensor Dust Removal 237 Removing Dust with a Blower 238 Optional Accessories 240 Using the GPS Unit 244 Error Messages 245 Troubleshooting 247 Main Specifications 250 Index 256 WARRANTY POLICY 263 ...

Страница 15: ...s Explains procedures for changing the shooting settings such as the file format 6 Playback Functions and Image Editing Explains various operations for playing back and editing images 7 Changing Additional Settings Explains general camera settings and file management settings such as the monitor display settings and the image folder naming system 8 Connecting to a Computer Explains how to connect ...

Страница 16: ...symbols used in this Operating Manual are explained below 1 Indicates reference page numbers explaining a related operation Indicates useful information Indicates precautions to take when operating the camera ...

Страница 17: ...Your Camera Check the package contents and the names and functions of the working parts before use Checking the Contents of the Package 16 Names and Functions of the Working Parts 17 How to Change Function Settings 31 ...

Страница 18: ...t all accessories are included Hot shoe cover FK installed on camera Body mount cover installed on camera USB cable I USB7 Strap O ST120 Rechargeable lithium ion battery Battery charger D BC90 AC plug cord Software CD ROM S SW120 Operating Manual this manual Quick Guide Refer to p 240 for information on optional accessories D LI90 ...

Страница 19: ...OS sensor AF assist light Microphones Monitor Battery cover Hot shoe Card cover Strap lug Lens mount index red dot Lens information contacts Speaker Connection cable cover AF coupler Battery cover unlock switch Microphone input terminal Strap lug SD Memory Card slot Terminal cover HDMI output terminal Type C Built in flash PC AV output terminal ...

Страница 20: ...of each part is explained here but some parts have multiple functions and work differently depending on the selected setting 1 Shutter release button Press to capture images p 57 2 Main switch Move to turn the camera on and off p 49 3 Lens unlock button Press to detach a lens p 48 4 Mode dial Changes the capture mode p 74 8 9 0 a b c 4 7 5 2 6 1 3 d e f ...

Страница 21: ...on a L button You can select the function of this button either to focus on the target or to lock the exposure value p 87 p 96 p 152 b N button Switches to playback mode p 64 c M button Displays the control panel Press again to change the type of information displayed in standby mode p 22 d 4 button When the control panel or a menu screen is displayed press this button to confirm the selected item...

Страница 22: ...20 Before Using Your Camera 1 Here you can learn which parts are used and how they function when in playback mode Playback Mode 5 6 7 4 2 3 1 8 9 0 ...

Страница 23: ... captured image is JPEG and its data still remains in the buffer memory press this button to save the image in RAW format p 64 6 N button Switches to capture mode 7 M button Changes the type of information displayed in playback mode p 25 8 4 button Confirms the setting you selected in the menu or playback screen 9 Four way controller 2345 Use this to move the cursor or change the item to set in th...

Страница 24: ...formation Display Only the Live View image is displayed Press the shutter release button halfway to display the shutter speed aperture value sensitivity and number of recordable images Display Off Nothing is displayed on the monitor The shutter speed aperture value and sensitivity are displayed while the exposure is set with the e dial Not available when the mode dial is set to C Electronic Compas...

Страница 25: ...elected the display setting returns to Standard Information Display when the camera is turned off 1 Capture mode p 74 14 Number of shots during Interval Shooting or Multi exposure Exposure range during p mode 2 Flash Mode p 59 Recording Sound Level p 114 3 Drive Mode p 68 15 Interval Shooting p 108 Multi exposure p 111 4 White Balance p 130 5 Custom Image p 140 16 AF frame p 57 6 p mode p 137 HDR ...

Страница 26: ...orrection p 138 19 SD Memory Card status 9 Lateral Chromatic Aberration Adjustment p 138 20 Number of recordable still pictures movie recordable time 10 Highlight Correction p 133 21 Exposure Setting p 113 11 Shadow Correction p 134 22 Recording Sound Level p 114 12 Shake Reduction p 100 Movie SR p 114 23 Framerate p 114 Settings that cannot be changed due to the current camera setup cannot be sel...

Страница 27: ...rs are displayed Detailed Information Display Detailed information on how and when the image was taken is displayed in two pages p 26 Histogram Display The captured image and brightness histogram are displayed Not available during movie playback p 28 RGB Histogram Display The captured image and RGB histogram are displayed Not available during movie playback p 28 No Information Display Only the cap...

Страница 28: ...000 1 2000 F2 8 F2 8 G1A1 G1A1 50mm 50mm 1600 1600 02 02 2012 02 02 2012 100 0001 100 0001 1 5 1 5 0 0 0 0 0 0 0 0 0 0 10 30 10 30 AM AM 10 10 10 10 0 0 0 0 1 125 1 125 F8 0 F8 0 G1A1 G1A1 50mm 50mm 125 125 02 02 2012 02 02 2012 100 0001 100 0001 0 0 0 0 0 0 0 0 0 0 10 30 10 30 AM AM 1 2 3 4 5 6 7 8 9 10 11 12 13 29 30 14 15 16 17 20 19 18 21 22 23 24 25 26 27 28 32 31 02 02 2012 02 02 2012 N 36 4...

Страница 29: ...Flash Mode p 59 31 Color Space p 129 17 Flash Exposure Compensation p 61 32 Shooting date and time 33 Recording time 18 Sensitivity p 79 34 Recording Sound Level p 114 19 HDR Capture p 135 Multi exposure p 111 35 Framerate p 114 36 Lens direction 20 White Balance p 130 37 Photographer p 202 21 White Balance fine tuning p 131 38 Information tampering warning 22 File Format p 127 39 Copyright Holder...

Страница 30: ...ng 8 Sensitivity 3 Folder number File number 9 Histogram R 4 Save RAW Data 10 Histogram G 5 File Format 11 Histogram B 6 Shutter speed If Bright Dark Area p 156 of the Q Playback 1 menu is set to O On bright overexposed portions blink red while dark underexposed portions blink yellow This information is not displayed in Detailed Information Display or RGB Histogram Display 1 2000 1 2000 F2 8 F2 8 ...

Страница 31: ...sed or underexposed areas the graph peaks in the middle If the image is underexposed the peak is on the left side and if it is overexposed the peak is on the right side When the image is underexposed the part to the left is cut off underexposed portions with no detail and when the image is overexposed the part to the right is cut off overexposed portions with no detail This camera can be set so th...

Страница 32: ...n the monitor may flicker You can cut down on flicker by setting the power frequency in Flicker Reduction p 184 of the R Set up 1 menu to that used in your region If the camera position is changed rapidly during shooting the image may not be displayed with the appropriate brightness Wait for the display to become stable before shooting Noise may appear on the monitor image when used in dark locati...

Страница 33: ...y White Balance Flash Mode and Drive Mode by pressing the four way controller 2345 p 68 Below how to set Flash Mode is explained as an example 1 Press the four way controller 4 in standby mode The Flash Mode setting screen appears 2 Use the four way controller 45 to select a flash mode 3 Press the 4 button The camera is ready to take a picture Using the Direct Keys Cancel Cancel MENU Auto Flash Di...

Страница 34: ...tandby mode The control panel appears 2 Use the four way controller 2345 to select an item you want to change the setting for You cannot select items that cannot be changed as a result of current camera settings 3 Press the 4 button The setup screen of the selected item appears Using the Control Panel Custom Image Custom Image Bright Bright 65535 65535 JPEG Quality JPEG Quality 37 37 ...

Страница 35: ...he A Rec Mode 2 menu is explained as an example 1 Press the 3 button in standby mode The A Rec Mode 1 menu appears on the monitor The menus listed below are displayed in the following situations You can also change the setting by turning the e dial after selecting the item you want to change in Step 2 Recording Sound Level for C mode can only be set using this operation Detailed settings such as f...

Страница 36: ...tering AE Metering Lens Correction Lens Correction MENU 1 2 3 HDR Capture HDR Capture Exit Exit Multi exposure Multi exposure Interval Shooting Interval Shooting D Range Setting D Range Setting High ISO NR High ISO NR Slow Shutter Speed NR Slow Shutter Speed NR MENU 1 2 3 Shake Reduction Shake Reduction Input Focal Length Input Focal Length Exit Exit MENU 1 2 3 Exit Exit Multi exposure Multi expos...

Страница 37: ... 3 button and close the menu screen your settings will not be saved if the camera is turned off improperly such as by removing the battery while the camera is on You can select either to display the menu tab selected the last time first or to always display the A Rec Mode 1 menu first p 193 Refer to the following pages for details on each menu A Rec Mode menu 1 p 69 C Movie menu 1p 71 Q Playback m...

Страница 38: ...Memo 36 ...

Страница 39: ...s from purchasing the camera to taking pictures Be sure to read this and follow the instructions Attaching the Strap 38 Inserting the Battery 39 Inserting Removing an SD Memory Card 45 Attaching a Lens 47 Turning the Camera On and Off 49 Initial Settings 50 ...

Страница 40: ... Getting Started 2 Attaching the Strap 1 Pass the end of the strap through the strap lug then secure it on the inside of the clasp 2 Attach the other end of the strap in the same manner as described above ...

Страница 41: ...e the battery Note AC plug cord Listed Type SPT 2 or NISPT 2 18 2 flexible cord rated 125 V 7A minimum 6ft 1 8m 1 Connect the AC plug cord to the battery charger 2 Plug the AC plug cord into the power outlet 3 Face the 2 mark on the battery up and insert the battery into the battery charger The indicator lamp lights up when charging and turns off when the battery is fully charged Charging the Batt...

Страница 42: ...m charging time is approximately 320 minutes depends on temperature and remaining battery power Charge in a location where the temperature is between 0 C and 40 C Inserting Removing the Battery Insert the battery correctly If the battery is inserted incorrectly it may not be removed Wipe the electrodes of the battery with a soft dry cloth before inserting Do not open the battery cover or remove th...

Страница 43: ...lowing symbols displayed on the monitor Battery Level Indicator Monitor Display Battery Level w green Battery is full x green Battery is close to full y yellow Battery is running low z red Battery is almost empty Battery depleted The camera turns off after displaying the message y or z red may appear even when the battery level is sufficient if the camera is used at low temperatures or for a long ...

Страница 44: ...r Refer to Step 1 on p 40 Remove the battery if it is inserted in the camera Approximate Image Storage Capacity and Playback Time when Using a Fully Charged Battery Battery Temperature Normal Shooting Flash Photography Playback Time 50 Use 100 Use D LI90 23 C 540 images 500 images 440 images 320 minutes 0 C 480 images 450 images 410 images 300 minutes Battery performance temporarily decreases as t...

Страница 45: ... the battery chamber until it locks into place To remove the DC coupler push the battery lock switch 2 in the direction of the arrow 4 Close the battery cover The connection cable is pulled out from the connection cable cover section 5 Connect the DC coupler and the AC adapter 6 Connect the AC adapter to the AC plug cord 2 1 ...

Страница 46: ...er supply is lost while the card is being accessed While the AC adapter is in use the connection cable is pulled out from the bottom side of the camera so remember that you cannot stand the camera upright on a table etc After removing the DC coupler return the connection cable cover to its original location When the AC adapter is connected to the camera W is displayed as the battery level Be sure ...

Страница 47: ...f the arrow 3 Open the card cover in the direction of the arrow Do not remove the SD Memory Card while the card access lamp is lit Do not open the terminal cover and card cover while the camera is in use Use this camera to format initialize an SD Memory Card that is unused or has been used on other devices Refer to Formatting an SD Memory Card p 199 for details on formatting Use a high speed memor...

Страница 48: ...or Push the SD Memory Card in once to remove 5 Close the card cover and the terminal cover 1 2 Close both covers properly For details on the approximate number of still pictures and the amount of time of movies that can be recorded on an SD Memory Card refer to Approximate Image Storage Capacity p 255 1 2 ...

Страница 49: ...cover and lens cap to the lens after removing the lens from the camera Do not insert any fingers into the camera mount or touch the shutter or CMOS sensor The camera body and lens mount incorporate lens information contacts Dirt dust or corrosion on the contacts may damage the electrical system Please contact a PENTAX Service Center for professional cleaning Some functions will be restricted when ...

Страница 50: ...to make sure that the lens is locked in place 4 Remove the front lens cap To remove the lens Attach the lens cap first and then turn the lens counterclockwise while holding down the lens unlock button 4 Do not remove the lens while the power is on The body mount cover 1 is for preventing scratches and blocking dust when shipped Body Mount Cap K is sold separately and has a lock function 3 4 ...

Страница 51: ... set period of time Auto Power Off To reactivate the camera turn it on again or perform any of the following operations Press the shutter release button halfway Press the 3 button or M button Auto Power Off is set to 1min by default You can change the setting in Auto Power Off of the R Set up 2 menu p 194 To turn the camera on in playback mode turn the main switch to ON while holding down the N bu...

Страница 52: ...ssages etc are displayed 1 Use the four way controller 2345 to select the desired language and press the 4 button The Initial Setting screen appears in the selected language Proceed to Step 6 if W Hometown does not have to be changed 2 Press the four way controller 3 to move the frame to W and press the four way controller 5 The W Hometown screen appears Setting the Display Language Cancel Cancel ...

Страница 53: ...amera returns to the Initial Setting screen 6 Press the four way controller 3 to select Settings complete and press the 4 button The Date Adjustment screen appears If the hometown and the date and time are not set the Initial Setting screen or Date Adjustment screen will be displayed again the next time the camera is turned on Hometown Hometown DST DST New York New York Cancel Cancel MENU OK OK OK...

Страница 54: ...e date format is set to mm dd yy 5 Use the four way controller 23 to set the month Set the day and year in the same manner Next set the time If you select 12h in Step 2 the camera switches between am and pm depending on the time Setting the Date and Time Cancel Cancel MENU Date Adjustment Date Adjustment Date Format Date Format Date Date Time Time mm dd yy mm dd yy 24h 24h 01 01 2012 01 01 2012 00...

Страница 55: ... is turned off before the date and time settings are complete the Date Adjustment screen will appear the next time you turn the camera on You can set the date and time from the menu later p 187 When you press the 4 button in Step 6 the seconds value is set to 0 To set the exact time press the 4 button when the time signal on the TV radio etc reaches 0 seconds You can change the language and date a...

Страница 56: ...Memo 54 ...

Страница 57: ...g the mode dial to n Auto Picture to have the camera select the optimum settings based on the subject For information about advanced functions and settings for taking pictures refer to chapter 4 and onward Basic Shooting Operation 56 Using the Built in Flash 59 Reviewing Images 64 ...

Страница 58: ... explains how to take pictures by simply pressing the shutter release button 1 Set the mode dial to n The capture mode is set to n mode 1Selecting the Appropriate Capture Mode p 74 2 Set the focus mode switch to The focus mode changes to the autofocus mode 1Setting the Focus Mode p 92 Letting the Camera Choose the Optimal Settings ...

Страница 59: ...cro Moving Object Night Scene Portrait K Sunset d Blue Sky or x Forest p 75 The built in flash pops up automatically when necessary 5 Press the shutter release button fully The picture is taken This action is referred to as releasing the shutter or release 6 Review the captured image on the monitor The image appears for 1 second on the monitor shortly after it is captured Instant Review 1Setting t...

Страница 60: ... p 95 The beep that sounds when the image is focused can be turned off p 186 You can set the camera so that it automatically focuses when the L button is pressed p 96 You can preview the image on the monitor and check the depth of field before shooting p 99 Power Zoom functions Image Size Tracking Zoom Clip and Auto Zoom Effect are not compatible with this camera ...

Страница 61: ... the Flash p 215 Setting the Flash Mode Flash Mode Function C Auto Flash Discharge Automatically measures the ambient light and determines whether to use the flash i Auto Flash Red eye Reduction Discharges a pre flash for red eye reduction before the automatic flash E Manual Flash Discharge Discharges the flash manually Discharges when the flash is popped up and does not discharge when it is retra...

Страница 62: ... mode and press the 4 button The camera is ready to take a picture Capture Mode Selectable Flash Mode n H C i E F e c E F G H I b a p E F k The flash does not discharge in the following capture modes p a or C mode K Sunset or d Blue Sky of n mode K Sunset d Blue Sky A Night Scene Z Night Scene HDR y Backlight Silhouette U Candlelight n Stage Lighting or E Museum of H mode A red E blinks while the ...

Страница 63: ...teps Selectable Flash Compensation Value 1 3 EV 2 0 1 7 1 3 1 0 0 7 0 3 0 0 0 3 0 7 1 0 1 2 EV 2 0 1 5 1 0 0 5 0 0 0 5 1 0 When the flash output exceeds its maximum amount the compensation will not be effective even if the compensation value is set to the plus side Compensating to the minus side may have no effect if the subject is too close the aperture is set to a large opening or the set sensit...

Страница 64: ...e that the camera selects When E or F is selected the built in flash pops up and begins charging If the camera determines that the flash is not necessary the flash mode icon will not be shown 3 Press the shutter release button fully The picture is taken 4 Push down on the top of the flash in the direction indicated in the illustration to retract the built in flash Shooting with Auto Flash The auto...

Страница 65: ...charges and the picture is taken 4 Push down on the top of the flash in the direction indicated in the illustration to retract the built in flash Shooting with Manual Flash When the mode dial is set to a Flash Off the built in flash will not pop up even if the K i button is pressed By default you cannot take pictures while the built in flash is being charged If you want to take pictures while char...

Страница 66: ...ctions and Image Editing p 153 for details on the playback functions When the file format of the last captured image is JPEG and its RAW data still remains in the buffer memory you can save the RAW image by pressing the m c button during Instant Review or playback if Save RAW Data is set to O On in Instant Review of the A Rec Mode 3 menu p 191 If the image was captured using any of the following s...

Страница 67: ...controller 2 to select Delete 4 Press the 4 button The image is deleted Deleting a Single Image Deleted images cannot be restored Protected images cannot be deleted p 200 You can delete multiple images at once Refer to Deleting Multiple Images p 163 for details For the images captured with File Format p 127 set to RAW you can select the file format to delete in Step 3 Delete Delete 100 0001 100 00...

Страница 68: ...Memo 66 ...

Страница 69: ...ilable with this camera How to Operate the Shooting Functions 68 Selecting the Appropriate Capture Mode 74 Setting the Exposure 79 Focusing 92 Checking the Depth of Field Preview 99 Using the Shake Reduction Function to Prevent Camera Shake 100 Taking Pictures Continuously 106 Recording Movies 113 ...

Страница 70: ... items For details on how to use the menus refer to Using the Menus p 33 Direct Keys Setting Items Key Item Function Page 2 Sensitivity Sets the ISO sensitivity p 79 3 White Balance Adjusts the color balance to match the type of the light source illuminating the subject p 130 4 Flash Mode Sets the method of flash discharge p 59 5 Drive Mode Selects Single Frame Shooting Continuous Shooting Self ti...

Страница 71: ...ecorded Pixels 1 Sets the recording size of images saved in JPEG format JPEG Quality 1 Sets the quality of images saved in JPEG format Color Space Sets the color space to use AE Metering 1 Selects the part of the sensor to use for measuring brightness and determining exposure p 88 AF MF Settings Autofocus Method 1 Selects the autofocus method in mode p 93 AF Autozoom Automatically magnifies the mo...

Страница 72: ...igh ISO sensitivity p 89 Slow Shutter Speed NR Sets the Noise Reduction setting when shooting with a slow shutter speed p 91 Shake Reduction 1 Activates the Shake Reduction function p 100 Input Focal Length Sets the focal length when using a lens for which focal length information cannot be obtained p 234 A3 Live View Sets the Live View display settings p 190 Instant Review Sets the Instant Review...

Страница 73: ...ts the movie exposure mode from e c or a mode p 113 Movie Capture Settings Recorded Pixels 1 Sets the number of recorded pixels and size of the movie Framerate 1 Sets the number of frames shot per second Quality Level 1 Sets the quality level of the movie Recording Sound Level 1 Sets the microphone sensitivity Movie SR 1 Activates the Shake Reduction function Interval Movie Takes still pictures at...

Страница 74: ...oting p 85 7 Bulb B Mode Options Sets the operation when pressing the shutter release button in p mode p 83 A2 8 WB When Using Flash Sets the white balance setting when using flash p 131 9 AWB in Tungsten Light Sets whether to adjust the tungsten light color tone when the white balance is set to F Auto White Balance 10 AF Release Options Sets the action priority for when the shutter release button...

Страница 75: ... during standby mode as well p 101 16 Using Aperture Ring Sets whether to enable shutter release when the lens aperture ring is set to a position other than s p 235 Reset Custom Functions Resets all the settings in the A Custom Setting 1 3 menus to the defaults p 197 Menu Item Function Page ...

Страница 76: ...ode dial to the dial indicator Capture Mode Characteristics Page n Auto Picture mode Automatically selects the optimal capture mode for the subject p 75 H Scene mode Lets you choose the capture mode from various scene styles p 76 p mode Captures 3 images to generate a single HDR image and provides a wider dynamic range p 137 a Flash Off mode Deactivates the flash Exposure modes e b c a p Changes t...

Страница 77: ...olor image b Macro For capturing tiny objects at close focus range like flowers coins jewelry and more Moving Object For capturing images of fast moving subjects such as at sporting events Night Scene Portrait For capturing images of people in low light conditions such as dusk or at night Even though the flash is used the camera will use slow shutter speeds so the background areas beyond the flash...

Страница 78: ...the picture Slow speed Sync p 216 To prevent camera shake either set Shake Reduction p 100 to Q On or mount the camera on a tripod K Sunset For capturing sunrises or sunsets in beautiful vivid color d Blue Sky For capturing images of blue sky Produces a more impressive deep blue x Forest Enhances colors of trees and sunbeams through foliage and produces a vivid color image A Night Scene Used for s...

Страница 79: ... shake either set Shake Reduction p 100 to Q On or mount the camera on a tripod Selecting a Scene Mode To change the scene mode press the M button and select Scene Mode in the control panel When the 3 button is pressed while the mode dial is set to H the item Scene Mode appears on the A Rec Mode 1 menu Press the four way controller 5 to display the Scene Mode selection screen and you can select a ...

Страница 80: ...e according to the program line p 81 b Shutter Priority Automatic Exposure Lets you set the desired shutter speed for expressing subject movement c Aperture Priority Automatic Exposure Lets you set the desired aperture value for controlling the depth of field a Manual Exposure Lets you set the shutter speed and aperture value to match your photographic vision p Bulb Exposure Lets you capture image...

Страница 81: ...tting is ISO AUTO 1 Press the four way controller 2 in standby mode The Sensitivity setting screen appears 2 Use the four way controller 23 to select ISO AUTO or ISO 3 Use the e dial to change the sensitivity value 4 Press the 4 button The camera is ready to take a picture Setting the Sensitivity ISO AUTO Sets the range to be adjusted automatically ISO Sets the fixed value Cancel Cancel MENU OK OK...

Страница 82: ... appear in captured images if a higher sensitivity is set You can reduce image noise by using Noise Reduction Set in High ISO NR p 70 of the A Rec Mode 2 menu You can select whether to set the sensitivity in increments of 1 EV or in accordance with the EV step setting for exposure p 84 This can be set in 2 Sensitivity Steps p 72 of the A Custom Setting 1 menu The sensitivity range can be expanded ...

Страница 83: ...re Priority Automatic Exposure mode and the sensitivity is automatically set so that a proper exposure is obtained from the set shutter speed and aperture value When the sensitivity is set to a fixed value images are captured with the set sensitivity 1 Set the mode dial to e b c a or p 2 Turn the e dial to adjust the value Changing the Exposure Mode Exposure Mode Change Shutter Speed Change Apertu...

Страница 84: ...e 3 menu p 150 b a L Shutter speed c p Aperture value The proper exposure may not be obtained with the selected shutter speed and aperture value when the sensitivity is set to a fixed value p 79 In a mode the difference from the proper exposure is displayed in a bar scale while the shutter speed or aperture value is adjusted The exposure value blinks red when the difference from the proper exposur...

Страница 85: ...hooting HDR Capture Shake Reduction To operate the shutter release button in p mode set in 7 Bulb B Mode Options p 72 of the A Custom Setting 1 menu More noise may appear in captured images if a slower shutter speed is set You can reduce image noise by using Noise Reduction Set in Slow Shutter Speed NR of the A Rec Mode 2 menu p 91 Use a tripod to prevent camera shake during Bulb shooting We recom...

Страница 86: ...ed The EV bar scale and the compensation value are displayed on the monitor during adjustment Available operations Adjusting the Exposure EV Steps Exposure Compensation Value 1 3 EV 0 3 0 7 1 0 1 3 1 7 2 0 2 3 2 7 3 0 1 2 EV 0 5 1 0 1 5 2 0 2 5 3 0 m c button Starts ends selecting the compensation value d G button Resets the compensation value EV Compensation is not available in a or p mode The se...

Страница 87: ...screen appears 2 Use the four way controller 45 to select l Changing the Exposure Automatically when Shooting Exposure Bracketing Standard exposure Underexposure Overexposure 1 0 Standard Underexposed Overexposed default setting 2 0 Underexposed Standard Overexposed 3 0 Overexposed Standard Underexposed 4 0 Standard Overexposed Underexposed Exposure Bracketing is not available in the following sit...

Страница 88: ...ion value when taking underexposed or overexposed images d G button Resets the compensation value The focus position is locked with the first image and is used for subsequent images Select 9 Single Frame Shooting in the Drive Mode setting screen to cancel Exposure Bracketing The setting is canceled automatically when the camera is turned off if Drive Mode is set to P Off in Memory of the A Rec Mod...

Страница 89: ...ode If you want to also lock the exposure when the focus is locked set 4 AE L with AF Locked p 72 of the A Custom Setting 1 menu to On When the shutter speed or aperture value is changed while AE Lock is engaged in a Manual mode the combination of shutter speed and aperture value changes while the exposure remains the same For example when the shutter speed is 1 125 sec and aperture value is F4 an...

Страница 90: ...ts exposure M Center weighted Metering is weighted at the center of the sensor The sensitivity increases at the center and no automatic adjustment is performed even during backlit scenes N Spot The brightness is measured only within a limited area at the center of the sensor You can use this in combination with the AE Lock function p 87 when a subject is too small to obtain a correct exposure You ...

Страница 91: ...four way controller 5 and use the four way controller 23 to select a setting Reducing the Image Noise Noise Reduction Pictures cannot be taken while Noise Reduction is being processed In particular if you use Slow Shutter Speed NR it may take more time to process High ISO NR Auto Applies Noise Reduction at optimally calculated levels throughout ISO range default setting Low Medium High Applies Noi...

Страница 92: ... set the level of noise reduction which is applied to the selected sensitivity The sensitivity values displayed vary according to the 1 EV Steps and 2 Sensitivity Steps p 72 settings made in the A Custom Setting 1 menu Available operations 6 Press the 3 button The screen that was displayed in Step 2 appears again 7 Press the 3 button twice The camera is ready to take a picture E dial Switches betw...

Страница 93: ...ines conditions such as shutter speed sensitivity and internal temperature and automatically applies Noise Reduction as necessary default setting On Applies Noise Reduction when the shutter speed exceeds 1 second Off Does not apply Noise Reduction 1 2 3 Multi exposure Multi exposure Interval Shooting Interval Shooting D Range Setting D Range Setting High ISO NR High ISO NR Slow Shutter Speed NR Sl...

Страница 94: ... how to take pictures in mode Setting the Focus Mode Autofocus The camera automatically focuses on the subject when the shutter release button is pressed halfway Manual focus The focus can be adjusted manually In mode when the subject is in a dark location the AF assist light is used when the shutter release button is pressed halfway If you do not want to use the AF assist light set AF Assist Ligh...

Страница 95: ...acking Tracks the subject in focus when the shutter release button is pressed halfway G Select Focuses on a desired area The sensor is divided into 100 areas 10 horizontal by 10 vertical and you can select a wider or narrower focusing area by using 4 16 or 36 of those 100 areas available p 94 H Spot Focuses on a limited area at the center You can also change the setting from Autofocus Method p 69 ...

Страница 96: ...broken lines and a white rectangle appears on it You can set the AF area by changing the position and size of this rectangle 4 Select the AF area Available operations 5 Press the 4 button or the shutter release button halfway The AF area is set Selecting the Desired Focusing Area Four way controller 2345 Changes the position of the AF area E dial Changes the size of the AF area d G button Returns ...

Страница 97: ... image on the monitor is magnified centering around the AF point 3 Use the e dial to change the magnification Magnification can be selected from 2 to 6 times 4 Press the 4 button or stop pressing the shutter release button halfway The camera returns to standby mode Checking the Focus When AF Autozoom is set to O On in AF MF Settings of the A Rec Mode 1 menu the camera automatically magnifies the i...

Страница 98: ...on halfway 1 Assign Enable AF1 or Enable AF2 to the L button Refer to Setting the L Button Operation p 152 for details By default autofocus can be performed by either pressing the shutter release button halfway or using the L button 2 While viewing the subject on the monitor press the L button The autofocus system operates Focusing Using the L Button ...

Страница 99: ...od to H 2 Frame the desired composition for your picture on the monitor 3 Center the subject to focus on the monitor and press the shutter release button halfway The AF frame turns green when focused The focus is locked while the AF frame is green 4 Recompose the picture while keeping the shutter release button pressed halfway Locking the Focus Focus Lock Turning the zoom ring with the focus locke...

Страница 100: ...erations 4 Press the 4 button or the shutter release button halfway The camera returns to standby mode Adjusting the Focus Manually Manual Focus Four way controller 2345 Moves the display area d G button Changes the display area to the center When Focus Peaking is enabled in AF MF Settings of the A Rec Mode 1 menu the outline of the subject in focus is emphasized and makes it easier to check the f...

Страница 101: ...o buttons Refer to Setting the d Button Operation p 147 for details 2 View the subject on the monitor and press the shutter release button halfway The autofocus system operates 3 Press the d G R button Press the button that you assigned Preview to in Step 1 You can check the depth of field on the monitor while the button is pressed 4 Take your finger off the d G R button Preview is ended and the c...

Страница 102: ...uction Function The Shake Reduction function does not compensate for blurring caused by subject movement To take pictures of a moving subject increase the shutter speed The Shake Reduction function may not fully reduce camera shake when taking close up shots In this case it is recommended to deactivate the Shake Reduction function and use the camera with a tripod The Shake Reduction function will ...

Страница 103: ...trol shooting when p mode is set when HDR Capture is set and Auto Align is set to P Off Shake Reduction is fixed to Q in Z Night Scene HDR of H mode You can select whether to use the Shake Reduction function only when taking pictures or during standby mode as well with 15 Shake Reduction Options p 73 from the A Custom Setting 3 menu To extend the battery life set this to not operate during standby...

Страница 104: ... shutter release button halfway The autofocus system operates Shooting with the Self timer g Self timer 12 sec The shutter is released after about 12 seconds Use this mode to include the photographer in the picture Z Self timer 2 sec The shutter is released about 2 seconds after the shutter release button is pressed Use this mode to avoid camera shake when the shutter release button is pressed Sho...

Страница 105: ... release button is pressed fully For Z the shutter will be released about 2 seconds after the shutter release button is pressed fully Select 9 Single Frame Shooting in the Drive Mode setting screen to cancel shooting with the self timer The setting is canceled automatically when the camera is turned off if Drive Mode is set to P Off in Memory of the A Rec Mode 3 menu p 195 The Shake Reduction func...

Страница 106: ...ink and the camera is in a standby status 5 Press the shutter release button halfway The autofocus system operates Shooting with a Remote Control Unit Optional h Remote Control The shutter is released immediately after the shutter release button on the remote control unit is pressed i Remote Control 3 sec delay The shutter is released about 3 seconds after the shutter release button on the remote ...

Страница 107: ...ontrol p 72 is set to On in the A Custom Setting 2 menu you can use the remote control unit to adjust the focus Select 9 Single Frame Shooting in the Drive Mode setting screen to cancel shooting with a remote control unit The setting is canceled automatically when the camera is turned off if Drive Mode is set to P Off in Memory of the A Rec Mode 3 menu p 195 The Shake Reduction function is fixed t...

Страница 108: ...tton halfway The autofocus system operates Continuous Shooting g Continuous Shooting Hi Up to approximately 6 frames per second can be taken continuously for JPEG images Not available when the file format is set to RAW or RAW h Continuous Shooting Lo Up to approximately 3 frames per second can be taken continuously for JPEG images Continuous Shooting is not available in the following situations wh...

Страница 109: ...f the file format is changed to RAW or RAW while g is selected the shooting mode is temporarily changed to h The shutter cannot be released until charging is complete when using the built in flash Set 12 Release While Charging to On in the A Custom Setting 2 menu to enable shutter release before the built in flash is ready p 63 Select 9 Single Frame Shooting in the Drive Mode setting screen to can...

Страница 110: ...ken Press the 4 button to complete the setting Interval Shooting Interval Set the time interval between shots from 1 second to 24 hours Number of Shots Set from 2 to 999 The number of images that can be set varies depending on the shooting conditions such as the amount of available space on the SD Memory Card Start Interval Select whether to take the first picture now or at a set time Selecting No...

Страница 111: ...tton The camera is ready to take a series of interval pictures 11 Press the shutter release button halfway The autofocus system operates The focus during Interval Shooting is locked at this position 12 Press the shutter release button fully When Start Interval is set to Now the first picture is taken When set to Set Time shooting starts at the set time For shooting multiple pictures pictures are t...

Страница 112: ...hot taken is displayed on the monitor with Instant Review they cannot be magnified deleted or saved in RAW format The monitor turns off during the intervals between shots If the Auto Power Off function turns the camera off before starting Interval Shooting the camera automatically turns on again when the shooting time approaches When using Interval Shooting use the AC Adapter kit K AC1202 optional...

Страница 113: ...ustment and use the four way controller 45 to select O On or P Off When set to O the exposure is adjusted according to the number of shots 5 Use the four way controller 23 to select Start shooting and press the 4 button The camera is ready to take a series of pictures Multi exposure Multi exposure is not available in the following situations when Z Night Scene HDR of H mode p mode or C mode is set...

Страница 114: ...he shutter release button is pressed Press the K i button during Instant Review to discard pictures taken up to that point and take pictures again from the first frame To cancel shooting press the 3 button The picture is saved when the set number of shots are taken and then the screen in Step 3 appears again ...

Страница 115: ...23 to select Exposure Setting and press the four way controller 5 3 Use the four way controller 23 to select e c or a and press the 4 button 4 Use the four way controller 23 to select Movie Capture Settings and press the four way controller 5 The Movie Capture Settings screen appears Changing the Settings for Movie Recording e Sets the exposure automatically Allows you to adjust the EV compensatio...

Страница 116: ...al Microphone or External Microphone and use the four way controller 45 to select the recording sound level The sound level for recording can be set in the range from 0 to 5 for Internal Microphone and from 0 to 10 for External Microphone Sound is not recorded when l 0 is selected 11 Use the four way controller 23 to select Movie SR and press the four way controller 5 12 Use the four way controlle...

Страница 117: ...he microphone plug to the microphone input terminal 3 Turn the camera on The settings described in this section can also be set through the control panel Connecting a Microphone The following specifications are recommended for external microphones Plug Stereo mini plug 3 5mm Type Stereo electret condenser Power supply Plug in power system operating voltage of 2 0V or less Impedance 2 2kΩ Note that...

Страница 118: ...he top right of the screen blinks during movie recording 5 Press the shutter release button again Movie recording stops Recording Movies E dial Exposure Setting c Adjusts the aperture value Exposure Setting a Adjusts the shutter speed m c button E dial Exposure Setting e c Adjusts the EV compensation value Exposure Setting a Adjusts the aperture value Four way controller 2 Exposure Setting a Adjus...

Страница 119: ...ode setting recording starts when the shutter release button is pressed fully even if the subject is not in focus You can record a movie continuously up to 4 GB or 25 minutes When the SD Memory Card is full recording stops and the movie is saved The screen display in C mode is set according to the Live View setting made in the A Rec Mode 3 menu p 190 You can set the L button operation in C mode Re...

Страница 120: ...ing is Movie Recording 2 View the subject on the monitor 3 Press the shutter release button halfway The autofocus system operates 4 Press the d R button Movie recording starts 5 Press the d R button again Movie recording stops Recording Movies Using the d Button Exposure Setting is fixed to e HDR Capture and Digital Filter are not available during movie recording In standby mode during Interval Sh...

Страница 121: ... Interval Movie Interval Set the shooting interval to 1 sec 5 sec 10 sec 30 sec 1 min 5 min 10 min 30 min or 1 hour Recording Time Set the time at which to start and stop recording from 4 seconds to 99 hours The time that can be set varies depending on the Interval setting Start Interval Select whether to take the first picture now or at a set time Selecting Now starts recording immediately When S...

Страница 122: ...ess the 4 button to complete the setting 10 Use the four way controller 23 to select Start shooting and press the 4 button After the message Press the shutter release button to start interval shooting appears the monitor turns off 11 Press the shutter release button halfway The autofocus system operates 12 Press the shutter release button fully When Start Interval is set to Now a picture is taken ...

Страница 123: ...way controller 5 Fast forwards playback Four way controller 4 Reverses a frame when paused Press and hold four way controller 4 Fast reverses playback Four way controller 3 Stops playback Displays the playback mode palette when stopped p 154 E dial Adjusts the volume 6 levels M button Switches between Standard Information Display and No Information Display m c button Saves the displayed image as a...

Страница 124: ...he movie 2 Use the four way controller 45 to display the frame to save as a still picture 3 Press the m c button The save confirmation screen appears 4 Use the four way controller 23 to select Save as and press the 4 button The captured image is saved in JPEG format Capturing a Still Picture from a Movie 10 00 10 00 90 18000 90 1800 Frame number Total number of frames ...

Страница 125: ...ividing point is displayed at the top of the screen Up to four points can be selected divided into five segments Available operations Proceed to Step 8 if you do not want to delete any segment 5 Press the K i button The screen to select the segment s to delete is displayed Editing Movies Four way controller 2 Plays back pauses a movie Four way controller 5 Forwards a frame when paused Press and ho...

Страница 126: ...te files and the single image display reappears Select dividing points in chronological order from the beginning of the movie When canceling the selected dividing points cancel each of them in reverse order from the end of the movie to the beginning In an order other than specified you can neither select frames as a dividing point nor cancel the selections of the dividing points You cannot for exa...

Страница 127: ...ter describes image file formats and camera operating settings in capture mode Setting a File Format 126 Setting the White Balance 130 Correcting Images 133 Setting the Image Finishing Tone 140 Customizing the Button Functions 147 ...

Страница 128: ...he four way controller 23 to change the settings and press the 4 button 4 Press the 3 button twice The screen that was displayed before selecting the menu item appears again Select the horizontal and vertical ratio of images from K J default setting I or L Aspect Ratio File Format JPEG Recorded Pixels and JPEG Quality can also be set through the control panel When File Format JPEG Recorded Pixels ...

Страница 129: ...ages but they are saved as actual original information When you perform the development process by using the RAW Development function p 174 or using the provided software p 211 you can create JPEG images with these effects RAW Captures images in both JPEG and RAW formats When One Push File Format is assigned to the d G R button you can press the d G R button to temporarily change the file format a...

Страница 130: ...4 2376 P 3456 1944 g 2688 1512 J p 4928 3264 default setting E 4224 2816 a 3456 2304 f 2688 1792 I W 4352 3264 r 3840 2880 a 3072 2304 g 2304 1728 L N 3264 3264 a 2880 2880 f 2304 2304 h 1728 1728 The more pixels there are the bigger the file size The file size will also vary according to the JPEG Quality setting The quality of a captured image depends on the exposure control resolution of the pri...

Страница 131: ...etter E Good Quality grainier File size smaller Color Space sRGB Mainly used for devices such as a computer default setting AdobeRGB Covers a wider range of color than sRGB and is used for commercial uses such as industrial printing The file naming system changes depending on the color space setting as shown below xxxx is a four digit sequential number For sRGB IMGPxxxx JPG For AdobeRGB _IGPxxxx J...

Страница 132: ...ctures in the shade It reduces the bluish color tones in a picture Approx 8 000K Cloudy For use when taking pictures on cloudy days Approx 6 000K J Fluorescent Light For use when taking pictures under fluorescent lighting Select the type of fluorescent light D Fluorescent Daylight Color N Fluorescent Daylight White W Fluorescent Cool White L Fluorescent Warm White Approx 6 500K Approx 5 000K Appro...

Страница 133: ... operations 5 Press the 4 button The screen that was displayed in Step 2 appears again 6 Press the 4 button The camera is ready to take a picture Four way controller 23 Adjusts the tone of the colors between green G and magenta M Four way controller 45 Adjusts the tone of the colors between blue B and amber A d G button Resets the adjustment value Because the light source changes when a flash disc...

Страница 134: ... the L button The autofocus system operates 4 Press the shutter release button fully The screen that was displayed in Step 1 appears again Adjust the white balance as necessary The message The operation could not be completed correctly appears when measuring is unsuccessful Press the 4 button to remeasure the white balance 5 Press the 4 button The camera is ready to take a picture Adjusting the Wh...

Страница 135: ...f overexposed areas 1 Press the M button in standby mode The control panel appears 2 Use the four way controller 2345 to select Highlight Correction and press the 4 button The Highlight Correction screen appears 3 Use the four way controller 45 to select Auto On or Off and press the 4 button The camera returns to the control panel Brightness Adjustment Highlight Correction When Highlight Correctio...

Страница 136: ...way controller 2345 to select Shadow Correction and press the 4 button The Shadow Correction screen appears 3 Use the four way controller 45 to select Auto Low Medium High or Off and press the 4 button The camera returns to the control panel Shadow Correction You can also set Highlight Correction and Shadow Correction in D Range Setting p 70 of the A Rec Mode 2 menu Shadow Correction Shadow Correc...

Страница 137: ...nd press the 4 button The HDR Capture screen appears High Dynamic Range Image Capture HDR Capture Available by setting through the control panel or in the A Rec Mode 1 menu Z Night Scene HDR Available by selecting from H mode p 76 p mode Available by simply setting the mode dial to p p 137 During HDR Capture or in p mode the following functions are not available Continuous Shooting Exposure Bracke...

Страница 138: ...set a higher shutter speed and a higher ISO sensitivity When the sensitivity is set to ISO AUTO the sensitivity can be raised more easily than normal Auto Align may not be possible when the lenses that have a focal length exceeding 100 mm is used or when the entire subject is checkered or has a uniform surface In Z Night Scene HDR of H mode HDR Capture is fixed to Auto and Auto Align is fixed to O...

Страница 139: ...Capture screen for p mode appears 3 Press the four way controller 5 use the four way controller 23 to select Auto HDR 1 HDR 2 or HDR 3 and press the 4 button 4 Use the four way controller 23 to select Auto Align and use the four way controller 45 to select O or P Refer to p 136 for details on the setting 5 Press the 3 button twice The camera is ready to take a series of pictures 6 Use the e dial t...

Страница 140: ...s more easily when using a zoom lens or a small diameter lens and straight walls or the horizon in an image appear curved Lateral chromatic aberration Lateral chromatic aberration is a phenomenon in which the magnification of an image varies according to the colors wavelengths of light when a picture was taken and may cause a blurred image Chromatic aberration occurs more easily at shorter focal l...

Страница 141: ... a DA FISH EYE 10 17mm is used The Lens Correction function is disabled when using an accessory such as a close up ring or rear converter that is attached between the camera and the lens The shooting speed for Continuous Shooting may be slower when using the Distortion Correction function The effects of the Lens Correction function may be barely noticeable in some cases due to the shooting conditi...

Страница 142: ...ight skin tone Landscape Increases color saturation highlights shapes and produces a vivid color image Vibrant Changes the color slightly to create an antique look Radiant Emphasizes glossiness to produce a spectacular finish Muted Reduces the saturation to create a soft look Bleach Bypass Reduces the saturation and increases the contrast to create the look of an old picture Reversal Film Creates ...

Страница 143: ...pears 5 Use the four way controller 23 to choose a parameter you want to change The following parameters can be changed according to the selected image finishing tone Image Tone Parameter Bright Natural Portrait Landscape Vibrant Radiant Saturation 4 to 4 Hue 4 to 4 High Low Key Adj 4 to 4 Contrast 4 to 4 Sharpness 4 to 4 Muted Bleach Bypass Saturation 4 to 4 Toning Off Green Yellow Orange Red Mag...

Страница 144: ...isplayed in Step 3 appears again 8 Press the 4 button The camera returns to the control panel Reversal Film Sharpness 4 to 4 Monochrome Filter Effect None Green Yellow Orange Red Magenta Blue Cyan Infrared Filter Toning Off Green Yellow Orange Red Magenta Purple Blue Cyan High Low Key Adj 4 to 4 Contrast 4 to 4 Sharpness 4 to 4 Cross Processing Random Preset 1 3 Favorite 1 3 1 E dial Switches betw...

Страница 145: ...displayed while searching When a cross processed image is found the screen to save the settings appears If there are no cross processed images the message No cross processed image appears 3 Use the e dial to select a cross processed image 4 Use the four way controller 23 to select Save as Favorite 1 Save as Favorite 2 or Save as Favorite 3 and press the 4 button The settings of the selected image ...

Страница 146: ... Green Blue Yellow Retro For taking pictures with the look of old photos Toning B A 7 levels Frame Composite None Thin Medium Thick Not available in C mode High Contrast For taking pictures with high contrasts Intensity 1 to 5 Shading 1 For taking pictures with the edge areas darkened Shading Type 4 types Shading Level 3 to 3 Invert Color Inverts the colors in the image OFF ON Color For taking pic...

Страница 147: ...d filter Proceed to Step 7 if you do not need to change the parameters 4 Press the M button The screen to adjust the parameters appears 5 Use the four way controller 23 to select a parameter and use the four way controller 45 to adjust the value 6 Press the 4 button The screen that was displayed in Step 3 appears again 7 Press the 4 button The camera returns to the control panel Cancel Cancel Para...

Страница 148: ...e 1 menu p 69 Select No Filter in Step 3 to finish shooting with a digital filter After shooting you can also apply digital filter effects to JPEG RAW images in playback mode p 167 Shading Level for the Toy Camera filter and the Shading filter cannot be checked with Live View ...

Страница 149: ...tton One Push File Format Temporarily changes the file format Simultaneously saves an image in both JPEG and RAW formats regardless of the File Format setting You can set whether or not to apply the setting to only one image and select the file format when the d button is pressed p 149 Preview While the d button is pressed you can check the depth of field by stopping down the aperture to the set v...

Страница 150: ...ur way controller 23 to select a function and press the 4 button 4 Press the 3 button three times The screen that was displayed before selecting the menu item appears again MENU Movie Recording Movie Recording Enable AF1 Enable AF1 Enable AF1 Enable AF1 Green Button Green Button Button Customization Button Customization Cancel Cancel MENU Button Customization Button Customization Green Button Gree...

Страница 151: ... four way controller 5 use the four way controller 23 to select a file format and press the 4 button 5 Press the 3 button three times The screen that was displayed before selecting the menu item appears again Setting the One Push File Format O The recording format returns to the original file format after a picture is taken default setting P The setting is canceled when any of the following operat...

Страница 152: ...proper exposure Program shift default setting e b Switches to Shutter Priority Automatic Exposure mode Turn the e dial to adjust the shutter speed e c Switches to Aperture Priority Automatic Exposure mode Turn the e dial to adjust the aperture value OFF Disables the e dial operation when turned in e mode If the d G button is pressed after turning the e dial in e mode the setting returns to normal ...

Страница 153: ...m appears again Setting the Green Button Operation in a Mode e LINE Adjusts the aperture value and shutter speed to obtain a proper exposure according to the program line default setting b SHIFT Adjusts the shutter speed while the aperture value remains fixed to obtain a proper exposure c SHIFT Adjusts the aperture value while the shutter speed remains fixed to obtain a proper exposure OFF Disable...

Страница 154: ...on three times The camera is ready to take a picture Setting the L Button Operation Enable AF1 Both the L button and shutter release button are available to perform autofocus p 96 default setting Enable AF2 Autofocus is performed only when the L button is pressed and not when the shutter release button is pressed halfway Cancel AF While the L button is pressed autofocus is not performed even when ...

Страница 155: ... and how to edit the captured images How to Operate the Playback Editing Functions 154 Setting the Playback Display Method 156 Magnifying Images 157 Selecting the Playback Functions 158 Deleting Multiple Images 163 Processing Images 165 Developing RAW Images 174 Connecting the Camera to an AV Device 178 ...

Страница 156: ...size 1 2 Changes the number of recorded pixels or size of the image and saves the image as a new file p 165 o Cropping 1 Crops out only the desired area of the picture and saves it as a new image p 166 p Index 1 Joins a number of images together and creates a new image with them p 172 Z Protect Protects images from being accidentally erased p 200 u Slideshow Plays back the images one after another...

Страница 157: ...rints and the date to images saved on the SD Memory Card p 204 Playback Menu Items Menu Item Function Page Q1 Slideshow Plays back the images one after another You can set how images will be displayed in the slideshow p 160 Quick Zoom Sets the initial magnification when magnifying images p 156 Bright Dark Area Sets whether to display the Bright Dark Area warning during playback Auto Image Rotation...

Страница 158: ...r Auto Image Rotation and use the four way controller 45 to select O On or P Off 4 Press the 3 button The screen that was displayed before selecting the menu item appears again Bright Dark Area Bright overexposed portions blink red and dark underexposed portions blink yellow p 29 Auto Image Rotation During playback the image is automatically rotated based on the rotation information when 13 Save R...

Страница 159: ...rea d G button Returns a position of the magnified display area to the center when the magnified display area has been moved to the side M button Switches between Standard Information Display and No Information Display 4 button Returns to the single image display You can magnify an image by following the same procedure during Instant Review p 57 The default setting for the first click is 1 2 times...

Страница 160: ...ep 5 if you do not need to change the display style 2 Press the M button The display style selection screen appears 3 Use the four way controller 2345 to select the display style 4 9 16 36 81 Thumbnail Display Images are displayed with the screen divided into multiple sections Icons such as C and are displayed with images except in 81 Thumbnail Display Displaying Multiple Images Cancel Cancel MENU...

Страница 161: ...strip Display Four way controller 45 Selects an image taken on the selected shooting date in Calendar Filmstrip Display E dial to the right y Displays the selected image in the single image display in Calendar Filmstrip Display Turn to the left f to return to the Calendar Filmstrip Display K i button Deletes the selected images 4 button Displays the selected image in the single image display Displ...

Страница 162: ...e changed 3 Press the four way controller 5 use the four way controller 23 to change the setting and press the 4 button Playing Back Images Continuously Setting the Slideshow Display Item Description Setting Interval Select an image display interval 3sec default setting 5sec 10sec 30sec Screen Effect Select a transition effect when the next image is displayed OFF default setting Fade Wipe Stripe R...

Страница 163: ...slideshow ends the camera returns to the single image display even if you do not press the four way controller 3 Starting the Slideshow 4 button Pauses resumes playback Four way controller 4 Shows the previous image Four way controller 5 Shows the next image For movies only the first frame is displayed and then the next image is displayed after the set interval has elapsed To play a movie during a...

Страница 164: ...oller 2345 to select s Image Rotation and press the 4 button The selected image is rotated in 90 increments and the four thumbnail images are displayed 3 Use the four way controller 2345 to select the desired rotation direction and press the 4 button The image rotation information is saved Rotating Images When Auto Image Rotation p 156 in the Q Playback 1 menu is set to O On images with rotation i...

Страница 165: ...r to Displaying Multiple Images p 158 for details 3 Press the K i button The screen to select images to delete is displayed 4 Select images to delete Available operations Deleting Selected Images Protected images cannot be selected You can select up to 100 images at a time Four waycontroller 2345 Moves the selection frame 4 button Confirms cancels the image selection E dial Displays the selected i...

Страница 166: ...ntroller 2 to select Delete All Images and press the 4 button All images are deleted The confirmation screen appears when there are protected images Use the four way controller 23 to select Delete all or Leave all and press the 4 button When Delete all is selected protected images are also deleted If Folder Display is selected in Step 2 the selected folder and all of the images in it can be delete...

Страница 167: ...ars 3 Use the four way controller 45 to select the number of recorded pixels and press the 4 button You can select one of the image sizes starting from one size smaller than that of the original image The selectable sizes vary according to the original image size and aspect ratio 4 Use the four way controller 23 to select Save as and press the 4 button The resized image is saved as a new image Cha...

Страница 168: ... the cropping frame Available operations 4 Press the 4 button The save confirmation screen appears 5 Use the four way controller 23 to select Save as and press the 4 button The cropped image is saved as a new image Cutting Out Part of the Image Cropping Only JPEG images captured with this camera can be cropped Images already resized to Z or S with this camera cannot be cropped Four way controller ...

Страница 169: ...ot with a toy camera Shading Level OFF Low Medium High Blur Low Medium High Tone Break Red Green Blue Yellow Retro Creates an image with the look of an old photo Toning B A 7 levels Frame Composite None Thin Medium Thick High Contrast Enhances the contrast in the image Intensity 1 to 5 Shading Creates an image with darkened edges Shading Type 4 types Shading Level 3 to 3 Invert Color Inverts image...

Страница 170: ...roughout the image Soft Focus Low Medium High Shadow Blur OFF ON Starburst Creates an image with a special sparkling look by adding extra glitter to the highlights of night scenes or lights reflected on water Effect Density Small Medium Large Size Small Medium Large Angle 0 30 45 60 Fish eye Creates an image that looks as though it was shot with a fish eye lens Low Medium High Slim Changes the hor...

Страница 171: ... a filter The background image changes according to the selected filter You can select a different image by turning the e dial Proceed to Step 6 if you do not need to change the parameters 4 Press the M button The screen to adjust the parameters appears 5 Use the four way controller 23 to select a parameter and use the four way controller 45 to adjust the value 6 Press the 4 button The save confir...

Страница 172: ...ingle image display 2 Select D Digital Filter in the playback mode palette and press the 4 button 3 Use the four way controller 23 to select Recreating filter effects and press the 4 button The filter effects used for the selected image appear Up to 20 filters including a digital filter used during shooting p 144 can be applied to the same image Recreating Filter Effects MENU OK OK OK Apply additi...

Страница 173: ...d image is saved as a new image If Searching for the original image is selected in Step 3 on p 170 the original image prior to digital filter application can be retrieved If the original image is no longer stored on the SD Memory Card the message Original image prior to digital filter application is not found appears OK OK OK MENU INFO Details Details Reapplies following digital filter Reapplies f...

Страница 174: ...nd press the 4 button You can select o Thumbnail p Square q Random1 r Random2 s Random3 or p Bubble Images are displayed according to the file number from the smallest number for o and are displayed in random order for other layouts 4 Use the four way controller 23 to select Images and press the four way controller 5 5 Use the four way controller 23 to select the number of images and press the 4 b...

Страница 175: ...ss the 4 button After the index image is saved the camera returns to playback mode and the index image is displayed u All images Picks images automatically from all of the images saved w Manual Lets you select images you want to include in the index image If w is selected Select image s appears and leads you to the image selection screen x Folder name Picks images automatically from the folder sel...

Страница 176: ...t Developing a single image and press the 4 button The parameters saved in the image file appear Proceed to Step 6 if you do not need to change the parameters 4 Use the four way controller 23 to choose a parameter you want to change You can select a different image by turning the e dial Only RAW images captured with this camera can be edited RAW images and JPEG images captured with other cameras c...

Страница 177: ...as a new JPEG image 8 Use the four way controller 23 to select Continue or Exit and press the 4 button Select Continue to edit other images The screen that was displayed in Step 4 appears again Parameter Value Page Aspect Ratio K J I L p 126 JPEG Recorded Pixels 1 JPEG recorded pixels corresponding to the aspect ratio p 128 JPEG Quality C D E p 129 Color Space sRGB AdobeRGB p 129 Distortion Correc...

Страница 178: ...on To change parameters select Develop images with modified settings 5 Use the four way controller 2345 to set JPEG Recorded Pixels and JPEG Quality For JPEG Recorded Pixels select from W X Y or Z When Develop images with modified settings is selected in Step 4 refer to p 175 to change other parameters All images are developed with the same settings Developing Multiple RAW Images Four waycontrolle...

Страница 179: ...ns and Image Editing 6 6 Press the 4 button The save confirmation screen appears 7 Use the four way controller 23 to select Save as and press the 4 button The selected RAW images are developed and saved as new JPEG images ...

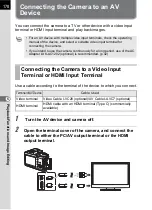
Страница 180: ...e PC AV output terminal or the HDMI output terminal For an AV device with multiple video input terminals check the operating manual of the device and select a suitable video input terminal for connecting the camera If you intend to use the camera continuously for a long period use of the AC Adapter kit K AC1202 optional is recommended p 42 Connecting the Camera to a Video Input Terminal or HDMI In...

Страница 181: ...e set video output format If this happens change the setting 1 Select Interface Options in the R Set up 2 menu and press the four way controller 5 The Interface Options screen appears 2 Use the four way controller 23 to select Video Out and press the four way controller 5 3 Use the four way controller 23 to select NTSC or PAL and press the 4 button You cannot output composite and HDMI video signal...

Страница 182: ... output format differs depending on the region When you set Setting the Time in the World Time setting p 187 to X Destination the video output setting changes to the video output format for that city Refer to List of World Time Cities p 189 for cities that can be selected as a hometown or destination Selecting the HDMI Output Format Auto The maximum resolution corresponding to the AV device and ca...

Страница 183: ...181 Playback Functions and Image Editing 6 The camera stays in playback mode while the HDMI cable is connected to it Remove the HDMI cable to enable shooting ...

Страница 184: ...Memo 182 ...

Страница 185: ...7 Changing Additional Settings This chapter describes how to change additional settings How to Operate the Set up Menu 184 Camera Settings 186 File Management Settings 199 ...

Страница 186: ...display of the local date and time of the specified city so they can be displayed on the monitor in addition to the present location p 187 Sound Effects Switches the operation sound on off and changes its volume p 186 LCD Display Switches the startup screen and guide display on off p 192 LCD Display Settings Adjusts the brightness and the color of the monitor p 192 Flicker Reduction Cuts down on s...

Страница 187: ...to dim automatically when no operation is performed for 10 seconds p 194 Auto Power Off Sets the time until the camera turns off automatically Reset Resets all settings p 196 R3 Pixel Mapping Maps out and corrects any defective pixels in the CMOS sensor p 194 Dust Removal Cleans the CMOS sensor by shaking it p 237 Sensor Cleaning Keeps the shutter open when cleaning the CMOS sensor with a blower p...

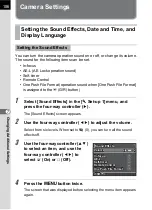
Страница 188: ...ffects screen appears 2 Use the four way controller 45 to adjust the volume Select from six levels When set to Z 0 you can turn all the sound effects off 3 Use the four way controller 23 to select an item and use the four way controller 45 to select O On or P Off 4 Press the 3 button twice The screen that was displayed before selecting the menu item appears again Setting the Sound Effects Date and...

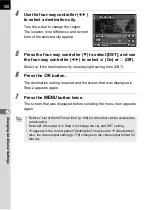
Страница 189: ...rs 2 Use the four way controller 45 to select X Destination or W Hometown for Setting the Time This setting is reflected in the date and time that appear in the control panel 3 Press the four way controller 3 to move the frame to X Destination and press the four way controller 5 The X Destination screen appears Changing the Date and Time Display Setting the World Time Cancel Cancel MENU Date Adjus...

Страница 190: ...he destination setting is saved and the screen that was displayed in Step 2 appears again 7 Press the 3 button twice The screen that was displayed before selecting the menu item appears again Refer to List of World Time Cities p 189 for cities that can be selected as a destination Select W Hometown in Step 3 to change the city and DST setting X appears in the control panel if Setting the Time is s...

Страница 191: ...xico City NTSC Kathmandu PAL Lima NTSC Dacca PAL Santiago NTSC East Asia Yangon NTSC Caracas NTSC Bangkok PAL Buenos Aires PAL Kuala Lumpur PAL Sao Paulo PAL Vientiane PAL Rio de Janeiro NTSC Singapore PAL Europe Lisbon PAL Phnom Penh PAL Madrid PAL Ho chi Minh PAL London PAL Jakarta PAL Paris PAL Hong Kong PAL Amsterdam PAL Beijing PAL Milan PAL Shanghai PAL Rome PAL Manila NTSC Copenhagen PAL Ta...

Страница 192: ... Select from e 4x4 Grid f Golden Section g Scale or h default setting 3 Press the four way controller 23 to select Histogram Display or Bright Dark Area and use the four way controller 45 to select O On or P Off 4 Press the 3 button twice The screen that was displayed before selecting the menu item appears again Setting the Display Language Setting the Monitor and the Menu Display Setting the Stan...

Страница 193: ... the menu item appears again Setting the Display for Instant Review Enlarge Instant Review You can magnify the image with the e dial p 157 Save RAW Data Sets whether to save the RAW image by pressing the m c button when the file format of the last captured image is JPEG and its RAW data still remains in the buffer memory p 64 Histogram Display Shows the brightness distribution of an image p 28 Bri...

Страница 194: ...e four way controller 23 to select Brightness Level Adjust Blue Amber or Adjust Green Magenta Setting the Startup Screen and Guide Display Adjusting the Brightness and the Color of the Monitor Brightness Level Changes the brightness of the monitor 7 to 7 Adjust Blue Amber Adjusts the tone of the colors between blue B7 and amber A7 Adjust Green Magenta Adjusts the tone of the colors between green G...

Страница 195: ...er 5 The 14 Save Menu Location screen appears 2 Use the four way controller 23 to select Reset Menu Location or Save Menu Location and press the 4 button 3 Press the 3 button The screen that was displayed before selecting the menu item appears again G button Resets the adjustment value E dial Displays a captured image in the background Setting the Initial Menu Tab to be Displayed 1 Reset Menu Loca...

Страница 196: ...unused for a while in standby mode The default setting is O On Press any button to return it to the normal brightness Auto Power Off The power turns off automatically Select from 1min default setting 3min 5min or Off Perform any of the following operations to reactivate the camera Turn the camera off and on again Press the shutter release button halfway Press the N button 3 button or M button The ...

Страница 197: ...yed before selecting the menu item appears again Selecting Settings to Save in the Camera Memory Function Default Setting Function Default Setting Flash Mode O Flash Exposure Comp O Drive Mode O Digital Filter P White Balance O HDR Capture P Custom Image O Playback Info Display O Sensitivity O File No O EV Compensation O O Settings are saved even when the camera is turned off P Settings are return...

Страница 198: ... sequential numbering four digits for the file name even if a new folder is created When Reset of the R Set up 2 menu is performed all Memory settings return to the default values p 196 Resetting the Camera Settings Resetting the Rec Mode Movie Playback Set up Menus The following settings are not reset Language u Flicker Reduction Date Adjustment Video Out The city and DST settings for World Time ...

Страница 199: ...ra If an update file for the firmware is released you can update the camera to the latest firmware version 1 Select Firmware Info Options in the R Set up 3 menu and press the four way controller 5 The firmware version for the camera is displayed on the Firmware Info Options screen At this point if an update file is saved on your SD Memory Card you can run the update 2 Press the 3 button twice The ...

Страница 200: ...ating it Before running the update be sure to save the data on your SD Memory Card to a computer or other location When the battery level is low Not enough battery power remaining to update the firmware is displayed on the monitor Use the AC Adapter kit K AC1202 optional or install a fully charged battery ...

Страница 201: ...ng starts When formatting is completed the screen that was displayed before selecting the menu item appears again Formatting an SD Memory Card Do not remove the SD Memory Card while formatting The card may be damaged and become unusable Formatting deletes all data either protected or unprotected Be aware When an SD Memory Card is formatted the volume label assigned to the card is K 01 When this ca...

Страница 202: ...e e dial to select an image to protect 5 Press the four way controller 2 to select Protect and press the 4 button Select Unprotect to cancel the protection of the image The image is protected and the Y icon appears at the top right of the screen Repeat Steps 4 and 5 to protect other images If you selected All images in Step 3 the camera returns to playback mode 6 Press the 3 button The camera retu...

Страница 203: ...ith a new number is created Changing the Naming System for Folders Date The two digits of the month and day on which the picture was taken are assigned as the folder name in the form of xxx_MMDD default setting MMDD month and day appears according to the display format set in Date Adjustment p 52 Example 101_0125 Folder for images taken on January 25th PENTX The folder name is assigned in the form...

Страница 204: ... P 3 Use the four way controller 23 to select Photographer and press the four way controller 5 The text entry screen appears Only one folder can be created using this operation Multiple empty folders cannot be created consecutively Setting the Photographer Information Use the provided software p 211 to check the Exif information O Embeds copyright information in the Exif P Does not embed copyright...

Страница 205: ...grapher 7 Press the 3 button twice The screen that was displayed before selecting the menu item appears again Four way controller 2345 Moves the text selection cursor E dial Moves the text input cursor m c button Switches between upper and lower case letters 4 button Enters a character selected with the text selection cursor at the position of the text input cursor K i button Deletes a character a...

Страница 206: ...ow to change the settings is displayed 3 Use the four way controller 23 to select Single image or All images and press the 4 button If you selected All images proceed to Step 5 4 Use the e dial to select an image to set DPOF settings 5 Use the four way controller 23 to select the number of copies You can set up to 99 copies K appears at the top right of the screen for images with DPOF settings To ...

Страница 207: ...ed and the camera returns to playback mode O The date is printed P The date is not printed Depending on the printer or printing equipment at the photo processing lab the date may not be printed on the pictures even if the date for DPOF setting is set to O The number of copies specified for all images is applied to all the images and that specified for a single image is canceled Before printing che...

Страница 208: ...Memo 206 ...

Страница 209: ... a Computer This chapter explains how to connect the camera to a computer install the supplied CD ROM etc Manipulating Captured Images on a Computer 208 Saving Images on a Computer 209 Using the Provided Software 211 ...

Страница 210: ... Supports multi core processors Intel Core i5 i7 Core 2 Quad Duo AMD Phenom II X4 X6 Athlon II X2 X4 and other RAM 1 GB minimum 2 GB or more recommended HDD For installing and starting up the program 100 MB minimum of free space For saving image files Approx 10 MB file Monitor 1024 768 dots 24 bit full color or higher Others Input devices such as a keyboard and mouse OS Mac OS X 10 5 10 6 or 10 7 ...

Страница 211: ... way controller 5 3 Use the four way controller 23 to select MSC or PTP and press the 4 button Unless otherwise specified select MSC 4 Press the 3 button twice The screen that was displayed before selecting the menu item appears again Setting the USB Connection Mode MSC Mass Storage Class default setting A general purpose driver program that handles devices connected to a computer via USB as a mem...

Страница 212: ...le disk or an SD Memory Card with a volume label K 01 If the K 01 dialog appears when the camera is turned on select Open folder to view files using Windows Explorer and click the OK button 4 Save the captured images to the computer Copy the image file s or folder s to the hard disk of the computer 5 Disconnect the camera from the computer Connecting the Camera and a Computer The camera cannot be ...

Страница 213: ...up on a computer log on with an account that has administrative rights before installing the software 1 Turn the computer on Make sure no other software is running 2 Place the CD ROM into the CD DVD drive on the computer The PENTAX Software Installer screen appears Installing the Software If the PENTAX Software Installer screen does not appear For Windows 1 Click My Computer from the Start menu 2 ...

Страница 214: ...m subsequent steps 4 Select the desired language in the Choose Setup Language screen and click OK 5 When the InstallShield Wizard screen appears in the selected language click Next Follow the instructions on the screen to perform subsequent steps Start SILKYPIX Developer Studio and see the help menu for details on using the software program ...

Страница 215: ...Click Product Registration on the screen in Step 3 on p 212 A world map for Internet Product Registration is displayed If the computer is connected to the Internet click the displayed country or area and then follow the instructions to register your software Note that you can only register online if your country or area is shown ...

Страница 216: ...Memo 214 ...

Страница 217: ...9 Using the Flash This chapter provides details on the built in flash and describes how to take pictures with an external flash Using the Built in Flash 216 Using an External Flash Optional 220 ...

Страница 218: ...s camera shake the slowest shutter speed depends on the focal length of the lens in use The shutter speed is locked at 1 180 sec when a lens other than a DA DA L D FA FA J FA or F lens is used You can use Slow speed Sync in Night Scene Portrait of H mode or b mode when shooting portraits with the sunset in the background Both the portrait and the background are captured beautifully G and H can be ...

Страница 219: ... a moving car with Trailing Curtain Sync trailing light is captured while the shutter is open and the flash captures the car immediately before the shutter is closed Therefore the picture will include a sharp well lit car with trailing light behind it Using the Trailing Curtain Sync Flash Trailing Curtain Sync slows down the shutter speed To avoid camera shake either set Shake Reduction to Q On or...

Страница 220: ...sh in this camera cannot be used when the distance is 0 7 m or less When the flash is used at distances closer than 0 7 m it causes vignetting in the picture corners light is distributed unevenly and the picture may be overexposed The following equation calculates the aperture value for shooting distances Aperture value F Guide number Shooting distance Example When the sensitivity is ISO 200 and t...

Страница 221: ...ccur if the focal length is less than 20 mm DA16 45mm F4ED AL When the focal length is less than 28 mm or when the focal length is 28 mm and the shooting distance is 1 m or less vignetting may occur DA 16 50mm F2 8ED AL IF SDM When the focal length is 35 mm or less or when the focal length is 50 mm and the shooting distance is less than 1 5 m vignetting may occur DA17 70mm F4AL IF SDM When the foc...

Страница 222: ...r slower Flash Camera Function Built in Flash AF540FGZ AF360FGZ AF200FG AF160FC Red eye reduction flash z z z Auto flash discharge z z z Automatically switching to the flash sync speed z z z Aperture value is automatically set in e mode and b mode z z z P TTL auto flash z 1 z 1 z 1 Slow speed Sync z z z Flash exposure compensation z z z AF assist light of external flash z Trailing Curtain Sync 2 z...

Страница 223: ...ke a picture Using the P TTL Auto Flash The P TTL auto flash is only available with an AF540FGZ AF360FGZ AF200FG or AF160FC flash unit For details such as operation method and effective distance refer to the external flash manual The flash does not discharge if the subject is bright enough when the flash mode is set to C or i Therefore these modes may not be suitable for daylight sync shooting Eve...

Страница 224: ... the mode dial to b or a 3 Turn on the camera and the external flash 4 Set the external flash sync mode to HSb high speed sync 5 Make sure that the external flash is fully charged and then take a picture Using the High speed Sync Flash High speed sync is available only when the shutter speed is set faster than 1 180 sec High speed sync is not available in p mode High speed sync is not available wi...

Страница 225: ...tension Cord F5P optional as shown in the illustration below The Off Camera Shoe Adapter F can be mounted to your tripod using the tripod screw Connecting an External Flash with an Extension Cord Do not combine with accessories that have a different number of contacts such as a Hot Shoe Grip as a malfunction may occur Combining with flashes from other manufacturers may cause equipment breakdown We...

Страница 226: ...Memo 224 ...

Страница 227: ...ult Settings 226 Functions Available with Various Lens Combinations 232 Cleaning the CMOS Sensor 237 Optional Accessories 240 Error Messages 245 Troubleshooting 247 Main Specifications 250 Index 256 WARRANTY POLICY 263 ...

Страница 228: ...age Sensitivity ISO AUTO ISO 100 to 3200 Yes p 79 White Balance F Auto Yes p 130 Flash Mode Depends on capture mode Yes p 59 Drive Mode 9 Single Frame Shooting Yes p 85 p 102 p 104 p 106 Item Default Setting Reset Setting Page Custom Image Bright Yes p 140 Digital Filter No Filter Yes p 144 HDR Capture HDR Capture Off Yes p 135 Auto Align O On Yes Image Capture Settings Aspect Ratio J Yes p 126 Fi...

Страница 229: ...ction Auto Yes p 133 Shadow Correction Auto Yes p 134 High ISO NR Auto Yes p 89 Slow Shutter Speed NR Auto Yes p 91 Shake Reduction Q On Yes p 100 Input Focal Length 35 mm Yes p 234 Live View Show Grid h Off Yes p 190 Histogram Display P Off Yes Bright Dark Area P Off Yes Instant Review Display Time 1 sec Yes p 191 Enlarge Instant Review O On Yes Save RAW Data O On Yes Histogram Display P Off Yes ...

Страница 230: ... p 244 GPS Time Sync O On Yes Item Default Setting Reset Setting Page Exposure Setting e Yes p 113 Movie Capture Settings Recorded Pixels a 1920 1080 K Yes Framerate 30 fps Yes Quality Level C Yes Recording Sound Level Internal Microphone 3 Yes External Microphone 5 Yes Movie SR Q On Yes Interval Movie Interval 1 sec Yes p 119 Recording Time 00 00 04 Yes Start Interval Now Yes Start Time 12 00 AM ...

Страница 231: ...rding to the setting p 166 Index p 172 Protect No p 200 Slideshow Yes p 161 Save Cross Processing Yes p 143 RAW Development Recorded Pixels p Quality Level C Yes p 174 Movie Editing p 123 DPOF No p 204 Item Default Setting Reset Setting Page Slideshow Interval 3 sec Yes p 160 Screen Effect OFF Yes Repeat Playback P Off Yes Quick Zoom Off Yes p 156 Bright Dark Area P Off Yes Auto Image Rotation O O...

Страница 232: ...play Startup Screen O On Yes p 192 Guide Display O On Yes LCD Display Settings 0 Yes p 192 Flicker Reduction 50 Hz No p 30 Interface Options Video Out According to initial setting No p 179 HDMI Out Auto Yes p 180 USB Connection MSC Yes p 209 Folder Name Date Yes p 201 Create New Folder p 201 Copyright Information Embed Copyright Data P Off Yes p 202 Photographer No Copyright Holder No Power Saving...

Страница 233: ...Order 0 Yes p 85 7 Bulb B Mode Options Mode1 Yes p 83 8 WB When Using Flash Auto White Balance Yes p 131 9 AWB in Tungsten Light Subtle Correction Yes 10 AF Release Options Focus priority Yes p 93 11 AF with Remote Control Off Yes p 105 12 Release While Charging Off Yes p 63 13 Save Rotation Info On Yes p 156 14 Save Menu Location Reset Menu Location Yes p 193 15 Shake Reduction Options Mode1 Yes ...

Страница 234: ...th a maximum aperture of F2 8 or faster Only available at the s position 2 Lenses with a maximum aperture of F5 6 or faster 3 When using the built in flash AF540FGZ AF360FGZ AF200FG or AF160FC Lens Mount type Function DA DA L D FA FA J FA 6 F 6 A M P KAF KAF2 KAF3 KAF KAF2 KAF KA K Autofocus Lens only With AF adapter 1 7x 1 z z z Manual focus With the focus indicator 2 z z z z z Quick shift focus ...

Страница 235: ...nt DA lenses with an ultrasonic motor and no AF coupler use the KAF3 mount FA single focal length lenses non zoom lenses DA or DA L lenses without an ultrasonic motor and D FA FA J and F lenses use the KAF mount Refer to respective lens manuals for details Note that this camera is not equipped with a power zoom function When the aperture ring is set to a position other than s Auto or a lens withou...

Страница 236: ...n The camera is ready to take a picture Setting the Focal Length 8 10 12 15 18 20 24 28 30 35 40 45 50 55 65 70 75 85 100 120 135 150 180 200 250 300 350 400 450 500 550 600 700 800 If the focal length for your lens is not listed above select the value closest to the actual focal length example 18 for 17 mm and 100 for 105 mm When using a zoom lens select the actual focal length at the zoom settin...

Страница 237: ...essoriessuchas extension tube K c Pictures can be taken with a specified aperture value but an exposure error may occur F appears for the aperture indicator Manual diaphragm lens such as reflex lens lens only c FA F SOFT 85mm FA SOFT 28mm lens only c Pictures can be taken with a specified aperture value in the manual aperture range F appears for the aperture indicator When the depth of field is ch...

Страница 238: ...236 Appendix 10 If the aperture is set to a position other than s the camera operates in c mode regardless of the mode dial setting except when set to a or C mode ...

Страница 239: ...utton The Dust Removal function is activated by shaking the CMOS sensor To activate the Dust Removal function every time the camera is turned on and off set Startup Action and Shutdown Action to O When Dust Removal is completed the camera returns to the R Set up 3 menu Removing Dust by Shaking the CMOS Sensor Dust Removal Use a brush less blower to remove dirt and dust from the CMOS sensor Using a...

Страница 240: ...eaning the CMOS sensor It is not a malfunction Do not use a spray type blower Do not clean the sensor when the mode dial is set to p To prevent dirt and dust from accumulating on the CMOS sensor keep the body mount cover on the camera when a lens is not attached When the battery level is low Not enough battery power remaining to clean sensor is displayed on the monitor It is recommended to use the...

Страница 241: ...th a brush may scratch the CMOS sensor Do not wipe the CMOS sensor with a cloth 6 Turn the camera off The shutter is closed 7 Attach the lens or body mount cover Sensor Cleaning Sensor Cleaning Opens shutter to access sensor Opens shutter to access sensor for cleaning When finished turn for cleaning When finished turn the camera off to close shutter the camera off to close shutter Cancel Cancel St...

Страница 242: ...risk are the same as those supplied with the camera Battery Charger kit K BC90 Kit includes Battery Charger D BC90 and AC plug cord Rechargeable Lithium ion Battery D LI90 AC Adapter kit K AC1202 Kit includes AC Adapter D AC120 DC Coupler D DC120 and AC plug cord Lets you power your camera from an AC outlet Power Supply Accessories The AC adapter and battery charger are both only sold as a kit ...

Страница 243: ...is a P TTL auto flash unit with a maximumguide number of about 20 ISO 100 m Auto Macro Flash AF160FC The AF160FC is a flash system especially designed for macro photography to take close shadowless pictures of small objects It is compatible with existing TTL auto flash functions and it can be used with a wide range of PENTAX cameras by using provided adapter rings Flash Accessories AF540FGZ AF360F...

Страница 244: ...a Off camera Shoe Clip CL 10 This large clip is used for setting the AF540FGZ or AF360FGZ on a desk or table Used in Remote Control shooting Operating range of the remote control From the front of the camera approx 4 m Remote Control Remote Control F Remote Control Waterproof O RC1 Hot Shoe Adapter FG Off camera Shoe Adapter F Off camera Shoe Clip CL 10 ...

Страница 245: ... latitude longitude altitude direction and Coordinated Universal Time UTC p 244 Camera Case O CC120 Camera Strap O ST120 Hand Strap O ST991 Free Length Strap O ST842 Body Mount Cap K Hot Shoe Cover FK USB Cable I USB7 Video Cable I VC28 AV Cable I AVC7 GPS Unit O GPS1 Camera Case Strap Others ...

Страница 246: ...e manual of the GPS unit for details on how to attach the unit and information on the unit s functions To display the electronic compass press the M button twice and select Electronic Compass in the screen to select the type of information displayed The setting returns to Standard Information Display when the shutter release button is pressed halfway Press the M button and reselect the setting to ...

Страница 247: ...t not with this camera Card is not formatted The SD Memory Card you have inserted is unformatted or has been formatted on another device and is not compatible with this camera Use the card after formatting it with this camera p 199 Card is locked The write protect switch on an SD Memory Card you have inserted is locked Unlock the SD Memory Card This image cannot be magnified You are trying to magn...

Страница 248: ...ly The camera was unable to measure the manual white balance p 132 or use HDR Capture p 135 Try the operation again No more images can be selected You cannot select 100 or more images at a time for Index p 172 and Select Delete p 163 No image can be processed There are no images that can be processed using the Digital Filter p 167 or RAW Development p 174 function This image cannot be processed Ap...

Страница 249: ...g E blinks red while the built in flash is charging Wait until charging is finished There is no available space on the SD Memory Card Insert an SD Memory Card with available space or delete unwanted images p 45 p 163 Recording Wait until recording is finished The lens aperture ring is set to a position other than s Set the lens aperture ring to the s position or select Enable in 16 Using Aperture ...

Страница 250: ...arge When the flash mode is set to C or C the flash will not discharge if the subject is bright Set the flash mode to E Manual Flash Discharge or F Manual Flash Red eye Reduction p 59 a mode is set Set the mode dial to any mode other than a Flash Off K d A Z y U n or E of H mode is set Set H mode to any mode other than K Sunset d Blue Sky A Night Scene Z Night Scene HDR y Backlight Silhouette U Ca...

Страница 251: ...h information cannot be obtained is used set the focal length in the Input Focal Length screen p 234 Shutter speed is too low for the Shake Reduction function to be effective when panning or shooting night scenes etc Set Shake Reduction to R Off and use a tripod The subject is too close Move away from the subject or set Shake Reduction to R and use a tripod Problem Cause Remedy ...

Страница 252: ...andard Output ISO AUTO 100 to 12800 EV steps can be set to 1 EV 1 2 EV or 1 3 EV expandable from ISO 100 to ISO 25600 Image Stabilizer Sensor shift Shake Reduction File Formats File Format RAW DNG JPEG Exif 2 3 DCF2 0 compliant Recorded Pixels JPEG J p 4928x3264 E 4224x2816 a 3456x2304 f 2688x1792 I W 4352x3264 r 3840x2880 a 3072x2304 g 2304x1728 K q 4928x2776 N 4224x2376 P 3456x1944 g 2688x1512 L...

Страница 253: ...ed LED AF assist light Focus Assist AF Autozoom Off 2 4 6 Focus Peaking When set to an image can be magnified by pressing the 4 button Metering Type TTL image sensor metering multi segment metering center weighted metering and spot metering Metering Range EV 1 to 21 ISO 100 50mm F 1 4 lens Exposure Modes Auto Picture modes automatically selects from Standard Portrait Landscape Macro Moving Object ...

Страница 254: ...stortion Correction Lateral Chromatic Aberration Correction Digital Filter Extract Color Toy Camera Retro High Contrast Shading Invert Color Color HDR Capture Auto HDR 1 HDR 2 HDR 3 Auto Align automatic composition correction Multi exposure Number of shots 2 9 Exposure adjusted automatically Interval Shooting Shooting interval 1 sec to 24 hr Start Interval setting immediately from the set time Num...

Страница 255: ...Contrast Shading Invert Color Color Tone Expansion Sketch Filter Water Color Pastel Posterization Miniature Soft Starburst Fish eye Slim Base Parameter Adj RAW Development File Format JPEG Image Capture Settings Aspect Ratio Recorded Pixels Quality Level Color Space Distortion Correction Lat Chromatic Ab Adj Custom Image White Balance Sensitivity High ISO NR Shadow Correction Edit Resize Cropping ...

Страница 256: ... 0 high speed compatible AV output terminal HDMI output terminal Type C stereo microphone input terminal USB Connection MSC PTP Video Output Format NTSC PAL Dimensions and Weight Dimensions Approx 121 mm W 79 mm H 59 mm D excluding the operation parts and protrusion Weight Approx 560 g loaded and ready with the dedicated battery and SD Memory Card Approx 480 g body only Accessories Package Content...

Страница 257: ...PEG Quality RAW C D E K q 4928 2776 251 445 878 76 N 4224 2376 343 602 1181 P 3456 1944 507 890 1707 g 2688 1512 830 1429 2672 J p 4928 3264 214 379 749 76 E 4224 2816 289 512 1007 a 3456 2304 429 758 1463 f 2688 1792 706 1229 2363 I W 4352 3264 242 429 841 76 r 3840 2880 311 548 1078 a 3072 2304 483 841 1617 g 2304 1728 841 1463 2793 L N 3264 3264 323 569 1117 76 a 2880 2880 412 723 1396 f 2304 2...

Страница 258: ...ht 77 n Stage Lighting 77 E Museum 77 C Movie 116 a Flash Off 74 A AC adapter 42 AC plug cord 39 Accessories 16 240 Action in a L Mode 151 Adding the date DPOF 205 AdobeRGB 129 AE Lock 87 AE Metering 88 AF area 94 AF Assist Light 17 92 Autofocus 92 AF coupler 17 AF frame 57 AF point 95 L button 19 96 152 Aperture Priority Automatic Exposure mode c 81 Aspect Ratio 114 126 F White Balance 130 n Auto...

Страница 259: ...e 141 Control panel 24 32 Copyright Holder 202 Correcting distortion 138 Creating New Folders 201 Cropping images 166 Cross Processing Custom Image 140 f White Balance 130 Custom Image 140 A Custom Setting menu 72 231 D Dark areas 134 Date Adjustment 52 Date change 187 Daylight White Balance 130 DC coupler 43 Default settings 226 K i Delete button 21 65 Deleting 65 163 Deleting a single image 65 D...

Страница 260: ...Focus lock 57 97 Focus mode 92 Focus mode switch 19 Focus Peaking 98 147 Focusing 92 Focusing ring 98 Folder Display 159 Folder Name 201 Food K 76 Forest x 75 76 Format 199 Four way controller 2345 19 21 31 68 Framerate 114 G d G button 19 147 GPS 23 244 GPS Time Sync 244 Green button 19 147 Guide Display 75 147 192 Guide indicators 30 Guide number 218 H HDMI output format 180 HDMI output terminal...

Страница 261: ...ens mount cover 47 Lens mount index 17 48 Lens unlock button 18 Lens with aperture ring 235 Live View 190 Locking the exposure 87 Locking the focus 97 Long exposure 83 M M button 158 a Manual Exposure mode 81 Macintosh 208 Macro b 75 76 Main switch 18 21 49 Manual Exposure mode a 81 Manual Flash Discharge 59 63 Manual focus 92 98 Manual White Balance 132 Memory 195 Memory Card 45 3 button 19 21 33...

Страница 262: ...lette 154 229 Playback time 42 Playing back images continuously 160 Playing back movies 121 Portrait c 75 76 Portrait Custom Image 140 Posterization Digital Filter 168 Power 49 Power Saving 194 Preview 99 147 Printing 204 Product registration 213 Program Automatic Exposure mode e 81 Protect setting 200 Provided software 211 PTP 209 P TTL Flash 221 Q Quality Level 114 129 Quick Zoom 156 R d R butto...

Страница 263: ...r 168 Slow Shutter Speed NR 91 Slow speed Sync 59 216 Soft Digital Filter 168 Software 197 211 Sound Effects 186 Speaker 17 Specifications 250 Spot Autofocus Method 93 Spot metering 88 sRGB 129 Stage Lighting n 77 Standard U 75 Standard Information Display 23 25 Standby mode display selection 22 Starburst Digital Filter 168 Startup screen 49 192 Strap 38 Sunset K 75 76 Surf Snow Q 77 T L Shutter A...

Страница 264: ...262 Appendix 10 Volume 114 186 W Water Color Digital Filter 167 White Balance 130 Windows 208 World Time 187 Write protect 5 Z Zoom lens 57 ...

Страница 265: ... by non authorized PENTAX service facilities Procedure During 12 month Warranty Period Any PENTAX which proves defective during the 12 month warranty period should be returned to the dealer from whom you purchased the equipment or to the manufacturer If there are no representatives of the manufacturer in your country send the equipment to the manufacturer with postage prepaid In this case it will ...

Страница 266: ...e and only after you accept the quoted service charge instruct the service station to proceed with the servicing This warranty policy does not affect the customer s statutory rights The local warranty policies available from PENTAX distributors in some countries can supersede this warranty policy Therefore we recommend that you review the warranty card supplied with your product at the time of pur...

Страница 267: ...l interference to radio communications However there is no guarantee that interference will not occur in a particular installation If this equipment does cause harmful interference to radio or television reception which can be determined by turning the equipment off and on the user is encouraged to try to correct the interference by one or more of the following measures Reorient or relocate the re...

Страница 268: ...the standards Records maintained continue to reflect the equipment being produced can be expected to be within the variation accepted due to quantity production and testing on the statistical basis as required by 47CFR 2 909 Operation is subject to the following two conditions 1 This device may not cause harmful interference and 2 This device must accept any interference received including interfe...

Страница 269: ...ropriate waste handling If a chemical symbol is added beneath the symbol shown above in accordance with the Battery Directive this indicates that a heavy metal Hg Mercury Cd Cadmium Pb Lead is present in the battery at a concentration above an applicable threshold specified in the Battery Directive For more information about collection and recycling of used products please contact your local autho...

Страница 270: ...Memo ...

Страница 271: ...tries SDXC Logo is a trademark of SD 3C LLC This product includes DNG technology under license by Adobe Systems Incorporated The DNG logo is a either registered trademark or trademark of Adobe Systems Incorporated in the United States and or other countries HDMI the HDMI logo and High Definition Multimedia Interface are trademarks or registered trademarks of HDMI Licensing LLC in the United States...

Страница 272: ...ww pentax fr PENTAX RICOH IMAGING DEUTSCHLAND GmbH Julius Vosseler Strasse 104 22527 Hamburg GERMANY http www pentax de PENTAX RICOH IMAGING UK LTD PENTAX House Heron Drive Langley Slough Berks SL3 8PN U K http www pentax co uk PENTAX RICOH IMAGING AMERICAS CORPORATION 633 17th Street Suite 2600 Denver Colorado 80202 U S A http www pentaximaging com PENTAX RICOH IMAGING CANADA INC 1770 Argentia Ro...

Отзывы: