Pentax EG-1690K Скачать руководство пользователя страница 11

– 6 –

1-3. Video Processor

NOTE:

Read the instructions for use supplied with the video processor.

WARNING: 

Do not install, operate or store electro-medical equipment in a dusty 
environment. Accumulation of dust within these units may cause 
malfunction, smoke, or ignition.

NOTE:

Be sure to use compatible bottle and water bottle cap. If incompatible  
bottle and a water bottle cap are used together, it could cause the air to 
escape resulting in insufficient pressure and flow of air and water during 
the endoscopic procedure. 

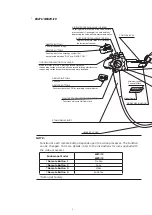
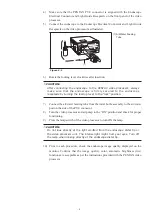
1)  PENTAX Video Processor

(6)

(1)

(2)

(5)

(4)

(3)

(1) Lamp Switch
(2) Pump Switch
(3) Endoscope Electrical 

Connector

(4) Light Guide 

Receptacle

(5) Power Switch
(6) Water Bottle Assembly

Figure 1.2 

CAUTION:

Replace the lamp before the lamp life expires. Prior to use, check the lamp 
life indicator. Excessive use of the lamp beyond the lamp life could cause 
the lamp to explode resulting in damage to the video processor. Refer to 
the video processor's instructions for use regarding the lamp life.

NOTE:

Software update may be required depending on the software version of 
the PENTAX video processor. If the software is not updated, the image will 
not be displayed.  If the images are not displayed correctly, please contact 
your local PENTAX service facility.

Содержание EG-1690K

Страница 1: ...procedures for inspecting and preparing the equipment prior to its use For the cleaning and maintenance of the equipment after its use please refer to the separate Instructions for Use reprocessing E...

Страница 2: ......

Страница 3: ...ding valve OF B190 Inlet seal OE C12 Water jet check valve adapter Notes Read this Instructions for Use IFU before operating and save this book for future reference Failure to read and thoroughly unde...

Страница 4: ...erator about important information on the use of this equipment Prescription Statement Federal U S A law restricts this device to sale by or on the order of a physician or other appropriately licensed...

Страница 5: ...TION FOR USE 7 2 1 Inspection of the Video Processor 7 2 2 Inspection of Endoscope 9 2 3 Preparation just before Insertion of Endoscope 28 3 DIRECTIONS FOR USE 30 3 1 Operation 31 3 2 Pretreatment 33...

Страница 6: ...ONTROL KNOB UP DOWN ANGULATION CONTROL KNOB RIGHT LEFT ANGULATION LOCK KNOB Functions similar to Up Down lock UMBILICAL CORD REMOTE BUTTON 1 REMOTE BUTTON 4 MAGNIFICATION CONTROL LEVER EG 2990i See de...

Страница 7: ...d surface WATER JET PORT Endoscopes with water jet system STRAIN RELIEF BOOT To connect the OL Z3 cable From the a compatible PENTAX video processor Not available in EG 1690K FEEDBACK TERMINAL INSERTI...

Страница 8: ...ng the valve delivers pressurized water SUCTION CONTROL VALVE OF B120 Depress to remove fluids or air through the instrument channel REMOTE BUTTON 1 Push to freeze an image Push to activate the hardco...

Страница 9: ...f a spray directed at the endoscopically visualized surface WATER JET PORT Endoscopes with water jet system RIGHT LEFT ANGULATION CONTROL KNOB INSTRUMENT CHANNEL INLET For introduction of biopsy force...

Страница 10: ...TAX instruments the accessory manufacturer should be consulted to confirm compatibility with PENTAX endoscope before use Maximum outer diameter of an endoscopic accessory instrument must be at least 0...

Страница 11: ...X Video Processor 6 1 2 5 4 3 1 Lamp Switch 2 Pump Switch 3 Endoscope Electrical Connector 4 Light Guide Receptacle 5 Power Switch 6 Water Bottle Assembly Figure 1 2 CAUTION Replace the lamp before th...

Страница 12: ...essor is properly grounded or that it is connected to an appropriate isolation transformer PENTAX SAT 1300 or other medical purpose isolation transformers Also be sure to use a video processor specifi...

Страница 13: ...er to the lock position 7 Connect the air water feeding tube from the water bottle assembly to the air water port on the side of the PVE connector 8 Turn the video processor and air pump to the ON pos...

Страница 14: ...e integrity of their water tight design using PENTAX leakage tester If the endoscope is used in a condition where the integrity of its water tight design is compromised it could result in endoscope da...

Страница 15: ...gh textured surfaces cracks brittleness sharp edges holes peeling tackiness etc the endoscope should NOT BE USED During this inspection process check the surface condition of the adhesive by applying...

Страница 16: ...the endoscope if there are any extraordinarily rigid portion which do not bend as easily as the rest of the arch extraordinarily flexible portions which bend much more than the rest of the arch Figur...

Страница 17: ...membrane tissue damage to the patient Therefore do not use the endoscope if there is any sign of abnormalities in the distal end of the endoscope CAUTION During pre use inspection ensure that the dist...

Страница 18: ...ully inspected for their integrity and checked for any looseness in the mating or joining of components including the following parts areas the instrument channel inlet biopsy inlet port 1 the suction...

Страница 19: ...ument avoid excess force twisting rotation and or bending of the actual insertion tubes and umbilical cord to prevent inadvertent damage crush compression deformity etc to these parts as well as to in...

Страница 20: ...angulation mechanism does not operate properly Use of endoscope with suspect angulation mechanism could lead to angulated distal tip to not being able to be released and end up damaging patient tissu...

Страница 21: ...re O ring set model OF B192 and the air water feeding valve model OF B188 can be used and perform the inspection again Since the check valve can NOT be replaced by the end user replace the entire A W...

Страница 22: ...be followed 1 Disconnect the endoscope from the video processor 2 Remove the suction control valve and the air water feeding valve 3 Using a cotton tipped applicator and alcohol clean the valve recess...

Страница 23: ...ure the oil is applied to all O rings and wipe off all excess Do NOT apply excess oil Doing so can allow for inadvertent migration of the oil inside channels or other areas not intended to be lubricat...

Страница 24: ...e OF B113 to the water jet port on the PVE connector c Attach a syringe filled with sterile water to this tube and flush water through the tube Water should flow in a steady and forceful stream from t...

Страница 25: ...as patient conditions allow WARNING Although the water jet system may not be clinically used during each procedure because the water jet channel of the endoscope enters the body cavity it can be conta...

Страница 26: ...ld result in decreased suction capability air fluid leakage and or the potential for cross contamination due to the possible reflux or spit back of patient fluids HANDLING OPERATION Simultaneous sucti...

Страница 27: ...thoroughly clean the suction channel selector and rinse well 7 Inspection of Remote Buttons and Magnification Control a Remote Buttons Check to ensure that the function that you assigned to each remot...

Страница 28: ...re not damaged or worn 1 1 OF B120 Figure 2 17 WARNING Make sure that the correct suction control valve OF B120 is being used A worn or damaged valve and or O ring should be replaced with a new one Th...

Страница 29: ...suction Continuous aspiration can cause loss of air fluid difficulty in maintaining proper insufflation and or inadvertent suctioning of tissue into the distal instrument channel opening Also it could...

Страница 30: ...ope Apply a small amount of silicone oil lubricant OF Z11 onto rubber part and the O ring Place a small droplet of oil OF Z11 on one s sterile gloved forefinger and gently swirl between thumb and fore...

Страница 31: ...r each clinical use CAUTION The instrument A W and the water jet channel systems are made of stainless steel Noryl and fluorine contained polymers When any fluids are used with this endoscope please r...

Страница 32: ...copic accessories such as biopsy forceps through a fully angulated bending section Prior to using accessories from another source non PENTAX products contact the manufacturers of the accessories to co...

Страница 33: ...ufacturer and follow local regulations regarding safe use appropriate handling and disposal of cleaning and disinfection solution including alcohol Material Safety Data Sheets Health and Safety Data S...

Страница 34: ...s lens cleaner CAUTION Never drop this equipment or subject it to severe impact as it could compromise the functionality and or safety of the unit Should this equipment be mishandled or dropped do not...

Страница 35: ...ecialized in the field to determine whether the use of this instrument is safe by taking all factors into consideration WARNING Because of the leakage current from the endoscope there is a possibility...

Страница 36: ...gulate the distal end in the Left direction 1 2 F U L R D F 1 Right Left 2 UP Down Figure 3 1 2 Angulation Lock function a Turn the Up Down Angulation Lock Lever counterclockwise to lock the Up Down a...

Страница 37: ...Control Valve to stop suctioning 5 Remote Button function Function assigned to each Remote Button is activated by pressing the corresponding Remote Button Refer to the Instructions for Use supplied wi...

Страница 38: ...such as starting and stopping please refer to the PENTAX Video Processor Instructions for Use 1 Endoscopes with Magnification Control Lever Turn the magnification control lever counterclockwise to re...

Страница 39: ...tance be encountered never apply excessive force WARNING Ensure that the angulation controls can rotate smoothly that there is no grinding or excess friction within the angulation system and that the...

Страница 40: ...ring aspiration avoid prolonged suction time and use the minimum level of negative pressure required to perform the clinical procedure CAUTION Do not apply excessively negative pressures high suction...

Страница 41: ...SE STERILE WATER ONLY NOTE Leaving the finger on the button could cause the function hard copy or recording etc to be activated inadvertently 11 Image capture hard copy video recording etc may be carr...

Страница 42: ...d be consulted to confirm compatibility with PENTAX endoscope before use CAUTION For safety reasons always insert and advance the accessory in the standard non magnified mode Magnified vision reduces...

Страница 43: ...forceps onto the target area Figure 3 6 3 Open the forceps cups jaws and advance the forceps against the target area Carefully squeeze the forceps handle to close the cups jaws and obtain a specimen...

Страница 44: ...ndings such as an environment with a high oxygen concentration may cause explosion If there is a possibility of flammable gas being present within a body cavity use nonflammable gas such as CO2 or air...

Страница 45: ...no greater than the rate of air delivery when the air water feeding valve on the control head of the endoscope is covered 4 The water delivery system is activated by pressing the air water feeding val...

Страница 46: ...e laser close distance of laser fiber to endoscope tip excessive tissue burning can each adversely influence image quality To obtain optimum results it is recommended that the power settings of the ai...

Страница 47: ...o within 10mm of the irradiated tissue flare may appear at the corners of the image as shown below in Figure 3 13 1 2 1 Flare 2 Probe Figure 3 9 WARNING Activation of the laser at high power settings...

Страница 48: ...ygen concentration may cause explosion If there is a possibility of flammable gas being present within a body cavity use nonflammable gas such as CO2 or air instead When using nonflammable gas there i...

Страница 49: ...ARNING To avoid user burn and or severe damage to the patient follow the instructions below before high frequency energy is delivered 1 Use only the electrosurgical systems with the floating grounding...

Страница 50: ...the patient while high frequency energy is delivered 8 To avoid the risk of thermal injury use only insulated devices Never use non insulated devices while performing endoscopic electrosurgical proce...

Страница 51: ...ity and or functionality of PENTAX instruments built with these unauthorized untested and unapproved items materials repair assembly methods must be referred to the third party service organization an...

Страница 52: ...this product is 6 years from the date of manufacture Follow the instructions in the Instructions for Use for appropriate pre use inspections proper usage care after use storage and replacement of con...

Страница 53: ...mpatibility Y Yes N No Water Jet Y N N N N Selection of Suction Channel N N N N N Electrosurgery Y Y N Y Y There is no guarantee that instruments selected solely using this minimum instrument channel...

Страница 54: ...Operation Function Y Yes N No Compatibility Y Yes N No Water Jet Y Y Y Selection of Suction Channel N N Y Electrosurgery Y Y Y There is no guarantee that instruments selected solely using this minimum...

Страница 55: ...ion Y Yes N No Compatibility Y Yes N No Water Jet N Y Selection of Suction Channel N N Electrosurgery Y Y There is no guarantee that instruments selected solely using this minimum instrument channel w...

Страница 56: ...51 MEMO...

Страница 57: ...52 MEMO...

Страница 58: ...53 MEMO...

Страница 59: ......

Страница 60: ...on 2 7 5 Naka Ochiai Shinjuku ku Tokyo 161 8525 Japan PENTAX Medical Company A Division of PENTAX of America Inc 3 Paragon Drive Montvale New Jersey 07645 1782 USA Tel 1 201 571 2300 Toll Free 1 800 4...

Отзывы: