background image

O’Pen Wide (P 2004) 


DE - 5 

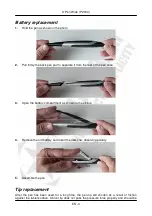
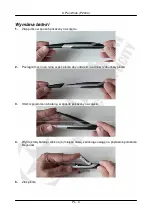
Wechseln der Spitze 

Nach  längerem  Stifteinsatz  verkürzt  sich  die  Spitze  infolge  der  Reibung  an  der 
Tablettoberfläche.  Eine  abgestumpfte  Stiftspitze  kann  den  Anpressdruck  nicht  genau 
wiedergeben, deswegen soll sie ersetzt werden. Dem Tablett liegen zwei zusätzliche Spitzen 
sowie eine Pinzette zum leichten Wechsel der Spitze bei. Führen Sie nachfolgende Schritte 
durch, um die Spitze zu wechseln: 

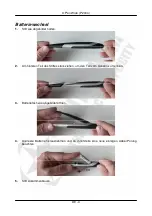
1. 

Mit  der  beiliegenden  Pinzette  an  der  Spitze  fassen  und  sorgfältig  aus  dem  Stift 
herausziehen. 

2. 

Eine neue Spitze an die Stelle der abgenutzten einsetzen. 

3. 

Die neue Spitze senkrecht stehend andrücken. 


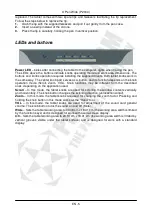
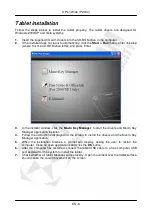
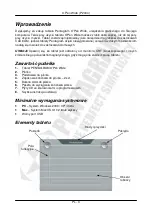
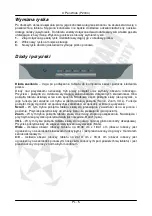
Leuchtdioden und Tasten 


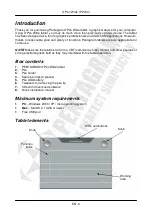
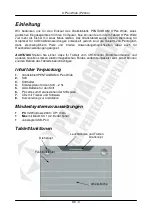
Stromdiode

  –  blinkt  nach  dem  Anschluss  des  Tabletts  an  den  Computer;  sie  leuchtet 

kontinuierlich, wenn Bewegungen des Stiftes verfolgt werden. 
Die  Leuchtdioden  zeigen  den  Betriebsmodus  der  Drehknöpfe  sowie  Abmessungen  der 
Arbeitsfläche an. Tasten und Drehknöpfe erfordern zu ihrem Betrieb, dass die mitgelieferten 
Treiber  installiert  sind.  Beide  Drehknöpfe  des  Tabletts  arbeiten  auf  die  gleiche  Weise.  Der 
mittlere Teil eines Drehknopfes dient als eine Taste, deren Funktion vom Betriebsmodus der 
Drehknöpfe  (Scroll,  Zoom,  VOL)  abhängt.  Die  Funktion  der  Drehknöpfe  kann  von  der 
beschriebenen abweichen, je nach Anwendung, mit der sie zum Einsatz kommen. 

Scroll

  –  In  diesem  Modus  dienen  die  Drehknöpfe  zum  vertikalen  und  horizontalen 

Verschieben  des  Fensterinhalts.  Die  Taste  am  Drehknopf  dient  zum  Umkehren  der 
Scrollrichtung (vertikal/horizontal). 

Zoom

 – In diesem Modus dienen die Drehknöpfe zum Ändern des Vergrößerungsfaktors. Das 

Drücken und Gedrückthalten der Drehknopftaste wirkt wie das Werkzeug „Hand“. 

VOL

  –  In  diesem  Modus  dienen die  Drehknöpfe  zum  Einstellen  der  allgemeinen  Lautstärke 

der Soundkarte. Die Taste auf dem Drehknopf dient zum Ein-/Ausschalten der Stummfunktion 
(Mute). 

Wide

 – Die Arbeitsfläche des Tabletts wird als 30,48 cm x 18,41 cm festgelegt (die Breite der 

Arbeitsfläche  wird  durch  Funktionstasten  eingeschränkt),  sie  ist  zum  Einsatz  mit 
Breitbildschirm-Monitoren bestimmt. 

4:3

 – Die Arbeitsfläche des Tabletts wird als 24,13 cm x 18,41 cm festgelegt (die Breite der 

Arbeitsfläche  wird  durch  sichtbare  vertikale  Schnitte  unter  der  Tablettoberfläche 
eingeschränkt), sie ist zum Einsatz mit einem üblichen Monitor bestimmt. 
 

Содержание O'Pen Wide P 2004

Страница 1: ...TZUNGEN DE 3 TABLETTFUNKTIONEN DE 3 BATTERIEWECHSEL DE 4 WECHSELN DER SPITZE DE 5 LEUCHTDIODEN UND TASTEN DE 5 INSTALLATION DES TABLETTS DE 6 UMGANG MIT DEM TABLETT DE 7 KONFIGURATION DES TABLETTS DE 8 WINDOWS 2000 XP DE 8 WINDOWS VISTA DE 10 MACRO KEY MANAGER DE 10 WPROWADZENIE PL 3 ZAWARTOŚĆ PUDEŁKA PL 3 MINIMALNE WYMAGANIA SYSTEMOWE PL 3 ELEMENTY TABLETU PL 3 WYMIANA BATERII PL 4 WYMIANA RYSIKA...

Страница 2: ...en und technische Angaben können sich ändern ohne dass es zuvor bekannt gegeben und oder in dieser Anleitung vermerkt wird Copyright 2007 PENTAGRAM Alle Rechte vorbehalten Vervielfältigung und Kopieren verboten UWAGA Wszystkie informacje i dane techniczne mogą ulec zmianie bez wcześniejszego powiadomienia i lub zaznaczenia tego w niniejszej instrukcji Copyright 2007 PENTAGRAM Wszelkie prawa zastrz...

Страница 3: ...Installation and User s manual PENTAGRAM O Pen Wide P 2004 The latest versions of manuals drivers and software are available on www pentagram pl ...

Страница 4: ...O Pen Wide P 2004 EN 2 ...

Страница 5: ... appropriate for home use NOTE Make sure the tablet is far from a CRT cathode ray tube monitor and other sources of strong electromagnetic field as they may interfere with the tablet operation Box contents 1 PENTAGRAM O Pen Wide tablet 2 Pen 3 Pen holder 4 Spare pen tips 2 pieces 5 Pen AAA battery 6 Tweezers for removing the pen tip 7 CDs with drivers and software 8 Quick installation manual Minim...

Страница 6: ...n case 3 Open the battery compartment as shown in the picture 4 Remove the old battery and insert the new one observing polarity 5 Assemble the pen Tip replacement After the pen has been used for a long time the pen tip will shorten as a result of friction against the tablet surface A blunt tip does not pass the pressure force properly and should be ...

Страница 7: ...tion mode Scroll Zoom VOL Knob functions may be different from the described ones depending on the application used Scroll In this mode the tablet knobs are used for scrolling the window contents vertically and horizontally The knob button changes the scrolling direction vertical horizontal Zoom In this mode the tablet knobs are used for changing the zoom factor Pressing and holding the knob butto...

Страница 8: ...e Macro Key Manager to start the drivers and Macro Key Manager application installer 4 Follow the instructions displayed on the screen to install the drivers and the Macro Key Manager application 5 When the installation finishes a prompt will display asking the user to restart the computer Close all open applications and click the OK button 6 After the computer has restarted connect the tablet USB...

Страница 9: ...ouble clicking with the left mouse button either tap the pen against the tablet surface twice in one place very quickly trying not to displace the pen or press the upper side button of the pen The pen side buttons functions may be changed in the tablet driver Windows Vista The right mouse button is replaced with the upper side button of the pen You can also hold the pen touched in one place of the...

Страница 10: ...tab you can see the most important information concerning the tablet Unit select if the tablet dimensions are to be displayed in inches inch or centimeters cm Tracking Mode select the tracking mode of the pen movements by the tablet Pen Absolute the tablet active area corresponds to the screen area Mouse Relative the tablet pen is treated as the mouse Below there is more information about the tabl...

Страница 11: ...e pen Default restoring the default settings Pen Offset Value to use the default tablet values tick the Auto Setting field To adjust the height untick the Auto Setting field click the Adjust button and follow the instructions on the screen Click Pressure setting the pressure sensitivity Test After clicking this button a window will open in which you may test the new pen sensitivity settings To cle...

Страница 12: ...ay next to the clock with the right mouse button causes the context menu to appear Its items are described below About Opens the window with information about the software version driver version and firmware version Show Displays the main application window Double clicking on the application icon has the same effect Disable Enable Turns off on the function fields Setting Opens the window with the ...

Страница 13: ...d in the preview Setting Tick this field to turn on the selected function field Hint Enter in the field the contents of the balloon which will display on the monitor when the pen is above the selected function field Linking Enter the path to the file which will be launched after pressing the selected function field To browse folders in order to find the file press the button Confirm Press this but...

Страница 14: ...installed in the system 3 After clicking the button the window Installed Software will display It contains the list of applications installed in the system Highlight the application you want to add to the list and click the OK button to select the application and close the window Click the Cancel button to close the window without choosing an application 4 After selecting the displayed application...

Страница 15: ...Installations und Bedienungsanleitung PENTAGRAM O Pen Wide P 2004 Die neueste Fassung der Anleitung Treiber und Software sind auf der Seite www pentagram pl erhältlich ...

Страница 16: ...O Pen Wide P 2004 DE 2 ...

Страница 17: ...gnet ACHTUNG Stellen Sie sicher dass Ihr Tablett vom CRT Monitor Bildröhrenmonitor und anderen Quellen starken elektromagnetischen Feldes entfernt eingesetzt wird sonst können sie den Betrieb des Tabletts beeinträchtigen Inhalt der Verpackung 1 Grafiktablett PENTAGRAM O Pen Wide 2 Stift 3 Stifthalter 4 Ersatzspitzen für den Stift 2 St 5 AAA Batterie für den Stift 6 Pinzette zum Herausziehen der St...

Страница 18: ...e abgebildet halten 2 Am hinteren Teil des Stiftes stark ziehen um den Teil vom Ganzen zu trennen 3 Batteriefach wie abgebildet öffnen 4 Die leere Batterie herausnehmen und an ihre Stelle eine neue einlegen dabei Polung beachten 5 Stift zusammenbauen ...

Страница 19: ...iche Weise Der mittlere Teil eines Drehknopfes dient als eine Taste deren Funktion vom Betriebsmodus der Drehknöpfe Scroll Zoom VOL abhängt Die Funktion der Drehknöpfe kann von der beschriebenen abweichen je nach Anwendung mit der sie zum Einsatz kommen Scroll In diesem Modus dienen die Drehknöpfe zum vertikalen und horizontalen Verschieben des Fensterinhalts Die Taste am Drehknopf dient zum Umkeh...

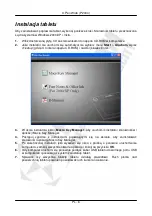
Страница 20: ...er um die Installationssoftware für Treiber und Anwendungen Macro Key Manager zu starten 4 Den eingeblendeten Anweisungen folgen um Treiber und die Anwendung Macro Key Manager zu installieren 5 Nachdem die Installation fertiggestellt ist erscheint das Fenster mit einer Anweisung das System erneut zu starten daraufhin alle Anwendungen schließen und auf die Schaltfläche OK klicken 6 Wenn der Compute...

Страница 21: ...imal nacheinander die Tablettoberfläche an einer Stelle antippen dabei den Stift nicht verschieben oder die obere seitliche Taste am Stift drücken Die Funktionsweise der am Stift seitlich angeordneten Tasten können im Treiberprogramm des Tabletts geändert werden Windows Vista Die rechte Maustaste wird von der oberen seitlichen Taste am Stift vertreten Hierzu können Sie auch die Tablettoberfläche a...

Страница 22: ...it Einheit Wählen Sie ob Abmessungen des Tabletts in Zoll inch oder in Zentimeter cm angezeigt werden sollen Tracking Mode Modus der Verfolgung Wählen Sie die Art und Weise wie das Tablett die Stiftbewegungen verfolgt Pen Absolute Stift absolut die aktive Fläche des Tabletts entspricht der Bildschirmfläche Mouse Relative Mouse relativ der Tablettstift wird wie eine Mouse behandelt Unten entnehmen ...

Страница 23: ...ameter des Tabletts zu verwenden aktivieren Sie das Ankreuzfeld Auto Setting Automatische Einstellungen Um den Abstand anzupassen entfernen Sie die Markierung Auto Setting Automatische Einstellungen klicken Sie auf die Schaltfläche Adjust Anpassen und folgen Sie den Anweisungen die auf dem Bildschirm eingeblendet werden Click Pressure Klickstärke Festlegung der Druckempfindlichkeit Test nach Ankli...

Страница 24: ... Uhr geklickt haben erscheint das Kontextmenü Nachfolgend sind einzelne Posten des Menüs beschrieben About Fenster mit Angaben über die Version der Anwendung Software Version des Treibers Driver Version und der Firmware Firmware Version werden angezeigt Show Hauptfenster der Anwendung wird eingeblendet Die gleiche Wirkung erzielen Sie wenn Sie mit der Maus auf das Symbol der Anwendung doppelklicke...

Страница 25: ...d den Inhalt einer Blase ein die am Bildschirm erscheint wenn sich der Stift über gewähltem Funktionsfeld befindet Use hot key Wählen Sie Schnelltasten die simuliert werden wenn das gewählte Funktionsfeld angetippt wird Linking Geben Sie den Pfad für eine Datei ein die gestartet wird wenn das gewählte Funktionsfeld angetippt wird Um Verzeichnisse in der Suche nach einer Datei durchzusuchen klicken...

Страница 26: ...ie die Schaltfläche angeklickt haben wird das Fenster Installed Software mit einer Liste der im Betriebssystem installierten Anwendungen eingeblendet Anwendung markieren die Sie zur Liste hinzufügen wollen und klicken Sie auf OK um die Anwendung zu übernehmen und das Fenster zu schließen Klicken Sie auf die Schaltfläche Cancel um das Fenster zu schließen ohne eine Anwendung zu übernehmen 4 Nachdem...

Страница 27: ...Instrukcja instalacji i obsługi PENTAGRAM O Pen Wide P 2004 Najnowsze wersje instrukcji sterowników i oprogramowania dostępne są na stronie www pentagram pl ...

Страница 28: ...O Pen Wide P 2004 PL 2 ...

Страница 29: ...domowych UWAGA Upewnij się Ŝe tablet jest oddalony od monitora CRT kineskopowego i innych źródeł silnego pola elektromagnetycznego gdyŜ mogą one zakłócić pracę tabletu Zawartość pudełka 1 Tablet PENTAGRAM O Pen Wide 2 Piórko 3 Podstawka na piórko 4 Zapasowe końcówki do piórka 2 szt 5 Bateria AAA do piórka 6 Pęseta do wyciągania końcówki piórka 7 Płyty CD ze sterownikami i oprogramowaniem 8 Szybka ...

Страница 30: ...azany na zdjęciu 2 Pociągnij mocno za tylną część piórka aby oddzielić ją od reszty obudowy piórka 3 Otwórz pojemnik na baterię w sposób pokazany na zdjęciu 4 Wyjmij starą baterię i włóŜ na jej miejsce nową zwracając uwagę na poprawne połoŜenie biegunów 5 ZłóŜ piórko ...

Страница 31: ...owa część pokrętła słuŜy jako przycisk a jego funkcja jest zaleŜna od trybu w jakim działają pokrętła Scroll Zoom VOL Funkcje pokręteł mogą się róŜnić od opisanych w zaleŜności od aplikacji w której są uŜywane Scroll W tym trybie pokrętła tabletu słuŜą do przewijania zawartości okna w pionie i poziomie Przycisk pokrętła słuŜy do zmiany kierunku przewijania pion poziom Zoom W tym trybie pokrętła ta...

Страница 32: ...ey Manager aby uruchomić instalator sterowników i aplikacji Macro Key Manager 4 Postępuj zgodnie z instrukcjami pojawiającymi się na ekranie aby zainstalować sterowniki i aplikację Macro Key Manager 5 Po zakończonej instalacji jeśli wyświetli się okno z prośbą o ponowne uruchomienie komputera zamknij wszystkie otwarte aplikację i kliknij na przycisku OK 6 Gdy komputer uruchomi się ponownie podłącz...

Страница 33: ... albo bardzo szybko dwa razy dotknąć piórkiem powierzchni tabletu w jednym miejscu starając się nie przesunąć piórka lub nacisnąć górny boczny przycisk piórka Funkcje bocznych przycisków piórka mogą zostać zmienione w sterowniku tabletu Windows Vista Prawy przycisk myszy jest zastąpiony górnym bocznym przyciskiem piórka MoŜna takŜe w tym celu dotknąć i przytrzymać piórkiem w jednym miejscu powierz...

Страница 34: ...ące tabletu Unit Jednostka Wybierz czy wymiary tabletu mają być wyświetlane w calach inch czy centymetrach cm Tracking Mode Tryb śledzenia Wybierz sposób śledzenia przez tablet ruchów piórka Pen Absolute Piórko bezwzględny obszar aktywny tabletu odpowiada obszarowi ekranu Mouse Relative Myszka względny piórko tabletu jest traktowane jak mysz PoniŜej znajdują się inne informacje o tablecie Tablet M...

Страница 35: ...ień domyślnych Pen Offset Value Odległość piórka aby uŜyć domyślnych ustawień tabletu zaznacz pole Auto Setting Ustawienia automatyczne Aby dostosować wysokość odznacz pole Auto Setting Ustawienia automatyczne kliknij przycisk Adjust Dostosuj i postępuj zgodnie z instrukcjami które pojawią się na ekranie Click Pressure Siła kliknięcia ustalenie czułości na nacisk Test po kliknięciu tego przycisku ...

Страница 36: ... się w zasobniku systemowym obok zegara pojawi się menu kontekstowe PoniŜej opisane są poszczególne pozycje tego menu About Otwiera okno z informacjami o wersji aplikacji Software Version wersji sterownika Driver Version i wersji oprogramowania Firmware Firmware Version Show Wyświetla główne okno aplikacji Ten sam efekt moŜna osiągnąć wykonując myszą dwuklik na ikonie aplikacji Disable Enable Wyłą...

Страница 37: ...e funkcyjne Hint Wpisz w pole zawartość dymka który będzie wyświetlany na monitorze gdy piórko znajdzie się nad wybranym polem funkcyjnym Use hot key Wybierz kombinację klawiszy która będzie symulowana po naciśnięciu wybranego pola funkcyjnego Linking Wpisz ścieŜkę do pliku który będzie uruchomiony po naciśnięciu wybranego pola funkcyjnego Aby przeglądać foldery w poszukiwaniu pliku naciśnij przyc...

Страница 38: ...istę zainstalowanych w systemie aplikacji 3 Po kliknięciu przycisku wyświetlone zostanie okno Installed Software zawierające listę zainstalowanych w systemie aplikacji Zaznacz aplikację którą chcesz dodać do listy i kliknij przycisk OK aby wybrać aplikację i zamknąć to okno Kliknij przycisk Cancel aby zamknąć to okno bez wybierania aplikacji 4 Po wybraniu nazwy wyświetlanej aplikacji i pliku uruch...

Страница 39: ...O Pen Wide P 2004 ...

Страница 40: ...000 4 4 1995 A2 2001 IEC 61000 4 5 1995 A1 2000 IEC 61000 4 6 1996 A1 2000 lEC 61000 4 8 1993 A1 2000 IEC 61000 4 11 1994 A1 2000 Niniejszy produkt spełnia zasadnicze wymagania zawarte w rozporządzeniu Ministra Transportu i Budownictwa z dnia 27 grudnia 2005 r w sprawie dokonywania oceny zgodności aparatury z zasadniczymi wymaganiami dotyczącymi kompatybilności elektromagnetycznej oraz sposobu jej...

Отзывы: