background image


17


B. Calibration – Mac OS 
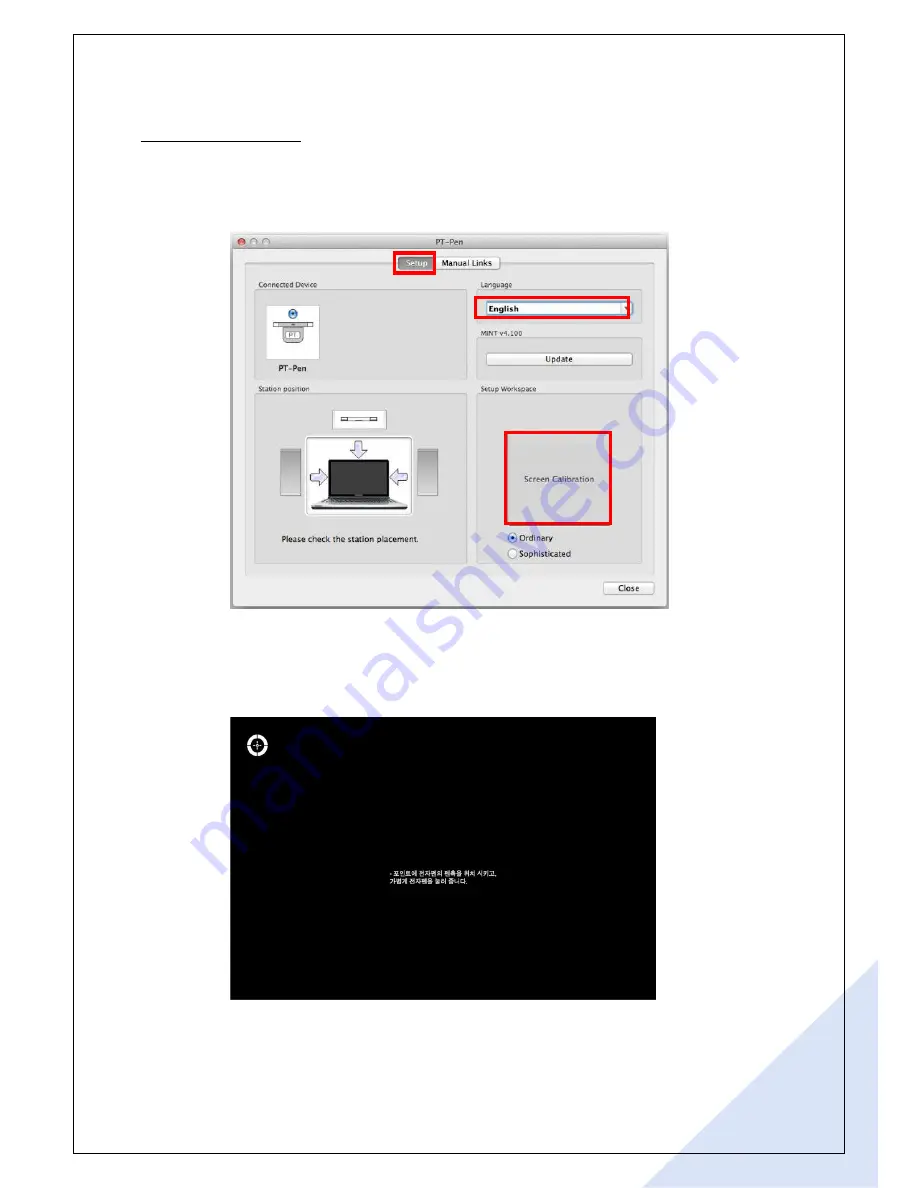
 

Connect the Station to PC and execute “MINT Control’ on desktop. After executing it, 
you can see and check the Station position and calibration in  ‘Calibration menu’ as 
shown in the picture below. 


After setting the Station position as user’s preference, click the ‘calibration’ button 

and then picture shown below will appear. Click the center of the each circle 

displayed on the screen. 


Содержание PT Pen

Страница 1: ... PENANDFREE PT Pen User s Manual Date 2012 09 25 Version 1 1 PENANDFREE PT PEN Windows Mac OS User s manual Copyright PENANDFREE LTD ...

Страница 2: ...quipment 7 5 1 Power supply of digital pen 7 5 2 Power supply of station 8 5 3 Charging equipment management 8 5 3 1 How to charge a pen 8 5 3 2 Verification of LED indication 9 6 Software installation guide 10 6 1 Windows OS 10 6 2 Mac OS 11 7 Station installation guide 13 8 Use of PT Pen 15 8 1 How to calibration 15 8 2 Use of pen 22 9 Product Specification 23 10 General Troubleshooting 24 ...

Страница 3: ...other infrared rays may cause product malfunction Eliminating such noises is required for normal operation This product contains a set of digital pen and station Be familiar with the function of product in order to use the product properly Be sure to read this user s guide carefully and follow all installation instruction in order to use the product properly This product has been tested by a digit...

Страница 4: ...C as well as annotating in any MS office document Also the rich functions from bundled software provided by Penandfree make it easier to write draw figures and graphs and it contains more than 2 000 contents Hence the distinct functions of PT Pen enable not only users to implement differentiated presentation but also make it easier for users to write and draw delicate figures that are difficult to...

Страница 5: ...l pen and other accessories as below Notice The picture above is for illustration purpose only Therefore the actual items may look different from the picture and some items are subject to change PT Pen is only usable with a station which is produced by PNF and accessories compatible with the product ...

Страница 6: ...his section For quick use of the product please be familiar with the exterior structure of PT pen 4 1 Station 4 2 Digital Pen Groove Receiver Sensor LED indicator USB Cable Charging Port Charges Power Button Power LED indicator Power on off indicator Battery indicator Deco Fixture ...

Страница 7: ... Lightly press the power button for 1 second to operate the pen The blinking of LED for 5 seconds indicates that the power is switched on Power verification When the pen is turned on a small Beep sound can be heard near the pen tip The Beep sound is too small that some people with poor hearing might not hear it To turn off A pen will turn itself off if it is not in use for more than 5 minutes To r...

Страница 8: ...recommend that you charge the pen fully before using the first time by connecting it with the PC through the charging cable Pen is still usable while charging It takes about 1 5 2 hours to fully charge the battery of pen 5 3 1 How to charge pen To charge the pen connect the smaller connector of the end of charging cable to the rear of the pen and connect the other end of charging cable to the USB ...

Страница 9: ...harging Verify that the charging cable is properly connected to the pen and USB port LED Light ON Pen is charging Wait until the pen is fully charged Caution Do not use any cable other than the cable provided with the product when charging the pen Using other cable might damage the digital pen When charging with USB Charger please use the genuine USB charger USB genuine charger purchasable separat...

Страница 10: ...nd various contents are included MINT Note Annotation software that s similar to MINT Interactive but no contents are included Refer to the Annotation SW Users guide for further instruction 6 1 Software installation Window OS Please insert a provided CD into a CD ROM MINT Installer pops up as shown in the picture below Select the language if required The default is set in accordance with the langu...

Страница 11: ... window Notes If the installer does not pop up automatically after inserting CD then go to Computer and find DVD drive labeled PNF and execute POPStater exe manually in it A warning pop up window might appear on Windows Vista and Windows 7 You can ignore it The latest version of S W will be installed after the existing version is automatically removed If you wish to remove the software manually th...

Страница 12: ...tem Language of user s PC operating system is set as a default Begin the software installation by clicking Install Click Next until it says installation complete After the completion of software installation MINT Control and MINT Interactive shortcut icons will appear on the desktop as shown in the picture below ...

Страница 13: ...n the right bottom side of the window 7 Station Installation Guide This page describes how to install a Station on your laptop 7 1 How to install a Station Bend a Station at 90 angle and then place the Deco Fixture into the groove as depicted below Peel off the masking tape double sided tape at the back of the Deco Fixture and then attach to the laptop of left right or top center based on your pre...

Страница 14: ...ect the USB at the end of Station to the USB port of laptop If the laptop is turned on a blue light will appear on the LED on the front side of Station and the product will automatically be recognized Please keep the Station separate when it will not be in use for a long time and it can be used anytime simply by mounting it to the fixed Deco Fixture ...

Страница 15: ...ntil the software is installed 8 Use of PT Pen 8 1 How to calibrate A Calibration Windows OS Connect the Station to PC and execute MINT Control on desktop After executing it you can see and check the Station position language and calibration in Setup menu as shown in the picture below ...

Страница 16: ... calibration button and then picture shown below will appear Click the center of the each circle displayed on the screen Click Sophisticated calibration if the pointed arrow doesn t accurately convey where the pen engages the target after the ordinary calibration s done ...

Страница 17: ...ng it you can see and check the Station position and calibration in Calibration menu as shown in the picture below After setting the Station position as user s preference click the calibration button and then picture shown below will appear Click the center of the each circle displayed on the screen ...

Страница 18: ...18 Click Sophisticated calibration if the pointed arrow doesn t accurately convey where the pen engages the target after the ordinary calibration s done ...

Страница 19: ...displays in multiple displays menu View by small icons in control panel Using an external monitor of less than 17 monitor is recommended Sizes and the shapes of external monitors are varied depending on its manufacturer Therefore there may be a blurry screen on the upper and lower corner Connect the Station to the USB Port of your PC and then go to Control Panel Click on Tablet PC Settings Tablet ...

Страница 20: ...ase1 using it on Monitor 1 Mount the station on Monitor 1 and lightly touch the screen of Monitor 1 with the Pen Execute MINT Control and calibrate Monitor 1 Monitor 2 Lightly touch the screen with the Pen ...

Страница 21: ...C What s being displayed on Monotor1 will appear on Monitor 2 as soon as you press the Enter key Touch the screen of Monitor2 when display appears Execute MINT Control and calibrate Monitor 1 Monitor 2 Press Enter key on your PC and lightly touch the screen with the Pen Press Esc key to exit ...

Страница 22: ...ouch twice the same location with a pen tip Drag Function After touching the screen with a pen tip drag it to any location you would like Caution The pointing arrow and pen tip might not be in alignment depending on the angle or direction at which you are grabbing a pen Grab a pen in the same way as you did while calibration It is now ready to use You can use the tablet PC function by touching and...

Страница 23: ...0 Workable Temp Humidity 10 40 C 20 80 RH Non condensing Storage Temp Humidity 20 60 C 20 90 RH Non condensing System Requirements CPU Greater than 1Ghz Pentium compatible computer or upper level RAM Over 1 GB CD ROM 4 Speed CD Rom Drive Power Supply Lithium Polymer Battery Fully charged in 1hr useable for 5hrs Power Consumption Full Active 11mAH Idle 3mAH Station Function Receiver for Laptop Ultr...

Страница 24: ... after charging it Pen is not writing smoothly Intercepting sound or light that affect the Station exists nearby Try again in a different area Pen is writing weird letters or drawing unnecessary lines Try it after setting the Station position again Pen is not writing on certain areas Make sure your hands are not blocking the Station s receiving sensor of IR or US Not working after connecting Stati...

Отзывы: