Pelonis FZ10-19JR Скачать руководство пользователя страница 5

4

CLEANING

1. Be sure to unplug from the electrical supply source before cleaning.

2. Plastic parts should be cleaned with mild soap and a damp cloth or sponge. 

    Thoroughly to remove soap film with clean water.

3. Be sure not to make water or other liquid enter inside of motor.

4. 

Dry all parts completely before reassembling and reconnecting to power 

    source.

a) Grasp plug and remove from the receptacle or

    other outlet device. Do not unplug by pulling 

    on cord. 

b) Open fuse cover. Slide open fuse access 

    cover on top of attachment plug towards blades.

c) Remove fuse carefully. Insert the tip of your tool 

    into fuse slot (close with the terminal), then prize 

    the fuse gradually and slowly, but not overexert. If you feel tight, you can try it at 

    several times and prize the fuse little by little. When one side of the fuse has 

    been prized, then you can get the fuse out entirely.

d) Risk of fire. Replace fuse only with 2.5 Amp, 125 Volt fuse.

e) Close fuse cover. Slide closed the fuse access cover on top of attachment plug.

f)  Risk of fire. Do not replace attachment plug. Contains a safety device (fuse) that 

    should not be removed. Discard product if the attachment plug is damaged.

Notice: 

1. When you replace the fuse, please don’t operate suddenly or overexert, or else 

    the product will be damage or cause accident.

2. When you feel it hard to be operated, please make sure you have got the right 

    way.

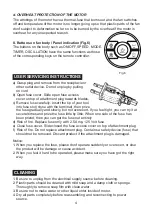
USER SERVICING INSTRUCTIONS

Fig.6

Speed

Mode

Timer

ON/OFF

Osc

d. OVERHEAT PROTECTION OF THE MOTOR

The windings of the motor have a thermal-fuse that burns out and the fan switches 

off and temperature of the motor is no longer going up so that plastic parts of the fan 

don’t subject to deformation so far so to be burned by the overheat if the motor is 

overheat for any unexpected reason.

II. Buttons on fan body / Panel indication (Fig.6)        

The buttons on the body such as ON/OFF,SPEED, MODE,

TIMER, OSCILLATION have the same functions as those 

of the corresponding keys on the remote controller.

Содержание FZ10-19JR

Страница 1: ...INSTRUCTION MANUAL 36 TOWER FAN MODEL FZ10 19JR READ AND SAVE THESE INSTRUCTIONS...

Страница 2: ...n authorized service facility for examination and or repair 3 Do not run cord under carpeting Do not cover cord with throw rugs runners or similar coverings Do not route cord under furniture or applia...

Страница 3: ...Press this key to select mode The sequence is normal natural and sleep when this key being touched repeatedly or continuously The light indicate mode state ASSEMBLY INSTRUCTIONS Fig 4 OPERATION INSTRU...

Страница 4: ...he time for air delivery Increase in increments up to 1 2 3 4 5 6 7 hours c REMOTE CONTROLLER OPERATION Point the remote controller at the receptor on body of the fan and press the desired button The...

Страница 5: ...place fuse only with 2 5 Amp 125 Volt fuse e Close fuse cover Slide closed the fuse access cover on top of attachment plug f Risk of fire Do not replace attachment plug Contains a safety device fuse t...

Страница 6: ...5 For questions or comments please write to Midea America Corporation Customer Care Center 11411 NW 107th Street Suite 12 Miami FL 33178 1 866 646 4332 fan...

Страница 7: ...usage Midea America Corporation assumes no responsibility whatsoever if the Fan should fail during the warranty period by reason of Misuse negligence physical damage or accidents Lack of maintenance s...

Страница 8: ...MANUAL DE INSTRUCCIONES VENTILADOR DE TORRE DE 91 8cm MODELO FZ10 19JR LEE LAS INSTRUCCIONES Y GU RDALAS...

Страница 9: ...corriendo 2 Desconecte el ventilador cuando se mueva de una ubicaci n a otra 3 Aseg rese de que el ventilador est sobre una superficie estable cuando est funcionando para evitar volcaduras 4 No use e...

Страница 10: ...edio y Alto 3 BOT N DE MODO Pulse esta tecla para seleccionar el modo La secuencia es normal Natural y dormir cuando se toca esta tecla repetidamente o continuamente La luz indica estado de modo INSTR...

Страница 11: ...inalmente a baja velocidad Si configura la velocidad M se ejecuta a velocidad media 30 1 minutos finalmente a baja velocidad Si se configura a velocidad L se ejecuta a baja velocidad 4 OSC REJILLA Una...

Страница 12: ...oltios e Cierre la tapa del fusible Deslice y cierre la tapa de acceso al fusible en la parte superior del tap n de fijaci n f Riesgo de incendio No sustituya enchufe Contiene un dispositivo de seguri...

Страница 13: ...s o comentarios por favor escriba a Centro de atenci n al cliente Midea America Corporation 11411 NW 107th Street Suite 12 Miami FL 33178 Para su registro engrape su recibo de compra a este manual y r...

Страница 14: ...sponsabilidad si el Ventilador falla durante el per odo de garant a debido a Midea America Corporation no ofrece m s garant as ni declaraciones expre sas o impl citas excepto las que se incluyen en es...

Отзывы: