pela tools 507083 Скачать руководство пользователя страница 1

Tyre changer U-6656AT

Däckmaskin U-6656AT, en hastighet

Item No: 

507083

Содержание 507083

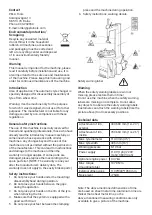
Страница 1: ...Tyre changer U 6656AT Däckmaskin U 6656AT en hastighet Item No 507083 ...
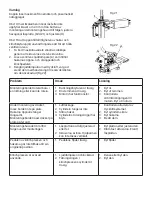
Страница 2: ... och skada på maskinen och då gäller inte längre garantin Om vissa delar är skadade var god och ersätt dem enligt reservdelslistan OBS Garantin är ett år efter tillverkarens leveransdatum Garantin gäller inte de lättbrutna delarna Säkerhetsanvisningar 1 Placera inte händerna under monterings demonteringshuvudet under drift 2 Placera inte händerna mellan gapen under operationen 3 Placera inte hände...

Страница 3: ...redelse av verktygen 2 Placera svänggångjärnen 3 bild 3 på stammen 1 bild 3 med 4 skruvar M12 träd luftslangen 2 bild 3 genom hålet i pelaren Dra åt 4 låsmuttrar 8 bild 3 3 Sätt bulten 9 bild 3 i hålen i både pelare och den lutande cylinderarmen 11 bild 3 dra åt den med en låsmutter 10 bild 3 4 Skruva loss de två bultarna på det vänstra locket och ta bort locket anslut luftslangen 2 bild 3 som tid...

Страница 4: ... skada däcket eller till och med orsaka att det går sönder Sätt fast fälgen med fastsättningshakarna beroende på dess måttförhållanden a Att låsa fälgen från yttersidan Använd pedalen V för att röra de fyra hakarna G på monteringsbordet Y till lämplig punkt beroende på fälgens storlek Sätt däcket på monteringsbordet håll i fälgen och tryck på hakarnas pedal V tills fälgen är stabilt fastsätt i hak...

Страница 5: ...ingen och har erfarenhet av maskiner Denna apparat får användas endast med våra däckmaskiner och vi ger ingen garanti att den fungerar med andra däckmaskiner Producenten tar inget ansvar för modifieringar som användaren gör på maskinen Installation Lägg märke till Installationen av denna hjälpanordning ska utföras av professionell personal Koppla bort enheten från strömförsörjningen och luftkällan...

Страница 6: ...Lyft hjälparmmen för att flytta däckpressblocket till sin arbetsställning 3 Demontering av nedre klinchen Vrid däckviktsrullen och flytta det under däcket men rör inte det med fälgen bild 15 Tryck på pedalen av monteringsbordet för att rotera bordet under tiden lyft hjälparmen gradvis för att lossa däcket och demontera nedre klinchen Varning Däckviktsrullen kan inte användas för alla däck vissa dä...

Страница 7: ...tt flytta maskinen Koppla från däckväxlaren från elnätet och den pneumatiska luftförsörjningen lyft basplattan och sätt i gaffeltruckarnas fötter Montera sedan däckväxlaren till en ny position och fixera den ordentligt Obs Den plats som valts för att fixa däckväxlaren måste uppfylla säkerhetsföreskrifterna Underhåll Varning Endast professionella personer kan göra underhåll För att förlänga maskine...

Страница 8: ...trasig 2 Drivremmen är trasig 3 Motorn har funktionsfel 1 Byt ut 2 Byt ut remmen 3 Kontrollera strömförsörjningen till motorn Byt ut motorn Under montering av däcket låses bordet inte på plats Hakarna öppnar stänger långsamt Monteringsbordet låser däcket på plats på fel sätt 1 Luftläckage 2 Cylindern fungerar inte 3 Slitna hakar 4 Cylinderns tätningsringar har bryts 1 Kontrollera alla delar av try...

Страница 9: ...pa spett eftersom spettet alltid placeras inuti så vi lokaliserar sprängskissen enligt nedan Se siffran 12 från figuren hitta sedan alla meddelanden från listan och notera dem Som följande figur Notera informationen Samla informationen om produkterna till exempel Kontakta vår reservdelsavdelning för att bekräfta beställningsinformationen Bekräfta att beställningsinformationen är korrekt så att bes...

Страница 10: ......

Страница 11: ...ger applies If some parts are damaged please replace them according to the spare parts list NOTE The warranty is one year after the manufacturer s delivery date The warranty does not apply to the easily broken parts Safety instructions 1 Do not place your hands under the mounting disassembly head during operation 2 Do not place your hands between the gaps during the operation 3 Do not place your h...

Страница 12: ...3 with 4 screws M12 thread the air hose 2 Fig 3 through the hole in the pillar Tighten 4 locknuts 8 Fig 3 3 Insert the bolt 9 Fig 3 into the holes in both the column and the inclined cylinder arm 11 Fig 3 tighten it with a lock nut 10 Fig 3 4 Unscrew the two bolts on the left cover and remove the cover connect the air hose 2 Fig 3 as previously mentioned to the side holes that guide the inclined 5...

Страница 13: ...achine can damage the tyre or even cause it to break Attach the rim with the mounting hooks depending on its dimensions a To lock the rim from the outside Use the pedal V to move the four hooks G on the mounting table Y to the appropriate point depending on the size of the rim Place the tyre on the mounting table hold the rim and press the pedal of the hooks V until the rim is firmly attached to t...

Страница 14: ... and has experience with machines This appliance may only be used with our tyre machines and we do not guarantee that it will work with other tyre machines The manufacturer takes no responsibility for modifications that the user makes to the machine Installation Notice The installation of this auxiliary device must be carried out by professional personnel Disconnect the unit from the power supply ...

Страница 15: ...k is released d Raise the auxiliary arm to move the tyre press block to its working position Disassembly of the lower clinch Turn the tyre weight roller and move it under the tire but do not touch it with the rim Fig 15 Press the pedal of the mounting table to rotate the table meanwhile gradually lifting the auxiliary arm to loosen the tyre and disassemble the lower clutch Warning The tyre weight ...

Страница 16: ... insert the feet of the forklift trucks Then mount the tyre changer to a new position and fix it properly Note The location chosen for fixing the tyre changer must comply with the safety regulations Maintenance Warning Only professionals can perform maintenance To extend the life of the machine maintain the machine carefully according to the operating instructions Otherwise it will affect the reli...

Страница 17: ...Engine malfunction 1 Replace 2 Replace the belt 3 Check the power supply to the motor Replace the engine While mounting the deck the table does not lock in place The hooks open close slowly The mounting table locks the tyre in place incorrectly 1 Air leakage 2 The cylinder does not work 3 Worn hooks 4 The cylinder sealing rings have been broken 1 Check all parts of the compressed air system 2 Repl...

Страница 18: ...or example we have to buy skewers because the skewer is always placed inside so we locate the exploded view as below See the number 12 from the figure then find all messages from the list and note them As the following figure Note the information Gather the information about the products for example Contact our spare parts department to confirm the order information Confirm that the order informat...

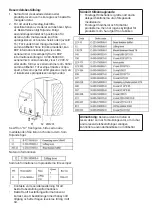
Страница 19: ...Exploded views ...

Страница 20: ......

Страница 21: ......

Страница 22: ......

Страница 23: ......

Страница 24: ......

Страница 25: ......

Страница 26: ......

Страница 27: ......

Страница 28: ......

Страница 29: ......

Страница 30: ......

Страница 31: ...Wiring diagram ...

Страница 32: ......

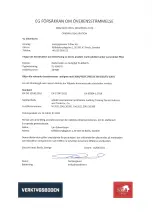
Страница 33: ...Verktygsboden Erfilux AB Källbäcksrydsgatan 1 SE 507 42 Borås Verktygsboden Borås Sweden 0120504 03 ...

Отзывы: