


15 •Place the chrome decals into the headlight
section of the front grill. Then attach the
clear plastic cover; press the attachments
into the 4 slots to form the front
headlight.
16 •Press the side inserts into place on the
body.
17 •Unscrew the knobs on the bottom of the
seat.
18 •Place seat bolts into red seat support
holes.
19 •The seat can be adjusted to 2 positions to
suit the height of the child (see figure).
20 •After adjusting the seat, tighten the 2
knobs that hold it in place.
21 •Insert front red seat support fingers into
chassis.
22 •Rotate support (and seat) down onto
chassis at the rear. Turn tractor chassis
upside down and secure support to chassis
with 2 screws.
23 •Apply the chrome decals to the taillight
positions as shown in the figure.
24 •Attach the taillight lenses by pressing from
the bottom upwards.
25 •Install left & right black plastic covers into
“C” slots on each rear fender.
26 •Press the trim piece into place under the
steering wheel.
27 •Install steering wheel; reach under tractor
to find metal steering column tube. Push it
upward as far as possible and hold it.
ENGLISH
FRANÇAIS
ESPAÑOL
15 •Positionner les autocollants chromés sur le
feu avant, au niveau de la calandre. Monter
ensuite le cache en plastique transparent
en enclenchant les quatre fixations dans
leurs logements pour former le phare
avant.
16 •Accrocher par pression les inserts latéraux
du châssis.
17 •Dévisser les poignées situées au fond du
siège.
18 •Placer les boulons du siège dans les
orifices rouges de support.
19 •Le siège est réglable en 2 positions selon la
taille de l’enfant (voir figure).
20 •Après avoir réglé le siège, revisser les 2
poignées de fixation.
21 •Insérez frontales rouges doigts de support
de siège dans le châssis.
22 •Retourner le support (et le siège) sur
l'arrière du châssis. Tournez le châssis du
tracteur vers le haut et fixer le support au
châssis à l'aide de 2 vis.
23 •Appliquer les décalcomanies chromées sur
les feux arrière comme montré sur la
figure.
24 •Fixer les cabochons des feux arrière en
poussant du bas vers le haut.
25 •Installer les deux couvercles en plastique
noirs droite et gauche dans les fentes “C”
de chaque aile arrière.
26 •Monter par pression la douille située sous
le volant.
27 •Installer le volant ; trouver sous le tracteur
la jupe de colonne de direction. La pousser
vers le haut le plus possible et la fixer.
15 •Pegar las pegatinas cromadas en el faro
delantero, donde se halla la rejilla
delantera. A continuación, colocar la tapa
de plástico transparente encajando los 4
enganches en sus orificios para formar el
faro delantero.
16 •Enganchar a presión las piezas laterales al
chasis.
17 •Desenroscar los botones esféricos que hay
en el fondo del asiento.
18 •Colocar los pernos del asiento en los
orificios del soporte del asiento rojo.
19 •El asiento se puede regular en 2 posiciones
según la altura del niño (véase la figura).
20 •Después de haber colocado el asiento,
volver a atornillar los dos botones
esféricos de fijación.
21 •Introducir las lengüetas de soporte del
asiento rojo delantero en el chasis.
22 •Girar el soporte (y el asiento) hacia abajo
en el chasis en la parte posterior. Girar el
chasis del tractor y sujetar el soporte al
chasis con 2 tornillos.
23 •Aplicar las pegatinas cromadas en la
posición de la luz trasera tal y como
muestra la figura.
24 •Acoplar los cristales de las luces traseras
apretando desde la parte inferior hacia
arriba.
25 •Instalar las cubiertas de plástico derecha e
izquierda en las ranuras “C” de cada
guardabarros posterior.
26 •Montar a presión la tuerca que hay debajo
del volante.
27 •Instalar el volante; buscar en la parte
inferior del tractor la varilla de metal del
volante. Empujarla hacia arriba tanto como
sea posible y sujetarla.
28 •Place steering wheel onto tube, align bolt
holes.
29 •Install bolt and nut. Tighten.
28 •Placer le volant sur la jupe, aligner les
orifices des boulons.
29 •Installer le boulon et l'écrou. Serrer.
28 •Situar el volante en la varilla, alinear los
orificios del perno.
29 •Instalar el perno y la tuerca. Ajustar.
30
31
32
1
2
33
31
30/
3
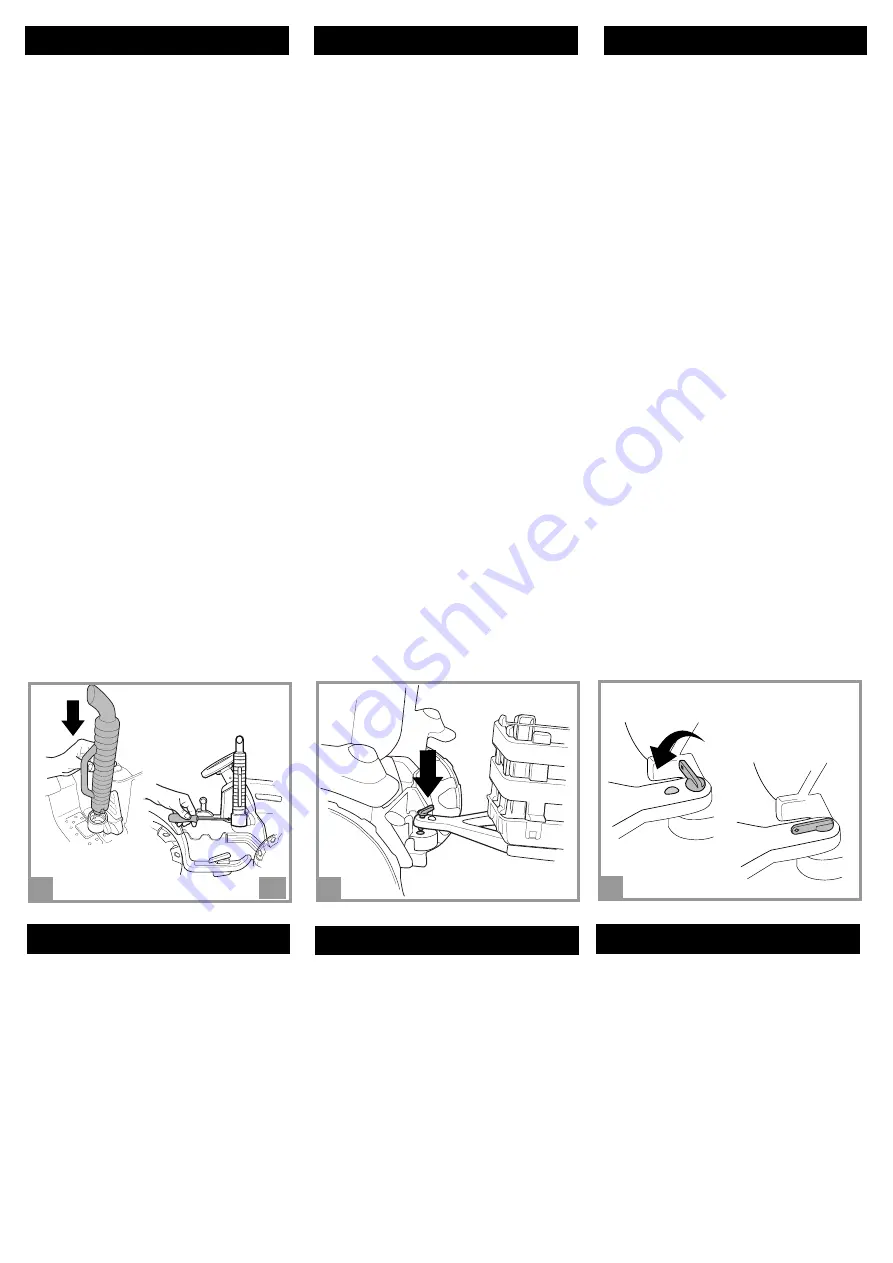
1•Place exhaust stack firmly into bracket
and secure with long screw.
32 •Attach the trailer to the tractor as follows:
insert the trailer coupling into the opening
on the back of the tractor, and rotate it
(see fig. 33).
33 •Position 1: the trailer can be removed.
Position 2: the trailer is locked into place.
WARNING: The trailer will hold a load
weighing up to 10 kg/22 lbs.
ENGLISH
FRANÇAIS
30/
3
1•Placer la cheminée d'échappement sur
son support et la fixer à l'aide d'une vis
longue.
32 •Accrocher la remorque au tracteur de la
manière suivante : insérer le crochet de la
remorque dans le trou situé à l’arrière du
tracteur et le faire pivoter (voir fig. 33).
33 •Position 1 : la remorque peut être
démontée. Position 2 : la remorque est
bloquée. ATTENTION : La remorque peut
contenir des objets pour un poids
maximum de 10 kg/22 lbs.
ESPAÑOL
30/
3
1 •Enroscar la chimenea en la
abrazaderacon el tornillo largo
incluido.
32 •Para enganchar el remolque al tractor,
seguir los pasos siguientes: meter el
gancho del remolque en el orificio que hay
en la parte de detrás del tractor y girarlo
(véase la fig. 33).
33 •Posición 1: el remolque puede quitarse.
Posición 2: el remolque está bloqueado.
ATENCIÓN: El remolque puede contener
objetos con un peso máximo de 10 Kg/22
lbs.
8
Содержание Case IH Magnum Tractor
Страница 6: ...ASSEMBLY MONTAGE MONTAJE A 1 2 3 4 5 6 7 8 9 10 11 12 13 2 3 1 14 5 ...
Страница 8: ...2 1 chrome decal 1 2 1 2 15 16 17 18 19 20 21 22 23 24 25 26 27 28 29 7 ...
Страница 11: ...b blue bk black r red w white b azul bk negro r rojo w blanco b bleu bk noir r rouge w blanc 10 ...
Страница 28: ......