Peco STT52A-23KA Скачать руководство пользователя страница 10

PEC

PEC

PEC

PEC

PECO

O

O

O

O

MODEL 3

MODEL 3

MODEL 3

MODEL 3

MODEL 37

7

7

7

762

62

62

62

621

1

1

1

12

2

2

2

21

1

1

1

13 - 1

3 - 1

3 - 1

3 - 1

3 - 16

6

6

6

6

SC

SC

SC

SC

SCA

A

A

A

AG TURF TIGER

G TURF TIGER

G TURF TIGER

G TURF TIGER

G TURF TIGER

PECO

PECO

PECO

PECO

PECO

MAINTEN

MAINTEN

MAINTEN

MAINTEN

MAINTENAN

AN

AN

AN

ANCE

CE

CE

CE

CE

1

1

1

1

10

0

0

0

0

PeCo Lawn Vac Owners should record the name and telephone number of their Service Center
Your Service Center will be happy to supply replacement parts, and accessories as well as
preform necessary service or repairs to your lawn vac. If for some reason your Service Center is
unable to service your lawn vac or supply replacement parts, contact PeCo and include the
following information:

 Service

Your PeCO Lawn Vac was designed and built to provide years of service with only minor care.
Certain tasks however must be performed to keep it in good operating condition and to avoid
costly repairs.  This section describes and provides procedures for the necessary care of the Lawn
Vac.

Storage

Never store your PeCo Lawn Vac with a full or partially filled container; decaying grass and leaves may constitute a fire
hazard if left too long.  Never leave your vac exposed to the elements.  While the metal parts are protected with a quality
paint, the engine and other unprotected parts may deteriorate if left exposed to rain or snow.

SCHEDULED CARE

Before Each Use

After Each Use

Every 10 Hours

CARE REQUIRED

Check engine oil.
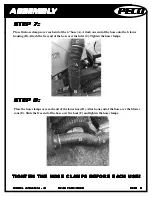
Check all hose connections.

Clean Collector Box, hoses and engine of all grass and dirt.

Check to be sure all screws, nuts, bolts, pins, etc. are  present and secure.

Emptying The  Lawn Vac

When the container becomes full, the blower tone will change.  In order to empty the container - Release the back door
by moving the dump handle on the left hand side of the container.  Release the door, push back on the container and
the debris falls out.  When empty, pull the box forward; move the dump handle in to properly close the rear door.

Tractor Model:  __________________________________  Year of Mfg.
_________________

Deck Size:  _____________________________________

PeCo Vac Model:  ________________________________

Vac Serial Number: _______________________________

Date of Purchase: _____  /_______  /________

Service  Center’s Name:_______________________________________________________

Service Center’s  City: ________________________State:______________Zip:__________

Service Center’s  Phone Number: _______________________________

Содержание STT52A-23KA

Страница 1: ...AND AND AND THANK THANK THANK THANK THANK Y Y Y Y YOU FOR B OU FOR B OU FOR B OU FOR B OU FOR BUYING UYING UYING UYING UYING THIS PECO LA THIS PECO LA THIS PECO LA THIS PECO LA THIS PECO LAWN WN WN WN WN V V V V VA A A A ACUUM CUUM CUUM CUUM CUUM Y Y Y Y Your ne our ne our ne our ne our new PECO w PECO w PECO w PECO w PECO V V V V Vac has been engineer ac has been engineer ac has been engineer ac ...

Страница 2: ... herein Except as described above PeCo Inc makes no other warranties AND SPECIFICALLY DISCLAIMS ANY AND ALL IMPLIED WARRANTIES OF FITNESS AND MERCHANTABILITY G ANY MACHINE USED FOR RENTAL OR COMMERCIAL PURPOSES ARE GUARANTEED FOR 45 DAYS FROM DATE OF ORIGINAL SALE ONLY H REMEDIED EXCLUSIVE The only remedies the purchaser has in connection with the breach or performance of any warranty on PeCo Inc ...

Страница 3: ...s that a spark arrester muffler be installed and be in effective working order The spark arrester must be attached to the exhaust system and comply with Section 4442 of the California Public Resources Code 1 Readtheowner smanualcarefullyandfamiliarize yourself with the proper use of your attachment Do not allow anyone who is not acquainted with the Safety Instructions to use your attachment 2 Know...

Страница 4: ... the mower s engine Secure the main frame assembly C using 4 nuts and bolts D 2 per side that were removed from the left and right sides of the mower With the main frame secure reattach the 2 upper ends of the support brackets B using 2 3 8 16 x 1 1 2 hex bolts E PN K1193 and the 2 nuts removed from the left and right sides of the mower S S S S STEP 1 TEP 1 TEP 1 TEP 1 TEP 1 Remove the mower s rea...

Страница 5: ...5 16 18 flange nuts PN K1178 S S S S STEP 4 TEP 4 TEP 4 TEP 4 TEP 4 S S S S STEP 5 TEP 5 TEP 5 TEP 5 TEP 5 To mount the boot A the boot plate B place the boot plate on the boot Secure the boot plate B to the boot by using 2 3 8 16 x 1 carriage bolts PN K1182 and 2 3 8 16 flange nuts PN K1215 Place the head of the carriage bolt from the inside of the boot The hex nut will be on top of the boot plat...

Страница 6: ...678901234567890123456789012123456789012345678901234567890121234567890123456789012345678901212345678901234567890123456789012123456789012 1234567890123456789012345678901212345678901234567890123456789012123456789012345678901234567890121234567890123456789012345678901212345678901234567890123456789012123456789012 1234567890123456789012345678901212345678901234567890123456789012123456789012345678901234567...

Страница 7: ...12 2 2 2 21 1 1 1 13 1 3 1 3 1 3 1 3 16 6 6 6 6 SC SC SC SC SCA A A A AG TURF TIGER G TURF TIGER G TURF TIGER G TURF TIGER G TURF TIGER PECO PECO PECO PECO PECO P P P P PAR AR AR AR ART T T T TS DIA S DIA S DIA S DIA S DIAGRAM GRAM GRAM GRAM GRAM 5 5 5 5 5 02 03 04 05 06 07 08 09 13 14 15 01 10 11 12 ...

Страница 8: ...ELLER BL IMPELLER BLADE REPL ADE REPL ADE REPL ADE REPL ADE REPLA A A A ACEMENT CEMENT CEMENT CEMENT CEMENT T T T T TO REMO O REMO O REMO O REMO O REMOVE VE VE VE VE First remove hex bolts from hub then screw the bolts into threaded holes to remove old blade This will push impeller off the hub If the impeller will not move hit the base of the impeller between each vein with a hammer then try again...

Страница 9: ...TIGHTEN TIGHTEN TIGHTEN TIGHTEN THE HOSE CLAMPS BEFORE EA THE HOSE CLAMPS BEFORE EA THE HOSE CLAMPS BEFORE EA THE HOSE CLAMPS BEFORE EA THE HOSE CLAMPS BEFORE EACH USE CH USE CH USE CH USE CH USE A A A A A B B B B B E E E E E F F F F F Place the hose clamps over each end of the 6 hose A Attach one end of the hose onto the b lower housing B Attach the free end of the hose over the inlet C Tighten t...

Страница 10: ...constitute a fire hazard if left too long Never leave your vac exposed to the elements While the metal parts are protected with a quality paint the engine and other unprotected parts may deteriorate if left exposed to rain or snow SCHEDULED CARE Before Each Use After Each Use Every 10 Hours CARE REQUIRED Check engine oil Check all hose connections Clean Collector Box hoses and engine of all grass ...

Страница 11: ...repairs without first contacting your dealer OUTDOOR POWER EQUIPMENT Arden North Carolina 28704 Serial Number PROBLEM CAUSE SOLUTION Leaves and Grass 1 Engine speed too slow A Run at full throttle not being picked 2 Ground speed too fast B Use lower gear up completely 3 Hose plugged C Check and tighten all hoses D Unplug hose Hoses plug easily 1 Grass or leaves too wet A Wait for drier conditions ...

Страница 12: ...AR AR AR AROLIN OLIN OLIN OLIN OLINA 28 A 28 A 28 A 28 A 2870 70 70 70 704 4 4 4 4 1 800 438 5823 OR 828 68 1 800 438 5823 OR 828 68 1 800 438 5823 OR 828 68 1 800 438 5823 OR 828 68 1 800 438 5823 OR 828 684 1 4 1 4 1 4 1 4 123 23 23 23 234 F 4 F 4 F 4 F 4 FAX AX AX AX AX 828 68 828 68 828 68 828 68 828 684 0858 4 0858 4 0858 4 0858 4 0858 E MAIL pecoinc1 bellsout net E MAIL pecoinc1 bellsout net...

Отзывы: