Peavey XR-AT Скачать руководство пользователя страница 9

EFFECTS EDIT MODE: 

In EFX Edit Mode, the EFX Select knob 

is used to navigate through the EFX 

presets. Turning the knob changes 

the EFX preset in the display. The 

new selection will be blinking in the 

display; push the EFX Select knob 

to choose the new effect. Once the 

effect has been selected, you can 

now edit the effect. To do this, press 

the EFX Select knob and the display 

will change to the current parameter 

setting of the preset. Turn the EFX 

Select knob to edit the parameter. 

Press the knob again to exit EFX 

preset edit mode. To restore the EFX 

presets back to factory settings, 

press and hold the EFX Select knob 

for 5 seconds and select "Y" when 

prompted.

AUTO-TUNE EDIT MODE:

In Auto-Tune

®

 Edit Mode the EFX 

Select knob is used to navigate 

through the Auto-Tune presets. 

Turning the knob changes the 

Auto-Tune preset in the display. The 

new selection will be blinking in the 

display; push the EFX Select knob to 

choose the new Auto-Tune preset.
Once the preset has been selected, 

you can edit the preset by pressing 

the EFX Select knob. The display will 

change to the current Key setting. 

Turn the EFX Select knob to change 

the key and push the EFX Select knob 

when you have chosen the key you 

desire. The Key setting determines 

which notes are enabled in the 

Auto-Tune process. For example, in 

the key of CMaj, the notes C, D, E, F, 

G, A, and B are enabled, and all other 

notes are disabled. To see which 

notes are enabled or disabled for 

each key, see the Key Table.

NOTE:

 If Custom Key is selected, the 

display will enter Custom Key Edit 

Mode. In this mode, you can create 

a custom Auto-Tune Key. Use the 

EFX Select knob to select the Root 

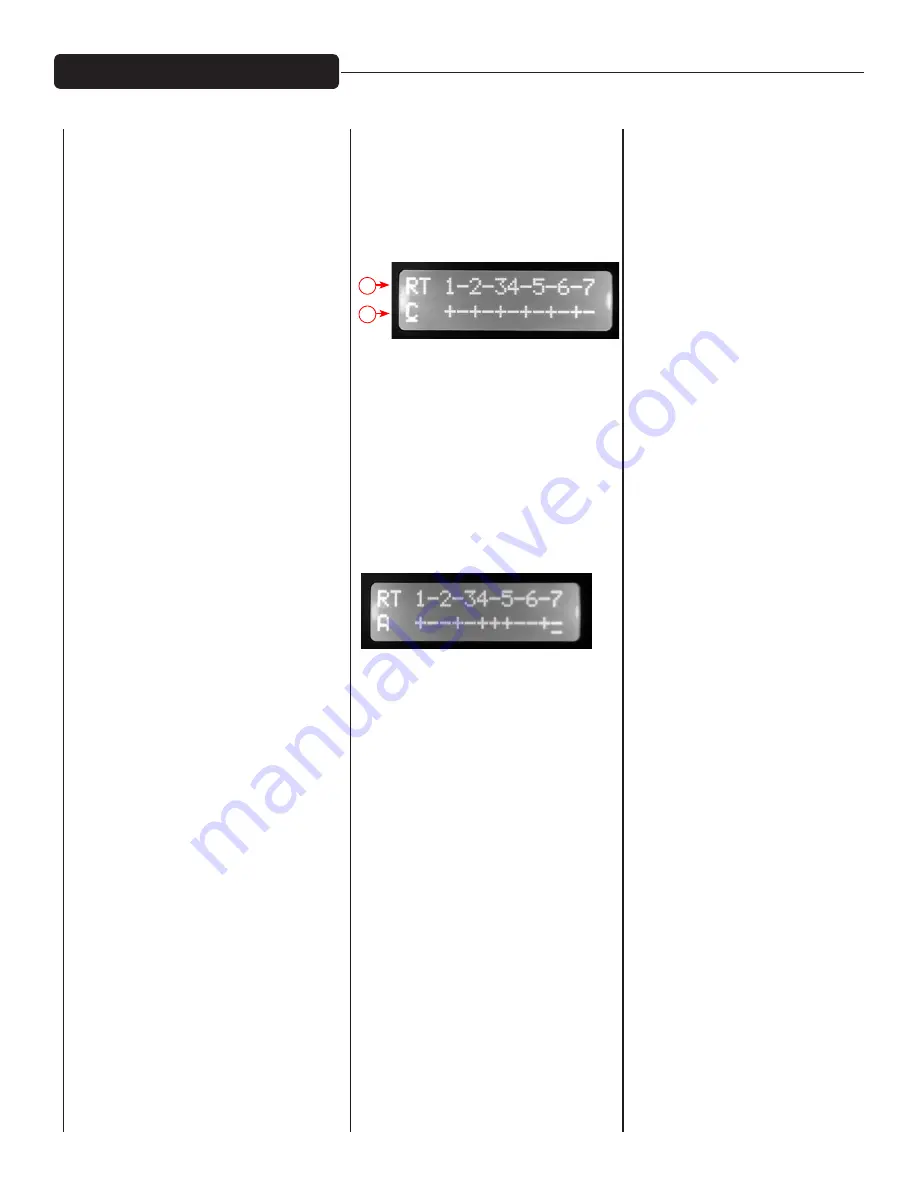
(labeled "RT"). This will be the note 

on which the custom key is based. 

Then use the Media Select knob to 

move the cursor and use the EFX 

Select knob to activate or deactivate 

the 12 notes in the key. Once you 

have finished editing the custom key, 

press the EFX Select knob to exit 

Custom Key Edit Mode. The mixer is 

capable of storing 9 different custom 

keys, one for each preset slot.

The scale degrees are numbered across the 

top, with half-steps indicated by a dash.

"+" indicates the note will be allowed.

"-" indicates the note will not be allowed.

By looking at the sequence of 

allowed and disallowed notes above, 

this is a whole tone scale. There are 

only two of those, so you can have 

the other one just by changing the 

root to C# or B.

*This screen cap shows an A blues scale. You 

don't have to edit the whole scale to change 

keys - just change the root.

Once you have selected the key and 

pressed the EFX Select knob, the 

display will change to the current 

Speed setting. Turn the EFX Select 

knob to change the Speed setting. 

The Speed setting determines 

how quickly and aggressively the 

Auto-Tune will correct the pitch. 

The range for this setting is 0 to 25, 

where 0 is the quickest and 25 is the 

slowest. Push the EFX Select knob 

when you are done editing the speed 

parameter.
The display will now change to 

the current Detune setting. Turn 

the EFX Select knob to change the 

Detune setting. The Detune setting 

determines how the Auto-Tune pitch 

correction is calibrated. When the 

Detune setting is 0 cents, this means 

the Auto-Tune is calibrated to the 

standard A440, or where the note 

A4 equals 440 Hz. The range of the 

Detune setting is -64 to 63 cents, 

a width of 128 cents. The distance 

between two notes, or semitones, 

is 100 cents, which means that the 

Auto-Tune can be detuned to fit any 

possible environment.

NOTE: 

Detuning the Auto-Tune can 

be very useful, especially when 

being used in conjunction with an 

instrument that is not easily tuned 

on-the-fly. For example, if a piano is 

accompanying Auto-Tuned vocals 

and the piano is slightly out of tune 

from the A440 standard, simply 

change the Detune setting in the 

Auto-Tune setting. This is much 

easier and takes much less time 

than having someone tune the entire 

piano! Also, although the Detune 

setting is changed in the Auto-Tune 

preset edit mode, this is a global 

parameter. This means if you change 

the Detune setting and then later 

change the Auto-Tune preset, the 

Detune setting will not change.
Once you have selected the 

appropriate Detune setting, press 

the EFX Select knob to exit Auto-Tune 

preset edit mode. To restore all 

Auto-Tune presets back to factory 

settings, press and hold the EFX 

Select knob for 5 seconds and select 

"Y" when prompted.

NOTE: 

Preset 9 is chromatic with 

speed set to 7. It is recommended 

for general purpose, safe, easy 

use of Auto-Tune, without having 

to adjust any settings. The slower 

speed setting does not produce a 

robotic effect on the voice, and all 

twelve semitones are allowed. Just 

remember to use footswitch #2 to 

bypass Auto-Tune between songs, 

otherwise your speaking will be 

Auto-Tuned!

Operating The DSP

RT=Root or Key

*indicates the root or key is C

RT

*

Содержание XR-AT

Страница 1: ...www peavey com XR AT Powered Mixer Operating Manual ...

Страница 2: ...e equipment and receiver Connect the equipment into an outlet on a circuit different from that to which the receiver is connected Consult the dealer or an experienced radio TV technician for help Caution The equipment complies with FCC radiation exposure limits set forth for an uncontrolled environment FCC Compliancy Statement This device complies with Part 15 of the FCC rules Operation is subject...

Страница 3: ...with Peavey s exclusive Kosmos C technology which drastically enhances the low end of the audio spectrum Built in 24 bit digital effects complement the already feature packed unit Before you begin using your powered mixer it is very important to ensure that the product has the proper AC voltage supplied You can find the proper voltage for your amp printed next to the IEC line power cord on the rea...

Страница 4: ... as excess compression may lead to feedback The LED will light red when the signal level is high enough to activate the compression HIGH EQ This High EQ shelving type of active tone control varies the treble frequencies 15 dB at 12kHz and is designed to remove noise or add brilliance to the signal depending on the quality of the source MID MORPH EQ CH 1 7 Where most mid range controls work at just...

Страница 5: ... of the connected device if possible SIG When this LED is green it is an indication the mixer is receiving signal at the input of the channel If you are having trouble getting sound out of the mixer and this LED is not on check the microphone instrument or cable that is connected to the channel USB MEDIA JACK CH 9 A type USB connector to which a removable data storage device can be connected to pl...

Страница 6: ...be used to reduce feedback or to adjust the overall frequency response of the signal being sent to the amplifiers Subtle adjustments made with the graphic equalizer can improve the way your loudspeaker system sounds in the room You should be aware however that setting large amounts of boost or arbitrary curves can reduce amplifier headroom leading to early distortion or just plain bad or unintelli...

Страница 7: ...t press will rewind to the beginning of the current song Pressing this button twice will take you to the previous song on the USB drive A long press will rewind through the current song release to play when you reach the desired spot in the song PLAY PAUSE The play pause button toggles the current song between play and pause When the II is displayed the song will be playing When II is displayed th...

Страница 8: ...cessful the Bluetooth Active LED will blink rapidly 5 times and then remain lit You are now ready to begin streaming through Bluetooth to the mixer The level can be adjusted from the connected source or by the level control in Channel 9 The XR AT mixer will remember up to 10 devices that it was previously paired with and will automatically connect to the last device with which it was paired when t...

Страница 9: ...o of those so you can have the other one just by changing the root to C or B This screen cap shows an A blues scale You don t have to edit the whole scale to change keys just change the root Once you have selected the key and pressed the EFX Select knob the display will change to the current Speed setting Turn the EFX Select knob to change the Speed setting The Speed setting determines how quickly...

Страница 10: ... C D E F G A B D Mnr C D E F G A A D Maj C D D F G G A D Mnr C D F F G A B E Maj C D E F G A B E Mnr C D E F G A B F Maj C D E F G A A F Mnr C C D F G G A F Maj C D F F G A B F Mnr C D E F G A B G Maj C D E F G A B G Mnr C D D F G A A G Maj C C D F G G A G Mnr C D E F G A B A Maj C D E F G A B A Mnr C D E F G A B A Maj C D D F G A A A Mnr C C D F F G A B Maj C D E F G A B Mnr C D E F G A B ...

Страница 11: ...mplifiers can then drive additional speakers MONITOR OUT TRS Balanced This 1 4 jack provides a signal from the monitor mix after the graphic EQ for an external power amplifier An external power amplifier such as our IPR series of amplifiers can then drive additional speakers SUB MONO OUT TRS Balanced This 1 4 jack provides a signal that passes all signals under 150Hz This can be used to drive an e...

Страница 12: ...mpedance of 4 ohms This means you can connect either one 4 ohm one 8 ohm or two 8 ohm speakers to each amplifier Do not operate below rated minimum impedance For maximum power transfer and to prevent damage to your amplifier be sure to use speaker cables and not instrument cables to connect to the speakers We recommend the use of 18 gauge or larger speaker wire The signal going to Power Amp 2 is d...

Страница 13: ...the Auto Tune channel buttons on the XR AT mixer is pressed the Auto Tune will automatically globally enable but will only enable the Auto Tune channel that was selected Buttons 2 4 the Preset Selector buttons allow the performer to change Auto Tune presets on the fly along with button 5 the Preset Bank Selector Below is a table describing which Auto Tune preset will be selected when using the Pre...

Страница 14: ...igh Small Subtle Moderate Club R3 Snare Low 70 ms Low Small Moderate Subtle Bathroom R4 AC GTR 42 ms Med Small Moderate Subtle Med Walls R5 Brass Room 40 ms High Med Subtle Moderate Med Room Damped Walls DELAY TIME D1 Double D2 Slapback D3 Bright Few Repeats D4 Bright More Repeats D5 Bright Most Repeats D6 Dark Few Repeats D7 Dark More Repeats D8 Dark Most Repeats ENHANCE CUTOFF FREQ E1 Light Harm...

Страница 15: ...MON EFX LEVEL USB INPUT EQ LEVEL MONITOR CLIP LIMITER LIMITER MUTE MICS DEFEAT MUTE MICS VOLUME MASTER ASSIGN VOLUME MONITOR LOW MUTE LINE INPUT BLUETOOTH SUB EFX EFX EFFECTS MEDIA SELECTOR MICS MUTE AMP2 EQ 9 BAND EQ 9 BAND EQ EQ HIGH CHANNEL 8 MEDIA PLAYER MIC PRE USB BLUETOOTH CHANNEL 9 CHANNEL 1 7 AMP2 IN AMP1 IN MICS CH 1 7 CH 8 9 CLIP MONITOR COMP LEVEL KOSMOS ENABLE MONITOR STATUS AUTO TUNE...

Страница 16: ...0 005 main line output 4 dBu in line input Channel 1 0 5 amp 1 400 Watts into 4 Ohms MASTER EQ 80Hz 12 dB 250Hz 12 dB 500Hz 12 dB 1kHz 12 dB 2kHz 12 dB 4kHz 12 dB 10kHz 12 dB METER ARRAY LIMIT 6 dB 12 dB 18 dB 24 dB 30 dB AMP LIMITER Limits amplifier power just before clipping The limiter holds the amp power without clipping and can be driven up to 18 dB past maximum output AMPLIFIER OUTPUT POWER ...

Страница 17: ...____________________________________________ ______________________________________________________________________________________________________________________ ______________________________________________________________________________________________________________________ _____________________________________________________________________________________________________________________...

Страница 18: ...____________________________________________ ______________________________________________________________________________________________________________________ ______________________________________________________________________________________________________________________ _____________________________________________________________________________________________________________________...

Страница 19: ...et to know and serve you better To save time submit your warranty registration online at www peavey com support warrantyregistration Under 15 000 15 000 24 999 25 000 34 999 35 000 49 999 50 000 74 999 Television Radio Internet Newspaper Magazines Mail order catalogs Direct mail Literature from manufacturer Other 75 000 99 999 100 000 149 999 Over 150 000 13 What is your main motivation for buying...

Страница 20: ...Peavey Electronics Corporation Attn Warranty Department P O Box 1150 Meridian Ms 39302 1150 FROM Place Postage Here ...

Отзывы: